1. Introduction
This manual provides detailed instructions for the safe and effective use of your LLAVETOR Digital Torque Adapter. Please read this manual thoroughly before operation and retain it for future reference. This digital torque adapter is designed for precise torque measurement in various applications, including bicycle, motorcycle, and car maintenance.
2. Safety Information
- Always wear appropriate personal protective equipment, such as safety glasses, when using tools.
- Ensure the adapter is securely attached to the drive tool and the fastener before applying torque.
- Do not exceed the maximum torque capacity of the adapter (340 NM).
- Avoid dropping the adapter or subjecting it to severe impacts, as this may affect its accuracy.
- Keep the adapter away from water, moisture, and extreme temperatures.
- Do not attempt to disassemble or modify the adapter. Refer all servicing to qualified personnel.
- Ensure batteries are inserted correctly and replace them when the low battery indicator appears.

3. Package Contents
The LLAVETOR Digital Torque Adapter package includes the following items:
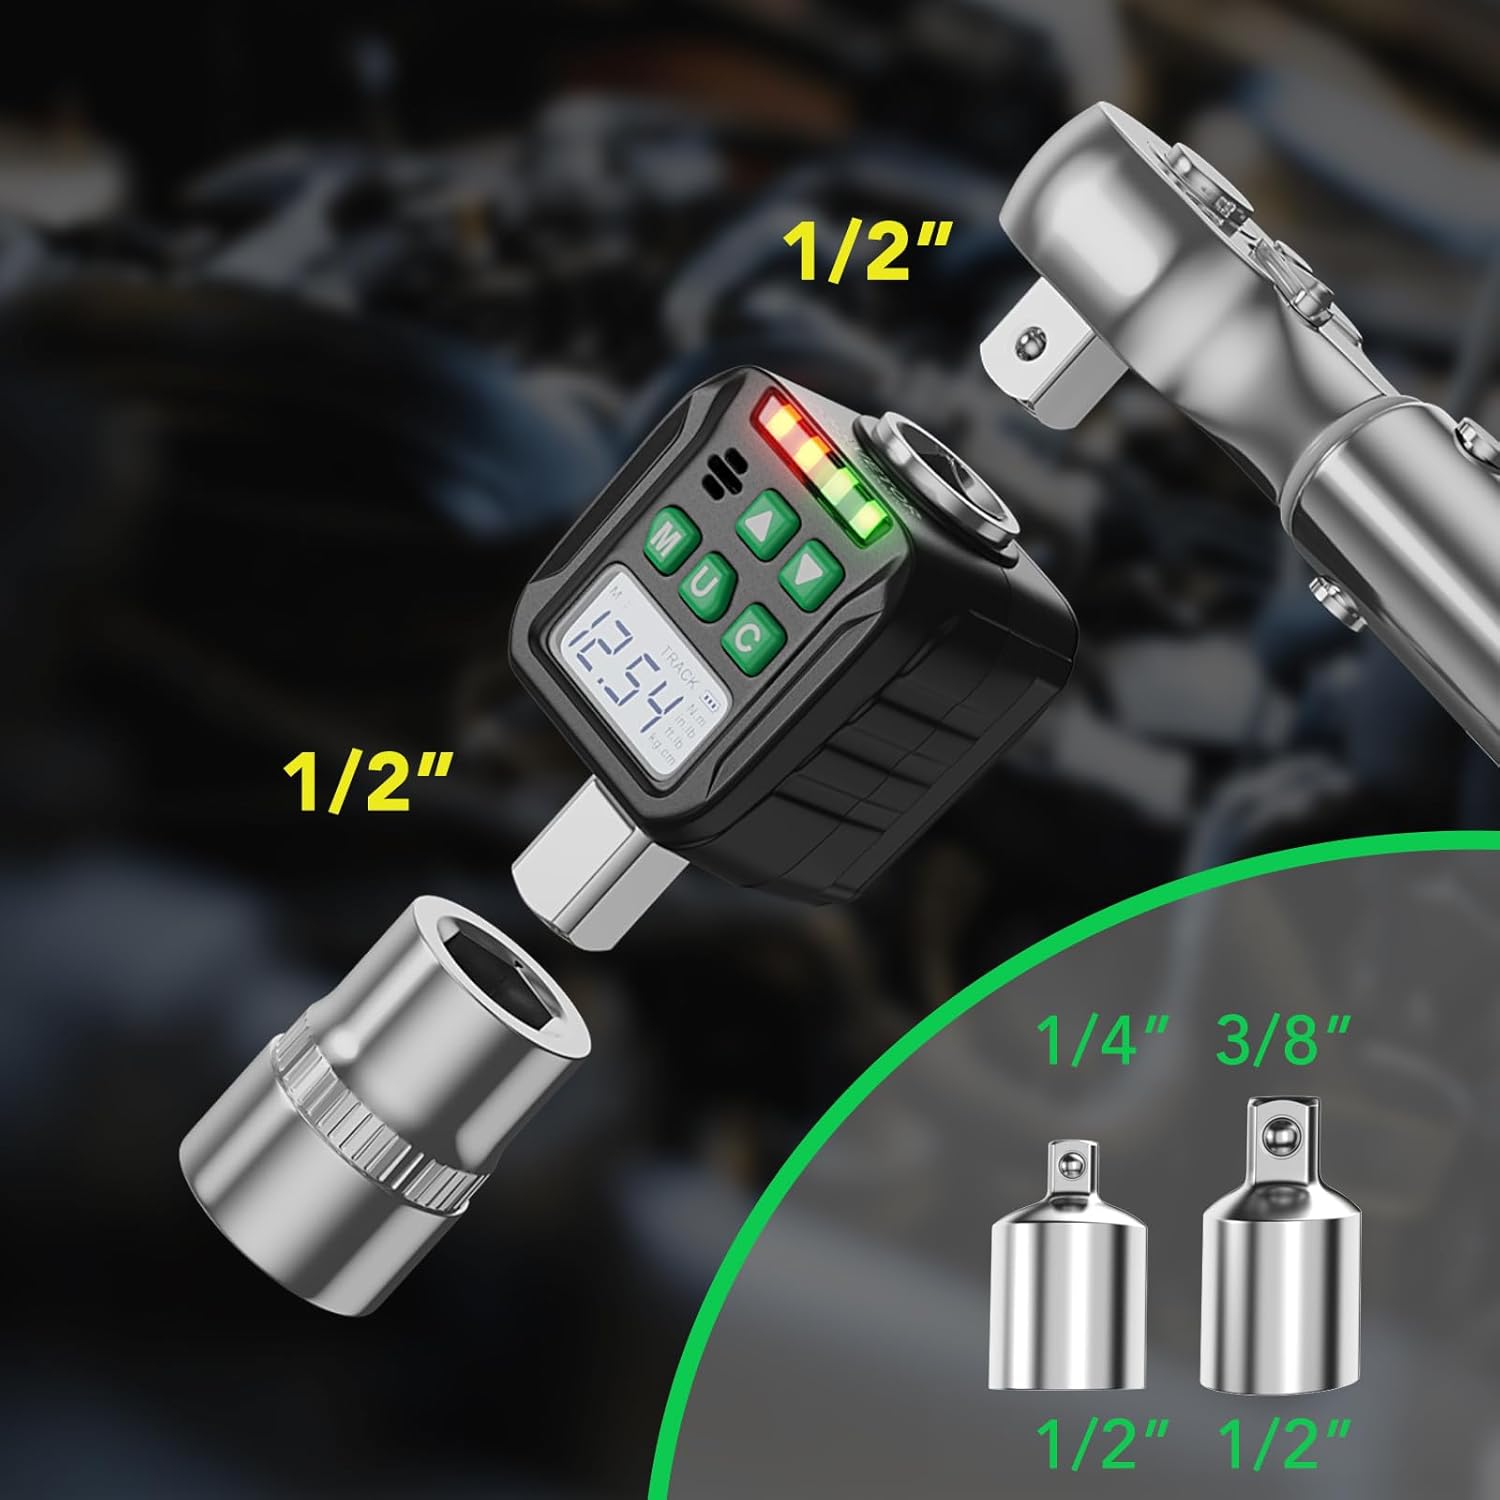
- 1 x Digital Torque Adapter (1/2 inch drive)
- 1 x 1/4 inch adapter
- 1 x 3/8 inch adapter
- 2 x AAA Batteries
- 1 x Screwdriver (for battery compartment)
- 1 x User Manual
4. Product Features
- High Precision: Professionally calibrated with an accuracy of ± 2%.
- Multiple Measurement Units: Supports N.m, Ft.lb, In.lb, and Kg.cm.
- Two Operating Modes: TACK mode for real-time display and PEAK mode for maximum value retention.
- Preset Torque Values: Features 6 preset memory values (M1-M6).
- Visual and Audible Indicators: Equipped with an LED indicator light (green to red) and a buzzer for reaching target torque.
- Backlit LCD Screen: High-definition display for clear visibility in various lighting conditions.
- Wide Application: Suitable for bicycle, motorcycle, and car maintenance.


5. Setup
5.1 Battery Installation
- Locate the battery compartment on the back of the digital torque adapter.
- Use the provided screwdriver to open the battery compartment cover.
- Insert two AAA batteries, ensuring correct polarity (+/-).
- Replace the battery compartment cover and secure it with the screw.
5.2 Attaching to a Wrench
- Select a suitable square drive wrench (e.g., ratchet wrench, breaker bar).
- Insert the 1/2 inch square drive of the digital torque adapter into the drive end of your wrench. Ensure it is fully seated.
- If using a smaller drive size (1/4 inch or 3/8 inch), attach the corresponding adapter to the digital torque adapter first, then attach your socket to the adapter.
6. Operating Instructions
6.1 Power On/Off
Press the 'M' button to power on the device. The LCD screen will illuminate. To power off, press and hold the 'M' button for a few seconds.
6.2 Unit Conversion
With the device powered on, press the 'U' button to cycle through the available measurement units: N.m, Ft.lb, In.lb, Kg.cm. Select the desired unit for your application.
6.3 Mode Selection (TACK / PEAK)
Press and hold the 'U' button for 3 seconds to switch between TACK and PEAK modes. Use the up/down arrow buttons to confirm the selection.
- TACK Mode: Displays the torque value in real-time as force is applied.
- PEAK Mode: Captures and displays the maximum torque value achieved during the tightening process. The value remains on the screen after force is removed.

6.4 Setting Target Torque and Presets
The adapter allows you to set a target torque value. When this value is approached and reached, the device will provide visual and audible alerts.
- Press the 'M' button to enter the preset mode. You can cycle through M1-M6 preset values.
- Use the up/down arrow buttons to adjust the target torque value for the selected preset.
- Once the desired value is set, press 'M' again to save and exit the preset setting.

6.5 Applying Torque
- Attach the adapter and wrench to the fastener you wish to tighten.
- Apply smooth, steady force to the wrench handle. Observe the torque reading on the LCD screen.
- As you approach the target torque, the LED indicator will turn green, and the buzzer will emit a slow beep.
- When the target torque is reached, the LED indicator will turn red, and the buzzer will emit a continuous beep. Stop applying force immediately.

7. Maintenance
- Cleaning: Wipe the adapter with a soft, dry cloth after each use. Do not use abrasive cleaners or solvents.
- Storage: Store the adapter in a dry, clean place, away from direct sunlight and extreme temperatures. Remove batteries if the device will not be used for an extended period.
- Calibration: For optimal accuracy, it is recommended to have the digital torque adapter professionally calibrated periodically, especially after heavy use or impacts.
8. Troubleshooting
| Problem | Possible Cause | Solution |
|---|---|---|
| Device does not power on. | Dead or incorrectly installed batteries. | Check battery polarity. Replace batteries with new AAA alkaline batteries. |
| Inaccurate torque readings. | Adapter not properly seated; Exceeding capacity; Needs calibration. | Ensure adapter is fully seated. Do not exceed 340 NM. Consider professional calibration. |
| Buzzer/LED not working. | Settings incorrect; Malfunction. | Verify target torque is set. If problem persists, contact customer support. |
| LCD screen is dim or blank. | Low battery; Extreme temperature. | Replace batteries. Operate within recommended temperature range. |
9. Specifications
| Feature | Specification |
|---|---|
| Model Number | LDTA |
| Brand | LLAVETOR |
| Torque Range | 17-340 NM (1/2 inch drive) |
| Accuracy | ± 2% |
| Drive Size | 1/2 inch (includes 1/4 inch and 3/8 inch adapters) |
| Measurement Units | N.m, Ft.lb, In.lb, Kg.cm |
| Operating Modes | TACK, PEAK |
| Power Source | 2 x AAA Alkaline Batteries |
| Material | Iron |
| Finish | Brushed |
| Package Dimensions | 14.81 x 12.9 x 5.69 cm |
| Weight | 540 grams |
10. Warranty Information
LLAVETOR products are manufactured to high-quality standards. For specific warranty details, please refer to the warranty card included with your purchase or visit the official LLAVETOR website. Keep your proof of purchase for any warranty claims.
11. Customer Support
If you have any questions, require technical assistance, or encounter issues not covered in this manual, please contact LLAVETOR customer support. Contact information can typically be found on the product packaging or the official LLAVETOR website.