1. Introduction
Thank you for choosing the Yunirvana 20V Cordless Reciprocating Saw. This manual provides essential information for the safe operation, maintenance, and care of your tool. Please read it thoroughly before use and keep it for future reference.
Package Contents:
- 1x Cordless Reciprocating Saw
- 3x Wood Saw Blades (6 inches)
- 2x Metal Saw Blades (6 inches)
- 1x Max 20V 2.0Ah Battery
- 1x Fast Charger
- 1x User Manual
- 1x Warranty Card

Figure 1: Yunirvana 20V Cordless Reciprocating Saw and its complete accessories, including the saw body, 20V battery, fast charger, three wood blades, and two metal blades.
2. General Safety Instructions
Always follow basic safety precautions to reduce the risk of fire, electric shock, and personal injury. Keep this manual for future reference.
2.1 Work Area Safety
- Keep the work area clean and well-lit. Cluttered or dark areas invite accidents.
- Do not operate power tools in explosive atmospheres, such as in the presence of flammable liquids, gases, or dust.
- Keep children and bystanders away while operating a power tool.
2.2 Electrical Safety
- Power tool plugs must match the outlet. Never modify the plug in any way.
- Avoid body contact with earthed or grounded surfaces such as pipes, radiators, ranges, and refrigerators.
- Do not expose power tools to rain or wet conditions.
2.3 Personal Safety
- Always wear eye protection, hearing protection, and a dust mask when operating the saw.
- Dress properly. Do not wear loose clothing or jewelry. Keep your hair and clothing away from moving parts.
- Stay alert, watch what you are doing, and use common sense when operating a power tool.
- Prevent unintentional starting. Ensure the switch is in the off-position before connecting to battery pack, picking up or carrying the tool.
2.4 Reciprocating Saw Specific Safety
- Hold the power tool by insulated gripping surfaces when performing an operation where the cutting accessory may contact hidden wiring or its own cord.
- Secure the workpiece. Use clamps or a vise to hold the workpiece.
- Do not force the saw. Let the saw blade do the work.
- Ensure the blade is clear of the workpiece before starting the saw.
- Always wait for the blade to stop completely before setting the tool down.
3. Product Components
Familiarize yourself with the various parts of your Yunirvana Reciprocating Saw for safe and effective operation.

Figure 2: Key components of the reciprocating saw, including the Toggle Clamp, Saw Blade, Backrest, Locking Button, Start Button, and Battery Pack.
- Toggle Clamp: Used for quick and tool-free blade changes.
- Saw Blade: The cutting accessory, interchangeable for different materials.
- Backrest (Pivot Shoe): Adjustable support that rests against the workpiece for stability and depth control.
- Locking Button: Prevents accidental activation of the saw.
- Start Button (Trigger Switch): Activates the saw and controls variable speed.
- Battery Pack: Provides power to the cordless saw.
- Soft Grip Handle: Ergonomically designed for comfortable and secure handling.

Figure 3: Detailed view of the adjustable Pivot Shoe (Backrest) and the Lock Off Switch, which prevents unintended operation.
4. Setup and Assembly
4.1 Charging the Battery
- Connect the fast charger to a standard power outlet.
- Slide the 20V battery pack onto the charger until it clicks into place.
- Allow the battery to charge fully. The charger indicator light will change to show a full charge (refer to charger manual for specific light indications).
- Once charged, disconnect the battery from the charger.

Figure 4: The 20V Lithium Ion battery pack, which powers the cordless reciprocating saw.
4.2 Installing/Removing the Saw Blade
The saw features a tool-free blade change mechanism for quick and easy blade swaps.
- Ensure the battery is removed from the saw before changing blades.
- To install a blade, lift the Toggle Clamp (blade release lever) located near the blade holder.
- Insert the shank of the saw blade fully into the blade holder. Ensure the teeth are facing the correct direction (away from the saw body).
- Release the Toggle Clamp. Gently pull on the blade to ensure it is securely locked in place.
- To remove a blade, lift the Toggle Clamp and pull the blade straight out.

Figure 5: The Toggle Clamp mechanism, allowing for quick and tool-free saw blade changes.
4.3 Attaching the Battery Pack
- Align the battery pack with the battery port on the bottom of the saw handle.
- Slide the battery pack into the saw until it clicks securely into place.
- To remove, press the battery release button (if present) and slide the battery out.
5. Operating Instructions
5.1 Starting and Stopping the Saw
- Ensure the Lock Off Button is disengaged (if applicable).
- Press the Start Button (trigger switch) to activate the saw. The saw will start operating.
- To stop the saw, release the Start Button.
- For safety, engage the Lock Off Button when the saw is not in use.

Figure 6: The Lock Off Switch, designed to prevent accidental starting of the reciprocating saw.
5.2 Variable Speed Control
The saw features a variable speed trigger, allowing you to adjust the cutting speed from 0 to 3000 SPM based on the material and application.
- Apply less pressure to the trigger for slower speeds, suitable for delicate cuts or starting a cut.
- Apply more pressure to the trigger for higher speeds, ideal for faster cutting through tougher materials.
5.3 Adjusting the Backrest (Pivot Shoe)
The adjustable backrest provides stability and allows for control over cutting depth and angle.
- Loosen the backrest adjustment mechanism (refer to Figure 2 for location).
- Slide the backrest to the desired position.
- Tighten the adjustment mechanism to secure the backrest.

Figure 7: Adjusting the backrest (pivot shoe) to suit different cutting environments and depths.
5.4 Cutting Techniques
Always ensure the workpiece is securely clamped before cutting.

Figure 8: The reciprocating saw is versatile for cutting various materials, including wood, metal, and PVC pipes.
5.4.1 Wood Cutting
- Use a wood-specific saw blade.
- Rest the backrest firmly against the workpiece.
- Start the saw at a moderate speed and gradually increase as the blade enters the material.
- Apply steady, even pressure. Do not force the saw.
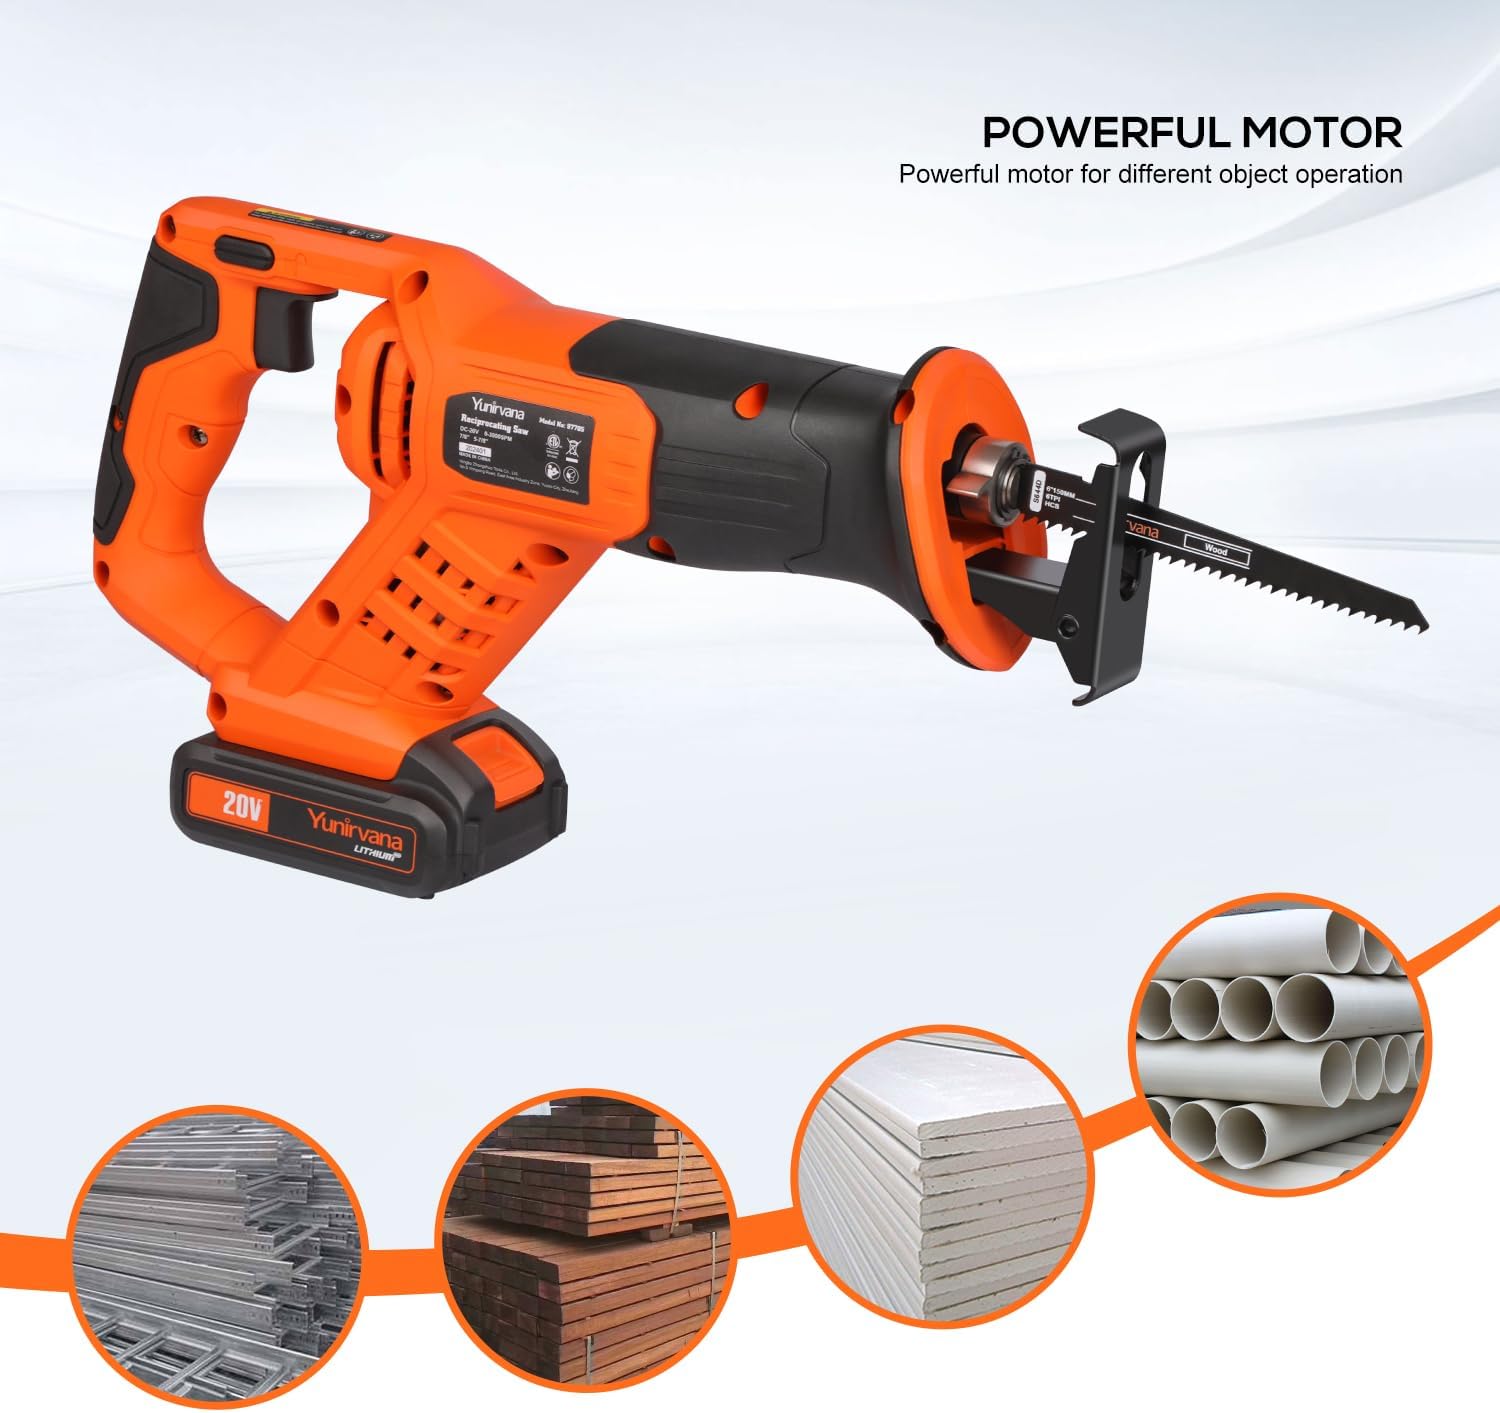
Figure 9: Demonstrating the reciprocating saw in action, cutting through a wooden beam with precision.
5.4.2 Metal Cutting
- Use a metal-specific saw blade.
- For thin metals, clamp a piece of scrap wood on both sides of the workpiece to minimize vibration.
- Use a slower speed setting to prevent overheating the blade and workpiece.
- Apply cutting fluid or oil to the blade and workpiece for better performance and blade life.

Figure 10: The reciprocating saw effectively cutting through a metal bar, highlighting its capability for various materials.
5.4.3 PVC/Plastic Cutting
- Use a fine-tooth blade suitable for plastics or a wood blade.
- Use a moderate to slow speed to prevent melting the plastic.
- Support the PVC pipe or plastic sheet firmly to avoid vibration and splintering.
6. Maintenance
Regular maintenance ensures the longevity and optimal performance of your reciprocating saw.
6.1 Cleaning
- Always disconnect the battery pack before cleaning.
- Use a soft cloth to wipe down the tool. Do not use harsh chemicals or abrasive cleaners.
- Clear any sawdust or debris from the ventilation openings using compressed air.
6.2 Blade Care
- Inspect blades before each use for sharpness and damage. Replace dull or damaged blades immediately.
- Store blades in a dry place to prevent rust.
6.3 Battery Care
- Store batteries in a cool, dry place away from direct sunlight and extreme temperatures.
- Do not store fully discharged batteries for extended periods. Charge them periodically.
- Do not attempt to open or modify the battery pack.
7. Troubleshooting
This section addresses common issues you might encounter with your reciprocating saw.
| Problem | Possible Cause | Solution |
|---|---|---|
| Saw does not start | Battery not charged or improperly installed. Lock Off Button engaged. | Ensure battery is fully charged and correctly inserted. Disengage Lock Off Button. |
| Blade not cutting efficiently | Dull or incorrect blade for material. Insufficient pressure. | Replace with a sharp, appropriate blade. Apply steady, even pressure. |
| Excessive vibration | Loose blade. Workpiece not secured. | Ensure blade is securely installed. Clamp workpiece firmly. |
| Saw stops during operation | Battery discharged. Overload protection activated. | Recharge battery. Reduce cutting pressure or allow tool to cool down. |
8. Specifications
| Feature | Detail |
|---|---|
| Model Number | 97705 |
| Voltage | 20 Volts |
| No-Load Speed | 0-3000 SPM (Strokes Per Minute) |
| Power Source | Battery Powered (Lithium Ion) |
| Battery Capacity | 2.0Ah |
| Blade Length | 6 Inches (included blades) |
| Product Dimensions (L x W x H) | 15.16"L x 3.35"W x 7.28"H |
| Item Weight | 5.08 pounds |
| Special Features | Quick release saw blade, Robust sole plate, Large trigger switch, External carbon brush design, Soft grip handle |
9. Warranty and Support
Your Yunirvana 20V Cordless Reciprocating Saw comes with a limited warranty. Please refer to the included warranty card for detailed terms and conditions, including coverage period and how to make a claim.
For technical support, replacement parts, or any questions regarding your product, please contact Yunirvana customer service through the contact information provided on your warranty card or visit the official Yunirvana website.