1. Introduction
This manual provides detailed instructions for the installation, operation, and maintenance of your Sunrosa 60" W x 76" H Frameless Sliding Shower Door. Please read this manual thoroughly before beginning installation or use to ensure proper function and safety. Keep this manual for future reference.
2. Safety Information
- Always wear appropriate safety gear, including safety glasses and gloves, during installation.
- Handle glass panels with extreme care. Tempered glass, while strong, can shatter if struck at the edges.
- Ensure the installation surface is structurally sound and capable of supporting the weight of the shower door.
- Do not overtighten screws, as this can damage components or glass.
- If you are unsure about any step, consult a qualified professional.
- Keep children and pets away from the installation area.
3. Package Contents
Verify that all components are present and undamaged before beginning installation. If any parts are missing or damaged, contact Sunrosa customer support.
- Frameless Glass Panels (3/8" / 10mm SGCC Tempered Glass)
- Stainless Steel Top Rail and Rollers
- Stainless Steel Handle (Brushed Gold finish)
- Wall Brackets and Mounting Hardware
- Full-length Glass Seal Strip
- Installation Auxiliary Part
- Instruction Manual
4. Specifications
| Feature | Detail |
|---|---|
| Brand | Sunrosa |
| Model | shower door |
| Dimensions (W x H) | 57 5/8" - 60" (1464-1524 mm) W x 76" (1930 mm) H |
| Walk-in Width | 23 5/8" - 26" (600-660 mm) |
| Glass Thickness | 3/8" (10 mm) SGCC Certified Clear Tempered Glass |
| Glass Coating | Nanocoating for easy cleaning |
| Frame & Handle Material | High-quality Stainless Steel |
| Finish | Brushed Gold |
| Features | Soft Close System, Anti-jumping Design, Reversible Installation |
| Item Weight | 160.9 Pounds |
5. Setup and Installation
This section outlines the general steps for installing your Sunrosa shower door. Refer to the detailed diagrams included with your physical product for precise measurements and component placement.
5.1 Pre-Installation Checks
- Measure Wall Spacing: Ensure your shower stall's wall spacing is within the adjustable range of 57 5/8" to 60" (1464-1524 mm).
- Level Surface: Verify that the shower base or curb is level.
- Tools Required: Gather all necessary tools (e.g., drill, level, measuring tape, screwdriver, caulk gun, safety glasses).
5.2 Installation Steps
- Prepare the Wall: Mark the positions for the wall brackets according to the provided template. Use the installation auxiliary part for convenient and fast measurement, placing it 15.5mm away from the edge and keeping it vertical to drill holes.
- Install Wall Brackets: Secure the wall brackets to the prepared wall using appropriate fasteners.
- Mount Top Rail: Attach the stainless steel top rail to the wall brackets. Ensure it is level and securely fastened.
- Install Fixed Glass Panel: Carefully place the fixed glass panel into its designated position and secure it.
- Attach Rollers to Sliding Glass Panel: Install the rollers onto the top edge of the sliding glass panel.
- Hang Sliding Glass Panel: Carefully lift and hang the sliding glass panel onto the top rail, ensuring the rollers engage properly. The soft-close system components should align.
- Install Handle: Attach the brushed gold stainless steel handle to the sliding glass panel.
- Apply Seal Strips: Install the full-length glass seal strips along the edges of the glass panels to ensure water containment.
- Seal with Silicone: Apply a bead of silicone sealant along the exterior seams where the shower door meets the wall and shower base to prevent leaks. Allow adequate drying time before use.
- Reversible Installation: The shower door is designed for reversible installation, allowing for a right or left door opening to fit your specific bathroom layout.
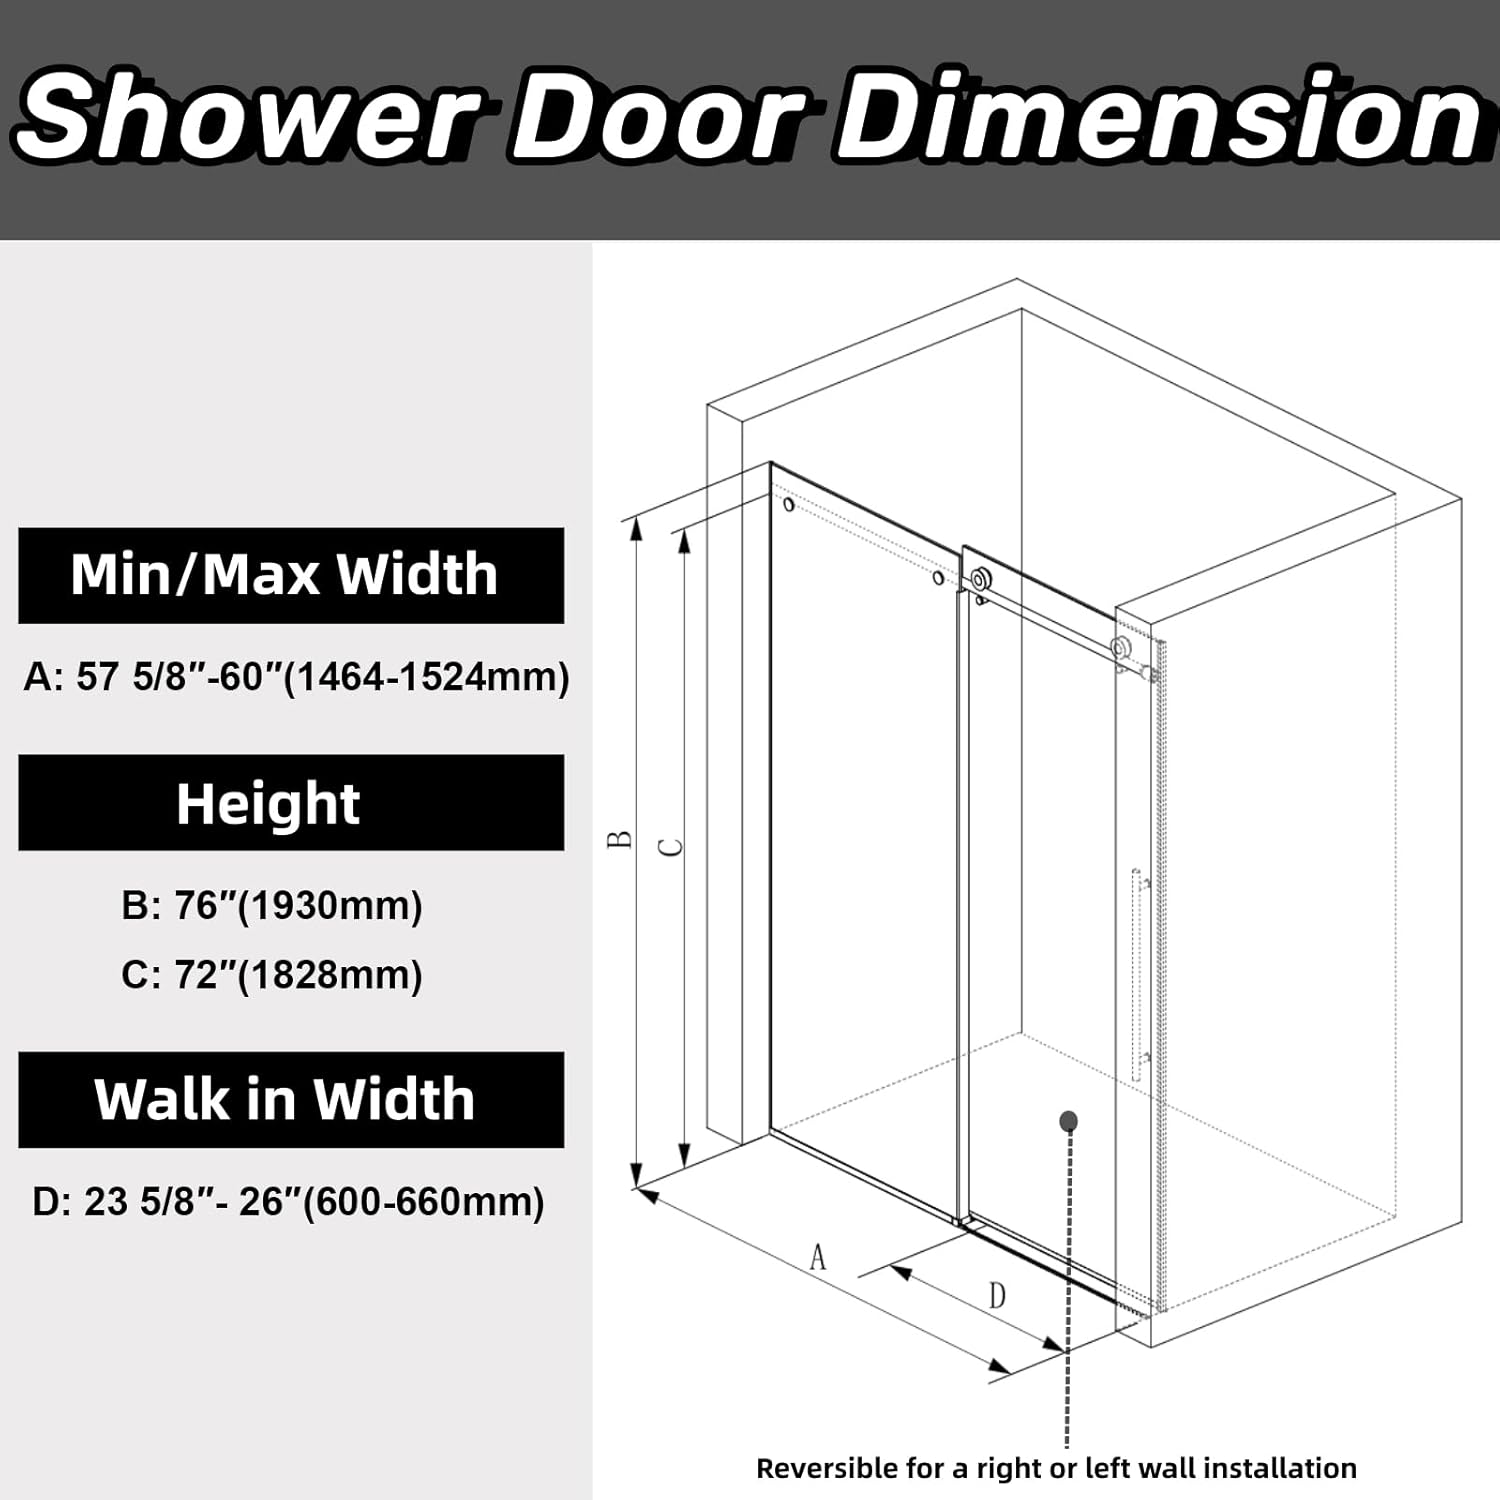
Image: Illustration of using the installation auxiliary part for precise drilling, showing a drill and a measurement tool.
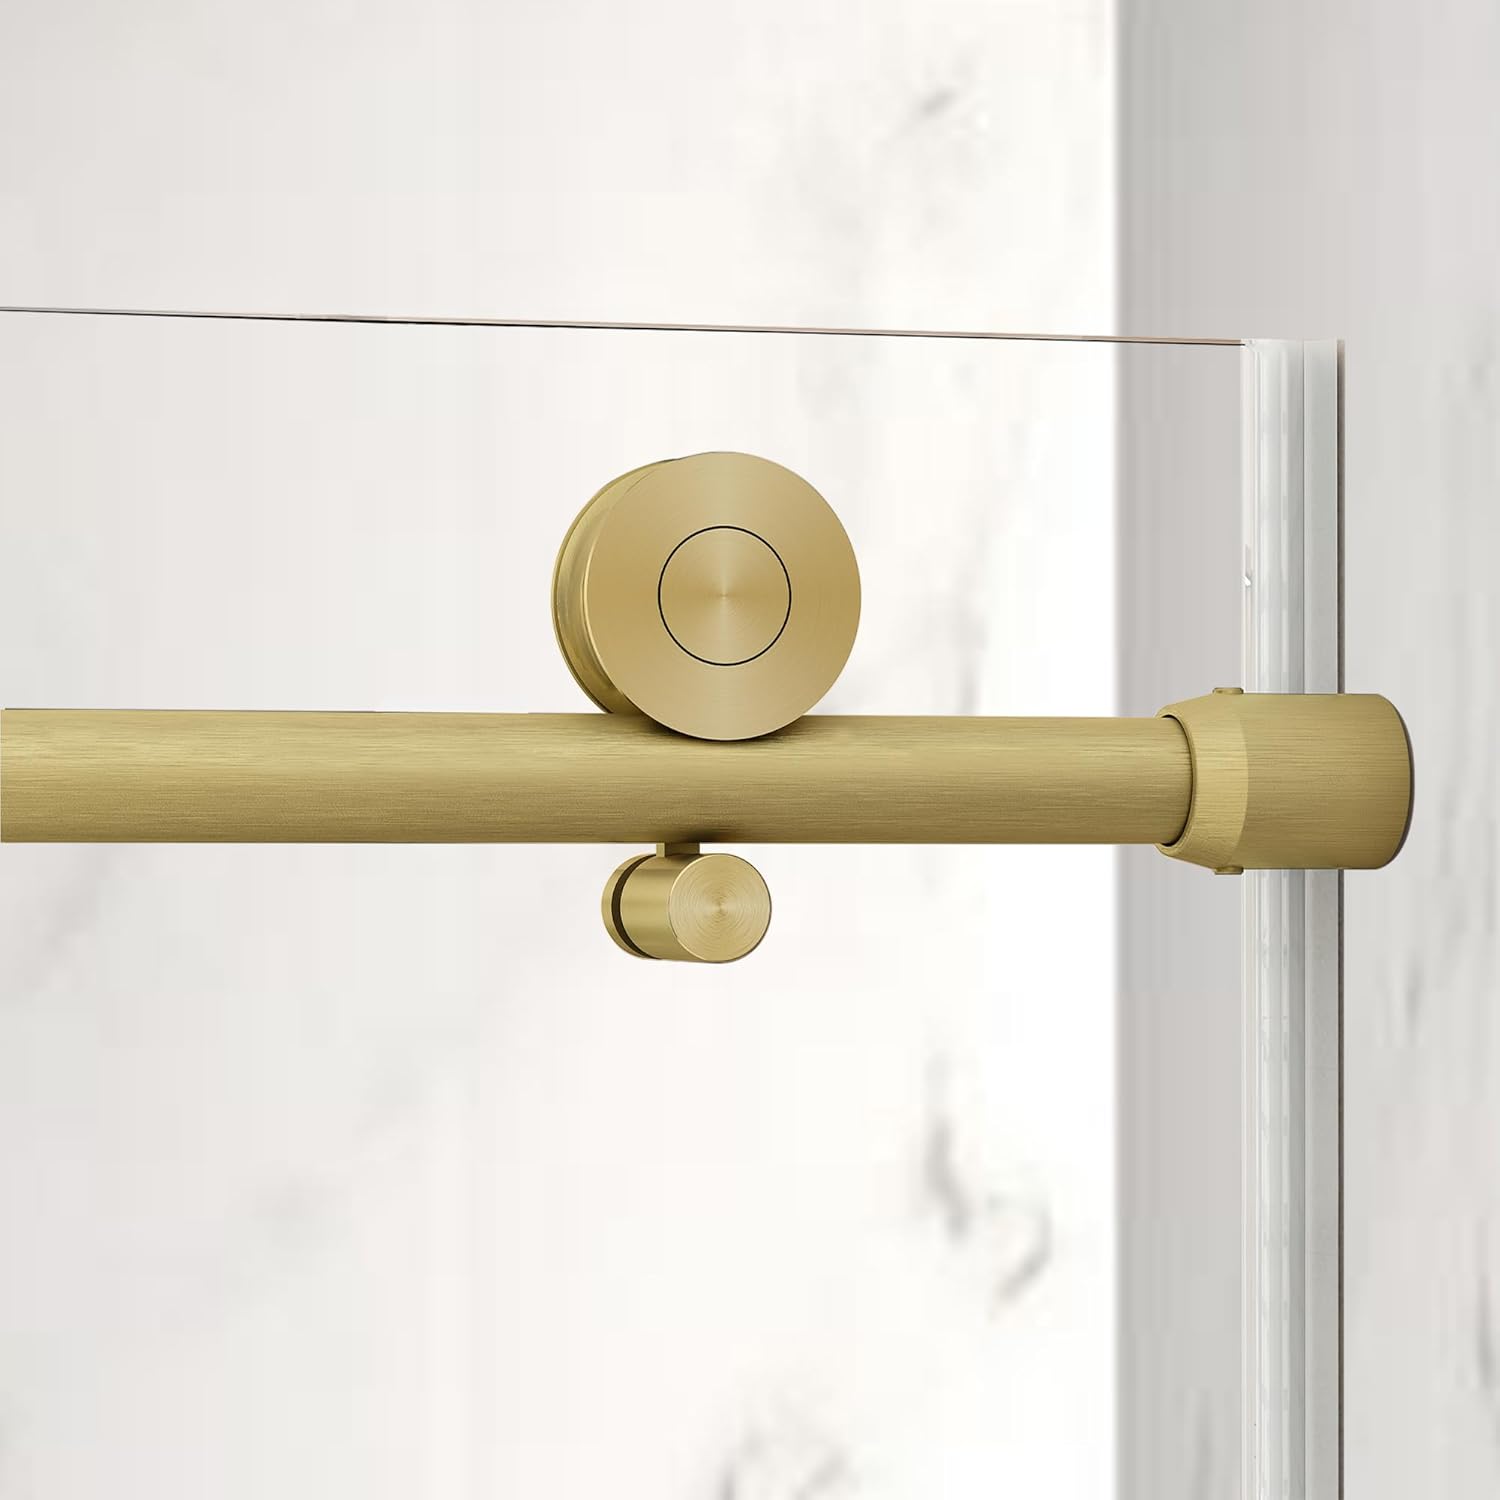
Image: Close-up view of the brushed gold top rail and roller mechanism, highlighting the smooth operation components.

Image: A brushed gold stainless steel handle vertically mounted on a clear glass shower door.

Image: Close-up of the shower door's water containment system, showing the seal strip and the separation of wet and dry zones.
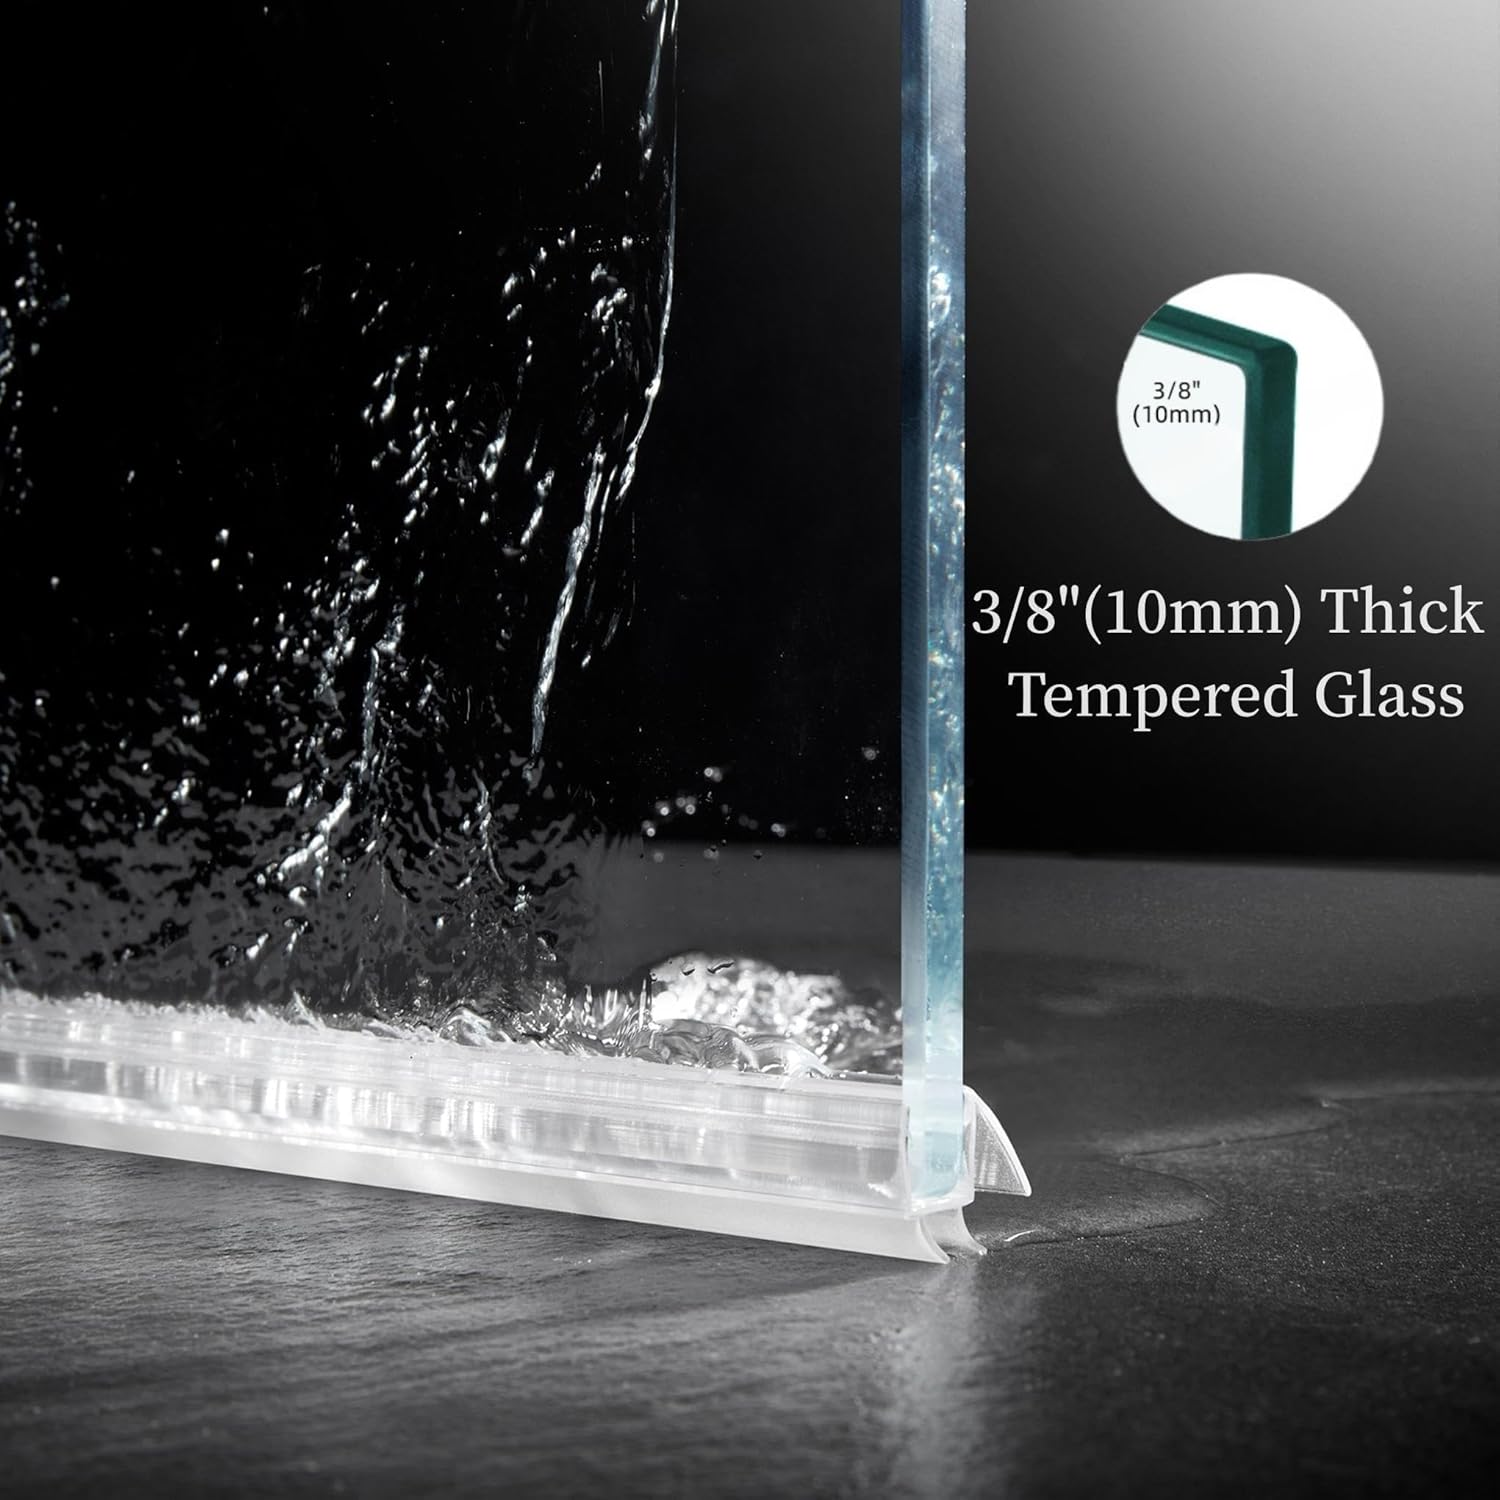
Image: Technical diagram illustrating the adjustable width (57 5/8" - 60"), height (76"), and walk-in width (23 5/8" - 26") of the shower door, also indicating reversible installation.
6. Operation
Your Sunrosa shower door features a smooth sliding mechanism and a soft-close system for enhanced user experience.
6.1 Sliding Mechanism
- To open or close the door, gently push or pull the handle. The robust stainless steel buffer pulleys ensure effortless gliding along the tracks.
- The anti-jumping design prevents the door from derailing during operation, ensuring stability and safety.
6.2 Soft Close System
- As the door approaches its fully open or closed position, the integrated soft-close system will engage, gently slowing the door's movement and bringing it to a quiet stop. This prevents slamming and reduces wear on components.

Image: Diagram illustrating the smooth operation features: silent rollers design, stainless steel rail, anti-jumping design, and soft closing system.
7. Maintenance
Regular cleaning and maintenance will ensure the longevity and appearance of your shower door.
7.1 Glass Cleaning
- The glass panels feature a nanocoating, making them smoother and easier to clean.
- After each use, wipe down the glass with a soft cloth or squeegee to prevent water spots and soap scum buildup.
- For deeper cleaning, use a non-abrasive glass cleaner. Avoid harsh chemicals or abrasive pads, which can damage the nanocoating.

Image: Visual comparison showing how nano-coated glass (ours) resists stains and water spots better than untreated glass (others).
7.2 Frame and Hardware Cleaning
- Clean the stainless steel frame and handle with a soft, damp cloth and mild soap.
- Avoid abrasive cleaners or scouring pads, as these can scratch the brushed gold finish.
- Periodically check all screws and fasteners to ensure they are tight. Do not overtighten.
8. Troubleshooting
This section addresses common issues you might encounter with your shower door.
8.1 Door Does Not Slide Smoothly
- Check Rollers: Ensure rollers are clean and free of debris. Clean with a damp cloth.
- Inspect Track: Verify the top rail is clear of obstructions and properly aligned.
- Lubrication: A small amount of silicone-based lubricant can be applied to the rollers and track if needed, but avoid oil-based lubricants.
8.2 Water Leaks from Enclosure
- Seal Strips: Check if the full-length glass seal strips are properly installed and undamaged. Replace if necessary.
- Silicone Sealant: Inspect the silicone sealant along the wall and base. Reapply sealant to any gaps or cracks.
- Door Alignment: Ensure the door is properly aligned and closing completely.
8.3 Soft Close System Not Functioning
- Obstructions: Check for any obstructions preventing the soft-close mechanism from engaging.
- Alignment: Ensure the door is correctly aligned with the soft-close components on the rail.
- If the issue persists, contact customer support.
9. Warranty and Support
Sunrosa is committed to providing high-quality products. If you encounter any issues with your shower door, please follow the steps below:
- Contact the Seller: Navigate to "Your Orders" on the purchase platform, click "Problem with order," and select "Contact seller."
- Describe the Issue: Attach images showing the product issue in the message chat and provide a detailed description of the problem.
- Resolution: Sunrosa will provide a solution, such as a complimentary replacement of damaged or missing parts or other appropriate resolutions.
This product is eligible for 30-day easy returns. For further assistance, please refer to the customer support options provided by your retailer.

Image: Diagram outlining the three steps to resolve a product issue: Contact the Seller, Describe the Issue in Detail, and Resolve the Issue.