Introduction
This manual provides essential instructions for the proper installation, maintenance, and general understanding of the Dana 90-4-791-1 Spl90 Series Automatic Transmission Yoke. This component is designed for specific automotive driveline applications, ensuring reliable power transfer. Adherence to these instructions is crucial for optimal performance and longevity of the part.
Safety Information
- Professional Installation Recommended: Installation of driveline components requires specialized knowledge and tools. It is highly recommended that this product be installed by a qualified automotive technician.
- Personal Protective Equipment: Always wear appropriate personal protective equipment (PPE) including safety glasses, gloves, and hearing protection when working on vehicles.
- Vehicle Support: Ensure the vehicle is securely supported on jack stands or a lift before beginning any work. Never rely solely on a jack.
- Torque Specifications: Adhere strictly to manufacturer's torque specifications for all fasteners. Improper torque can lead to component failure.
- Cleanliness: Maintain a clean work environment. Contaminants can compromise component integrity and performance.
Product Overview and Components
The Dana 90-4-791-1 Spl90 Series Automatic Transmission Yoke is a steel component designed to connect the transmission output shaft to the driveshaft. It features a 43-spline internal bore for precise fitment and robust power transmission.
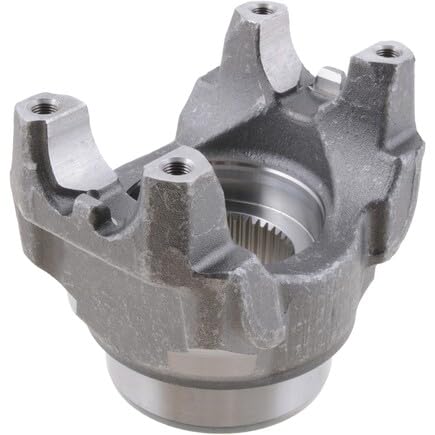
Figure 1: The Dana 90-4-791-1 Spl90 Series Automatic Transmission Yoke. This image shows the steel construction, the 43-spline internal bore for the transmission output shaft, and the four mounting points for the universal joint.
Key Features:
- Material: High-strength steel for durability.
- Spline Count: 43 splines for secure engagement with the transmission output shaft.
- Yoke Style: Designed for specific universal joint applications (Bs Yoke Style).
- Application: Automatic transmission systems.
Installation Instructions
Tools and Materials Required:
- Socket wrench set
- Torque wrench
- Pry bar (if needed for removal)
- Grease (specific type as per vehicle manufacturer's recommendation)
- Clean rags
- New universal joint (if replacing)
- Retaining clips/straps for U-joint (if applicable)
Installation Steps:
- Prepare Vehicle: Safely lift and support the vehicle. Ensure the transmission is in neutral and the parking brake is engaged.
- Remove Old Yoke (if applicable):
- Mark the orientation of the driveshaft relative to the old yoke to ensure proper reassembly and maintain driveline balance.
- Remove the universal joint retaining clips or straps.
- Separate the driveshaft from the old yoke.
- Carefully slide the old yoke off the transmission output shaft. Be prepared for transmission fluid leakage if the seal is compromised or if the transmission is not properly drained.
- Inspect Transmission Output Shaft: Clean the output shaft thoroughly. Inspect for any damage, wear, or burrs. Ensure the splines are clean and free of debris.
- Lubricate: Apply a thin, even coat of recommended grease to the splines of the transmission output shaft and the internal splines of the new Dana yoke.
- Install New Yoke: Carefully slide the new Dana 90-4-791-1 yoke onto the transmission output shaft. Ensure it slides on smoothly without excessive force. If resistance is met, re-inspect for alignment or obstructions.
- Install Universal Joint and Driveshaft:
- Align the driveshaft with the new yoke, ensuring the marks made during removal are matched (if applicable).
- Install the universal joint into the yoke, securing it with new retaining clips or straps as per the U-joint manufacturer's instructions.
- Tighten all fasteners to the vehicle manufacturer's specified torque values.
- Final Checks: Rotate the driveshaft by hand to ensure smooth, unrestricted movement. Check for any binding or unusual noises. Verify all fasteners are properly torqued.
Post-Installation Checks and Usage Guidelines
After installation, perform the following checks before operating the vehicle:
- Fluid Levels: Check and top off transmission fluid if any was lost during the installation process.
- Test Drive: Conduct a short test drive in a safe area. Listen for any unusual noises (e.g., clunking, whining, vibration) that may indicate an issue with the installation or component.
- Re-torque: After the initial test drive or a few hundred miles, it is advisable to re-check the torque on all universal joint fasteners to ensure they remain secure.
Maintenance
The Dana 90-4-791-1 yoke itself requires minimal maintenance beyond proper installation. However, regular inspection of the entire driveline system is recommended.
- Periodic Inspection: During routine vehicle maintenance, visually inspect the yoke and universal joint for signs of wear, corrosion, cracks, or looseness.
- Universal Joint Lubrication: If the universal joint is serviceable (has grease fittings), lubricate it according to the U-joint manufacturer's recommendations.
- Fluid Leaks: Check for any transmission fluid leaks around the yoke seal area. Address any leaks promptly to prevent transmission damage.
Troubleshooting
If you experience issues after installing the yoke, consider the following:
| Symptom | Possible Cause | Solution |
|---|---|---|
| Vibration during acceleration or at speed |
|
|
| Clunking or banging noise when shifting or accelerating |
|
|
| Transmission fluid leak at yoke seal |
|
|
If troubleshooting steps do not resolve the issue, consult a qualified automotive technician.
Specifications
| Attribute | Value |
|---|---|
| Brand | Dana |
| Model Number | 90-4-791-1 |
| Series | Spl90 Series |
| Application | Automatic Transmission |
| Material | Steel |
| Spline Count | 43 Spline |
| Yoke Style | Bs Yoke Style |
| Manufacturer | DANA |
| ASIN | B0CPTCX7W |
| Date First Available | June 10, 2022 |
Warranty Information
Dana products are manufactured to high standards. For specific warranty terms and conditions applicable to the 90-4-791-1 Spl90 Series Automatic Transmission Yoke, please refer to the official warranty documentation provided by Dana or contact Dana customer support directly. Warranty coverage typically applies to defects in materials and workmanship under normal use and service.
Support
For technical assistance, installation questions, or warranty claims, please contact Dana customer support or visit their official website. It is recommended to have your product model number (90-4-791-1) and purchase information available when seeking support.
Dana Official Website: www.dana.com


