
M93DVN WRX735SDBM00
M93DVN Compatible Ice Maker Instruction Manual
For Whirlpool Refrigerator Models: WRX735SDBM00, WRX735SDBH00, WRX735SDBE00
1. Introduction
This manual provides detailed instructions for the installation, operation, maintenance, and troubleshooting of your new M93DVN compatible ice maker. Please read this manual thoroughly before installation and use to ensure proper function and safety. This ice maker is designed as a replacement part for specific Whirlpool refrigerator models.
2. Safety Information
Always prioritize safety when working with appliances. Failure to follow these instructions may result in property damage, personal injury, or death.
- Disconnect Power: Always unplug the refrigerator from the power supply before attempting any installation, repair, or maintenance.
- Professional Installation: If you are unfamiliar with appliance repair, it is recommended to seek assistance from a qualified technician.
- Sharp Edges: Be aware of potential sharp edges on refrigerator components during installation. Wear appropriate protective gloves.
- Water Supply: Ensure the water supply to the refrigerator is turned off before beginning installation to prevent leaks.
- Electrical Connections: Ensure all electrical connections are secure and correct before restoring power.
3. Package Contents
Verify that all components are present and undamaged upon opening the package.
- 1 x M93DVN Compatible Ice Maker Unit
- 1 x Wiring Harness (may be pre-attached or separate)
- 1 x Set of Connectors/Terminals (as pictured)
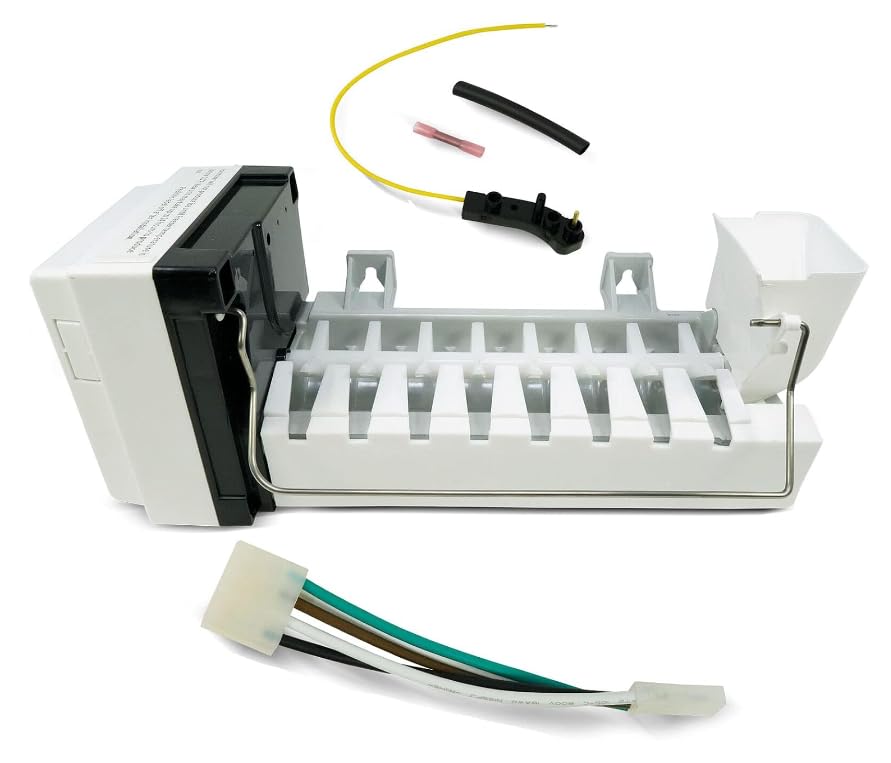
Figure 3.1: M93DVN Compatible Ice Maker unit, showing the main body, ice mold, and included wiring harness and connectors.
4. Specifications
| Feature | Detail |
|---|---|
| Brand | M93DVN |
| Compatible Models | Whirlpool WRX735SDBM00, WRX735SDBH00, WRX735SDBE00 |
| Voltage | 1.0 V (Note: This value may refer to a control signal or specific component, not main power. Refer to refrigerator's service manual for main power requirements.) |
| Capacity | 1.0 Kilograms (Refers to product weight or internal component capacity, not ice production.) |
| Refrigerant | R134a (This refers to the refrigerant type used in the refrigerator system, not the ice maker itself.) |
| Product Dimensions | Approximately 1"D x 1"W x 1"H (Note: These dimensions appear to be placeholder values. Actual dimensions will match the original part.) |
Note: The provided specifications for Voltage, Capacity, and Refrigerant appear to be general product attributes and may not directly apply to the ice maker's operational characteristics. Always refer to your refrigerator's specific service manual for detailed electrical and operational requirements.
5. Compatibility
This M93DVN ice maker is designed to be compatible with the following Whirlpool refrigerator models:
- WRX735SDBM00
- WRX735SDBH00
- WRX735SDBE00
Before installation, verify your refrigerator's model number, typically found on a label inside the refrigerator compartment or behind the kick plate.

Figure 5.1: The ice maker is designed for wide compatibility with specified Whirlpool models.
6. Installation Instructions (Setup)
Follow these steps carefully to install your new ice maker. Refer to your refrigerator's service manual for specific instructions related to your model, as procedures may vary slightly.
- Disconnect Power: Unplug the refrigerator from the electrical outlet to prevent electric shock.
- Turn Off Water Supply: Locate and turn off the water supply valve to the refrigerator.
- Access Freezer Compartment: Open the freezer door and locate the existing ice maker or the designated area for installation.
- Remove Old Ice Maker (if applicable):
- Carefully disconnect the wiring harness from the old ice maker.
- Unscrew any mounting screws or release clips holding the old ice maker in place.
- Gently remove the old ice maker unit.
- Install New Ice Maker:
- Position the new M93DVN ice maker in the designated mounting location.
- Secure the ice maker with the appropriate screws or clips. Ensure it is firmly in place.
- Connect the wiring harness from the refrigerator to the new ice maker. Ensure the connection is secure.
- If your model requires additional water line connections to the ice maker, ensure they are properly seated and secured to prevent leaks.
- Restore Water Supply: Turn the water supply valve back on and check for any leaks around the water line connections.
- Restore Power: Plug the refrigerator back into the electrical outlet.
- Initial Operation: The ice maker will not produce ice immediately. It may take up to 24 hours for the freezer temperature to stabilize and for the first batch of ice to be produced. Remove any protective labels from the ice maker before operation.
7. Operation
Once installed and powered, the ice maker will automatically begin the ice production cycle when the freezer temperature reaches the optimal level (typically below 10°F / -12°C).
- First Ice Production: The first few batches of ice may be smaller or have an unusual taste. It is recommended to discard the first 2-3 batches of ice to flush the system.
- Ice Level Sensor: The ice maker is equipped with an ice level sensor (often a wire arm) that stops ice production when the ice bin is full. Ensure this arm can move freely.
- Ice Production Rate: Ice production rates vary depending on freezer temperature, frequency of door openings, and water pressure.

Figure 7.1: The ice maker is constructed from durable materials for reliable, long-lasting operation.
8. Maintenance
Regular maintenance helps ensure optimal performance and longevity of your ice maker.
- Cleaning the Ice Bin: Periodically remove the ice bin and wash it with mild soap and warm water. Rinse thoroughly and dry completely before returning it to the freezer.
- Cleaning the Ice Maker: If mineral deposits or residue build up on the ice maker components, disconnect power to the refrigerator and gently wipe down accessible surfaces with a damp cloth. Do not use abrasive cleaners.
- Water Filter: Ensure your refrigerator's water filter (if equipped) is replaced according to the manufacturer's recommendations to maintain water quality and prevent mineral buildup in the ice maker.
- Inspection: Periodically inspect the water line for kinks or damage, and check electrical connections for security.
9. Troubleshooting
If your ice maker is not functioning as expected, consult the following common issues and solutions before contacting support.
| Problem | Possible Cause | Solution |
|---|---|---|
| No ice production | Refrigerator not plugged in; water supply off; freezer too warm; ice maker arm in "off" position; clogged water line/filter. | Check power connection; ensure water supply is on; allow 24 hours for freezer to cool; lower ice maker arm; check/replace water filter; inspect water line for kinks. |
| Small or hollow ice cubes | Low water pressure; clogged water filter; partially frozen water line. | Check water pressure; replace water filter; thaw water line if frozen (disconnect power first). |
| Ice tastes bad or has odor | First batches of ice; old water in reservoir; dirty ice bin; old water filter. | Discard first batches; clean ice bin; replace water filter. |
| Ice maker is noisy | Normal operation sounds; loose mounting. | Some operational sounds are normal. Ensure ice maker is securely mounted. |
10. Warranty and Support
This M93DVN ice maker comes with a 90-day warranty from the date of purchase, covering defects in materials and workmanship under normal use. This warranty does not cover damage resulting from improper installation, misuse, or unauthorized repairs.

Figure 10.1: The product includes a 90-day warranty, ensuring quality and support.
For warranty claims or technical assistance, please contact your retailer or the M93DVN customer support team. Please have your purchase receipt and product model information available.
Ask a question about this manual
Ask about setup, troubleshooting, compatibility, parts, safety, or missing instructions. Manuals+ will review the question and use this page’s manual context to help answer it.