1. Safety Information
Please read all safety instructions carefully before installing or operating the AORUS WATERFORCE X II 360 ICE Liquid CPU Cooler. Failure to follow these instructions may result in damage to the product, other components, or personal injury.
- Always disconnect power from your computer before performing any installation or maintenance.
- Handle components with care to avoid electrostatic discharge (ESD). Consider using an anti-static wrist strap.
- Do not open the liquid cooler's pump or radiator. It contains a sealed liquid cooling solution.
- Ensure all cables are connected securely and correctly to prevent electrical shorts or malfunctions.
- Keep the product away from extreme temperatures, humidity, and direct sunlight.
- This product is designed for use in desktop computer systems only.
2. Package Contents
Verify that all components listed below are present in your package:
- 1x AORUS WATERFORCE X II 360 ICE Liquid CPU Cooler (includes 360mm radiator, pump/waterblock, and pre-attached tubing)
- 3x 120mm Low Noise ARGB Fans
- Mounting Hardware Kit (for Intel LGA1851, LGA1700, 1200, 115x and AMD AM5, AM4, TR4, sTR5 sockets)
- USB Cable
- SATA Power Cable
- Fan and ARGB Connection Cables
- User Manual (this document)

Figure 2.1: AORUS WATERFORCE X II 360 ICE Liquid CPU Cooler and its retail packaging.
3. Specifications
| Feature | Specification |
|---|---|
| Model Number | GP-AORUS WATERFORCE X II 360I G2 |
| Radiator Size | 360mm |
| Fan Size | 120mm |
| Noise Level | 37.5 dB |
| Maximum Rotational Speed (Pump) | 9200 RPM |
| Cooling Method | Water |
| Power Connector Type | 3-Pin |
| Voltage | 12 Volts |
| Wattage | 100 watts |
| Compatible Devices | Desktop |
| CPU Socket Compatibility | Intel 115x, 1200, 1700, 1851; AMD TR4, AM5, AM4, sTR5 |
4. Setup and Installation
Follow these steps to properly install your AORUS WATERFORCE X II 360 ICE Liquid CPU Cooler. Ensure your computer is powered off and unplugged before beginning.
4.1. Prepare Your System
- Power Off: Shut down your computer completely and unplug the power cord from the wall outlet.
- Access Motherboard: Open your computer case to gain access to the motherboard and CPU area.
- Remove Existing Cooler: If an existing CPU cooler is installed, carefully remove it and clean any old thermal paste from the CPU's integrated heat spreader (IHS) using isopropyl alcohol and a lint-free cloth.
4.2. Install Mounting Hardware
The AORUS WATERFORCE X II 360 ICE supports a wide range of CPU sockets. Identify your CPU socket type (Intel or AMD) and use the corresponding mounting hardware from the kit.
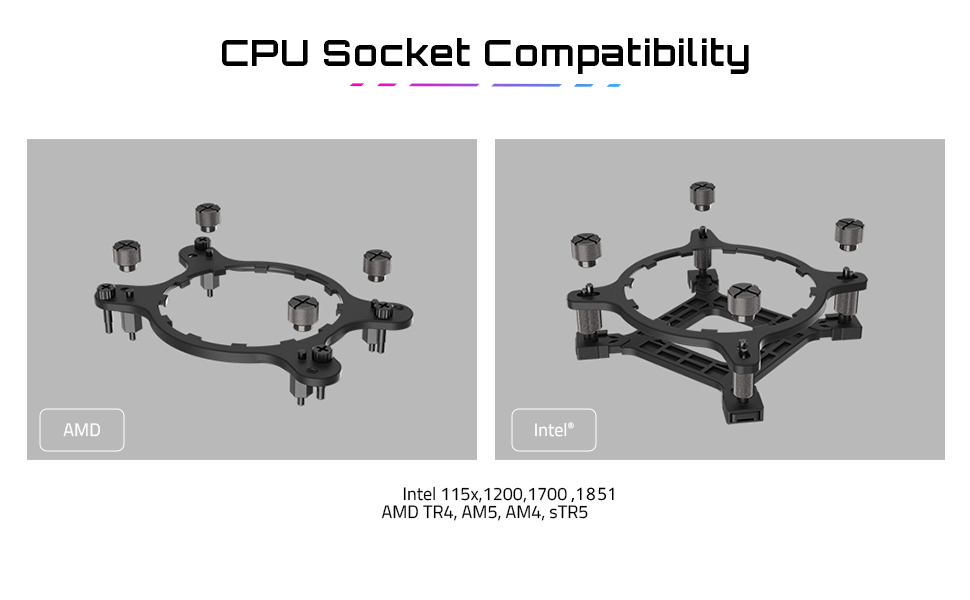
Figure 4.1: CPU Socket Compatibility and Mounting Brackets.
- Install Backplate: For Intel sockets, install the appropriate backplate behind the motherboard. For AMD sockets, use the existing motherboard backplate if applicable, or install the provided one.
- Attach Standoffs: Screw the correct standoffs into the backplate or motherboard mounting holes around the CPU socket.
4.3. Mount Radiator and Fans
The 360mm radiator requires sufficient space in your PC case. The fans feature an EZ-Chain Magnet design for simplified installation.

Figure 4.2: Overview of the AORUS WATERFORCE X II 360 ICE Liquid CPU Cooler.

Figure 4.3: Top view of the 120mm ARGB fans.

Figure 4.4: EZ-Chain Magnet fan design for simplified wiring.
- Attach Fans to Radiator: Secure the three 120mm ARGB fans to the radiator using the provided screws. Ensure the fan airflow direction is as desired (typically blowing air through the radiator and out of the case, or into the case for positive pressure). The EZ-Chain Magnet design allows fans to interlock and transmit power/signals, reducing cable clutter.
- Mount Radiator: Install the radiator assembly into your chosen mounting location within the PC case (e.g., top, front). Secure it with the appropriate screws.
4.4. Install Waterblock/Pump
- Apply Thermal Paste: If the waterblock's cold plate does not have pre-applied thermal paste, apply a small pea-sized amount to the center of your CPU's IHS.
- Position Waterblock: Carefully place the waterblock onto the CPU, aligning the mounting holes with the standoffs.
- Secure Waterblock: Use the provided thumb screws or nuts to secure the waterblock evenly to the standoffs. Tighten in a cross pattern until snug, but do not overtighten.
4.5. Connect Cables
- Pump Power: Connect the pump's 3-pin power cable to an available CPU_FAN or AIO_PUMP header on your motherboard. Consult your motherboard manual for the correct header.
- Fan Power/ARGB: Connect the fan power and ARGB cables. Thanks to the EZ-Chain Magnet design, the fans can be daisy-chained. Connect the main fan cable to an available fan header (e.g., SYS_FAN) and the ARGB cable to a 3-pin 5V ARGB header on your motherboard.
- USB Connection: Connect the cooler's USB cable to an available internal USB 2.0 header on your motherboard. This is essential for the LCD display and software control.
- SATA Power: Connect the SATA power cable from the cooler to a SATA power connector from your power supply.
5. Operating Instructions
Once installed, the AORUS WATERFORCE X II 360 ICE is ready to operate. For full functionality and customization, install the GIGABYTE Control Center (GCC) software.
5.1. Initial Power On
After ensuring all connections are secure and your PC case is closed, plug in your computer's power cord and power on the system. The cooler's fans and pump should begin operating, and the LCD display on the waterblock will initialize.
5.2. GIGABYTE Control Center (GCC) Software
The GCC software is crucial for managing your cooler's performance and aesthetics:
- Download: Download the latest version of GIGABYTE Control Center from the official GIGABYTE website.
- Installation: Install the software following the on-screen prompts.
- Features: Within GCC, you can:
- Monitor CPU temperature, pump speed, and fan speed.
- Adjust fan curves and pump speeds for optimal cooling and noise levels.
- Customize the ARGB lighting effects of the fans and waterblock.
- Manage the LCD Edge View display.
5.3. LCD Edge View Customization
The circular full-color LCD on the waterblock is highly customizable:

Figure 5.1: LCD Edge View features and customization.
- Monitoring: Display real-time information such as CPU clock frequencies, utilization, temperatures, fan RPM, and pump RPM.
- Default Animations: Choose from 5 meticulously crafted default animations.
- Personalization: Upload your own text, GIF, JPEG, or MP4 files to personalize the display. The cooler has 40MB of integrated storage capacity for custom content.
- Display Orientation: The display orientation can be software-controlled for a 360-degree rotation, allowing for flexible installation.
6. Maintenance
Regular maintenance helps ensure optimal performance and longevity of your liquid CPU cooler.
- Dust Cleaning: Periodically clean dust from the radiator fins and fan blades using compressed air or a soft brush. Ensure fans are not spinning during cleaning.
- Check Tubing: Inspect the tubing for any signs of kinks, damage, or leaks. While rare, addressing these issues promptly is important.
- Software Updates: Keep your GIGABYTE Control Center (GCC) software updated to the latest version to benefit from performance improvements, bug fixes, and new features.
7. Troubleshooting
If you encounter issues with your AORUS WATERFORCE X II 360 ICE, refer to the following common problems and solutions:
| Problem | Possible Cause | Solution |
|---|---|---|
| High CPU Temperatures | Improper waterblock contact, insufficient thermal paste, pump not running, fans not spinning, dust buildup. | Ensure waterblock is securely mounted. Reapply thermal paste if necessary. Check pump and fan cable connections. Clean radiator and fans. Verify pump and fan speeds in GCC. |
| Fans/Pump Not Spinning | Loose power connection, incorrect motherboard header, software issue. | Check SATA power cable connection. Ensure pump is connected to CPU_FAN/AIO_PUMP header. Verify fan connections. Restart GCC or reinstall if necessary. |
| ARGB Lighting Not Working | Incorrect ARGB header, loose connection, software conflict. | Ensure ARGB cable is connected to a 3-pin 5V ARGB header (not 4-pin 12V RGB). Check connections. Adjust lighting settings in GCC. |
| LCD Display Not Working/Frozen | Loose USB connection, software issue, power issue. | Check internal USB 2.0 cable connection. Ensure SATA power is connected. Restart GCC. Update GCC software. |
8. Warranty and Support
GIGABYTE products are manufactured to the highest quality standards. This product is covered by a limited warranty. For specific warranty terms and conditions, please refer to the warranty card included with your product or visit the official GIGABYTE website.
For technical support, driver downloads, and further assistance, please visit the official GIGABYTE support website:
Please have your product model number (GP-AORUS WATERFORCE X II 360I G2) and serial number ready when contacting support.