MaxiViz CQ1
MaxiViz Solar Security Camera CQ1 User Manual
Comprehensive guide for setup, operation, and maintenance of your MaxiViz CQ1 Solar Security Camera.
1. Product Overview
The MaxiViz CQ1 Solar Security Camera is a wireless outdoor surveillance solution designed for continuous operation. Featuring 2K HD resolution, 360° pan-tilt-zoom capabilities, and AI motion detection, it provides comprehensive monitoring for your property. Its solar-powered design ensures year-round functionality without the need for constant battery changes or wired power.

Figure 1.1: MaxiViz CQ1 Solar Security Camera with its solar panel and a view of the live feed on a smartphone.
Key Features:
- 2K HD Resolution: Provides clear and detailed video footage.
- Full Color Night Vision: Dual LED floodlights enable color vision in low-light conditions up to 33 feet.
- 360° PTZ Coverage: 355° horizontal pan and 90° vertical tilt for wide area monitoring.
- AI Motion Detection: Smart sensors distinguish between humans, animals, and other objects, reducing false alarms.
- Solar Powered: High-efficiency solar panel ensures continuous operation, even in challenging weather.
- IP66 Weatherproof: Designed to withstand extreme temperatures (-40°C to 60°C) and harsh weather conditions.
- Two-Way Audio: Built-in microphone and speaker for real-time communication.
- Flexible Storage: Supports up to 128GB SD card (not included) and offers 3-day free loop cloud storage.
- Smart Alarms: Activates spotlights and a 95dB siren upon detection to deter intruders.
- 2.4G WiFi Connectivity: Stable wireless connection with better penetration through obstacles.
2. Package Contents
Please verify that all items are present and in good condition upon opening the package.
- MaxiViz CQ1 Solar Security Camera (1 unit)
- Solar Panel (integrated or separate, based on image it's separate but connected)
- Mounting Bracket
- Mounting Screws and Wall Plugs
- USB Charging Cable
- User Manual (this document)
3. Setup Guide
3.1 Charging the Camera
Before initial use, fully charge the camera's internal battery using the provided USB cable. Connect the USB cable to the camera's charging port and a 5V/2A power adapter (not included). The charging indicator light will turn solid when fully charged.
3.2 App Installation and Account Creation
The MaxiViz CQ1 camera operates with the VicoHome app. Download the app from your smartphone's app store (iOS App Store or Google Play Store).
- Search for "VicoHome" in your app store.
- Download and install the app.
- Open the app and register for a new account using your email address.
- Follow the on-screen prompts to complete the registration and login.
3.3 Camera Pairing with App
- Ensure your smartphone is connected to a 2.4GHz Wi-Fi network. The camera only supports 2.4GHz Wi-Fi for optimal range and penetration.
- In the VicoHome app, tap the "+" icon to add a new device.
- Select your camera model (CQ1) from the list.
- Power on the camera. The camera will enter pairing mode, indicated by a flashing LED light.
- Follow the app's instructions to scan the QR code displayed on your phone with the camera lens. Hold the phone approximately 15-20 cm (6-8 inches) from the camera.
- Once the camera successfully scans the QR code, it will emit a confirmation sound.
- The camera will then connect to your Wi-Fi network. Once connected, you can name your camera and begin live viewing.
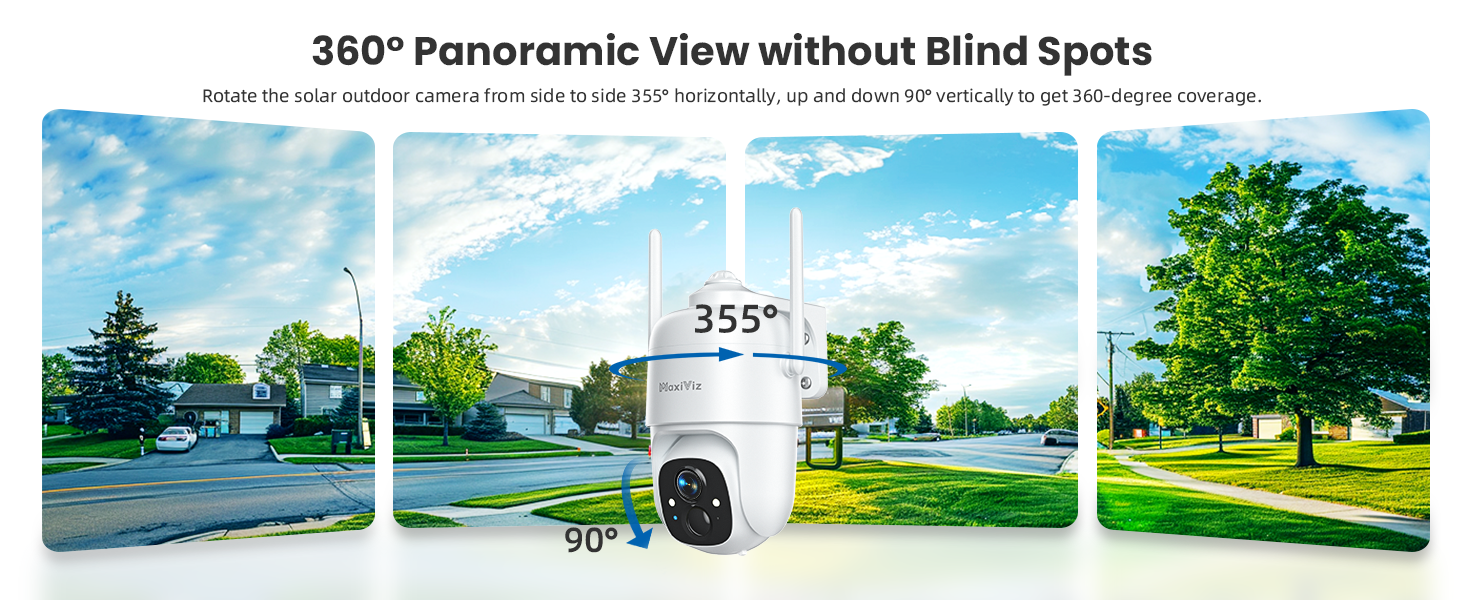
Figure 3.3.1: The camera offers 360° panoramic view with 355° pan and 90° tilt capabilities.
3.4 Mounting the Camera
Choose a mounting location that provides optimal sunlight exposure for the solar panel and a clear view of the area you wish to monitor. Ensure the camera is within range of your 2.4GHz Wi-Fi network.
- Mark the drilling points on the wall using the mounting bracket as a template.
- Drill holes and insert the wall plugs.
- Secure the mounting bracket to the wall with the provided screws.
- Attach the camera to the mounting bracket and adjust its angle for the desired coverage.
- Ensure the solar panel is positioned to receive maximum direct sunlight throughout the day for optimal charging.

Figure 3.4.1: Proper mounting ensures continuous solar power and optimal camera performance.
4. Operating Instructions
4.1 Live View and Playback
Open the VicoHome app and select your camera from the device list to access the live view. From here, you can:
- View Live Feed: See real-time video from your camera.
- Pan & Tilt: Use the on-screen controls to remotely adjust the camera's viewing angle (355° horizontal, 90° vertical).
- Two-Way Audio: Tap the microphone icon to speak through the camera's speaker and hear audio from the camera's microphone.
- Record Manually: Tap the record button to start/stop manual video recording.
- Take Screenshots: Capture still images from the live feed.
- Playback: Access recorded footage from the SD card or cloud storage. Navigate through the timeline to review past events.

Figure 4.1.1: The VicoHome app allows for real-time two-way communication.
4.2 Motion Detection and Alerts
The camera's AI motion detection system is designed to accurately identify relevant events.
- AI Object Analysis: The camera can distinguish between humans, pets, vehicles, and packages, reducing false alarms caused by irrelevant movements.
- Instant Notifications: Receive push notifications on your smartphone when motion is detected.
- Spotlight and Siren: Upon detection, the camera can automatically activate its bright spotlights and a 95dB siren to deter intruders. These features can be configured in the app settings.
- Customized Activity Zones: Set up specific areas within the camera's view where motion detection should be active, ignoring activity outside these zones.

Figure 4.2.1: Smart motion detection with active deterrence features.
4.3 Night Vision Modes
The MaxiViz CQ1 offers two night vision modes:
- Infrared Night Vision: Provides clear black and white video in complete darkness.
- Full Color Night Vision: When the dual LED floodlights are activated (either manually or automatically upon motion detection), the camera captures full-color video even at night.

Figure 4.3.1: Choose between infrared or full-color night vision based on your needs.
4.4 Storage Options
The camera supports both local and cloud storage:
- Micro SD Card: Insert a Micro SD card (up to 128GB, not included) into the camera's SD card slot for local storage of recordings.
- Cloud Storage: The VicoHome app offers a 3-day free loop cloud storage plan. Paid subscription plans are available for extended cloud storage.

Figure 4.4.1: Flexible storage options for your security footage.
5. Maintenance
- Clean the Lens: Periodically wipe the camera lens with a soft, dry cloth to ensure clear image quality. Avoid abrasive cleaners.
- Clean Solar Panel: Ensure the solar panel is free from dust, dirt, snow, or debris to maintain optimal charging efficiency.
- Check Mounting: Regularly inspect the camera's mounting to ensure it remains securely fastened, especially after strong winds or storms.
- Firmware Updates: Check the VicoHome app regularly for firmware updates. Keeping your camera's firmware updated ensures optimal performance and security.
- Battery Health: While solar-powered, extreme prolonged periods without sunlight may require manual charging via USB. Monitor battery levels in the app.
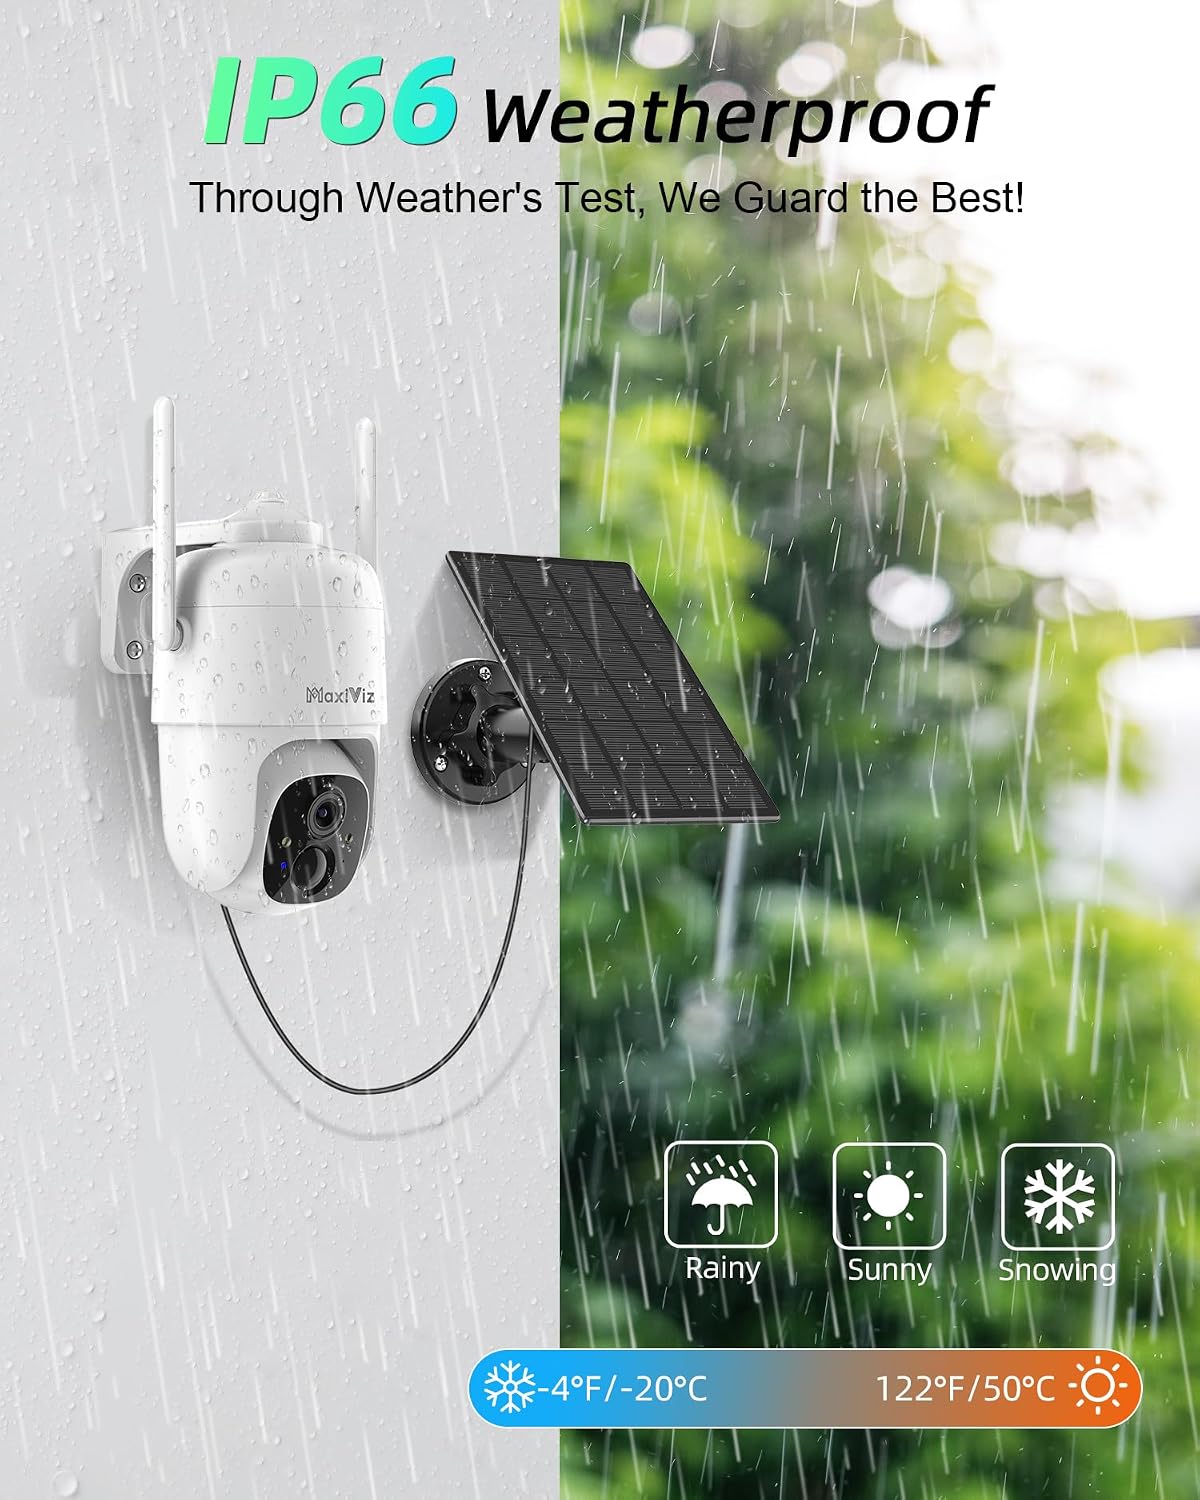
Figure 5.1: The IP66 weatherproof design ensures durability, but regular cleaning is recommended.
6. Troubleshooting
| Problem | Possible Cause | Solution |
|---|---|---|
| Camera not powering on. | Low battery; Power button not pressed correctly. | Fully charge the camera using the USB cable. Press and hold the power button for a few seconds. |
| Unable to connect to Wi-Fi. | Incorrect Wi-Fi password; Camera too far from router; Only 5GHz Wi-Fi used; Weak signal. | Ensure correct 2.4GHz Wi-Fi password. Move camera closer to router or use a Wi-Fi extender. Confirm your router is broadcasting 2.4GHz. |
| Frequent false motion alerts. | High sensitivity setting; Environmental factors (e.g., swaying branches, insects). | Adjust motion detection sensitivity in the VicoHome app. Set up customized activity zones to exclude irrelevant areas. |
| Poor night vision quality. | Dirty lens; Obstruction in front of IR/LED lights; Insufficient ambient light for color night vision. | Clean the camera lens. Ensure no obstructions block the IR/LED lights. Activate spotlights for full-color night vision. |
| Solar panel not charging effectively. | Insufficient sunlight; Dirty solar panel; Obstruction. | Relocate the solar panel to an area with more direct sunlight. Clean the solar panel surface. Remove any obstructions. |
7. Specifications
| Feature | Detail |
|---|---|
| Model Number | CQ1 |
| Video Capture Resolution | 2K (2304*1296) |
| Pan/Tilt Angle | Pan 355°, Tilt 90° |
| Night Vision Range | Up to 33 Feet (10 meters) |
| Connectivity | 2.4GHz Wi-Fi |
| Storage Options | Micro SD Card (up to 128GB), Cloud Storage |
| Power Source | Solar Powered, Built-in Lithium Polymer Battery |
| Weather Resistance | IP66 Weatherproof |
| Operating Temperature | -40°C to 60°C (-40°F to 140°F) |
| Two-Way Audio | Yes |
| AI Detection | Human, Pet, Vehicle, Package Recognition |
| Dimensions (L x W x H) | 20.32 x 15.75 x 13.46 cm |
| Weight | 1.05 kg |
| Material | Acrylonitrile Butadiene Styrene (ABS) |
| Included Components | Camera*1 |
8. Warranty and Support
8.1 Warranty Information
The MaxiViz CQ1 Solar Security Camera comes with a 1-year warranty from the date of purchase. This warranty covers manufacturing defects and malfunctions under normal use. It does not cover damage caused by misuse, accidents, unauthorized modifications, or natural disasters.
Please retain your proof of purchase for warranty claims.
8.2 Customer Support
For technical assistance, troubleshooting, or warranty inquiries, please contact MaxiViz customer support through the following channels:
- Email: Refer to the contact information provided in the VicoHome app or on the official MaxiViz website.
- Online Support: Visit the MaxiViz official website for FAQs, support articles, and contact forms.
When contacting support, please provide your product model number (CQ1) and a detailed description of the issue.
Ask a question about this manual
Ask about setup, troubleshooting, compatibility, parts, safety, or missing instructions. Manuals+ will review the question and use this page’s manual context to help answer it.