1. Introduction
Thank you for choosing the Weytoll 16.8V Cordless Mini Angle Grinder. This manual provides essential information for the safe and efficient operation, maintenance, and troubleshooting of your new tool. Please read this manual thoroughly before first use and keep it for future reference.
This mini angle grinder is designed for various applications including cutting, grinding, and polishing tasks on materials such as tiles, metal, and wood. Its cordless design offers flexibility and convenience for both indoor and outdoor projects.
2. Safety Instructions
WARNING: Read all safety warnings, instructions, illustrations, and specifications provided with this power tool. Failure to follow all instructions listed below may result in electric shock, fire, and/or serious injury.
2.1 General Power Tool Safety Warnings
- Work Area Safety: Keep the work area clean and well-lit. Cluttered or dark areas invite accidents. Do not operate power tools in explosive atmospheres, such as in the presence of flammable liquids, gases, or dust.
- Electrical Safety: Avoid body contact with earthed or grounded surfaces such as pipes, radiators, ranges, and refrigerators. There is an increased risk of electric shock if your body is earthed or grounded.
- Personal Safety: Always wear eye protection. Use personal protective equipment such as dust masks, non-skid safety shoes, hard hats, or hearing protection when appropriate.
- Tool Use and Care: Do not force the power tool. Use the correct power tool for your application. The correct power tool will do the job better and safer at the rate for which it was designed.
- Battery Tool Use and Care: Recharge only with the charger specified by the manufacturer. A charger that is suitable for one type of battery pack may create a risk of fire when used with another battery pack.
2.2 Angle Grinder Specific Safety Warnings
- This power tool is intended to function as a grinder, sander, wire brush, or cut-off tool. Read all safety warnings, instructions, illustrations, and specifications provided with this power tool.
- Do not use accessories that are not specifically designed and recommended by the tool manufacturer. Just because the accessory can be attached to your power tool, it does not assure safe operation.
- The rated speed of the accessory must be at least equal to the maximum speed marked on the power tool. Accessories running faster than their rated speed can break and fly apart.
- Always ensure the protective guard is properly installed and adjusted for maximum safety during operation. The thickened baffle design reduces debris splash.
- Hold the tool firmly with both hands during operation. A loss of control can result in personal injury.
3. Package Contents
Carefully unpack all items and check against the list below. If any items are missing or damaged, please contact your retailer.
- 1 x Weytoll Mini Angle Grinder
- 2 x 16.8V 2.0Ah Lithium-ion Batteries
- 1 x Battery Charger
- 1 x Grinding Blade (Cutting Disc)
- 1 x Screwdriver
- 1 x Pair of Gloves
- 6 x Saw Blades (various types)
- 1 x User Manual (this document)
4. Product Overview
Familiarize yourself with the components of your Weytoll Mini Angle Grinder before operation.
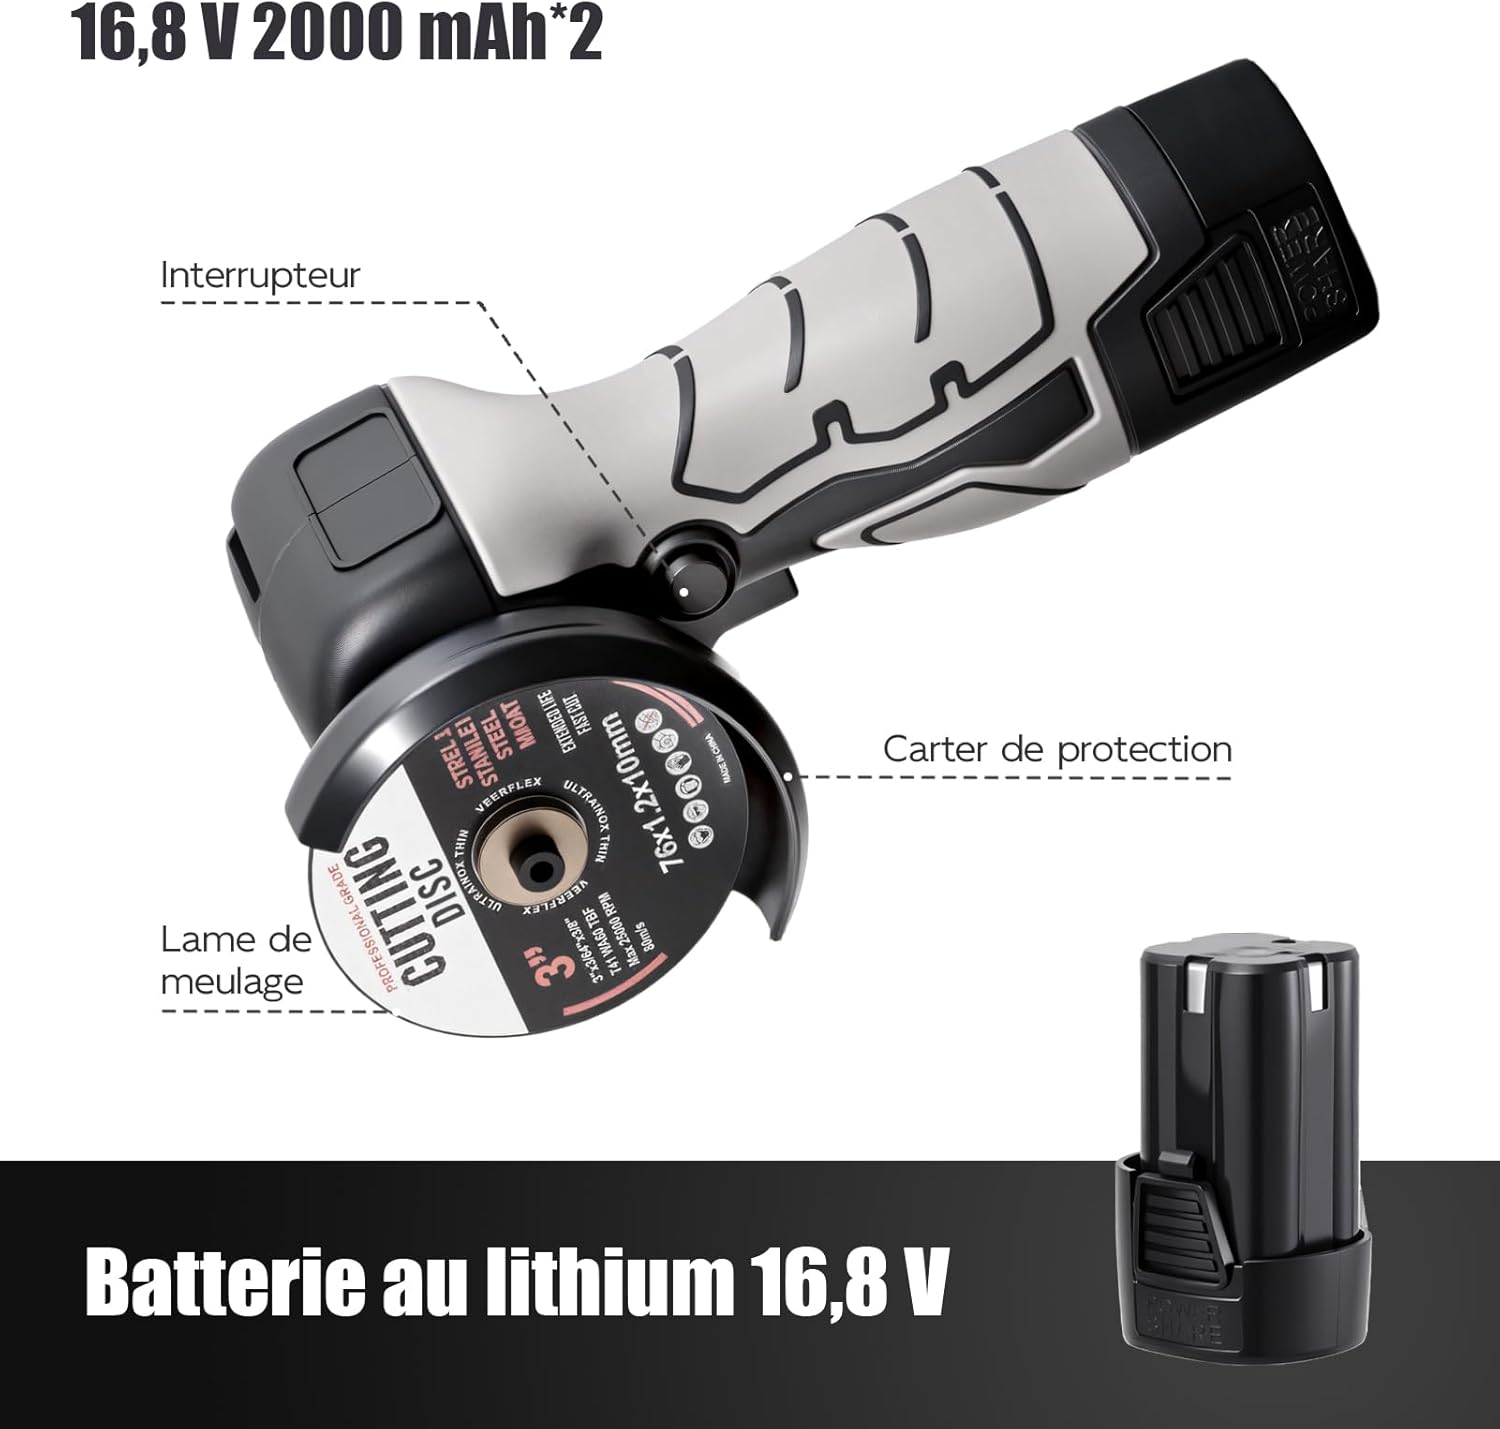
Figure 4.1: Main components of the Weytoll Mini Angle Grinder. Key parts include the power switch, protective guard, grinding blade, and the detachable 16.8V lithium battery.
- Switch: Activates and deactivates the grinder.
- Protective Guard: Shields the user from sparks and debris. Always ensure it is correctly positioned.
- Grinding Blade/Cutting Disc: The abrasive disc used for cutting or grinding materials.
- 16.8V Lithium Battery: Provides power to the cordless grinder.
- Spindle Lock Button: Used to lock the spindle for easy disc changes.
5. Setup
5.1 Charging the Battery
The batteries are not fully charged upon delivery. Fully charge the batteries before first use.
- Connect the charger to a suitable power outlet.
- Insert the 16.8V Lithium-ion battery into the charger.
- Allow the battery to charge until the indicator light on the charger shows a full charge (refer to charger manual for specific indicator details).
- Once charged, disconnect the battery from the charger and unplug the charger from the power outlet.
NOTE: The charger may have a US plug. An adapter for European outlets may be required (not included).
5.2 Installing/Changing the Cutting Disc
Always ensure the tool is switched off and the battery is removed before installing or changing any accessories.

Figure 5.1: Easy assembly steps for installing a cutting disc.
- Press the Spindle Lock Button: Locate and press the spindle lock button to prevent the spindle from rotating.
- Rotate the Inner Flange: While holding the spindle lock, use the provided screwdriver or wrench to rotate the inner flange until it loosens.
- Remove the Inner Flange: Unscrew and remove the inner flange.
- Insert the Wheel: Place the desired cutting or grinding wheel onto the spindle, ensuring it sits correctly on the outer flange.
- Install the Outer Flange: Place the outer flange back onto the spindle, securing the wheel.
- Tighten the Outer Flange: While pressing the spindle lock button, use the screwdriver or wrench to firmly tighten the outer flange.
- Release the Spindle Lock: Release the spindle lock button. Ensure the disc is securely fastened and rotates freely without wobbling.

Figure 5.2: Always use the correct type and size of cutting disc. Figure 1 illustrates the recommended disc type, while Figure 2 shows an unsuitable disc. Ensure the disc's maximum RPM rating meets or exceeds the grinder's 7000 RPM.
IMPORTANT: Only use cutting discs that are compatible with the grinder's specifications (70mm maximum diameter, 10mm joint diameter, and rated for at least 7000 RPM). Using incorrect discs can lead to serious injury or tool damage.
6. Operating Instructions
6.1 General Operation
- Insert Battery: Ensure the battery is fully charged and securely inserted into the grinder.
- Secure Workpiece: Always secure the workpiece firmly to prevent movement during operation.
- Grip the Tool: Hold the grinder firmly with one hand, utilizing the ergonomic design for comfortable and secure handling.
- Start the Tool: Press the side switch to turn on the grinder. Allow the disc to reach full speed before contacting the workpiece.
- Begin Work: Apply light, consistent pressure. Let the tool do the work. Avoid excessive force, which can cause kickback or damage the disc/tool.
- Turn Off: Release the side switch to turn off the grinder. Wait for the disc to stop completely before setting the tool down.

Figure 6.1: Versatile applications of the angle grinder, including cutting and grinding on different materials.

Figure 6.2: The grinder is suitable for both indoor and outdoor tasks, such as grinding wood and cutting metal.
6.2 Cutting Operations
- Use appropriate cutting discs for the material (e.g., metal, tile, PVC pipe).
- Hold the grinder at a slight angle (15-30 degrees) to the workpiece for optimal cutting.
- Do not apply side pressure to the cutting disc, as this can cause it to bind, break, or kickback.
- Allow the disc to cool periodically during long cuts.
6.3 Grinding and Polishing Operations
- Use appropriate grinding or polishing accessories.
- Maintain a shallow angle (5-15 degrees) between the disc and the workpiece for grinding.
- Move the grinder smoothly and consistently across the surface to achieve an even finish.
- For polishing, use specialized polishing pads and compounds.
7. Maintenance
Regular maintenance ensures the longevity and safe operation of your tool. Always disconnect the battery before performing any maintenance.
7.1 Cleaning
- After each use, clean the tool with a soft, dry cloth.
- Remove any dust or debris from the ventilation openings to prevent overheating.
- Do not use water or chemical cleaning agents.
7.2 Disc Inspection
- Regularly inspect cutting and grinding discs for wear, cracks, or damage.
- Replace worn or damaged discs immediately. Never use a damaged disc.
7.3 Battery Care
- Store batteries in a cool, dry place away from direct sunlight and extreme temperatures.
- Do not store fully discharged batteries for extended periods. Charge them periodically if not in use.
- If a battery appears damaged or does not hold a charge, discontinue use and dispose of it properly according to local regulations.
7.4 Storage
- Store the grinder and its accessories in a clean, dry, and secure location, out of reach of children.
- Remove the battery from the tool before storage.
8. Troubleshooting
If you encounter issues with your angle grinder, refer to the table below for common problems and solutions.
| Problem | Possible Cause | Solution |
|---|---|---|
| Grinder does not start. | Battery not inserted correctly or discharged. | Ensure battery is fully inserted. Charge the battery. |
| Grinder stops during operation. | Overload protection activated; battery low. | Reduce pressure on the tool. Charge or replace the battery. Allow tool to cool if overheated. |
| Excessive vibration or noise. | Damaged or improperly installed disc; loose components. | Inspect and replace damaged disc. Ensure disc is correctly installed and tightened. Check for loose parts. |
| Poor cutting/grinding performance. | Worn or incorrect disc; insufficient power. | Replace with a new, appropriate disc. Ensure battery is fully charged. |
If the problem persists after trying these solutions, please contact customer support.
9. Specifications
Detailed technical specifications for the Weytoll Mini Angle Grinder WT7000-168.
| Model Number | WT7000-168 |
| Brand | Weytoll |
| Rated Voltage | 16.8 Volts |
| Rated Speed | 7000 RPM |
| Battery Type | Lithium-ion |
| Battery Capacity | 2000 mAh (2.0 Ah) |
| Max Grinding Wheel Diameter | 70 mm |
| Joint Diameter | 10 mm |
| Charging Temperature | 0 ℃ ~ 45 ℃ (32 °F ~ 113 °F) |
| Operating/Storage Temperature | -20 ℃ ~ 50 °C (-4 °F ~ 122 °F) |
| Product Dimensions (L x W x H) | 21.2 x 11 x 7.5 cm (8.34 x 4.33 x 2.95 inches) |
| Item Weight | 0.73 kg (1.61 lbs) |
| Material | ABS, Acrylonitrile Butadiene Styrene Rubber |
| Power Source | Battery Powered |
| Color | Black |

Figure 9.1: Key specifications at a glance.
10. Warranty and Support
No specific warranty information is provided in the product details. For warranty claims or technical support, please contact your retailer or the manufacturer directly with your purchase details.
Please retain your proof of purchase for any warranty or service inquiries.