
1. Product Overview
This kit provides a comprehensive solution for repairing and controlling commercial cube ice machines. It is designed to be compatible with various brands, including Vevor, Cotlin, and Coolski split-type ice machines, provided their original main board and display boards match the specifications of this kit. The kit includes essential components for the ice maker's control system, enabling precise management of ice production.
Important Note: Before purchasing or installing, carefully compare your original ice machine's main board and display board with the components shown in this manual to ensure compatibility. It is highly recommended to take photos of your original board's connections and disconnect power before attempting any repairs or replacements.
2. Package Contents
The complete ice maker controller kit includes the following 6 parts:
- Main Control Board
- Touch Screen Display Board
- Water Temperature Sensor
- Water Float Switch
- Condenser Sensor
- Display Board Connecting Wire

3. Installation and Setup
Proper installation is crucial for the correct functioning of the ice maker controller. Always ensure the ice machine is disconnected from the power supply before beginning any installation or repair work.
3.1 Connecting the Sensors and Display
- Identify the main control board and the various sensors (water temperature, water float, condenser).
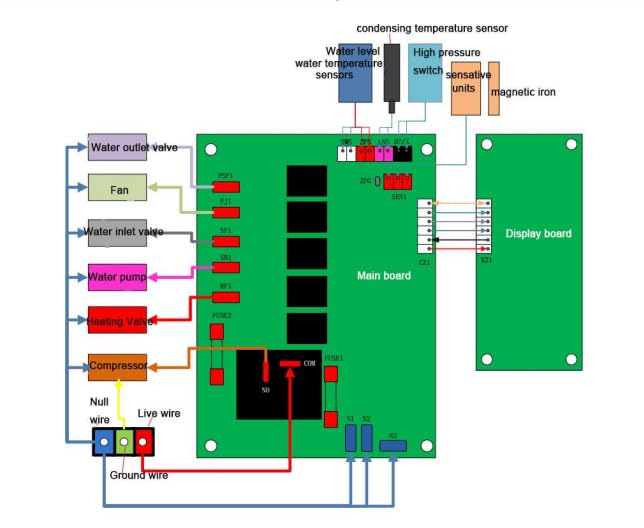
- Carefully connect each sensor to its corresponding port on the main control board. Refer to the wiring diagram (Figure 3.1) for precise connection points.
- Connect the display board connecting wire to the main control board and then to the touch screen display board. Ensure all connections are secure.
- Once all sensors and the display are connected, connect the main power supply to the control board.
3.2 Visual Installation Guide
For a visual step-by-step guide on connecting the components and adjusting settings, please refer to the official product video below:
Video 3.1: This video demonstrates the product details, how to connect the various components, and provides instructions on how to adjust the ice thickness settings.
4. Operating Instructions
4.1 Display Board Introduction
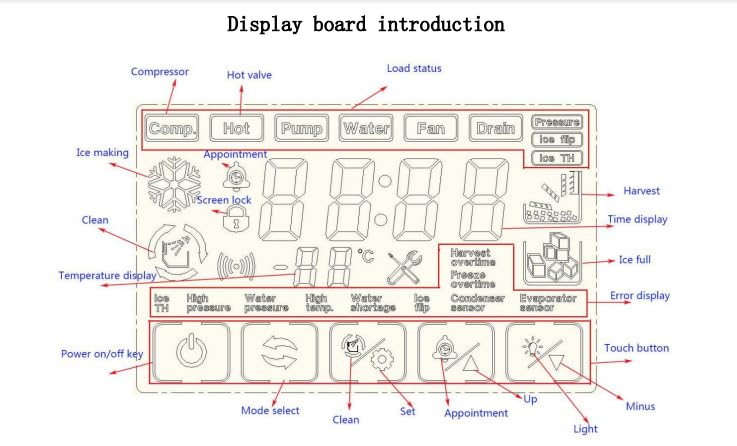
The touch screen display board provides real-time information and allows for control over various ice maker functions. Familiarize yourself with the layout and functions of the display as shown in the diagram below:
4.2 Adjusting Ice Thickness
To adjust the ice thickness, follow these steps:
- During the freezing cycle, locate and press the "Up" button on the display board.
- A small number will appear on the screen, indicating the current freezing time adjustment.
- Use the "Plus" (+) or "Minus" (-) buttons to adjust this number.
- Each "+1" increment adds 1 minute to the freezing time, resulting in thicker ice.
- Each "-1" decrement decreases the freezing time by 1 minute, resulting in thinner ice.
- Adjust the value to your desired ice thickness. The system will save the setting automatically.
5. Specifications
| Feature | Detail |
|---|---|
| Brand | Generic |
| Model Number | ZB1076 |
| Product Dimensions | 7.87 x 9.84 x 2.76 inches; 2 Pounds (Controller Kit) |
| Voltage | 115 Volts |
| Refrigerant Compatibility | R134a (for compatible ice machines) |
| Manufacturer | Xinruier |
| Country of Origin | China |
6. Troubleshooting
If you encounter issues with your ice maker after installing the controller kit, consider the following common troubleshooting steps:
- No Power/Display Off: Ensure all power connections are secure and the main power supply to the ice machine is active. Check for any tripped circuit breakers.
- Incorrect Connections: Double-check all sensor and display board connections against the provided wiring diagram (Figure 3.1). Ensure no wires are loose or incorrectly plugged in. Note that some original boards may have different terminal configurations; verify compatibility before installation.
- Ice Thickness Issues: Refer to Section 4.2 for instructions on adjusting ice thickness settings via the display board.
- Error Codes: Consult the display board introduction (Figure 4.1) to understand potential error indicators. Specific error codes may point to issues with sensors or other components.
- Other Components: This kit replaces the control system. If issues persist, verify that other components of your ice machine (e.g., compressor, water pump, valves) are functioning correctly.
If you are unable to resolve the issue after following these steps, please contact customer support for further assistance.
7. Maintenance
To ensure the longevity and optimal performance of your ice maker controller kit, consider the following general maintenance tips:
- Keep Dry: Ensure the control board and display are kept dry and free from moisture to prevent electrical damage.
- Clean Connections: Periodically inspect and gently clean electrical connections to prevent corrosion and ensure good contact. Always disconnect power before cleaning.
- Environmental Conditions: Operate the ice machine within its recommended environmental conditions to avoid stress on electronic components.
8. Warranty and Support
For any questions, technical support, or warranty inquiries regarding your Generic Ice Maker Controller Kit (Model ZB1076), please contact the seller directly through the platform where you made your purchase. They will be able to provide the most accurate and timely assistance.
Please have your purchase details and the product model number (ZB1076) ready when contacting support.