Diivoo DI-WT14M
Diivoo Water Flow Meter DI-WT14M Instruction Manual
Model: DI-WT14M
Introduction
This manual provides detailed instructions for the setup, operation, maintenance, and troubleshooting of your Diivoo Water Flow Meter, model DI-WT14M. This device is designed to accurately measure water consumption and flow rate for various outdoor applications, including garden hose watering and RV water tank filling.
Setup
1. Components Overview
The Diivoo Water Flow Meter consists of a main unit with an LCD screen, a durable brass inlet, and a detachable panel for easy reading. It also includes a quick connect adapter and an internal filter.

Figure 1: Diivoo Water Flow Meter with its detachable panel and connection examples.

Figure 2: Durable brass inlet for secure and leak-free connection.
2. Battery Installation
The water flow meter requires 1 Lithium Metal battery (included). To install, gently detach the display unit from the main body. Insert the battery according to the polarity markings. Reattach the display unit.
3. Connecting the Meter
The meter easily connects to a standard 3/4-inch garden hose or hose nozzle. Ensure the flow direction arrow on the meter aligns with the direction of water flow. For optimal performance and to prevent leaks, it is crucial to use Teflon tape on the threads and ensure the internal filter is properly installed and clean.
- Teflon Tape: Wrap Teflon tape around the threads of your faucet or hose before attaching the meter. This helps create a watertight seal.
- Filter Installation: Ensure the small filter screen is placed inside the inlet connection of the meter to prevent debris from entering and affecting accuracy.
- Secure Tightening: Hand-tighten all connections securely. Avoid over-tightening, which can damage threads, but ensure they are snug enough to prevent leaks.
Video 1: This video demonstrates correct installation practices, including the use of Teflon tape and proper filter placement, to prevent leakage and ensure accurate readings.
Operating Modes
The Diivoo Water Flow Meter offers four distinct measurement modes to suit various monitoring needs. Use the orange button on the front of the device to navigate and control functions.
1. Mode Selection
Press the orange button to cycle through the following modes:
- Real-time Flow Rate (AUTO Mode): Displays the current water flow rate (e.g., L/min or Gal/min).
- Real-time Water Volume (CONSUMPTION Mode): Shows the single water consumption for the current watering session.
- Average Daily Water Flow (AVG Mode): Provides the average water consumption over the last 7 days.
- Total Flow (TOTAL Mode): Accumulates the total water consumption over time.

Figure 3: Overview of the four measurement modes.
Video 2: This video demonstrates the various operating modes and how to switch between them, showing the meter in action.
2. Unit Conversion and Data Reset
- Toggle Units (Gallons/Liters): In AUTO mode, press and hold the orange button for 3 seconds to switch between liters (L/min) and gallons (Gal/min).
- Reset Data: In CONSUMPTION, AVG, or AUTO modes, press and hold the orange button for 3 seconds to reset the displayed data for that specific mode.
- Automatic Hibernation: The LCD screen will automatically turn off after 1 minute of no operation or water flow to conserve battery life.

Figure 4: The meter can measure up to 99999L or 26419GAL of water consumption.
Calibration
The Diivoo Water Flow Meter boasts a high accuracy of ±5%. For situations requiring even greater precision or to compensate for long-term use, manual calibration is available.
- Manual Calibration: In TOTAL mode, press and hold the orange button for 10 seconds. This allows you to fine-tune the meter's accuracy within a range of -30% to +30%. Follow the on-screen prompts to adjust the calibration value.

Figure 5: Manual calibration process to fine-tune accuracy.

Figure 6: Internal components contributing to the meter's accuracy.
Maintenance
Regular maintenance ensures the longevity and accuracy of your water flow meter.
- Clean the Filter: Periodically check the internal filter screen for any accumulated dirt or debris. A clogged filter can restrict water flow and affect measurement accuracy. Remove the filter and rinse it under clean water.
- Check Connections: Ensure all connections remain securely tightened to prevent leaks. Replace worn-out washers or O-rings as needed.
- Storage: During freezing temperatures, disconnect the meter and store it indoors to prevent damage from ice expansion.
Troubleshooting
| Problem | Possible Cause | Solution |
|---|---|---|
| Water Leakage | Loose connections, missing/damaged Teflon tape, missing/damaged washer. | Ensure connections are securely tightened. Apply Teflon tape to threads. Check and replace washers if necessary. Refer to Setup section. |
| Inaccurate Readings | Clogged filter, incorrect calibration, low battery. | Clean the filter. Perform manual calibration (see Calibration). Replace battery. |
| No Display/Meter Not Turning On | Dead battery, incorrect battery installation. | Replace the battery. Check battery polarity during installation. |
Specifications
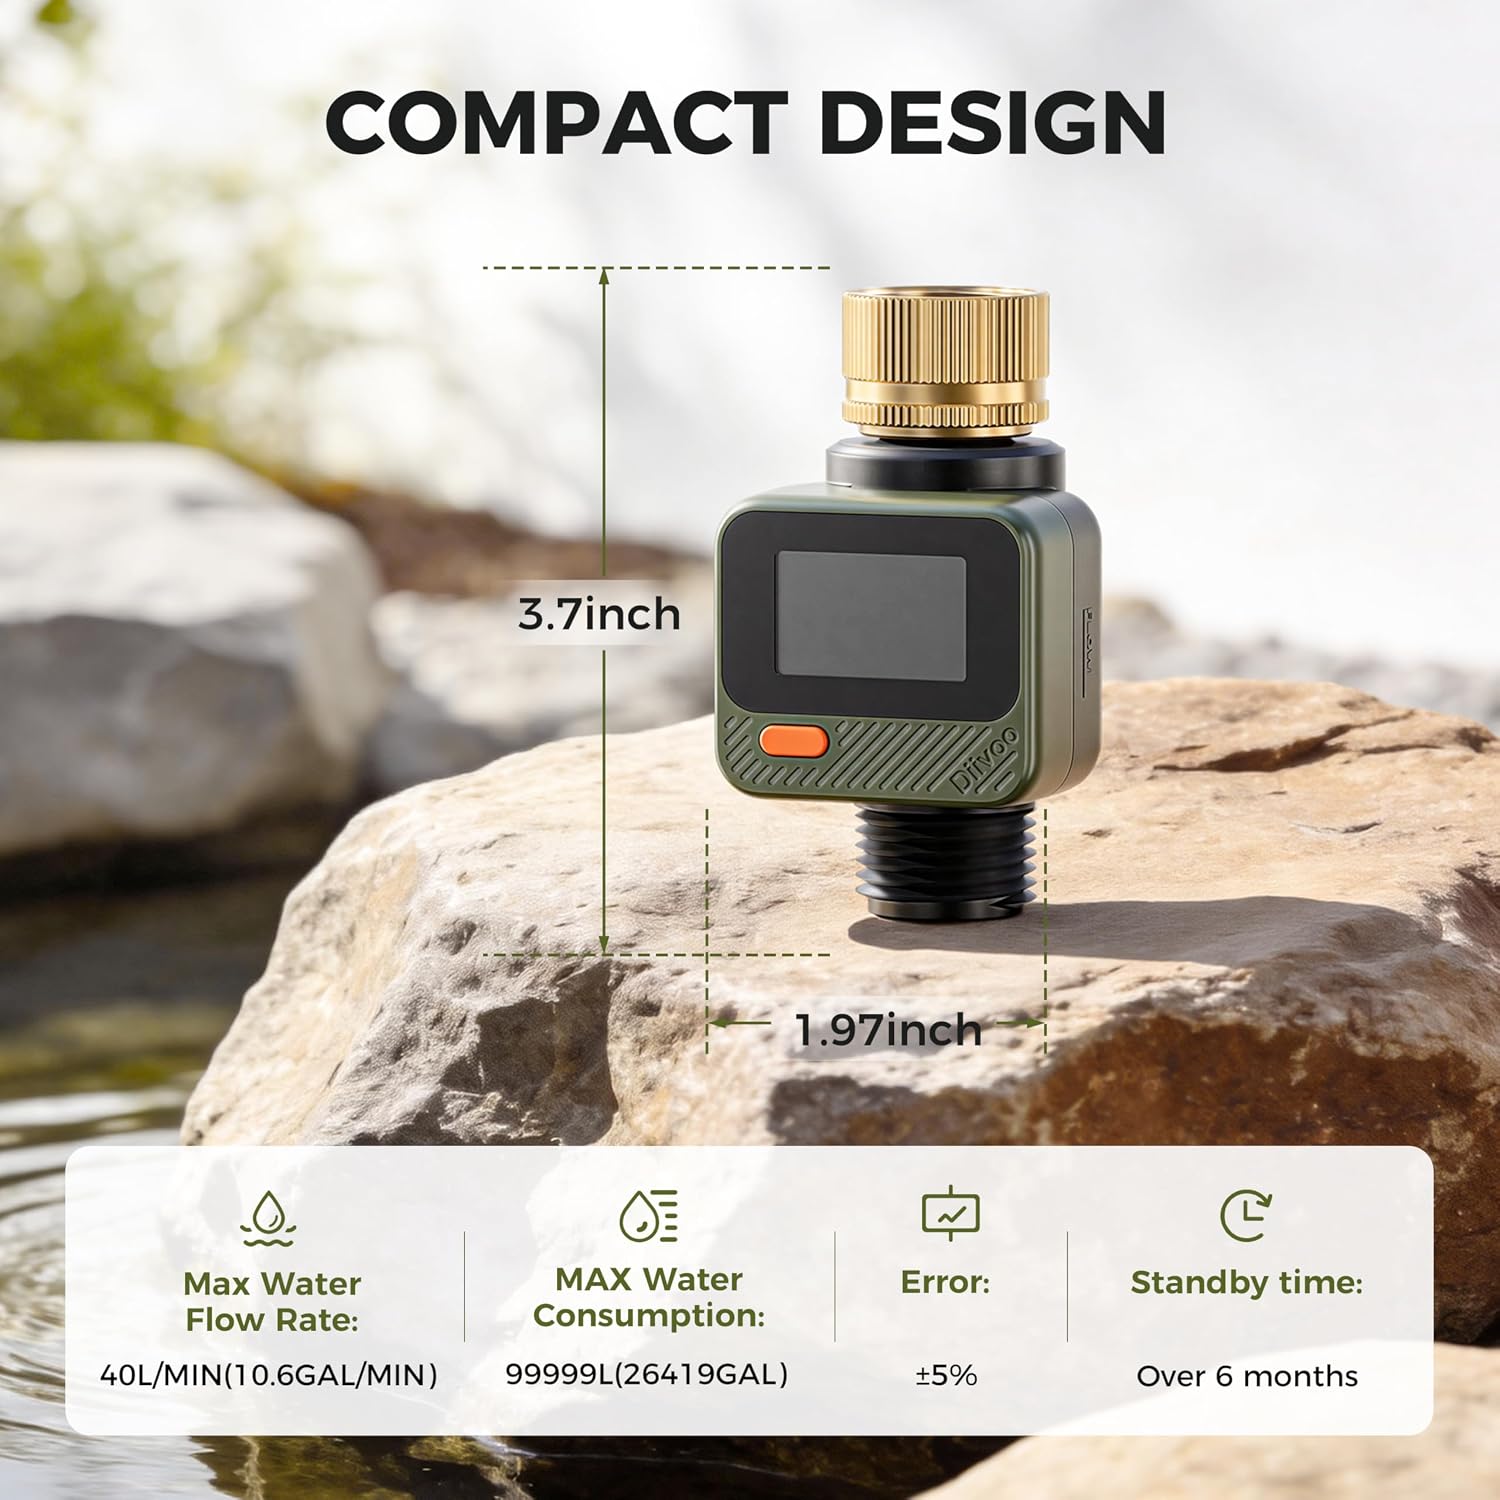
Figure 7: Compact design and key specifications.
| Feature | Detail |
|---|---|
| Model Number | DI-WT14M |
| Product Dimensions | 6.5 x 2.36 x 2.36 inches |
| Item Weight | 6.4 ounces |
| Batteries | 1 Lithium Metal battery (included) |
| Accuracy | ±5% |
| IP Rating | IP54 (Dust and splash resistant) |
| Max Water Flow Rate | 40 L/min (10.6 Gal/min) |
| Max Water Consumption | 99999 L (26419 Gal) |
| Standby Time | Over 6 months |
Warranty and Support
For warranty information or technical support, please refer to the product packaging or contact Diivoo customer service directly. Keep your purchase receipt for warranty claims.
Manufacturer: Zhuhai Tessan Power Technology Co., Ltd.
Related Documents - DI-WT14M
 |
Diivoo Water Flow Meter User Manual (DI-WT14M) User manual for the Diivoo Water Flow Meter (Model DI-WT14M). Includes installation, operation, calibration, and troubleshooting instructions. |
 |
Diivoo Dual Water Timer User Manual This user manual provides detailed instructions for the Diivoo Dual Water Timer, covering product appearance, specifications, function key descriptions, important tips, operation modes, and FAQs. Learn how to set up and use your Diivoo water timer for efficient garden irrigation. |
 |
Diivoo Smart Water Timer User Manual User manual for the Diivoo Smart Water Timer, covering setup, features, and troubleshooting. |
 |
Diivoo WT-03 Bluetooth Water Timer User Manual Comprehensive user manual for the Diivoo WT-03 Bluetooth Water Timer, covering installation, Smart Life app configuration, irrigation modes, and troubleshooting. |
 |
Diivoo WT-05W Smart Dual Water Timer with WiFi Hub User Manual User manual for the Diivoo WT-05W Smart Dual Water Timer with WiFi Hub. This guide covers setup, app usage, features like manual watering and rain delay, integration with Alexa and Google Assistant, and troubleshooting. |
 |
Diivoo 4-Outlet Water Timer User Manual (DI-WT23M1) User manual for the Diivoo 4-Outlet Water Timer (Model DI-WT23M1). Includes installation, programming, troubleshooting, and maintenance instructions for automatic garden irrigation. |
Ask a question about this manual
Ask about setup, troubleshooting, compatibility, parts, safety, or missing instructions. Manuals+ will review the question and use this page’s manual context to help answer it.