1. Product Overview
The dearnow 52-inch Ceiling Fan with Remote Control/Dimmer and Color Reduction is designed for both indoor and outdoor use, suitable for living rooms, dining rooms, pavilions, and yards. It features three solid wood fan blades in a black and walnut finish, offering a modern and industrial aesthetic. This fan provides efficient air circulation and adjustable lighting to enhance comfort in various environments.

Image: The dearnow 52-inch ceiling fan, featuring three solid wood blades and a remote control, shown installed in a bedroom setting. The image highlights the fan's size and includes visual indicators for different downrod lengths (5", 10", 14").
2. Safety Information
Please read all instructions carefully before beginning installation and keep this manual for future reference. Improper installation or operation can lead to electric shock, fire, or personal injury.
- Ensure the power is turned off at the circuit breaker before installation or maintenance.
- All wiring must be in accordance with national and local electrical codes. If you are unfamiliar with wiring, consult a qualified electrician.
- The mounting structure must be capable of supporting the weight of the fan (approximately 11 pounds).
- Do not operate the fan with damaged blades or housing.
- Keep hands, hair, and clothing away from moving fan blades.
- This fan is suitable for use in living rooms, home offices, dining rooms, and patios. It is water-resistant for outdoor use.
3. Package Contents
Verify that all components listed below are included in your package. If any parts are missing or damaged, contact customer support.
- Ceiling Fan Motor Assembly
- Solid Wood Fan Blades (3)
- Downrods (5-inch, 10-inch, 14-inch)
- Mounting Bracket
- Remote Control with Receiver
- LED Light Kit
- Hardware Pack (screws, washers, wire nuts)
- Instruction Manual

Image: A visual representation of the ceiling fan's main components, including the motor housing, three solid wood blades, three different length downrods (5", 10", 14"), and the remote control unit.
4. Specifications
| Feature | Detail |
|---|---|
| Brand | dearnow |
| Model Name | HR698-52BD |
| Size | 52-inch |
| Color | Black + Walnut |
| Material | Wood, Plastic, Metal, Copper |
| Power Source | DC (Direct Current) |
| Voltage | 120 Volts (DC) |
| Light Source Type | LED |
| Brightness | 1500 Lumen |
| Control Method | Remote Control |
| Indoor/Outdoor Usage | Outdoor, Indoor |
| Item Weight | 11 Pounds |

Image: Detailed views of the fan's construction, showing the solid wood fan blade, the trichromatic light source, the pure copper machine (motor), and the firm and stable iron cover. This highlights the quality of materials and design.
5. Installation
Installation should be performed by a qualified electrician or a person with sufficient electrical knowledge. Always ensure power is disconnected at the circuit breaker before starting.
5.1 Pre-Installation Check
- Unpack all components and verify against the package contents list.
- Inspect for any shipping damage.
- Ensure the ceiling joist or support structure can hold the fan's weight.
5.2 Mounting the Fan
Attach the mounting bracket securely to the ceiling outlet box and building structure. The fan supports downrod mount installation and can be installed on concrete roofs with up to a 15-degree tilt.
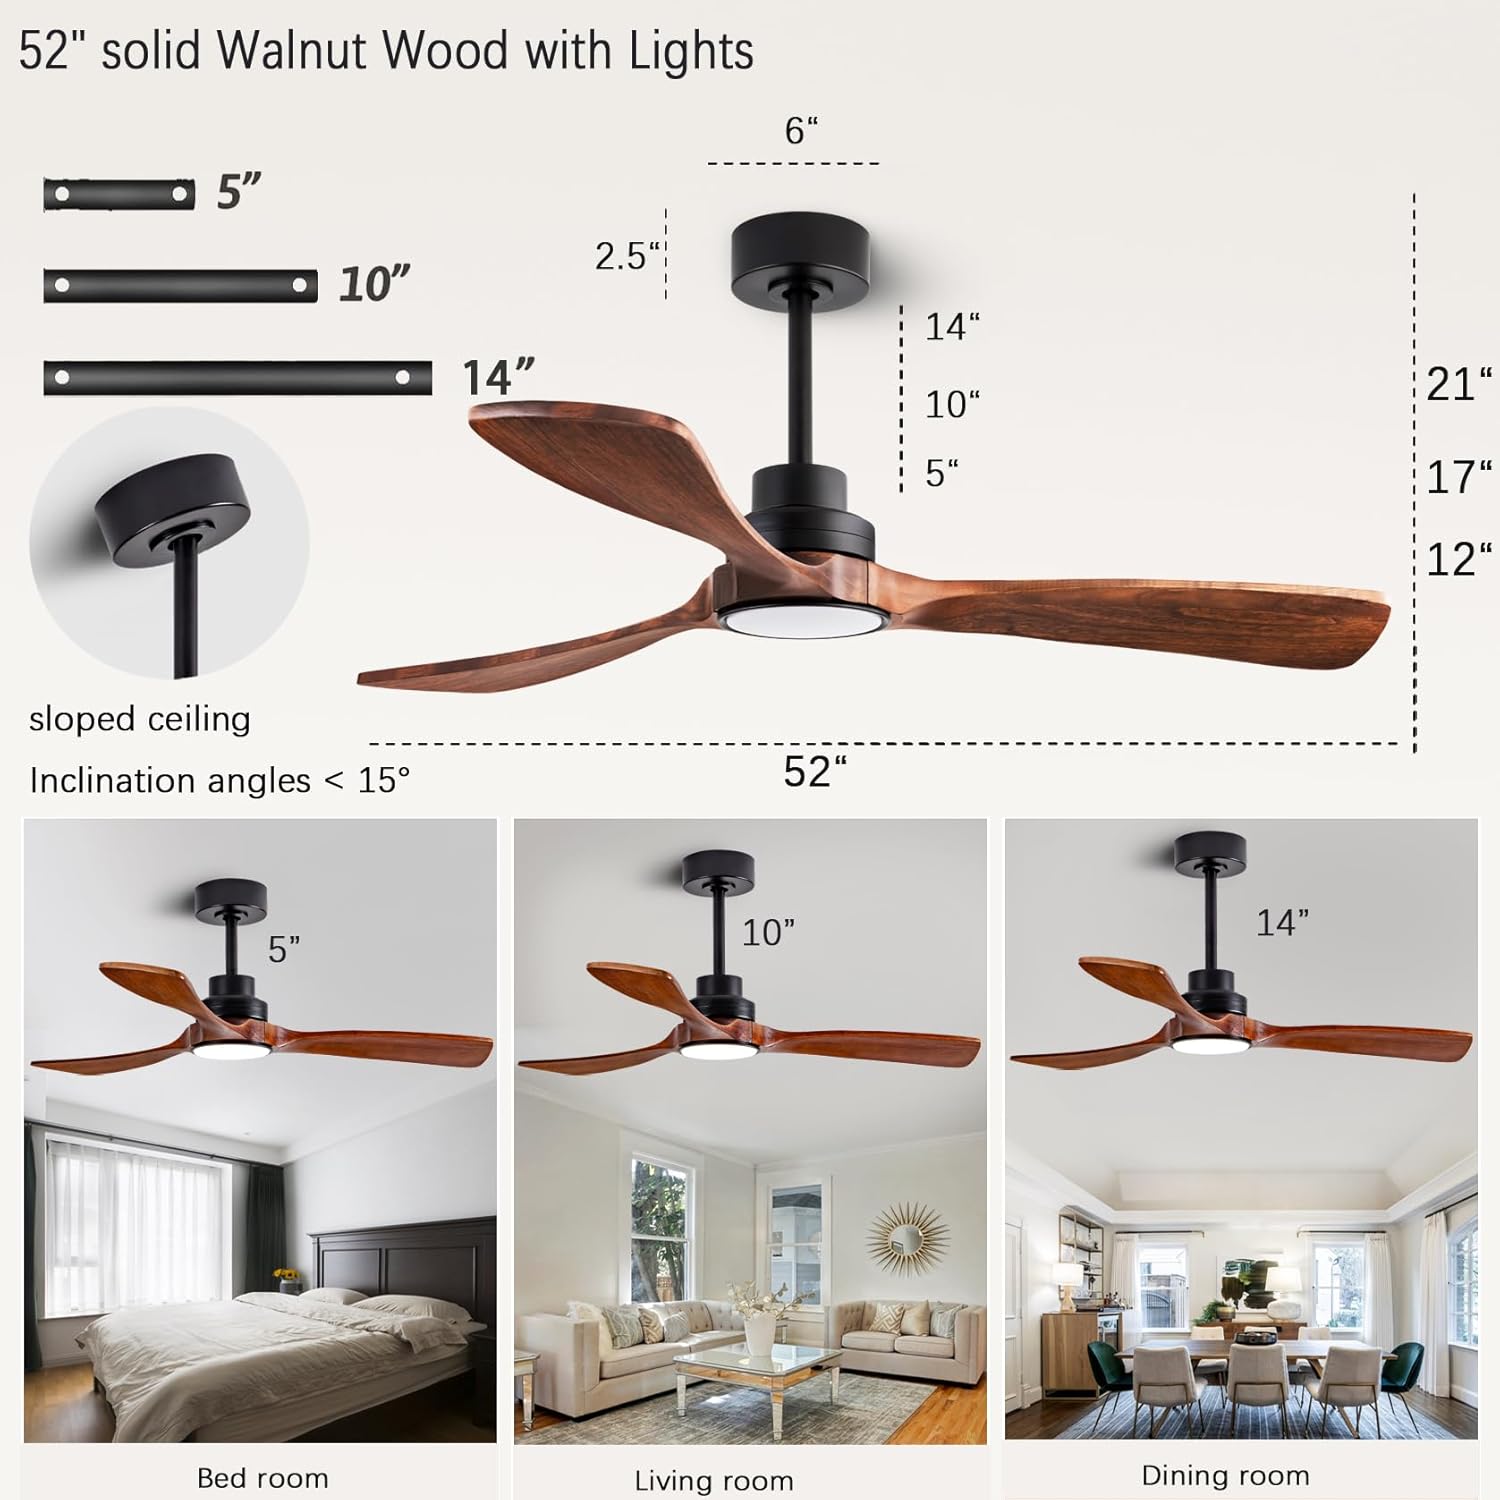
Image: Detailed dimensions of the 52-inch fan, including various downrod lengths (5", 10", 14") and compatibility with sloped ceilings up to 15 degrees. This visual aid helps in planning the installation location and required clearance.
5.3 Wiring Connections
Connect the fan's wiring to the household wiring according to the provided wiring diagram. Ensure all connections are secure. The fan uses plug-in connectors for the receiver, simplifying the process.
5.4 Attaching Fan Blades and Light Kit
Securely attach the three solid wood fan blades to the motor housing. Install the LED light kit. Ensure all screws are tightened appropriately.
5.5 Installation Video Guide
For a comprehensive visual guide on the installation process, please refer to the official installation video:
Video: Official installation video demonstrating the setup of the dearnow ceiling fan and light. This video provides step-by-step instructions for assembly and mounting.
6. Operating Instructions
The dearnow ceiling fan is operated via the included remote control, offering a range of convenient features.
6.1 Remote Control Functions
- Power On/Off: Turns the fan and light on or off.
- Fan Speed Adjustment: Select from 6 adjustable speeds.
- Light Color Temperature: Cycle through 3 color temperatures: 3000K Warm White, 4500K Neutral White, and 6000K Cold White.
- Dimmable Light: Adjust light brightness from 20% to 100%. The fan features a memory function that remembers your last light setting.
- Reversible Function (Summer/Winter Mode):
- Summer Mode (Counter-clockwise): Creates a downward airflow, providing a cooling effect.
- Winter Mode (Clockwise): Enhances upward air circulation, helping to distribute warm air evenly.
- Timer Setting: Set the fan to turn off automatically after 1, 4, or 8 hours.
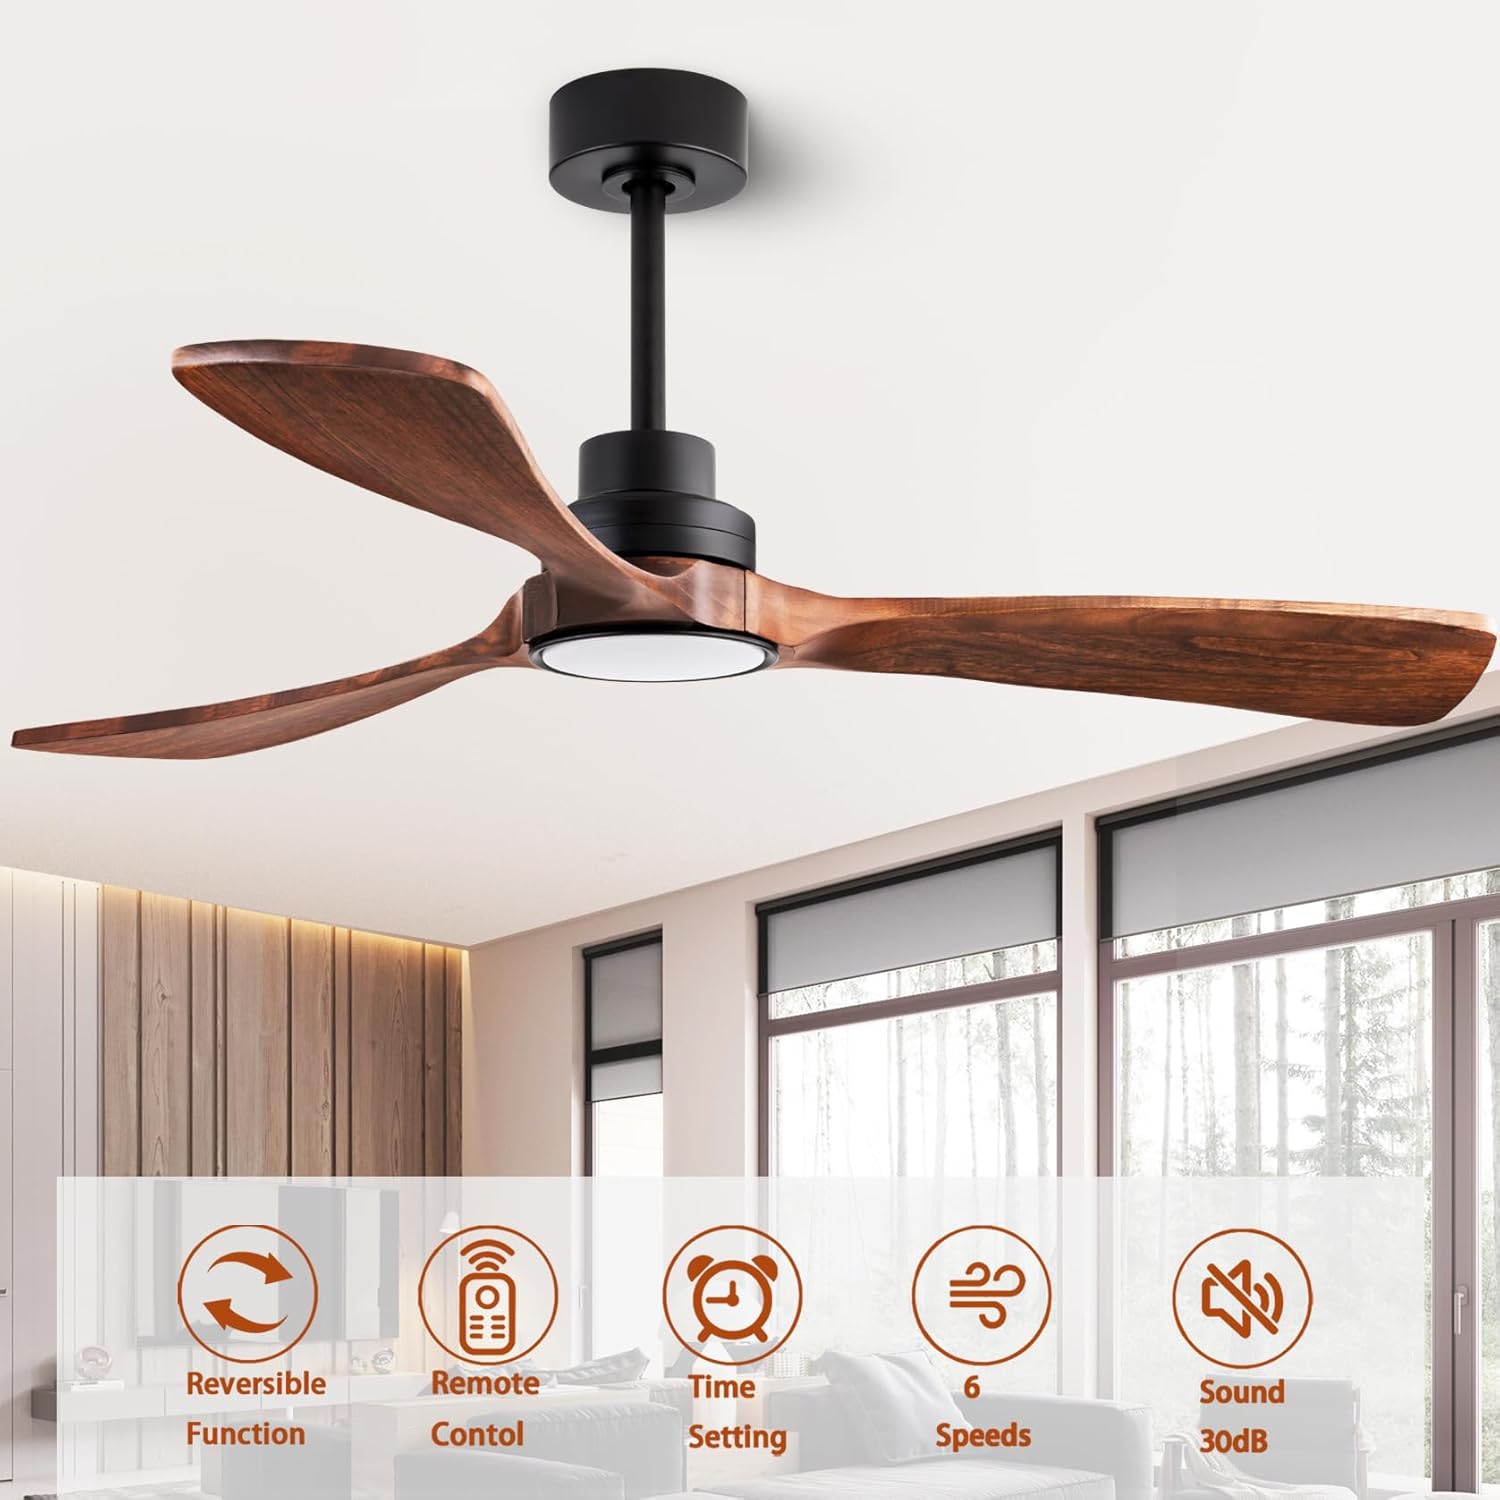
Image: Overview of the fan's key features: reversible function, remote control, timer setting, 6 speeds, and quiet operation (below 30dB). This image visually summarizes the fan's capabilities.

Image: Illustrates the reversible function of the ceiling fan. In summer mode, the fan circulates air downward for cooling. In winter mode, it enhances upward air circulation to reduce heat loss and distribute warm air.
7. Maintenance and Care
Regular maintenance ensures optimal performance and extends the lifespan of your ceiling fan.
- Cleaning: Use a soft, damp cloth to clean the fan blades and motor housing. Do not use abrasive cleaners or solvents.
- Blade Inspection: Periodically check the fan blades for any cracks or damage. Ensure they are securely attached.
- Tighten Screws: Over time, screws may loosen. Check and tighten all screws on the mounting bracket and fan assembly annually.
- Motor Lubrication: The DC inverter motor is designed for long-term, maintenance-free operation and does not require lubrication.
8. Troubleshooting
Before attempting any repairs, ensure the power is disconnected at the circuit breaker.
| Problem | Possible Cause | Solution |
|---|---|---|
| Fan does not start | No power to the fan; Loose wire connections; Remote control battery low or not paired. | Check circuit breaker and wall switch; Verify all wire connections are secure; Replace remote battery or re-pair remote. |
| Light does not work | Loose wire connection to light kit; LED light failure. | Check light kit wiring; Contact customer support for LED replacement if necessary. |
| Fan wobbles | Loose fan blades; Improperly mounted fan; Unbalanced blades. | Tighten all blade screws; Ensure mounting bracket is secure; Use balancing kit (not included) if needed. |
| Noisy operation | Loose screws; Motor housing rubbing; Obstruction in fan path. | Tighten all screws; Check for proper clearance around motor housing; Remove any obstructions. |
9. Warranty and Support
dearnow stands behind the quality of its products. Your experience is very important to us.
- Motor Warranty: The dearnow motor provides a 10-year warranty.
- Whole Machine Protection: Enjoy 2 years of worry-free protection for the entire fan unit.
- Remote Control Replacement: If the remote control is lost or damaged, dearnow provides free replacement service.
For further assistance, technical support, or warranty claims, please contact dearnow customer service through the retailer where you purchased the product.