1. Introduction
This manual provides detailed instructions for the installation, operation, and maintenance of your CWWk N100/i3-N305 six-bay NAS motherboard. This motherboard is designed for network-attached storage (NAS) systems, featuring an Intel Alder Lake-N low-power processor, multiple storage interfaces, and high-speed networking capabilities.
2. Safety Information
- Always disconnect power before installing or removing components.
- Wear an anti-static wrist strap to prevent electrostatic discharge (ESD) damage to components.
- Handle the motherboard by its edges to avoid touching sensitive components.
- Ensure proper ventilation in your system to prevent overheating.
- Refer to the CPU and RAM manufacturer's guidelines for specific installation procedures.
3. Package Contents
The CWWk N100 NAS Motherboard package typically includes:
- CWWk N100/i3-N305 Motherboard
- I/O Shield
- SATA Cables (quantity may vary)
- Mounting Screws
- (Optional) CPU Fan/Heatsink (if 'NAS Board-N100+Fan' variant)
*Note: Specific contents may vary based on the purchased variant and region.
4. Product Overview and Features
The CWWk N100/i3-N305 motherboard is a Mini-ITX form factor board designed for robust NAS applications.
4.1 Key Features
- Intel 12th generation Alder Lake-N low-power processor, standard 17x17 Mini-ITX form factor, compatible with market 115X series radiators.
- Dual M.2 NVMe x1 signal (PCIe3.0) 2280 size, 6 SATA3.0 onboard (JMB585 chip) 6Gbps high-speed hard disk interface.
- 4 Intel i226-V 2.5G network card chips; 1 SO-DIMM DDR5 4800 memory slot compatible with 5200/5600MHz.
- HDMI2.1+DP1.4b supports dual display 4K@60Hz; 1 USB3.0+2 USB2.0+1 USB-C 2.0 signal.
- 1 Realtek-ALC897 two-in-one 3.5mm audio interface; 1 PCIe x1 slot, supports expansion card (shares signal with the second M.2).
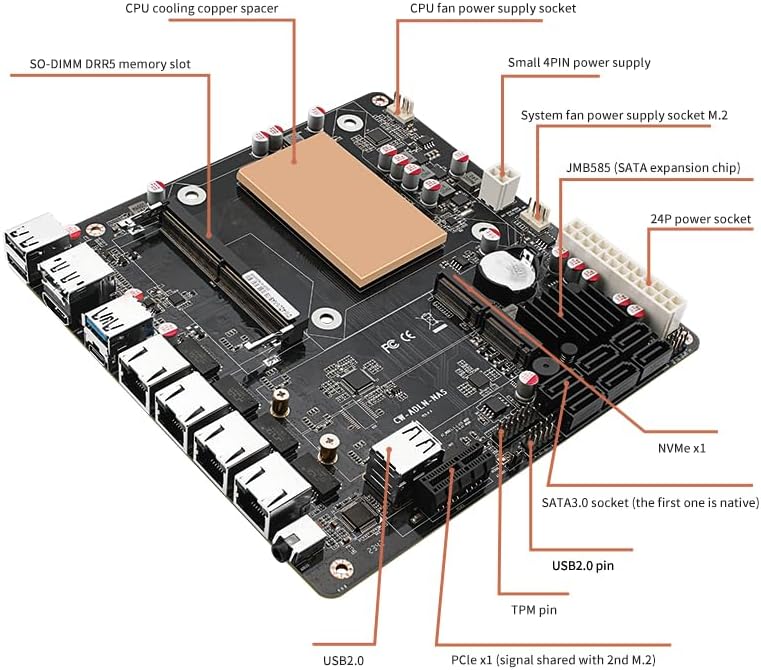
4.2 Motherboard Layout

5. Setup Guide
Follow these steps for initial setup of your CWWk N100 motherboard.
5.1 CPU Installation
Important Safety Warning: Incorrect CPU installation can permanently damage the motherboard and CPU. Returns will not be accepted in such cases.
- Carefully align the CPU with the socket. The CPU has a notch that corresponds to a bump on the CPU base.
- Ensure the CPU triangle logo is aligned with the #1 position of the motherboard's CPU chassis silkscreen.
- Do not force the CPU into the socket. If it does not seat easily, re-check alignment.
5.2 RAM (Memory) Installation
- Insert DDR5 SO-DIMM memory modules into the memory slot in a perpendicular orientation.
- Ensure the RAM module is fully seated and the clips on both sides lock into place.
5.3 Power Connections
- Connect the 24-pin ATX power connector from your power supply to the motherboard.
- Connect the 8-pin CPU power connector to the motherboard. Both 24-pin and 8-pin connectors must be connected simultaneously for proper operation.
5.4 Peripheral Connections
- Connect your keyboard, mouse, and monitor to the appropriate ports on the rear I/O panel.
- For initial testing, it is recommended to leave hard drives unconnected.
5.5 Initial Boot-up
- After connecting all necessary components, install the CPU fan.
- To power on the motherboard, short circuit pins 6 and 8 on the JFP1 header (Power Switch pins). Refer to the motherboard manual or silkscreen for exact pin layout.
- The first boot may take 3-5 minutes as the motherboard reads RAM information. Please wait patiently.
- If the boot screen does not appear, refer to the Troubleshooting section.
6. Operating Instructions
Once the system successfully boots, you can proceed with operating system installation and configuration.
- Operating System Compatibility: Compatible with Microsoft Windows 10/11 64-bit and Linux distributions.
- BIOS Access: Typically, press
DELorF2during boot-up to enter the BIOS/UEFI setup. - Storage Configuration: Utilize the 6x SATA 3.0 ports and 2x M.2 NVMe slots for your storage needs.
- Network Configuration: The 4x Intel i226-V 2.5G RJ45 network ports provide high-speed connectivity. Ensure appropriate drivers are installed for your chosen operating system.
7. Maintenance
- Dust Removal: Regularly clean dust from the CPU heatsink, fan, and motherboard components using compressed air.
- BIOS Updates: Check the CWWK PC website for the latest BIOS updates to ensure optimal performance and compatibility.
- Cable Management: Ensure cables are neatly routed to improve airflow and prevent interference.
8. Troubleshooting
If your system fails to boot or encounters issues, consider the following:
- No Boot Screen:
- Check if the CPU is correctly installed (refer to Section 5.1).
- Verify that the RAM gold fingers are not oxidized and the memory slot is free of dust.
- Ensure both the 24-pin and 8-pin power connectors are securely connected.
- If the motherboard emits an alarm without RAM installed, it indicates the motherboard itself is likely functional, suggesting a RAM compatibility issue.
- RAM Compatibility: The motherboard can be particular about RAM. It is recommended to use first-tier brands like Samsung, Crucial, KingBank, or KLEV.
- First Boot Delay: The initial boot may take 3-5 minutes to read RAM information. Be patient.
- Display Output: For the very first boot, some users report that the BIOS exclusively uses the DisplayPort. Try connecting your monitor via DisplayPort initially.
- CPU Fan: Ensure the CPU fan is rotating to confirm proper power delivery and cooling.
9. Specifications
| Feature | Detail |
|---|---|
| Manufacturer | CWWK |
| Model Number | N100 |
| Compatible Processors | Intel Alder Lake-N N100, N305 |
| RAM Memory Technology | DDR5 |
| Memory Clock Speed | 5600 GHz |
| Max Memory Capacity | 32 GB |
| Storage Interfaces | 6x SATA3.0, 2x M.2 NVMe |
| Network | 4x Intel i226-V 2.5G RJ45 |
| Graphics | Integrated Intel UHD Graphics (N100: 24EU, N305: 32EU) |
| Video Output | HDMI 2.1 (4K@60Hz), DP1.4b (4K@60Hz) |
| USB Ports | 1x USB3.0, 2x USB2.0, 1x Type-C (2.0 rate) |
| Audio | 1x Realtek-ALC897 3.5mm |
| PCIe Slot | 1x PCIe x1 (shared with 2nd M.2) |
| Form Factor | MINI-ITX (17CM*17CM) |
| Compatible OS | Microsoft Windows 10/11 64-bit, Linux |
10. Warranty and Support
For warranty information and technical support, please refer to the official CWWK PC website or contact your retailer. Protection plans are available for purchase separately.
Visit the CWWK PC Store for more products and support.