1. Product Overview
The PayLessHere Ergonomic Drafting Chair is designed to provide comfort and support for extended periods of sitting, whether at a standard office desk or a standing desk. Its versatile features cater to various work environments and user preferences.

Image: The PayLessHere Ergonomic Drafting Chair in a modern office environment, showcasing its design and functionality.
Key Features:
- Ergonomic Design: Features a comfortable cushioned seat and a design that supports natural posture, reducing fatigue.
- Breathable Mesh Back: The mesh material promotes air circulation, ensuring comfort during long work sessions.
- Flip-Up Armrests: Armrests can be flipped up for unrestricted movement or to easily tuck the chair under a desk.
- Adjustable Foot Ring: Customize the footrest position to find your ideal sitting height and support.
- Multi-Purpose Use: Suitable for various settings, including office environments, computer desks, and standing desks.
- Easy Assembly: Designed for hassle-free setup with clear instructions and all necessary hardware included.
2. Safety Information
Please read and understand all safety information before assembling and using this product. Failure to follow these instructions may result in injury or product damage.
- This chair has a maximum weight capacity of 220 pounds. Do not exceed this weight limit.
- The chair does not feature a tilting mechanism. Do not attempt to force the backrest to tilt.
- Ensure all bolts and fasteners are securely tightened before use. Periodically check and re-tighten as necessary.
- Keep children and pets away from the assembly area. Small parts may pose a choking hazard.
- Use the chair on a flat, stable surface to prevent tipping.
3. Package Contents
Verify that all components are present and undamaged before beginning assembly. If any parts are missing or damaged, please contact customer support.

Image: Exploded view diagram showing all parts included in the package, including backrest, seat, armrests, base, gas lift, foot ring, casters, and various bolts and tools.
| Part | Description | Quantity |
|---|---|---|
| A | Backrest | 1 |
| B | Seat | 1 |
| C | Armrests (Left & Right) | 2 |
| D | Mechanism | 1 |
| E | Gas Lift | 1 |
| F | Base | 1 |
| G | Legs | 5 |
| H | Casters | 5 |
| N | Foot Ring | 1 |
| I, J, K, L | Various Bolts | As needed |
| M | Wrench | 1 |
4. Setup & Assembly
Assembly is straightforward and typically takes about 10-15 minutes. All necessary tools and hardware are included. Follow these steps carefully:
- Attach Legs to Base: Turn the chair base (F) upside down. Insert each of the five legs (G) into the base. Secure them using the provided bolts (K) and wrench (M).
- Insert Casters: Press the five casters (H) firmly into the holes at the end of each leg until they click into place.
- Assemble Gas Lift and Foot Ring: Remove the protective cover from the top of the gas lift (E). Insert the gas lift into the center hole of the foot ring (N), lifting the foot ring upward to secure it. Then, insert the gas lift into the base (F).
- Attach Armrests to Backrest: Using the wrench (M), install the left and right armrests (C) to both sides of the backrest (A) with bolts (I). Tighten these bolts to 50% initially.
- Attach Armrests/Backrest to Seat: Turn the seat (B) upside down. Ensure the 'FRONT' marking on the seat is facing forward. Attach the assembled armrests and backrest to the seat using bolts (J). Tighten these bolts to 100%.
- Attach Mechanism to Seat: Ensure the 'FRONT' direction of the mechanism (D) aligns with the 'FRONT' of the seat (B). Attach the mechanism to the underside of the seat (B) using bolts (L) and the wrench (M). Tighten these bolts to 100%.
- Final Assembly: Align the hole on the mechanism (D) with the gas lift (E). Press the chair down firmly until it is fully secured onto the gas lift. Finally, fully tighten the previously installed bolts (I) on the armrests to 100%.
Video: A detailed assembly guide for the drafting chair, demonstrating each step from attaching the base to securing the seat and backrest.
5. Operating Instructions
Familiarize yourself with the chair's adjustable features to optimize your comfort and posture.
- Seat Height Adjustment: To adjust the seat height, locate the lever under the seat on the right side. While seated, pull the lever up to lower the seat. To raise the seat, stand up and pull the lever up. Release the lever at your desired height. The seat height ranges from 21.9 to 29.7 inches.
- Foot Ring Adjustment: The foot ring can be adjusted to accommodate different leg lengths and desk heights. Loosen the knob on the foot ring's support column, slide the foot ring to your preferred height, and then tighten the knob securely. The footrest offers 5.7 inches of height adjustment.
- Flip-Up Armrests: For increased mobility or to fit the chair under a desk, the armrests can be flipped up. Simply lift each armrest upwards until it locks into a vertical position. To return them, pull them down gently.
- Lumbar Support: The chair features built-in lumbar support to promote a healthy spine posture. This support is integrated into the mesh backrest.

Image: A close-up view illustrating the adjustable seat height lever and the gas lift mechanism, showing the range of adjustment.

Image: A visual guide demonstrating how to adjust the foot ring to achieve optimal leg support and comfort.
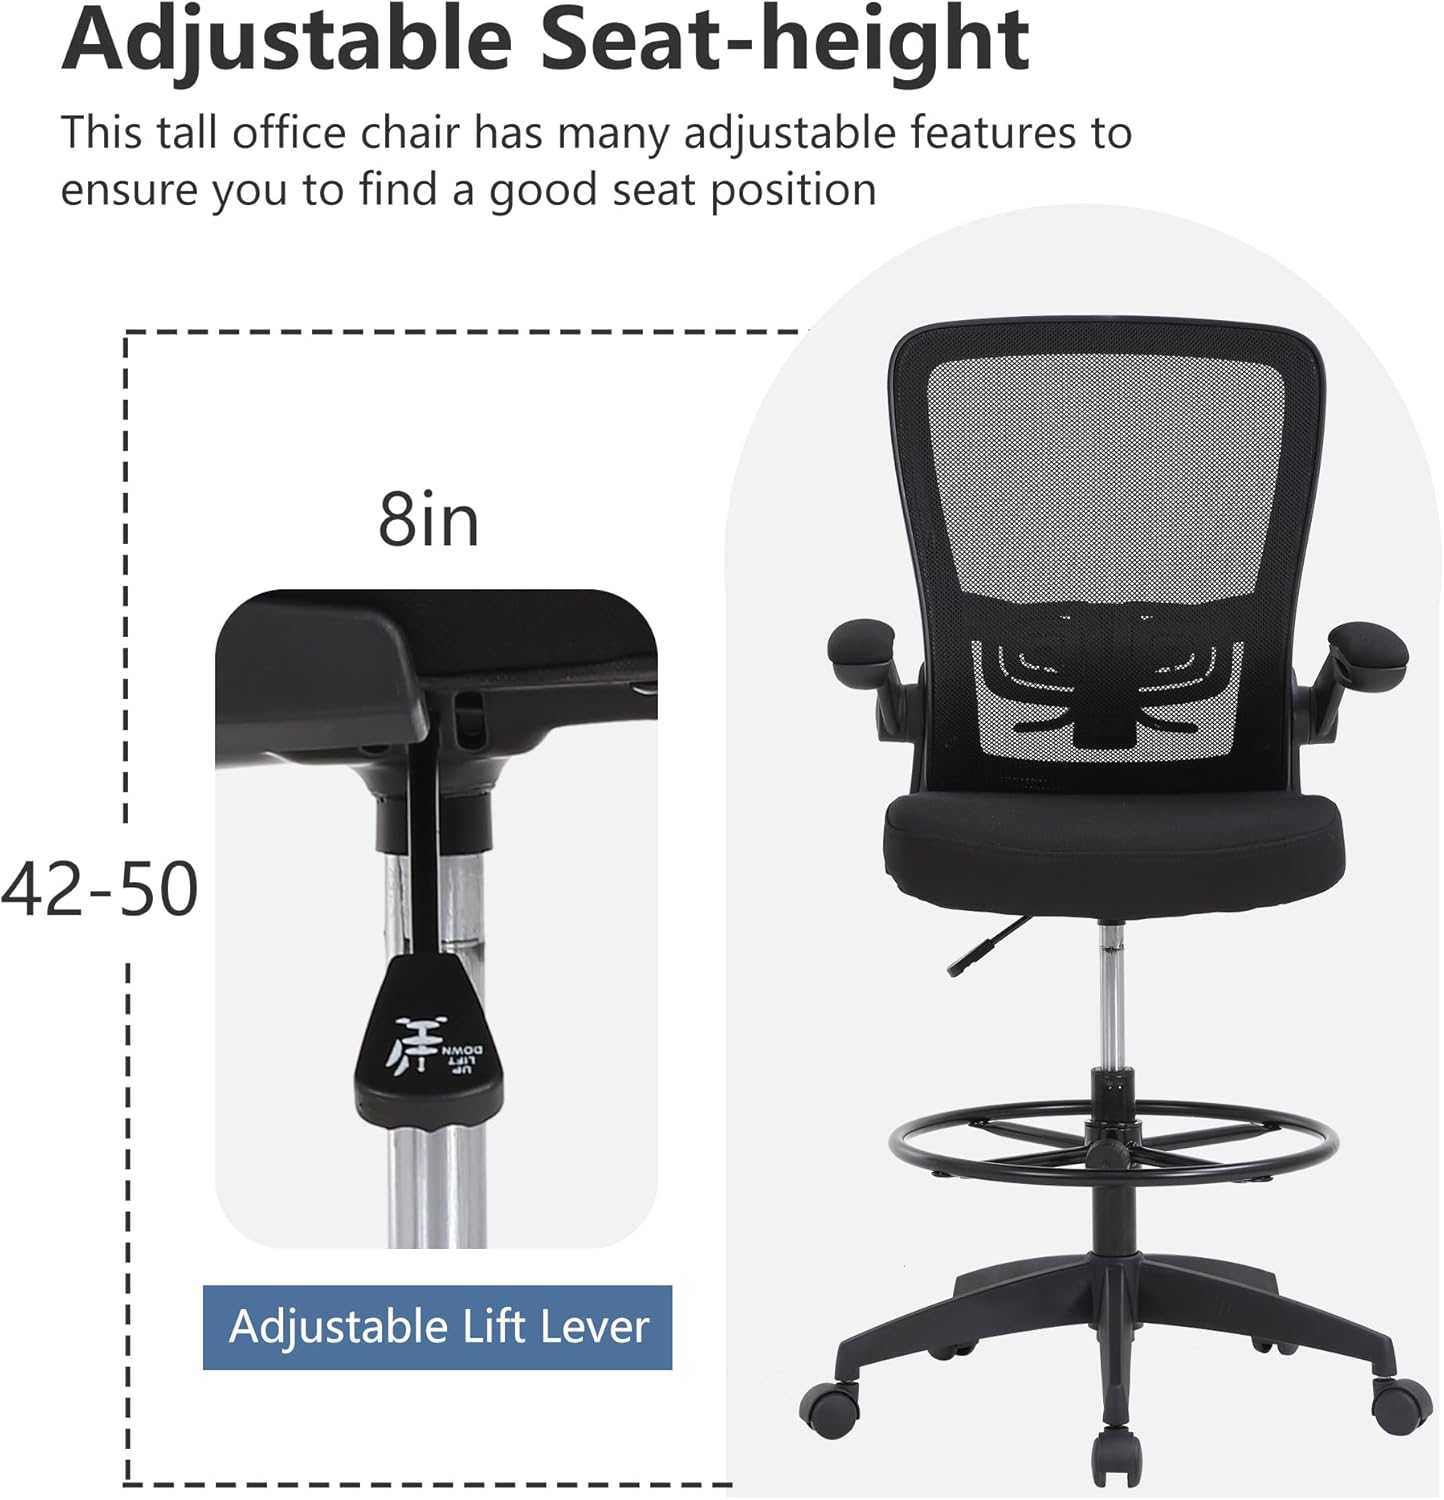
Image: The chair's flip-up armrests are shown in both the down and upright positions, highlighting their flexibility.

Image: A detailed view of the adjustable lumbar support mechanism, allowing users to customize the back support for their comfort.
6. Maintenance
Regular maintenance will ensure the longevity and optimal performance of your drafting chair.
- Cleaning: Wipe down plastic and metal parts with a soft, damp cloth. For the mesh back and fabric seat, use a mild soap solution and a soft brush, then wipe clean with a damp cloth. Avoid harsh chemicals.
- Fastener Check: Periodically check all bolts and screws to ensure they are tight. Re-tighten any loose fasteners to maintain stability and safety.
- Caster Care: Keep the casters free of hair, dust, and debris to ensure smooth rolling. Clean them regularly with a soft brush or vacuum.
- Gas Lift: The gas lift is a sealed unit and requires no maintenance. Do not attempt to disassemble it.
7. Troubleshooting
If you encounter any issues with your chair, refer to the following troubleshooting tips:
| Problem | Possible Cause | Solution |
|---|---|---|
| Chair does not adjust height | Gas lift lever not engaged or gas lift is faulty. | Ensure the lever is fully pulled up. If the issue persists, contact customer support. |
| Chair is wobbly | Loose bolts or uneven surface. | Check and tighten all assembly bolts. Ensure the chair is on a flat, even floor. |
| Casters not rolling smoothly | Debris caught in casters. | Turn the chair over and remove any hair, dust, or debris from the caster wheels. |
| Foot ring slides down | Foot ring adjustment knob is loose. | Tighten the foot ring adjustment knob firmly. |
8. Specifications
- Brand: PayLessHere
- Color: Black
- Product Dimensions: 19"D x 19"W x 52"H
- Seat Height: 21.9 - 29.7 Inches
- Seat Depth: 19 inches
- Chair Backrest Width: 29.7 Inches
- Back Style: Mesh Back
- Fill Material: Memory Foam
- Maximum Weight Recommendation: 220 Pounds
- Special Features: Cushioned Seat, Ergonomic Design, Rolling Casters, Flip-Up Armrests, Adjustable Foot Ring
- Form Factor: Drafting Chair
- Assembly: Required (tools and instructions included)
- Item Weight: 28 pounds
9. Warranty & Support
For warranty information and customer support, please refer to the documentation included with your purchase or contact PayLessHere directly. Protection plans may be available for extended coverage.