1. Product Overview
This manual provides essential information for the installation, operation, and maintenance of your Areyourshop Carburetor. This component is designed to deliver the correct air-fuel mixture to your outboard engine, ensuring optimal performance and efficiency.
The carburetor is an aftermarket replacement part, manufactured to meet or exceed original equipment specifications, offering stable performance and high reliability.
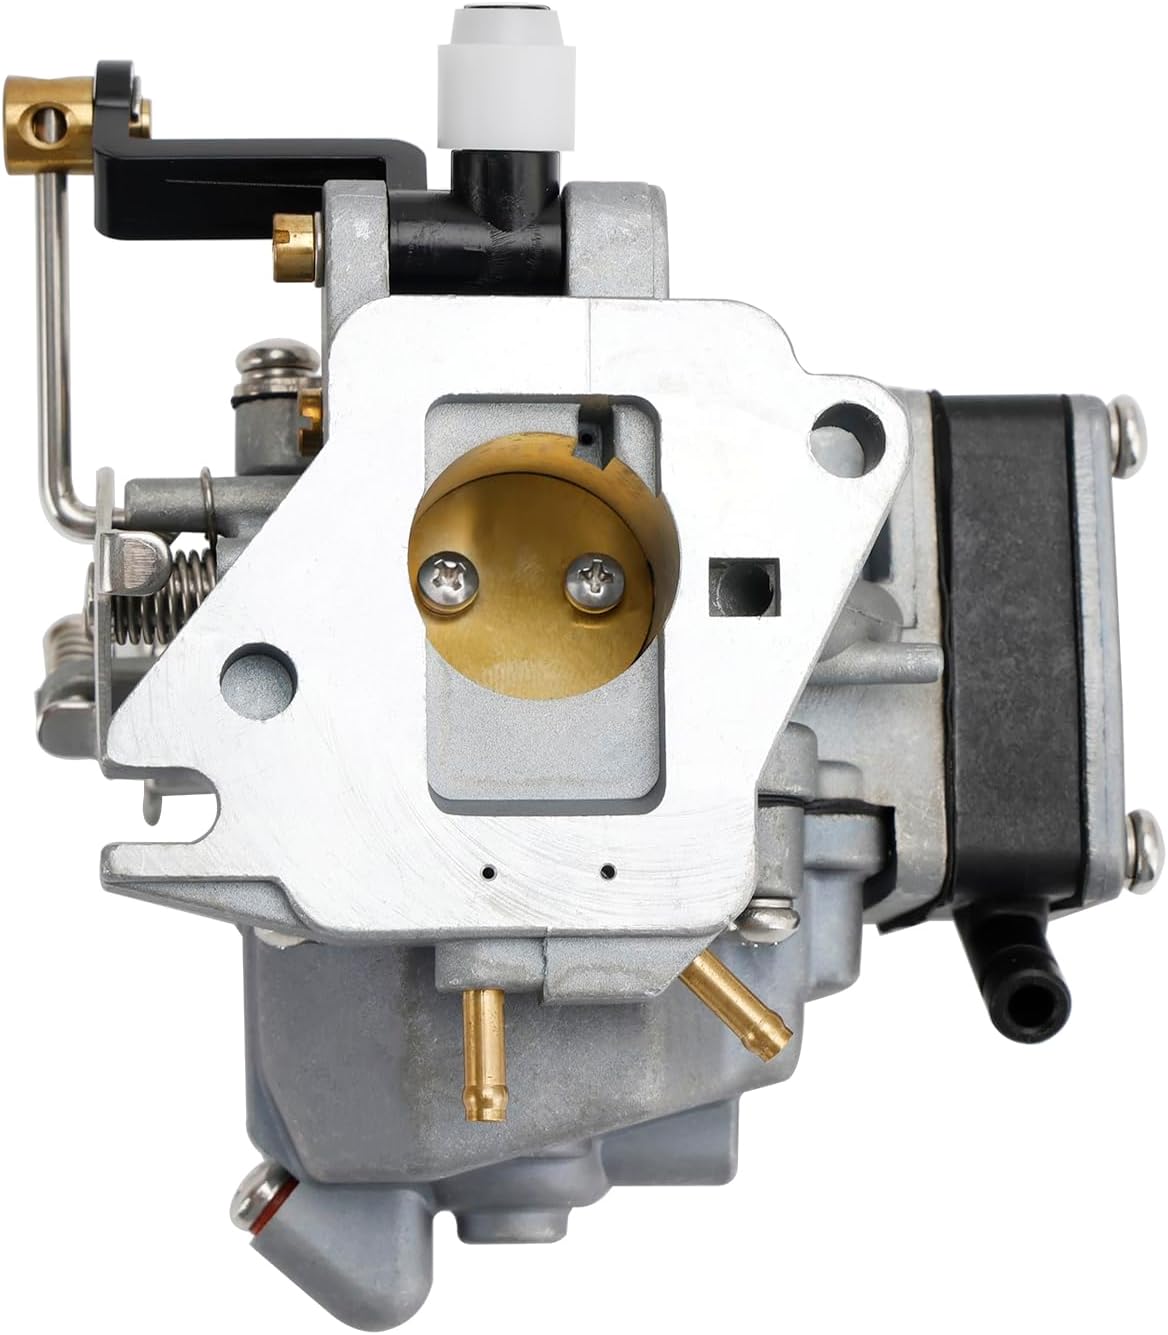
Image 1.1: Main view of the Areyourshop Carburetor. This image displays the carburetor from a primary angle, highlighting its overall structure and key components such as the throttle linkage and fuel inlet.
2. Compatibility
This Areyourshop Carburetor is compatible with the following Mercury Mariner outboard engine models:
- Mercury Mariner 2-stroke 9.9HP
- Mercury Mariner 2-stroke 15HP
- Specifically for models designated as 9.9 D M
It replaces the following OEM part numbers:
- 1383-8806M
- 1383-8516M
- 1383-9513M
- 1383-8024M
Important: Before purchasing and installing, please confirm the exact model and year of your vehicle to ensure proper fitment. Refer to your engine's service manual for specific part requirements.
3. Package Contents
The package includes:
- 1 x Areyourshop Carburetor
No additional accessories or installation tools are included unless explicitly stated.
4. Installation (Setup)
Carburetor installation requires mechanical knowledge and specific tools. If you are not confident in performing this procedure, it is recommended to seek assistance from a qualified marine mechanic.
General Installation Steps:
- Safety First: Disconnect the battery and ensure the engine is cool before beginning any work.
- Fuel System Depressurization: Relieve pressure from the fuel system according to your engine's service manual.
- Remove Old Carburetor: Carefully disconnect all fuel lines, vacuum lines, and throttle linkages from the old carburetor. Remove mounting bolts and detach the old unit.
- Inspect Gaskets: Ensure all mating surfaces are clean. Use new gaskets if necessary (not included with this product).
- Install New Carburetor: Position the new Areyourshop Carburetor, ensuring proper alignment. Secure it with mounting bolts, tightening to the manufacturer's specified torque.
- Reconnect Components: Reattach all fuel lines, vacuum lines, and throttle linkages. Double-check all connections for security and proper routing.
- Initial Adjustments: Perform initial idle mixture and idle speed adjustments as per your engine's service manual.
- Leak Check: Reconnect the battery and fuel supply. Start the engine and carefully check for any fuel leaks or unusual operation.
Warning: Improper installation can lead to engine damage or fire hazards. Always consult your engine's official service manual for detailed, model-specific instructions.

Image 4.1: Angled view of the carburetor, showing various linkages and adjustment points. Insets provide magnified views of critical areas for detailed inspection during installation.
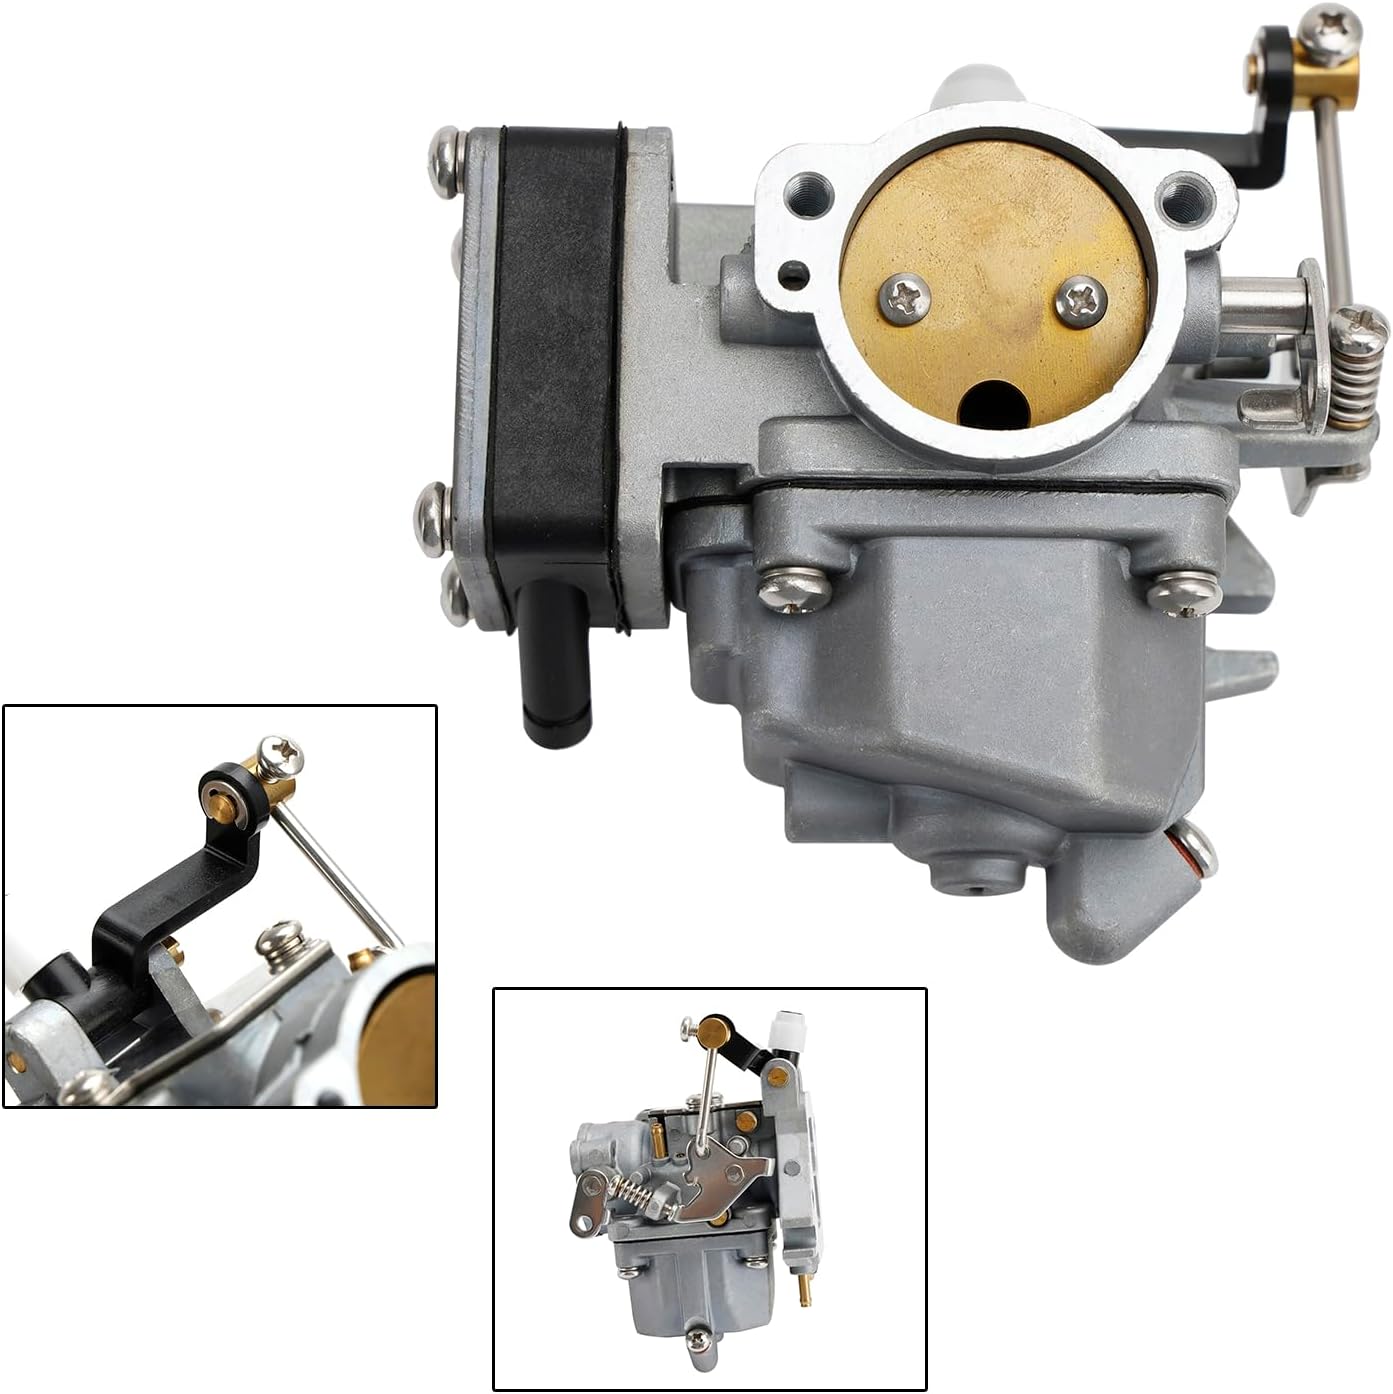
Image 4.2: Side profile of the carburetor, illustrating the fuel bowl and float assembly. Close-up views highlight the fuel inlet and drain screw locations.
5. Operation
Once properly installed and adjusted, the carburetor will automatically regulate the air-fuel mixture for your engine. No direct user operation is typically required beyond starting the engine and controlling the throttle.
Ensure that the engine starts smoothly and idles consistently. If the engine runs rough, stalls, or exhibits poor acceleration, further adjustments or troubleshooting may be necessary.
6. Maintenance
Regular maintenance of your carburetor is crucial for optimal engine performance and longevity. Consult your engine's service manual for specific maintenance schedules.
Recommended Maintenance Practices:
- Fuel Quality: Always use clean, fresh fuel. Stale or contaminated fuel is a primary cause of carburetor issues.
- Fuel Filter: Regularly inspect and replace the fuel filter to prevent debris from reaching the carburetor.
- Carburetor Cleaning: If the engine experiences fuel delivery problems, the carburetor may need cleaning. This involves disassembling the unit, cleaning jets and passages with carburetor cleaner, and replacing gaskets.
- Storage: Before long-term storage, run the engine until the fuel tank is empty or use a fuel stabilizer to prevent fuel degradation and gumming in the carburetor.

Image 6.1: A detailed view of the carburetor, showing the various screws and access points that may be involved in cleaning or adjustment procedures.
7. Troubleshooting
This section outlines common issues and potential solutions related to carburetor function. Always refer to your engine's service manual for comprehensive troubleshooting guides.
| Symptom | Possible Cause | Solution |
|---|---|---|
| Engine will not start or starts with difficulty | Clogged fuel filter, stale fuel, clogged jets, improper choke operation | Check fuel supply and filter. Clean carburetor jets. Verify choke function. |
| Rough idle or stalling | Improper idle mixture/speed adjustment, vacuum leak, dirty pilot jet | Adjust idle mixture and speed. Check for vacuum leaks. Clean pilot jet. |
| Poor acceleration or lack of power | Clogged main jet, incorrect float level, restricted air intake | Clean main jet. Adjust float level. Check air filter. |
| Fuel leaks | Damaged gaskets, loose fuel lines, stuck float | Replace gaskets. Tighten fuel lines. Inspect and free float. |
Note: If troubleshooting steps do not resolve the issue, professional diagnosis and repair are recommended.
8. Specifications
- Brand: Areyourshop
- Condition: 100% Brand New
- Item Weight: 1.08 pounds (approx. 0.49 kg)
- Product Dimensions: 5.91 x 4.72 x 3.94 inches (approx. 15 x 12 x 10 cm)
- Manufacturer Part Number: 1383-8806M, 1383-8516M
- OEM Part Numbers Replaced: 1383-8806M, 1383-8516M, 1383-9513M, 1383-8024M
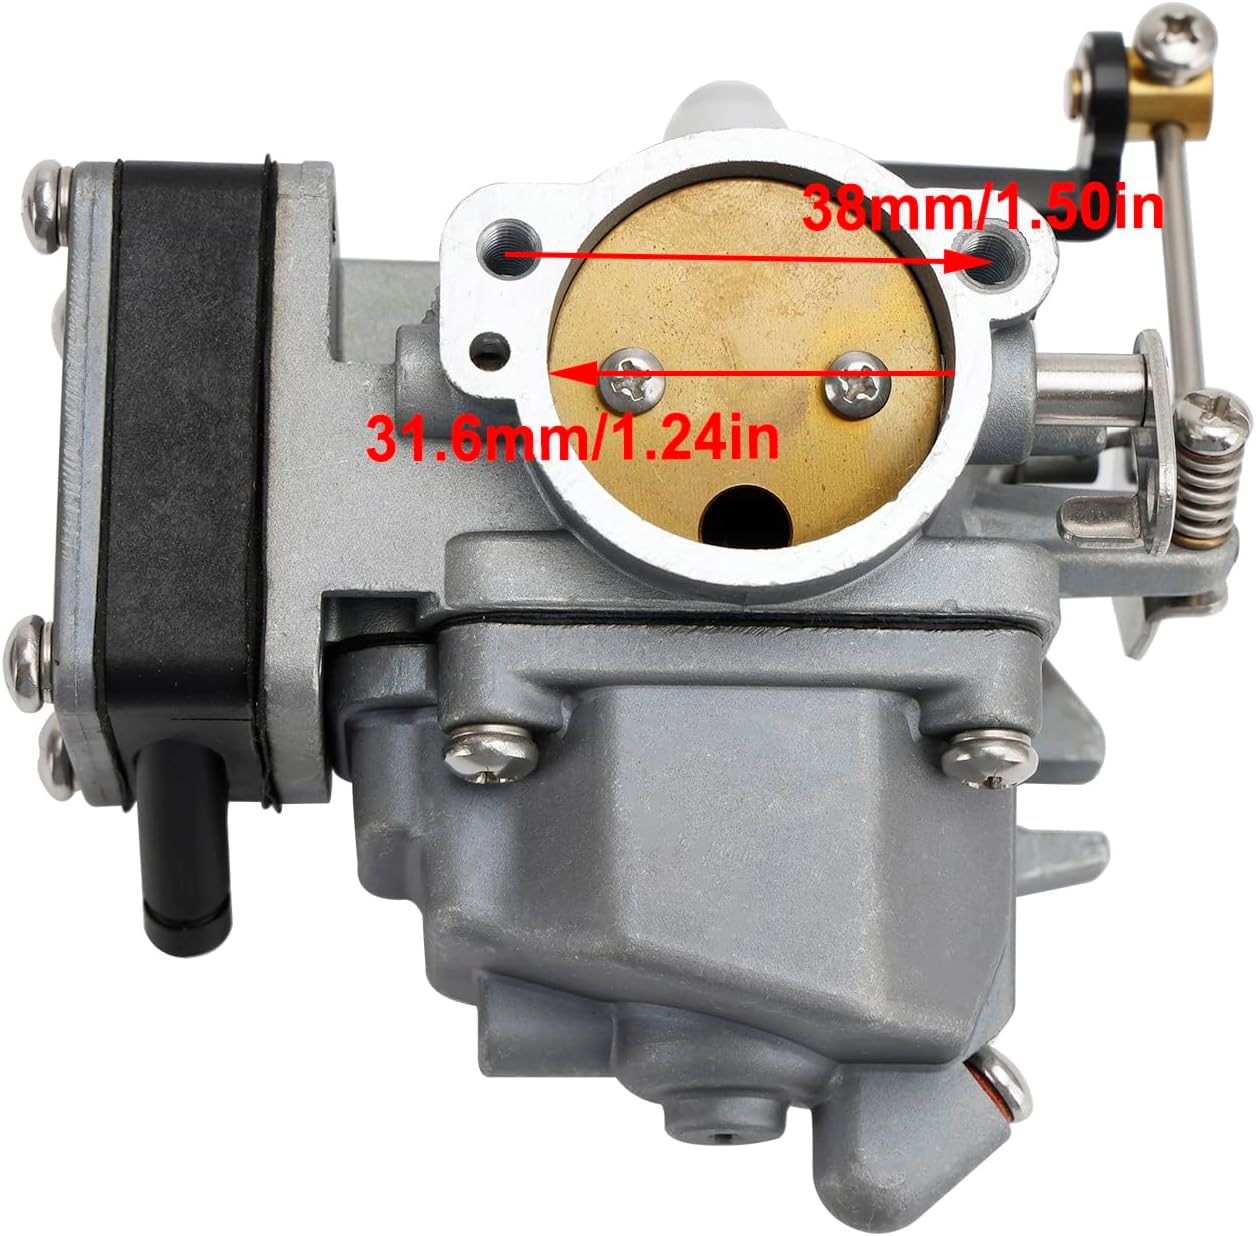
Image 8.1: Measurement of the carburetor's intake side, showing dimensions of 38mm (1.50in) and 31.6mm (1.24in) for mounting points.

Image 8.2: Measurement of the carburetor's air intake bore, indicating a diameter of 22.8mm (0.90in).
9. Important Notes and Disclaimer
- This product is an aftermarket replacement part.
- Always confirm suitability before purchasing by cross-referencing part numbers and engine models.
- Due to manual measurement, a difference of 1-3mm in dimensions may occur.
- The manufacturer conducts various tests to ensure accurate parameters and performance of its products.
Disclaimer: The information provided in this manual is for general guidance only. Areyourshop is not responsible for any damage or injury resulting from improper installation, use, or maintenance of this product. Professional installation is highly recommended.
10. Support and Warranty
For product support or warranty inquiries, please contact the seller directly through the platform where the purchase was made. Specific warranty terms and conditions may vary.
You can visit the Areyourshop Store for more products and information: Areyourshop Store