1. Introduction
The iSunergy Q7 Bluetooth Motorcycle Helmet Intercom Headset is designed to provide reliable communication and entertainment for motorcyclists. Featuring Bluetooth 5.1 technology, CVC noise reduction, and IP65 waterproofing, this device supports group intercom for up to 7 riders, phone calls, music playback, and FM radio. It is compatible with the SafeRiding APP for enhanced control and functionality.
2. Package Contents
Please verify that all items listed below are included in your package:
- Q7 Host Unit
- Type-C Charging Cable
- Accessory Posts and Accessory Clips for mounting
- Speaker and Microphone Set (HIFI-M2 headset, soft and hard mark 2-in-1 headset, soft microphone removable)
- User Manual

Image: The package contents include the Q7 host unit, accessory posts and clips, elbow and cord microphones, speakers, user manual, and a Type-C charging cable.
3. Product Overview
3.1. Components and Controls
Familiarize yourself with the main components and control buttons of your Q7 headset:

Image: Detailed view of the Q7 unit showing the antenna, indicator light, volume up/previous song button, FM radio button, B/D/F switch button, Power/Phone button, Volume reduction/next song button, Headphone jack, A/C/E switch button, and Type-C charging port. Dimensions are also indicated: Length 93mm, Width 44mm, Height 23mm.
- Antenna: Extend for optimal signal reception.
- Indicator Light: Displays device status (pairing, connected, charging).
- Volume Up / Previous Song Button (+): Increases volume; short press for previous song.
- FM Radio Button: Activates/deactivates FM radio.
- B/D/F Switch Button: Used for intercom group switching.
- Power / Phone Button: Powers the device on/off; answers/ends calls; activates voice assistant.
- Volume Reduction / Next Song Button (-): Decreases volume; short press for next song.
- Headphone Jack: Connects the speaker and microphone set.
- A/C/E Switch Button: Used for intercom group switching.
- Type-C Charging Port: For charging the device.
3.2. Certifications

Image: The back of the Q7 unit showing regulatory markings including Model: Q7, IC: 30300-V7, HVIN: V7, FCC ID: 2AIEB-Q7, CE mark, and Made in China.
4. Setup
4.1. Charging the Device
- Connect the provided Type-C charging cable to the charging port on the Q7 host unit.
- Connect the other end of the cable to a DC5V/1A charger (not included).
- The indicator light will show charging status. A full charge typically takes about 3 hours.
4.2. Installing the Headset in Your Helmet
The Q7 headset can be installed in most full-face helmets. Choose between the soft microphone (for full-face helmets) or the elbow microphone (for open-face helmets) based on your helmet type.
- Attach the accessory clips to the side of your helmet. Ensure a secure fit.
- Slide the Q7 host unit onto the mounted accessory clip.
- Insert the speaker and microphone set's jack into the headphone jack on the Q7 unit.
- Position the speakers inside the helmet's ear pockets. Ensure they are aligned with your ears for optimal sound.
- Position the microphone close to your mouth, ensuring it is not obstructed by padding.
Video: This video demonstrates the unboxing of the iSunergy Q7 helmet intercom, showcasing the components and the process of connecting the speaker and microphone set to the main unit. It also briefly shows the mobile application interface.
5. Operating Instructions
5.1. Power On/Off
- Power On: Press and hold the Power/Phone button until the indicator light turns on and you hear a voice prompt.
- Power Off: Press and hold the Power/Phone button until the indicator light turns off and you hear a voice prompt.
5.2. Bluetooth Pairing with Mobile Phone
- Ensure the Q7 unit is powered off.
- Press and hold the Power/Phone button for approximately 5-7 seconds until the indicator light flashes red and blue alternately, indicating pairing mode.
- On your mobile phone, enable Bluetooth and search for available devices.
- Select "Q7" from the list of devices to connect.
- Once connected, the indicator light will flash blue slowly. The Q7 can connect to two mobile phones simultaneously.
5.3. Intercom Function
The Q7 supports group intercom for up to 7 riders, with a communication distance of up to 800 meters outdoors. It features a 2-person intercom mode and can save 6-way switch intercom settings.
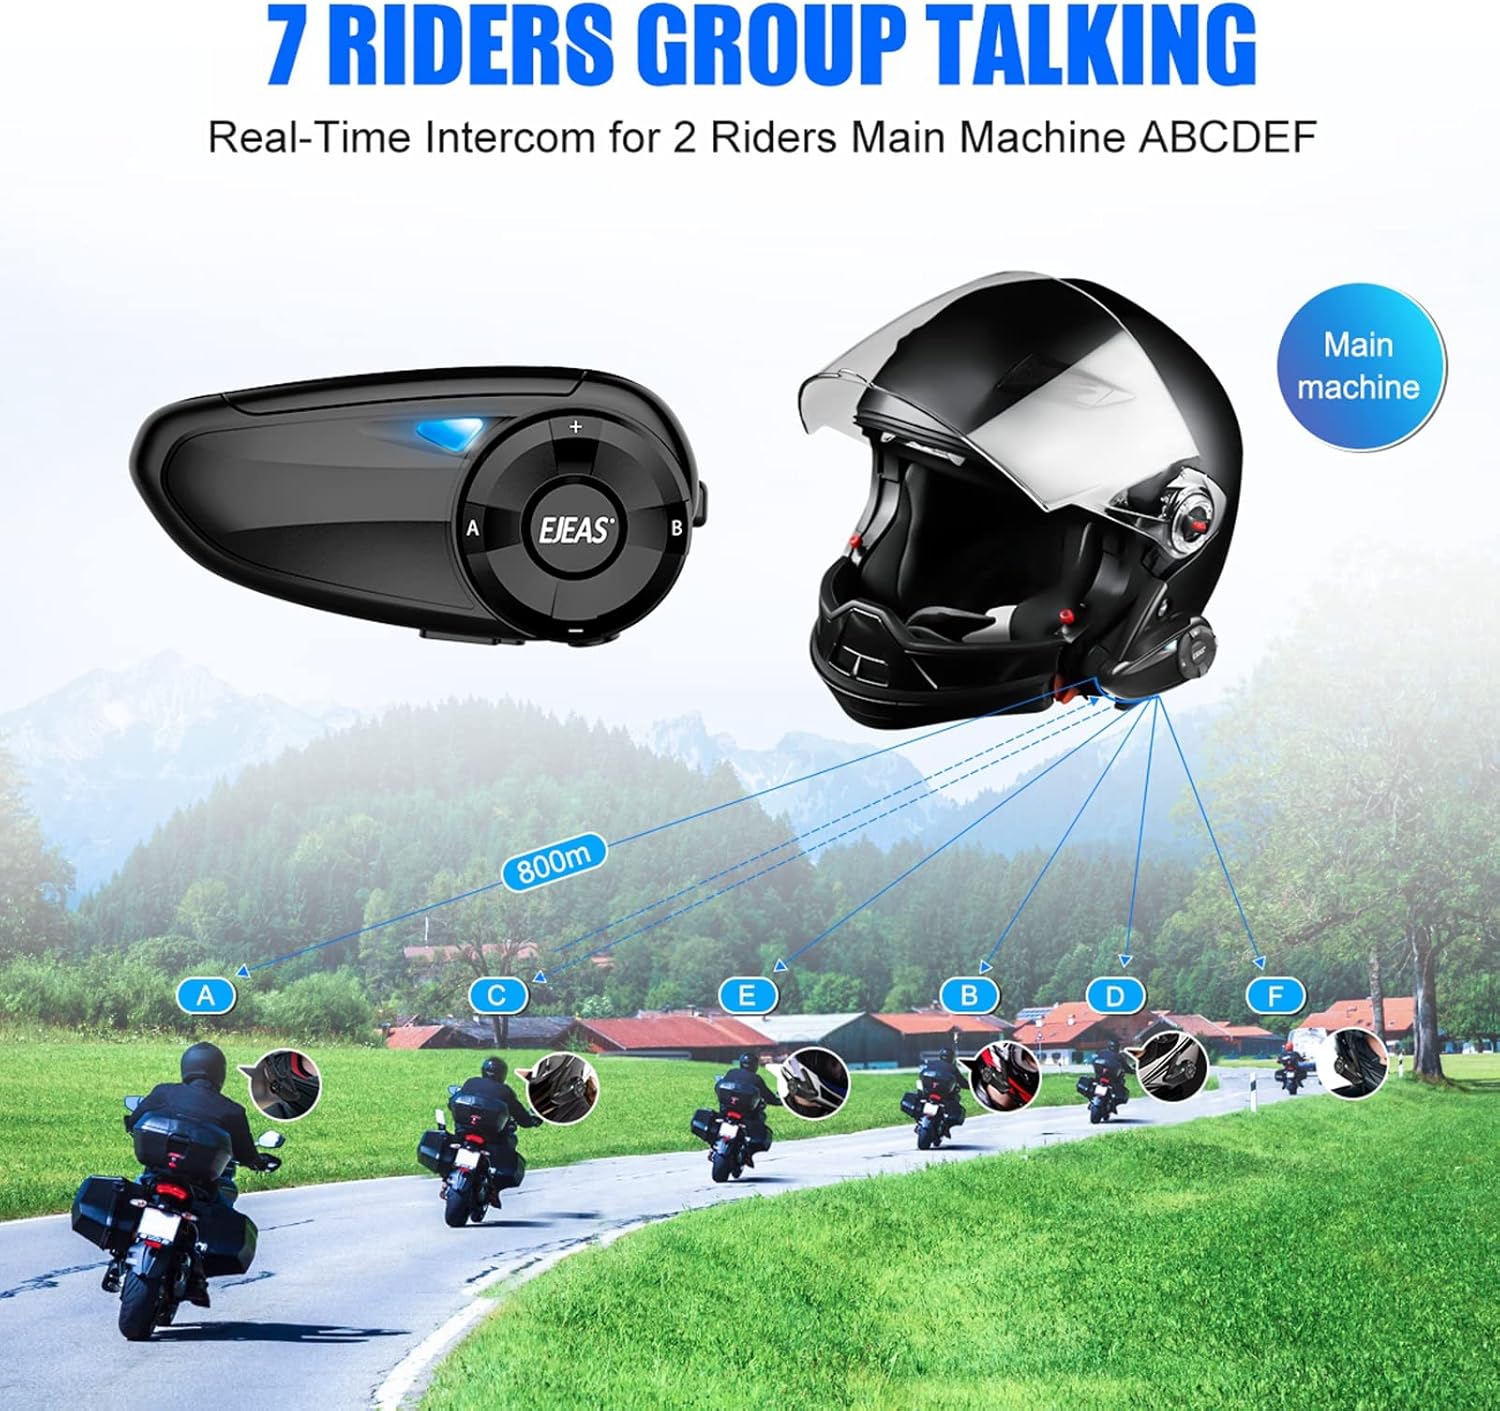
Image: Diagram illustrating the 7-rider group talking feature, showing a main machine (Q7 unit) connected to multiple riders (A, B, C, D, E, F) over an 800m range, enabling real-time intercom communication.
- Initiate Intercom: Refer to the detailed instructions in the included user manual for specific pairing sequences for multi-rider intercom.
- Switch Intercom: Use the A/C/E and B/D/F switch buttons to cycle through different intercom partners in a group setting.
- The Q7 can be paired with other brands of Bluetooth intercom devices that adhere to the same Bluetooth technology standard.
5.4. Phone Calls
- Answer Call: When a call comes in, it will be answered automatically after a few rings, or you can short press the Power/Phone button to answer.
- End Call: Short press the Power/Phone button during a call to end it.
- Redial Last Number: Double-press the Power/Phone button to redial the last outgoing number.
5.5. Music Playback
- Play/Pause: Short press the Power/Phone button to play or pause music.
- Next Song: Short press the Volume Reduction (-) button.
- Previous Song: Short press the Volume Up (+) button.
5.6. FM Radio
- Activate FM: Short press the FM Radio button to turn on the FM radio.
- Scan Channels: Press and hold the FM Radio button to automatically scan and save available stations.
- Change Station: Short press the Volume Up (+) or Volume Reduction (-) buttons to switch between saved stations.
- Deactivate FM: Short press the FM Radio button again to turn off the FM radio.
- The Q7 supports using intercom and FM simultaneously.
5.7. Voice Assistant
The Q7 supports activating your phone's voice assistant (e.g., Siri, Google Assistant).

Image: Illustration showing a user activating the voice assistant by pressing and holding the phone button for 1 second, with examples of commands like "Hey, Siri", "Play the music", "Call Jessie", and "Open the Google Map".
- Activate: Press and hold the Power/Phone button for one second to wake up the assistant. Your phone must support and have the voice assistant function enabled.
5.8. SafeRiding APP Connectivity
The Q7 headset is connectable with the SafeRiding APP for additional control and features. Download the app from your mobile device's app store and follow the in-app instructions to connect your Q7 unit.
6. Maintenance
- Cleaning: Wipe the Q7 unit with a soft, damp cloth. Do not use harsh chemicals or abrasive cleaners.
- Water Resistance: The Q7 is IP65 waterproof, dustproof, and sunproof. While it can withstand splashes and light rain, avoid submerging it in water. Ensure the Type-C charging port cover is securely closed when not charging.
- Storage: Store the device in a cool, dry place when not in use. Avoid extreme temperatures.
- Battery Care: To prolong battery life, avoid fully discharging the battery frequently. Charge the device regularly, especially if storing for extended periods.
7. Troubleshooting
| Problem | Possible Cause | Solution |
|---|---|---|
| Device does not power on | Low battery | Charge the device fully. |
| Cannot pair with phone | Device not in pairing mode; Bluetooth off on phone | Ensure Q7 is in pairing mode (flashing red/blue). Turn on phone's Bluetooth and search again. |
| No sound from speakers | Speakers not connected; volume too low; faulty connection | Check speaker connection to the Q7 unit. Increase volume. Ensure speakers are correctly positioned. |
| Intercom not working | Units not paired for intercom; out of range | Follow intercom pairing instructions carefully. Ensure units are within 800m range. |
| Poor sound quality / Noise | Microphone position; environmental noise | Adjust microphone closer to mouth. CVC noise reduction is active, but extreme noise may still affect quality. |
7.1. CVC Noise Cancellation
The Q7 incorporates CVC (Clear Voice Capture) professional noise reduction technology. This software-based technology reduces ambient noise through its built-in software and microphone, eliminating reverberation noise for clearer audio communication.

Image: A diagram illustrating the effect of CVC noise cancellation, showing sound waves before and after noise reduction, indicating a significant decrease in background noise.
8. Specifications
| Feature | Detail |
|---|---|
| Model | Q7 |
| Bluetooth Version | 5.1 (BLE low-power technology) |
| Battery Capacity | 750mAh, 3.7V |
| Charging Interface | Type-C |
| Charging Time | Approximately 3 hours |
| Intercom Time | Up to 18 hours |
| Music Time | Up to 32 hours |
| Standby Time | Up to 260 hours |
| Intercom Group Size | Up to 7 people |
| Intercom Distance | Outdoor 800m |
| Mobile Phone Connection Distance | Up to 10m |
| Waterproof Grade | IP65 |
| Noise Reduction | CVC Professional Noise Reduction Technology |
| Operating Temperature | -10°C to 55°C |
| Audio Coding Format | SBC and AAC |
| Dimensions (approx.) | Length: 93mm, Width: 44mm, Height: 23mm |
| Weight | 0.23 Kilograms |
| Material | Plastic |

Image: Information on battery performance, indicating 260 hours standby time, 18 hours intercom time, and 32 hours music playing time, with optimized low power consumption.

Image: A table summarizing key product parameters including dimensions, Bluetooth version, battery, noise cancellation, electrical parameters, charging time, life time, standby, charging port, audio coding, intercom mode, intercom distance, mobile phone connection distance, and operating temperature.
9. Warranty and Support
For product support, troubleshooting assistance, or warranty inquiries, please refer to the contact information provided with your purchase or visit the official iSunergy website. Keep your purchase receipt as proof of purchase for warranty claims.