1. Introduction
This manual provides essential information for the safe and efficient operation of your BOSYTRO 0-12V 0-50A 600W Adjustable Power Supply. This switching power supply is designed to convert AC input to a stable, adjustable DC output, making it suitable for a wide range of applications including industrial automation, LED strips, CCTV systems, 3D printers, and laboratory use.
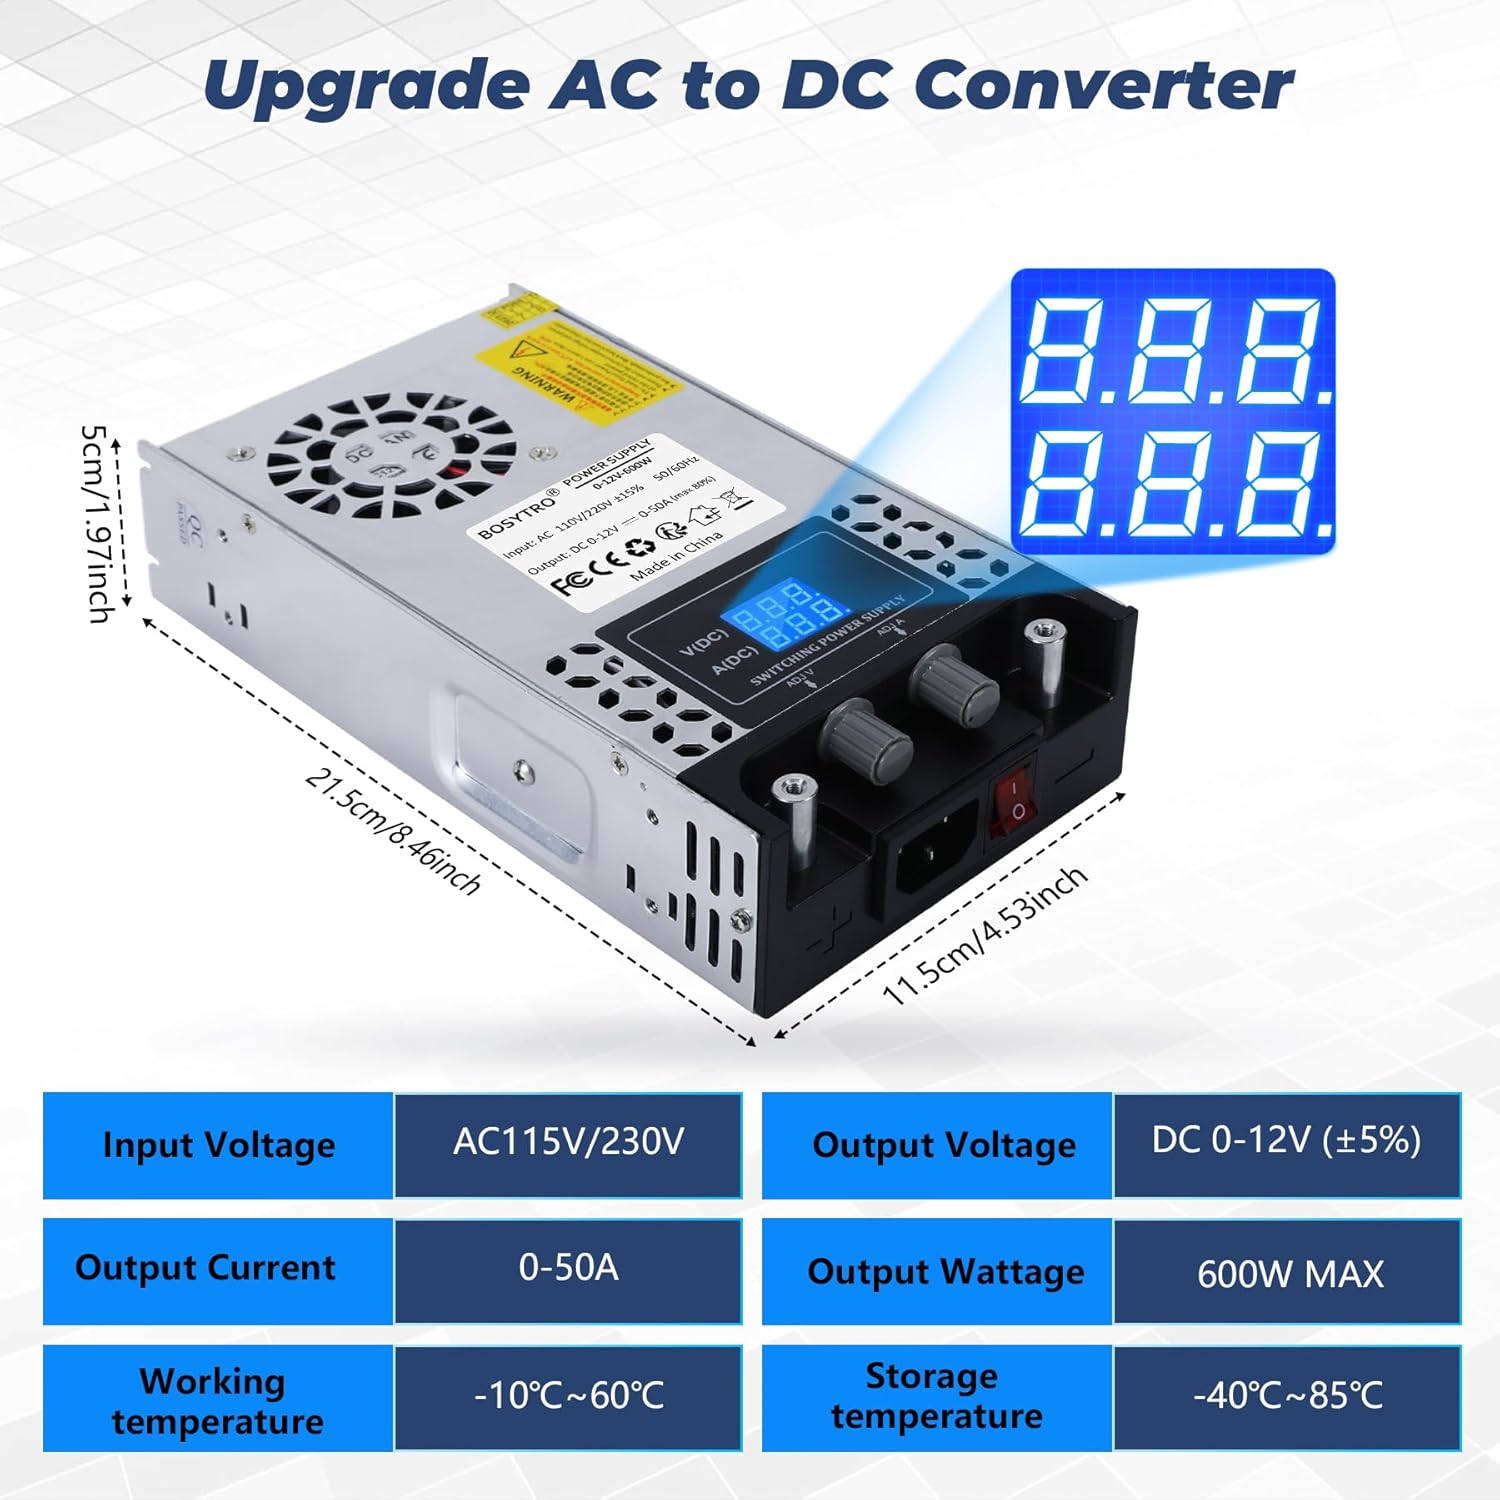
The unit features adjustable output voltage from 0-12V and adjustable output current from 0-50A, with a maximum power output of 600W. It incorporates an intelligent cooling system and multiple protection mechanisms to ensure reliable and safe performance.
2. Safety Instructions
Please read all safety instructions carefully before operating the device. Failure to follow these instructions may result in electric shock, fire, or damage to the product.
- Input Voltage Selection: Always ensure the input voltage switch (115V/230V) is set correctly according to your local power supply before connecting the unit to the mains. Incorrect selection can cause severe damage.
- Grounding: Ensure the power supply is properly grounded to prevent electric shock.
- Ventilation: Do not block the ventilation openings. Ensure adequate airflow around the unit to prevent overheating.
- Environment: Do not operate the power supply in wet, damp, or high-humidity environments. Avoid exposure to direct sunlight or extreme temperatures.
- Overload: Do not exceed the maximum output voltage (12V) or current (50A) ratings. Overloading can damage the unit and connected devices.
- Maintenance: Do not attempt to open or repair the unit yourself. Refer all servicing to qualified personnel.
- Connection: Ensure all connections are secure and correct before applying power.
3. Product Overview
The BOSYTRO 0-12V 0-50A 600W Adjustable Power Supply is designed for versatility and reliability. Key features include:
- Adjustable Output: Precisely control output voltage from 0-12V and current from 0-50A.
- High Power Output: Delivers up to 600W of power.
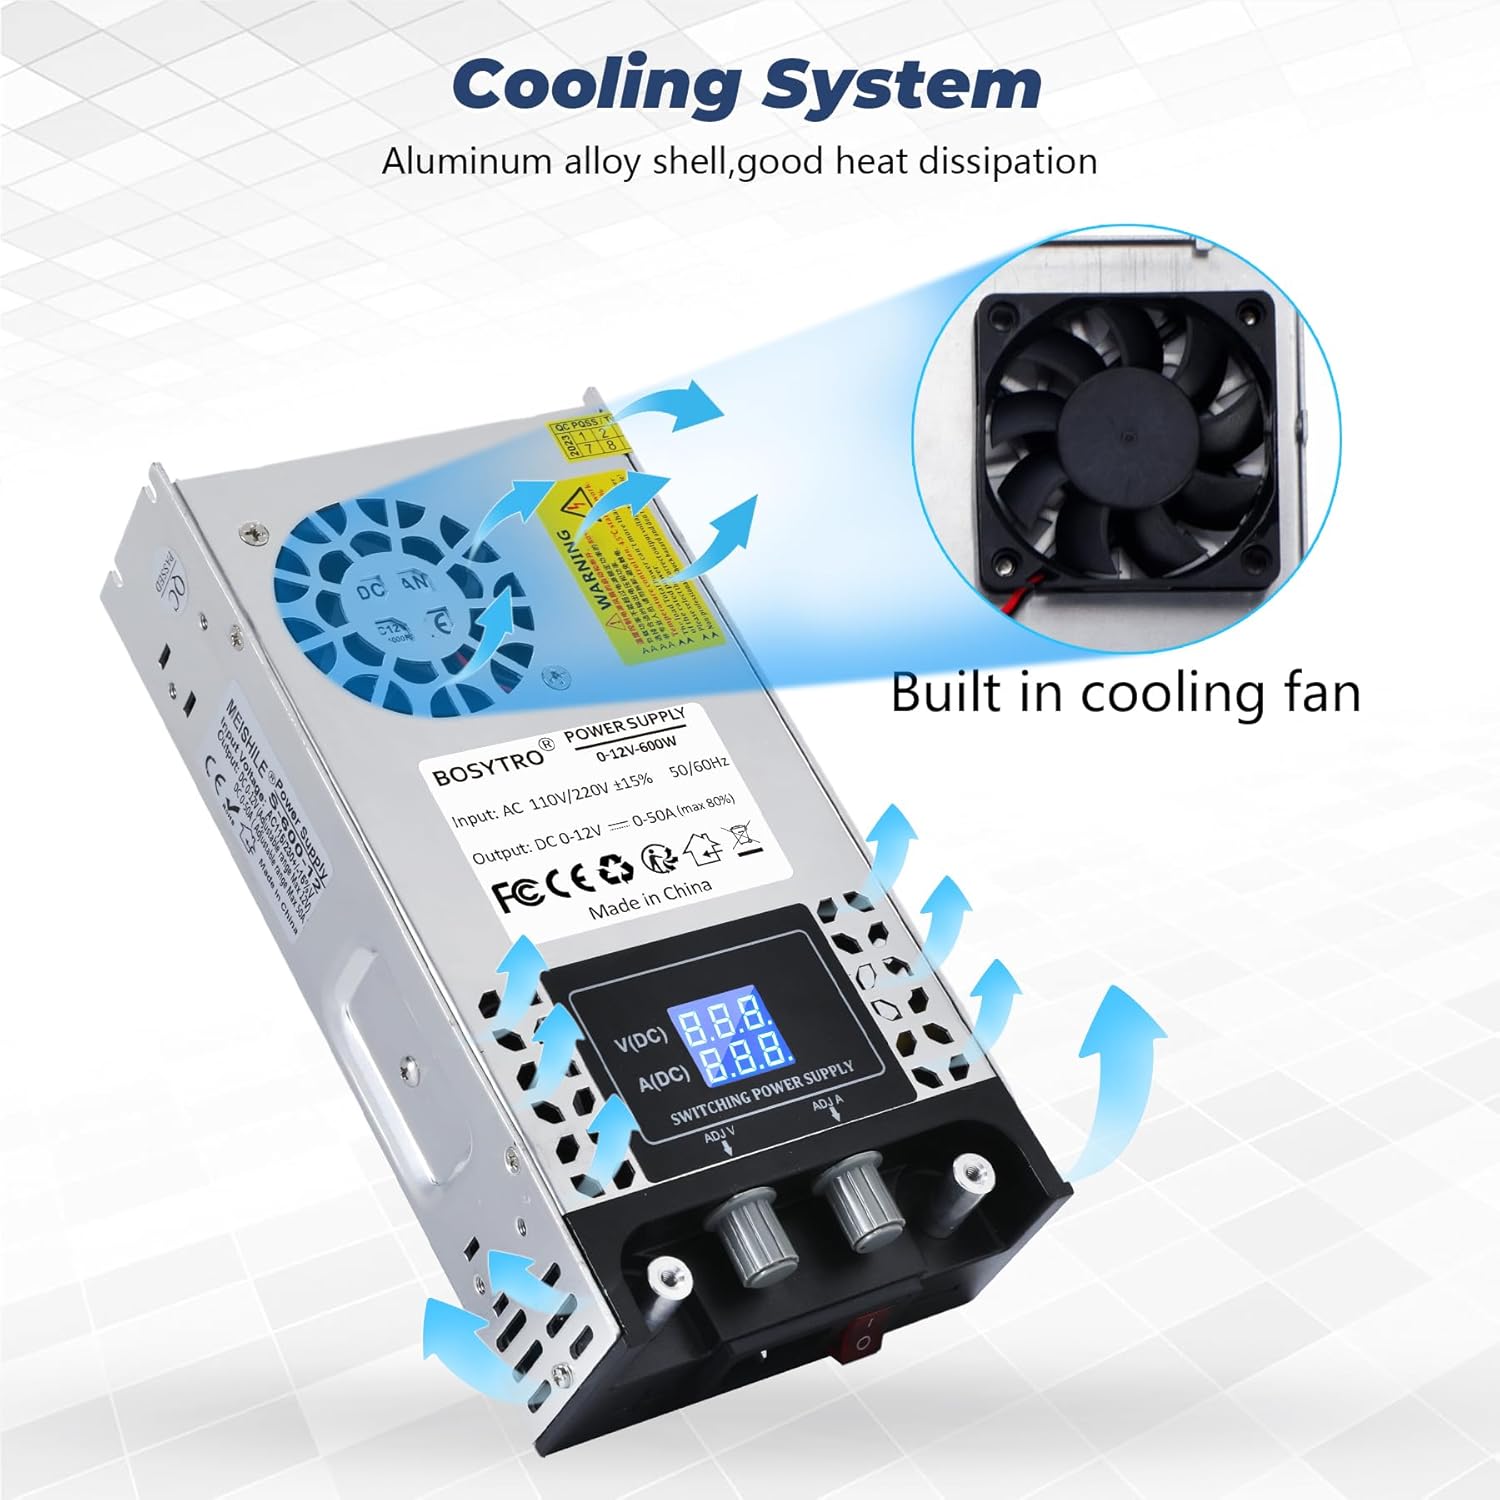
- Intelligent Cooling: Equipped with an integrated fan and aluminum alloy casing for efficient heat dissipation, preventing overheating.
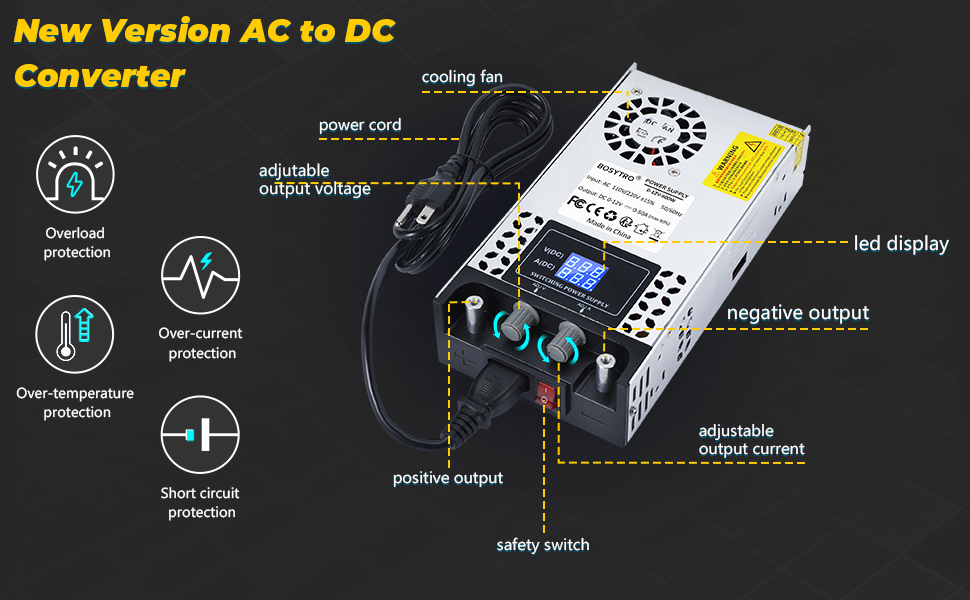
- Multiple Protections: Includes overload, over-current, over-voltage, over-temperature, and short-circuit protection to safeguard the unit and connected devices.
- Easy Connectivity: Features nickel-plated copper connectors for direct and secure wiring.
- Digital Display: High-precision LED display for real-time monitoring of voltage and current.
Components and Features Diagram


4. Setup
Follow these steps to set up your power supply:
- Unpack: Carefully remove the power supply from its packaging. Inspect for any signs of damage.
- Input Voltage Selection: Locate the red switch on the side of the unit. This switch allows you to select between 115V and 230V input voltage. Ensure this switch is set to match your local mains voltage before plugging in the power cord.


- Connect Power Cord: Insert the provided power cord into the AC input socket on the unit.
- Connect Load: Connect your device or load to the output terminals. The power supply features two nickel-plated copper connectors for easy and secure connections. Ensure correct polarity (positive to positive, negative to negative).

5. Operating Instructions
Once the power supply is set up and connected, follow these steps for operation:
- Power On: Plug the power cord into a suitable wall outlet. Flip the red safety switch on the front panel to the 'ON' position. The LED display should illuminate, showing the current voltage and current settings.
- Adjust Voltage: Use the 'ADJ V' knob to adjust the output voltage. Turn clockwise to increase voltage, counter-clockwise to decrease. The LED display will show the set voltage.
- Adjust Current: Use the 'ADJ A' knob to adjust the output current limit. Turn clockwise to increase the current limit, counter-clockwise to decrease. The LED display will show the set current.


- Monitor Output: Continuously monitor the LED display for real-time voltage and current readings during operation.
- Power Off: When finished, flip the safety switch to the 'OFF' position and disconnect the power cord from the wall outlet.
6. Maintenance
Proper maintenance ensures the longevity and optimal performance of your power supply.
- Cleaning: Regularly clean the exterior of the unit with a soft, dry cloth. Do not use liquid cleaners or solvents. Ensure the ventilation openings are free from dust and debris.
- Ventilation: Periodically check the cooling fan for obstructions. The integrated fan is crucial for heat dissipation.

- Storage: When not in use for extended periods, store the power supply in a cool, dry place, away from direct sunlight and extreme temperatures.
- Anti-slip Pads: The unit is equipped with anti-slip pads on the bottom, which also aid in heat dissipation by providing clearance. Ensure these are intact.

7. Troubleshooting
If you encounter issues with your power supply, refer to the following common problems and solutions:
- No Power/Display Off:
- Check if the power cord is securely plugged into both the unit and the wall outlet.
- Ensure the safety switch is in the 'ON' position.
- Verify the input voltage selector (115V/230V) is set correctly for your region. - No Output Voltage/Current:
- Check if the output terminals are correctly connected to your load.
- Ensure the output voltage and current knobs are adjusted to desired levels.
- The unit's protection features (overload, short-circuit) may have activated. Disconnect the load, power cycle the unit, and re-evaluate your setup. - Overheating:
- Ensure the ventilation openings are not blocked.
- Check if the cooling fan is operating. If not, contact support.
- Reduce the load if operating continuously at maximum capacity in a high ambient temperature. - Unstable Output:
- Check all connections for looseness.
- Ensure the load is within the specified voltage and current range of the power supply.
If the problem persists after attempting these troubleshooting steps, please contact customer support.
8. Specifications
| Feature | Specification |
|---|---|
| Model Number | BSC-0-12V-600W |
| Input Voltage | AC 110V-240V (Adjustable via switch) |
| Output Voltage | DC 0-12V (Adjustable) |
| Output Current | 0-50A (Adjustable) |
| Output Power | 600W Max |
| Dimensions (L x W x H) | 21.5 x 11.5 x 5 cm (8.46 x 4.53 x 1.97 inches) |
| Weight | 1 Kilogram (2.2 lbs) |
| Color | Silver |
| Material | Metal |
| Operating Temperature | -10°C to 60°C (14°F to 140°F) |
| Storage Temperature | -40°C to 85°C (-40°F to 185°F) |
| Components Included | Power Supply Unit |
| Compliance | CE, RoHS |
9. Warranty and Support
This BOSYTRO power supply comes with a commitment to quality. Spare parts availability is guaranteed for 3 years from the date of purchase.
For technical support, warranty claims, or any questions not covered in this manual, please contact the seller or manufacturer directly through your purchase platform. Provide your model number (BSC-0-12V-600W) and a detailed description of the issue for faster assistance.