1. Product Overview
This manual provides essential information for the proper installation, operation, and maintenance of your perfektGarten Recoil Starter, designed as a replacement part for the Güde Eco Wheeler 400 PD lawnmower. Please read these instructions carefully before installation and use to ensure safe and efficient operation.
The recoil starter is a critical component responsible for initiating the engine's combustion cycle by manually rotating the crankshaft. Proper installation and function are vital for starting your lawnmower.
2. Safety Information
- Always ensure the lawnmower engine is off and cool before attempting any installation or maintenance.
- Disconnect the spark plug wire to prevent accidental starting.
- Wear appropriate personal protective equipment (PPE), such as gloves and eye protection.
- If you are unsure about any step, consult a qualified technician.
3. Installation Instructions
This section details the steps for replacing the recoil starter on your Güde Eco Wheeler 400 PD lawnmower.
3.1. Preparation
- Ensure the lawnmower is on a flat, stable surface.
- Turn off the engine and allow it to cool completely.
- Disconnect the spark plug wire to prevent accidental starting.
- Locate the existing recoil starter assembly on your lawnmower.
3.2. Removing the Old Recoil Starter
- Identify and remove the bolts or screws securing the old recoil starter to the engine housing. Keep these fasteners for reuse if they are in good condition.
- Carefully detach the old recoil starter assembly. Note how the pull rope is routed and where the starter engages with the engine flywheel.
3.3. Installing the New Recoil Starter

Image 1: Front view of the perfektGarten Recoil Starter. This image shows the main housing and the pull handle in its retracted position.

Image 2: Rear view of the perfektGarten Recoil Starter. This image displays the internal spring mechanism and the engagement pawls that interact with the engine's flywheel.
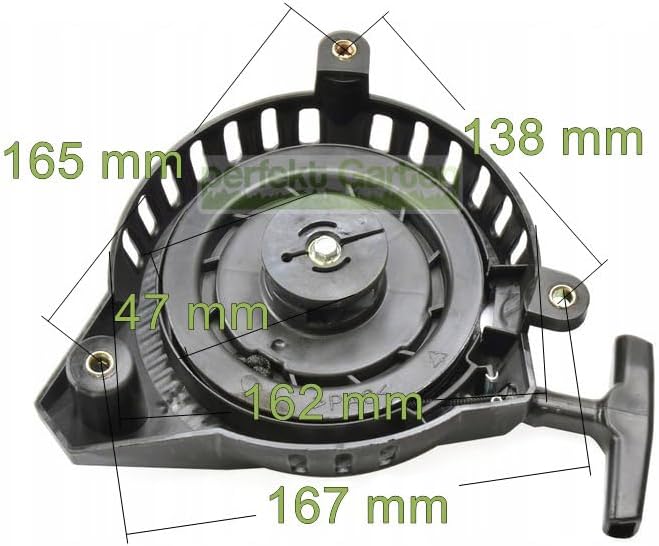
Image 3: Rear view of the perfektGarten Recoil Starter with key dimensions. This image provides measurements (e.g., 167mm, 165mm, 138mm, 47mm, 162mm) crucial for verifying compatibility and proper fitment during installation.
- Align the new recoil starter with the mounting holes on the engine housing. Ensure the engagement pawls are correctly positioned to interact with the engine's flywheel. Refer to Image 2 and 3 for visual guidance on the starter's rear mechanism and dimensions.
- Secure the new recoil starter using the original bolts or screws. Tighten them firmly but do not overtighten, as this can damage the housing.
- Gently pull the starter rope a few times to ensure it retracts smoothly and engages the engine correctly.
- Reconnect the spark plug wire.
4. Operating Instructions
Once the recoil starter is correctly installed, follow these steps to start your Güde Eco Wheeler 400 PD lawnmower:
- Ensure the lawnmower is on a level surface and clear of any obstacles.
- Check the fuel and oil levels.
- Set the throttle to the "Start" or "Choke" position as per your lawnmower's specific instructions.
- Grasp the recoil starter handle firmly.
- Pull the rope slowly until you feel resistance, then pull it quickly and smoothly with a full arm stroke. Do not pull the rope to its absolute maximum length.
- Allow the rope to retract slowly and completely into the starter housing. Do not let it snap back.
- Repeat the pulling action if the engine does not start on the first attempt.
- Once the engine starts, gradually move the throttle to the "Run" position.
5. Maintenance
Regular maintenance helps prolong the life of your recoil starter.
- Cleaning: Periodically clean the recoil starter housing to remove grass clippings, dirt, and debris. Use a soft brush or cloth.
- Rope Inspection: Inspect the starter rope for signs of fraying or wear. If the rope appears damaged, it should be replaced by a qualified technician to prevent breakage during operation.
- Spring Mechanism: The internal spring mechanism is generally maintenance-free. If you notice issues with rope retraction, it may indicate a problem with the spring, requiring professional service.
- Storage: When storing the lawnmower for extended periods, ensure the recoil starter is clean and dry.
6. Troubleshooting
If you encounter issues with your recoil starter, consider the following common problems and solutions:
| Problem | Possible Cause | Solution |
|---|---|---|
| Rope does not retract fully. | Damaged or worn recoil spring; debris inside housing. | Inspect for debris and clean. If spring is damaged, replacement by a technician is recommended. |
| Rope pulls out but does not engage engine. | Damaged or stuck engagement pawls; incorrect installation. | Check pawls for free movement. Re-verify installation steps. |
| Rope is frayed or broken. | Wear and tear; improper pulling technique. | Replace the starter rope (professional service recommended). |
| Engine does not start after pulling. | Not directly related to recoil starter; fuel, spark, or compression issue. | Consult your lawnmower's main instruction manual for engine starting troubleshooting. |
If the problem persists after attempting these solutions, it is advisable to seek assistance from a qualified service technician.
7. Specifications
- Product Dimensions (L x W x H): 16.7 x 16.5 x 4 cm
- Model Number: 1149
- Manufacturer: perfektGarten
- Compatibility: Güde Eco Wheeler 400 PD (400PD)
- Energy Type: Fuel-powered (for compatible lawnmowers)
- ASIN: B0CP861B6Z
8. Warranty and Support
Information regarding specific warranty terms and customer support for this perfektGarten recoil starter is not provided in the product details. Please refer to the seller's or manufacturer's website, or contact your point of purchase for details on warranty coverage and support options.