1. Introduction
This manual provides comprehensive instructions for the installation, operation, and maintenance of your new Toeeklsa 12.1-inch Android 12 Car Radio Head Unit. This unit is specifically designed for Ford Explorer models manufactured between 2011 and 2019, offering an upgraded infotainment experience with advanced features such as Wireless CarPlay, Android Auto, GPS Navigation, DSP sound processing, Bluetooth 5.0, 4G/WiFi connectivity, and FM/AM radio with steering wheel control integration.
Please read this manual thoroughly before installation and use to ensure proper functionality and to maximize your enjoyment of the product. Keep this manual for future reference.
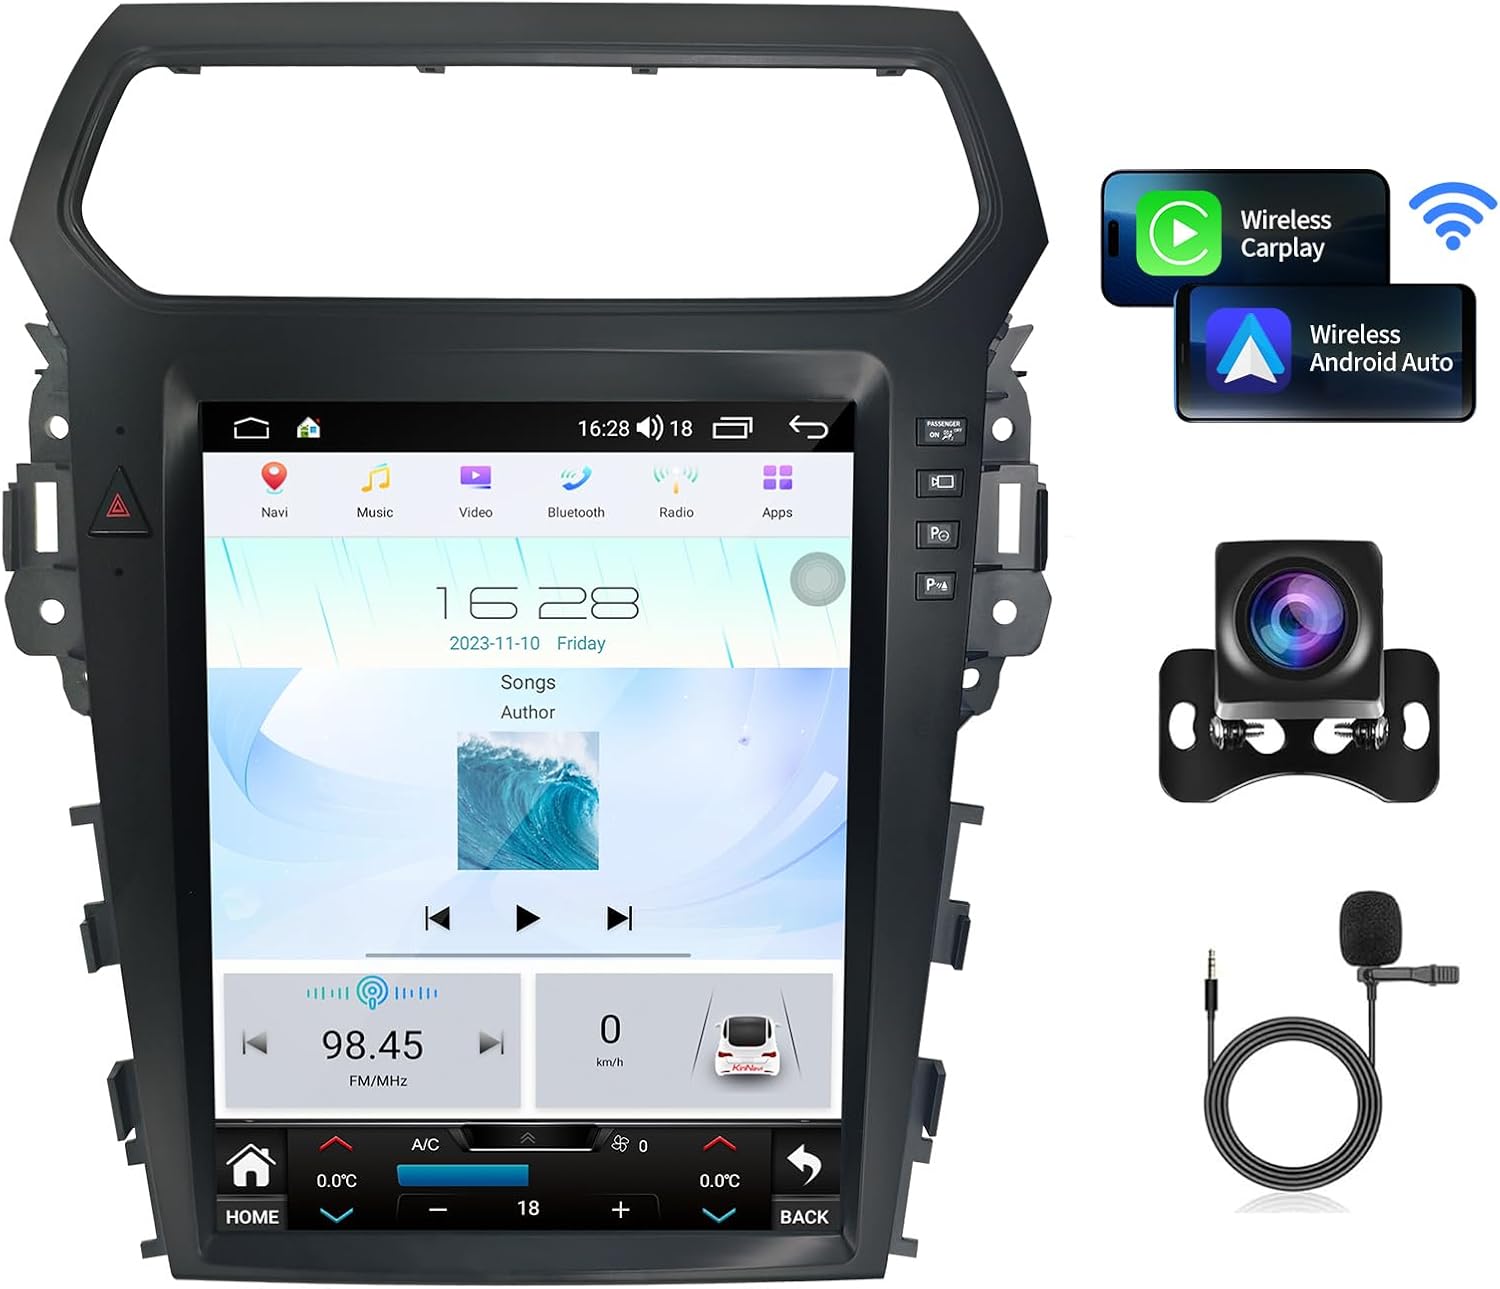
Image 1.1: Overview of the Toeeklsa 12.1-inch Android 12 Car Radio Head Unit with included accessories.

Image 1.2: Visual guide showing various Ford Explorer dashboard configurations compatible with this head unit (2011-2019).
2. Safety Information
Observe the following safety precautions to prevent accidents and damage to the unit or vehicle:
- Professional Installation Recommended: Installation of this unit requires technical knowledge and experience. It is highly recommended to have the unit installed by a qualified professional to avoid damage to the vehicle's electrical system or the unit itself.
- Power Disconnection: Always disconnect the vehicle's battery negative terminal before beginning any installation or wiring work to prevent electrical shorts and damage.
- Wiring: Ensure all wiring connections are secure and properly insulated. Incorrect wiring can cause malfunctions, electrical fires, or damage to the vehicle.
- Driving Safety: Do not operate the unit's complex functions or watch videos while driving. Distracted driving can lead to serious accidents. Always prioritize road safety.
- Volume Control: Keep the volume at a level that allows you to hear external traffic sounds. Excessive volume can impair your ability to react to emergencies.
- Environmental Conditions: Avoid exposing the unit to extreme temperatures, direct sunlight for prolonged periods, or excessive moisture.
3. Package Contents
Verify that all items listed below are included in your package:
- 12.1-inch Android Head Unit
- Power Plug
- 4G Antenna
- RCA Cable
- USB Cable (x2)
- Radio Cable
- GPS Antenna
- Microphone
- HD Camera (Backup Camera)
- Reversing Camera Cable
- Crowbar (Installation Tool)
- Gloves (Installation Aid)
- User Manual (This document)

Image 3.1: Visual representation of all items included in the product package.
4. Setup and Installation
This head unit is designed for a standard fit in Ford Explorer 2011-2019 models. No additional accessories are typically required for basic installation. Follow the general steps below. For detailed vehicle-specific instructions, consult a professional or refer to your vehicle's service manual.
4.1 Pre-Installation Steps
- Disconnect Battery: Before starting, disconnect the negative terminal of your vehicle's battery.
- Remove Original Head Unit: Carefully remove the trim panels and screws securing the factory radio. Disconnect all wiring harnesses from the original unit.
4.2 Connecting the New Head Unit
- Main Power Harness: Connect the provided main power plug to the vehicle's wiring harness. Ensure a secure connection.
- Antennas: Connect the GPS antenna and 4G antenna to their respective ports on the new head unit. Position the antennas in a location with clear signal reception (e.g., dashboard, A-pillar).
- USB Cables: Connect the USB cables for external devices or media playback. Route them to a convenient location, such as the glove compartment or center console.
- RCA Cables: If connecting external amplifiers or additional audio/video components, connect the RCA cables as needed.
- Radio Antenna: Connect the vehicle's FM/AM radio antenna to the unit.
4.3 Backup Camera Installation
The included HD backup camera provides a 170° wide-angle view with night vision for enhanced safety.
- Mounting: Mount the backup camera at the rear of your vehicle, typically near the license plate, ensuring a clear view.
- Wiring: Connect the camera's power wire to the vehicle's reverse light circuit. This ensures the camera activates automatically when the vehicle is in reverse.
- Video Signal: Route the video signal cable from the camera to the designated 'Reversing Camera Input' on the head unit.
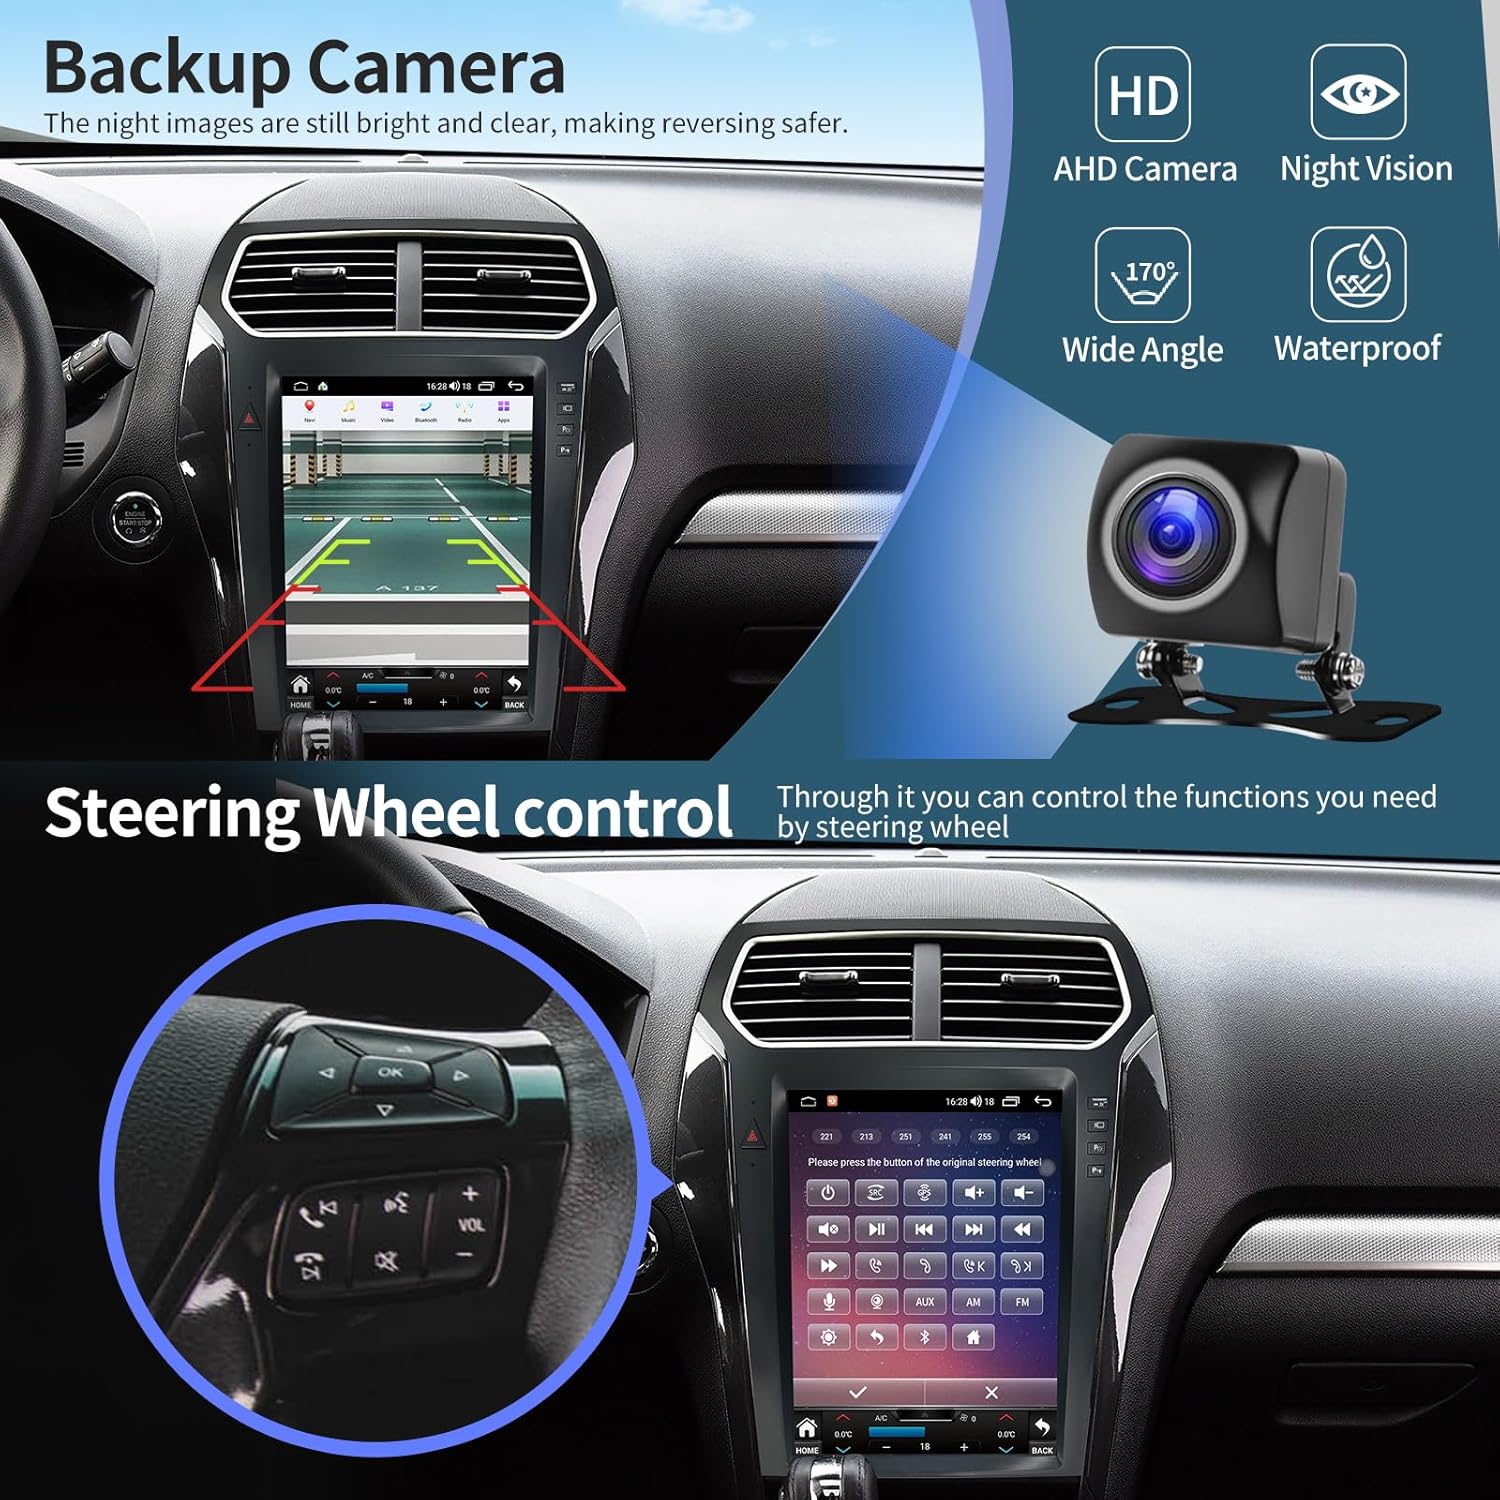
Image 4.1: Illustration of the backup camera display and integrated steering wheel controls.

Image 4.2: Details on the HD AHD backup camera, highlighting its wide-angle, night vision, and waterproof features.
4.4 Final Assembly
- Test Connections: Before fully reassembling the dashboard, reconnect the vehicle battery and perform a quick test of the unit's basic functions (power on, radio, touch screen response).
- Secure Unit: Carefully place the new head unit into the dashboard opening and secure it with screws. Reattach all trim panels.

Image 4.3: Comparison of the Ford Explorer dashboard before and after the installation of the Toeeklsa head unit.
5. Operating Instructions
This section details the operation of the key features of your Toeeklsa head unit.
5.1 Wireless CarPlay & Android Auto
Connect your smartphone wirelessly to access navigation, music, messages, and more directly on the head unit's screen.
- Enable Bluetooth & Wi-Fi: On your smartphone, ensure both Bluetooth and Wi-Fi are enabled.
- Connect Bluetooth: On the head unit, go to the Bluetooth settings and pair with your smartphone.
- Open Car Link 2.0: On the head unit, open the 'Car Link 2.0' application. Follow the on-screen prompts to connect to either Wireless CarPlay (for iOS devices) or Wireless Android Auto (for Android devices).
- Voice Control: Once connected, use voice commands (Siri or Google Assistant) for hands-free operation of navigation, calls, messages, and music.

Image 5.1: Step-by-step guide for connecting Wireless CarPlay and Android Auto via Bluetooth and the Car Link 2.0 app.

Image 5.2: Detailed visual instructions for establishing a wireless connection to CarPlay or Android Auto.
5.2 GPS Navigation
The unit features a built-in GPS module supporting high-precision navigation with GPS + GLONASS. It supports both online and offline maps.
- Map Applications: Access pre-installed navigation apps or download your preferred ones (e.g., Apple Maps, Google Maps, Waze) from the app store.
- Online/Offline Maps: For offline use, download map data for your region when connected to Wi-Fi.
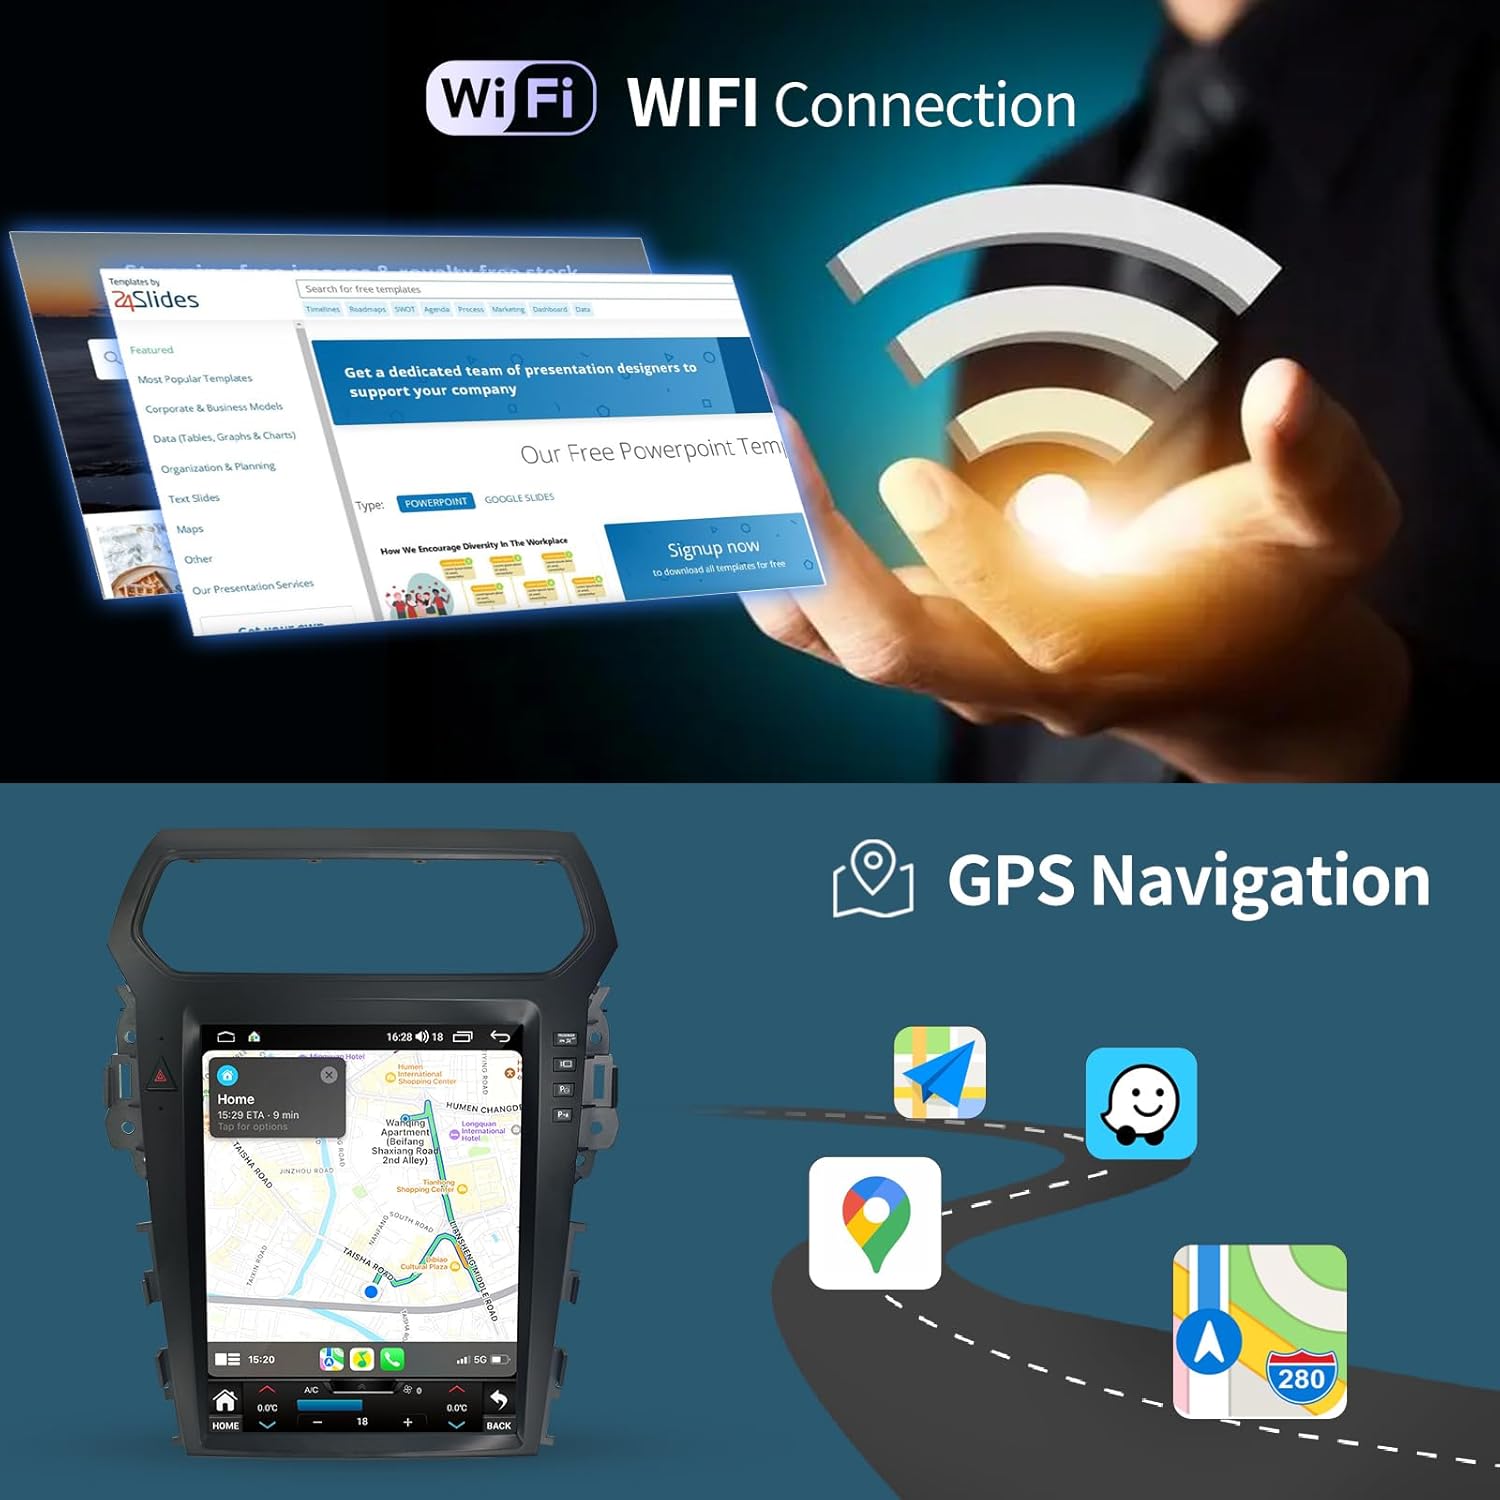
Image 5.3: Display of GPS navigation interface and Wi-Fi connection capabilities.
5.3 FM/AM Radio
Tune into your favorite radio stations with the integrated FM/AM/RDS tuner.
- Access Radio App: Select the 'Radio' icon from the main menu.
- Scan/Tune: Use the on-screen controls to scan for stations, manually tune, or select from saved presets.
- RDS Functionality: The Radio Data System (RDS) displays station information where available.

Image 5.4: Interface showing FM/AM radio, 32-band equalizer, and subwoofer settings.

Image 5.5: Detailed view of the FM/AM/RDS radio interface.
5.4 Bluetooth 5.0
Connect your phone via Bluetooth for hands-free calling and wireless audio streaming.
- Pairing: Go to the Bluetooth menu on the head unit and search for your phone. Select your phone from the list to pair.
- Hands-Free Calling: Once paired, you can make and receive calls directly from the head unit, with audio routed through your car's speakers and the external microphone.
- Bluetooth Music: Stream audio from your phone's music library or streaming apps to the head unit.
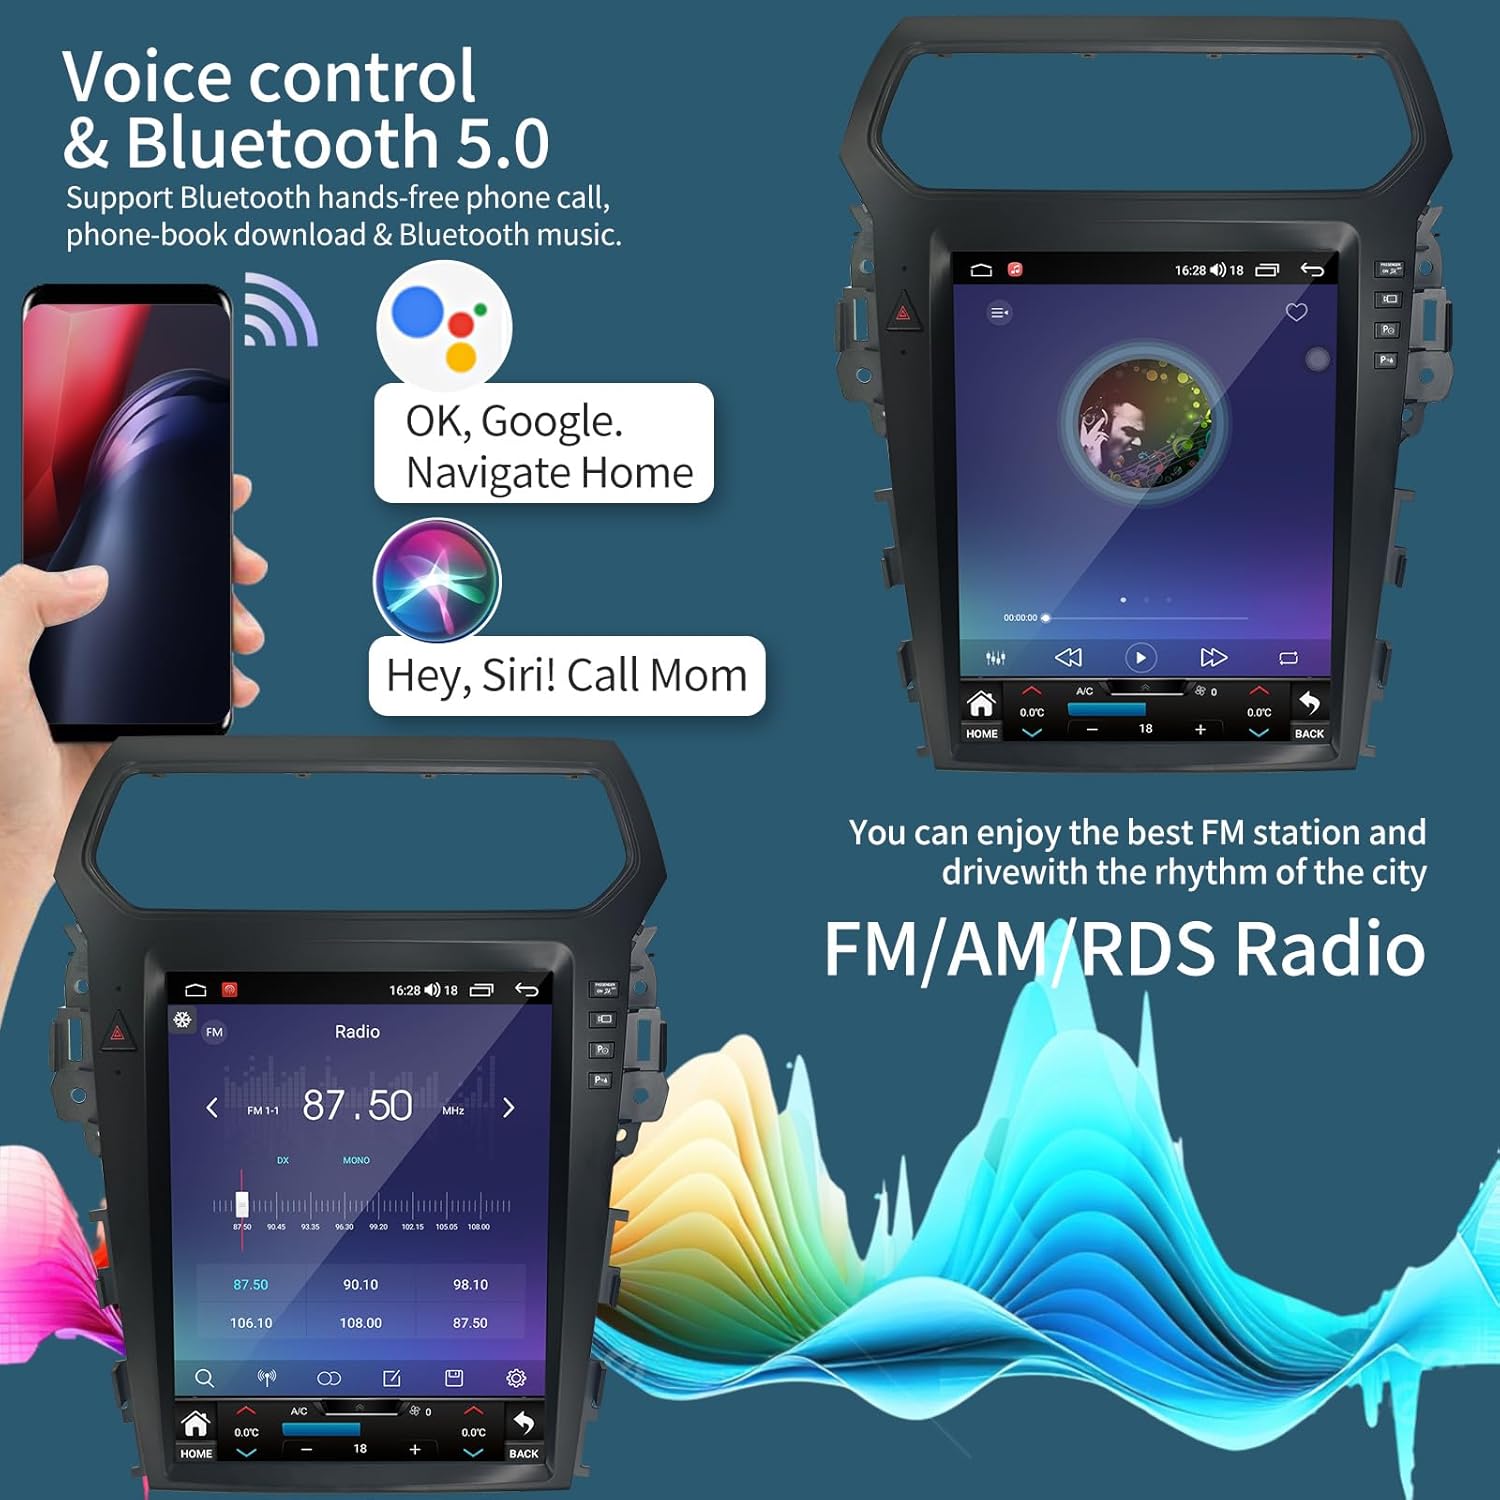
Image 5.6: Display showing voice control activation (Siri, Google Assistant) and Bluetooth 5.0 functionality for calls and music.

Image 5.7: User interface for Bluetooth 5.0, demonstrating music playback and hands-free calling screens.
5.5 Steering Wheel Control (SWC)
The unit supports learning functions for your original steering wheel buttons, allowing convenient control without taking your hands off the wheel.
- Configuration: Access the 'Steering Wheel Control' settings in the unit's menu.
- Learning Process: Follow the on-screen instructions to assign functions to each button on your steering wheel. This typically involves pressing a button on the screen and then pressing the corresponding button on your steering wheel.

Image 5.8: Interface for configuring steering wheel controls, showing button mapping options.
5.6 Split Screen Functionality
Utilize the split-screen feature to run two applications simultaneously, such as navigation and music playback.
- Activate Split Screen: Typically, long-press the recent apps button or drag an app to one side of the screen.
- Select Apps: Choose the two applications you wish to display side-by-side.

Image 5.9: Demonstration of the split-screen feature, displaying a video player and a navigation map concurrently.
5.7 DSP Sound Processing
The Digital Sound Processor (DSP) allows for advanced audio customization, including a 32-band equalizer and bass enhancement.
- Access DSP Settings: Navigate to the audio or sound settings menu on the head unit.
- Equalizer: Adjust the 32-band equalizer to fine-tune the audio output to your preference.
- Bass Enhancement: Modify bass levels and filter settings for a richer audio experience.

Image 5.10: User interface for DSP sound settings, including a graphic equalizer and bass enhancement options.
6. Maintenance
Proper care and maintenance will extend the life of your head unit.
- Screen Cleaning: Use a soft, lint-free cloth specifically designed for electronics screens. Lightly dampen the cloth with water or a screen cleaner if necessary. Avoid harsh chemicals or abrasive materials.
- General Cleaning: Wipe the unit's exterior with a soft, dry cloth. Do not use excessive moisture or spray cleaners directly onto the unit.
- Software Updates: Periodically check for available software updates to ensure optimal performance and access to new features. Updates can usually be found in the system settings or on the manufacturer's website.
- Avoid Extreme Temperatures: Prolonged exposure to very high or very low temperatures can affect the unit's performance and lifespan.
7. Troubleshooting
This section addresses common issues you might encounter. If problems persist, contact customer support.
| Problem | Possible Cause | Solution |
|---|---|---|
| Unit does not power on | Loose power connection, blown fuse, vehicle battery issue. | Check all power wiring connections. Inspect vehicle fuses. Ensure vehicle battery is charged. |
| No audio output | Incorrect wiring, volume too low, mute activated, amplifier issue. | Verify speaker wiring. Increase volume. Check if mute is active. If external amplifier is used, check its power and connections. |
| Backup camera not displaying | Camera not powered, video cable loose, incorrect input selected. | Ensure camera power is connected to reverse lights. Check video cable connection to head unit. Verify vehicle is in reverse. |
| Wireless CarPlay/Android Auto not connecting | Bluetooth/Wi-Fi off, incorrect pairing, Car Link 2.0 app not open. | Ensure Bluetooth and Wi-Fi are active on phone and head unit. Re-pair devices. Open 'Car Link 2.0' app on head unit. |
| Steering wheel controls not working | Not configured, incorrect wiring. | Access 'Steering Wheel Control' settings and perform the learning process. Check SWC wiring connections. |
| GPS signal weak or inaccurate | GPS antenna placement, environmental interference. | Ensure GPS antenna is placed in a clear line of sight to the sky. Avoid placing near metal objects. |
| Clock displays in 24-hour format, cannot adjust | System setting default. | Check system date/time settings for 12/24 hour format option. If not available, this may be a fixed system behavior. |
8. Specifications
| Feature | Detail |
|---|---|
| Model Number | 3b351437-afb0-4fba-9011-333a4b2f8f65 |
| Operating System | Android 12 |
| CPU | 8 Core Processor |
| RAM | 4GB |
| ROM | 64GB |
| Display Size | 12.1 Inches |
| Resolution | 1920 x 1200 (IPS Touchscreen) |
| Connectivity | USB, Wi-Fi, Wireless, Bluetooth 5.0, 4G |
| Special Features | Android Auto, Apple CarPlay, GPS Navigation, DSP Sound, FM/AM Radio, Steering Wheel Control, Backup Camera Support |
| Included Components | Head Unit, Backup Camera, DVR (Digital Video Recorder) |
| Product Dimensions | 21 x 6 x 16 inches |
| Item Weight | 8.2 pounds |

Image 8.1: Diagram illustrating the powerful 8-core CPU, 4GB RAM, and 64GB ROM for stable and fast performance.

Image 8.2: Details on the 12.1-inch IPS touchscreen, highlighting its 1280x720 HD resolution, wider viewing angle, 2.5D glass screen, and fast response time.
9. Warranty and Customer Support
9.1 Warranty Information
This Toeeklsa car radio comes with a 1-year product warranty from the date of purchase. Additionally, a 30-day money-back guarantee is offered for any reason. Please retain your proof of purchase for warranty claims.
9.2 Technical Support
For any questions regarding installation, operation, or troubleshooting, please contact our customer support team. We provide professional technical assistance and aim to respond to inquiries within 24 hours.
To contact support:
- Locate the seller's name (Tokesla) on the product purchase page.
- Click on the seller's name to access their profile.
- Select the "Ask a question" option to send a message to customer support.

Image 9.1: Visual guide on how to contact customer support via the product page.