1. Introduction
Thank you for choosing the COLAMY H6 Heavy-Duty Ergonomic Mesh Office Chair. This manual provides detailed instructions for assembly, operation, maintenance, and troubleshooting to ensure you get the most out of your new chair. Please read this manual thoroughly before assembly and use, and retain it for future reference.
2. Safety Information
- Weight Capacity: This chair is designed to support a maximum weight of 450 pounds (approximately 204 kg). Do not exceed this weight limit to prevent damage or injury.
- Proper Assembly: Ensure all parts are correctly assembled and tightened according to the instructions. Periodically check all bolts and screws to ensure they remain secure.
- Intended Use: This chair is intended for office and personal use. Do not stand on the chair or use it as a step stool.
- Children: Keep children away from the chair during assembly. Small parts may pose a choking hazard.
- Movement: Avoid sudden movements or leaning excessively to one side, which could cause the chair to tip over.
3. Package Contents
Before beginning assembly, verify that all components are present and undamaged. If any parts are missing or damaged, please contact customer support.
- Backrest
- Seat Cushion
- Armrests (2)
- Gas Lift Cylinder
- Base with Casters
- Mechanism Plate
- Hardware Kit (screws, washers, Allen wrench)
- User Manual
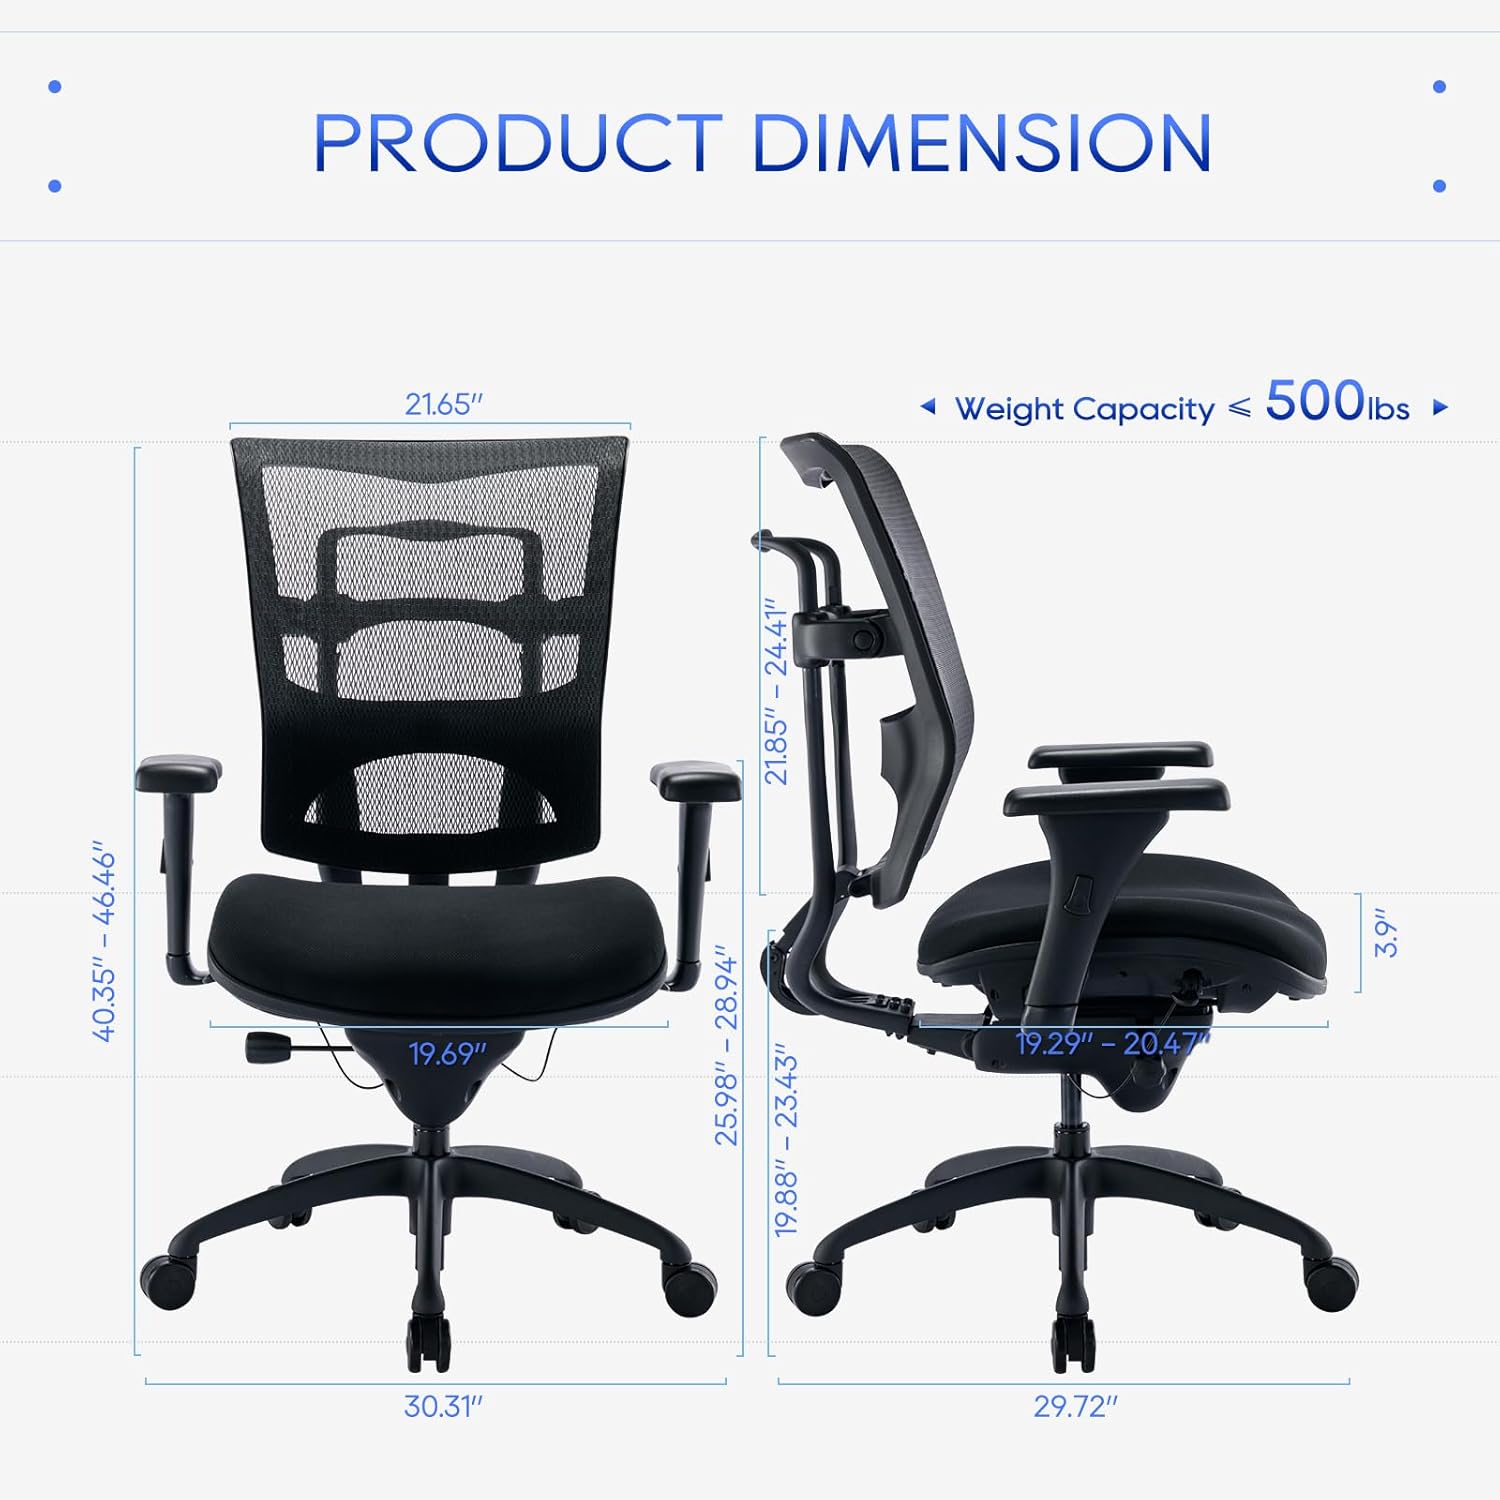
Figure 3.1: Product Dimensions and Components Overview. This image illustrates the overall size and key parts of the chair, including the backrest, seat, armrests, and base.
4. Setup (Assembly Instructions)
Assembly is straightforward and typically takes 10-15 minutes. Follow these steps carefully:
- Attach Casters to Base: Insert the casters into the holes at the ends of the chair base until they click securely into place.
- Insert Gas Lift: Place the gas lift cylinder into the center hole of the chair base.
- Attach Mechanism Plate to Seat: Align the mechanism plate with the screw holes on the underside of the seat cushion. Ensure the front of the mechanism faces the front of the seat. Secure with screws using the provided Allen wrench.
- Attach Armrests to Seat: Secure the armrests to the sides of the seat cushion using the designated screws. Ensure they are firmly attached.
- Attach Backrest to Seat/Mechanism: Connect the backrest to the seat and/or mechanism plate using the appropriate screws. Ensure all connections are tight.
- Connect Seat Assembly to Gas Lift: Carefully place the assembled seat onto the gas lift cylinder, ensuring it is centered and stable.
Once assembled, sit on the chair to firmly seat the gas lift into the base and mechanism.
5. Operating Instructions (Adjustments)
The COLAMY H6 chair offers multiple adjustments for personalized comfort:
- Seat Height Adjustment: Locate the lever on the right side under the seat. To raise the seat, lift the lever while taking your weight off the chair. To lower the seat, lift the lever while seated. Release the lever to lock the height.
- Seat Depth Adjustment: This chair features a wire-controlled sliding seat. Locate the control on the left side under the seat. Pull the control to slide the seat forward or backward by up to 2 inches. Release the control to lock the seat depth.
- Backrest Height Adjustment & Lumbar Support: The backrest height can be adjusted by 2.5 inches. While seated, grasp the backrest and lift it upwards to adjust. The synchronous lumbar support will adjust with the backrest height.
- Recline and Lock Function: Use the wire control on the right side under the seat. Pull the control to unlock the recline function. Lean back to your desired angle (95°, 100°, or 120°) and release the control to lock it in place.
- Tilt Tension Adjustment: The round knob located under the front of the seat controls the tilt tension. Turn clockwise to increase tension (making it harder to recline) or counter-clockwise to decrease tension (making it easier to recline).
- Armrest Height Adjustment: Press the button on the side of each armrest and slide the armrest up or down to your preferred height. Release the button to lock.
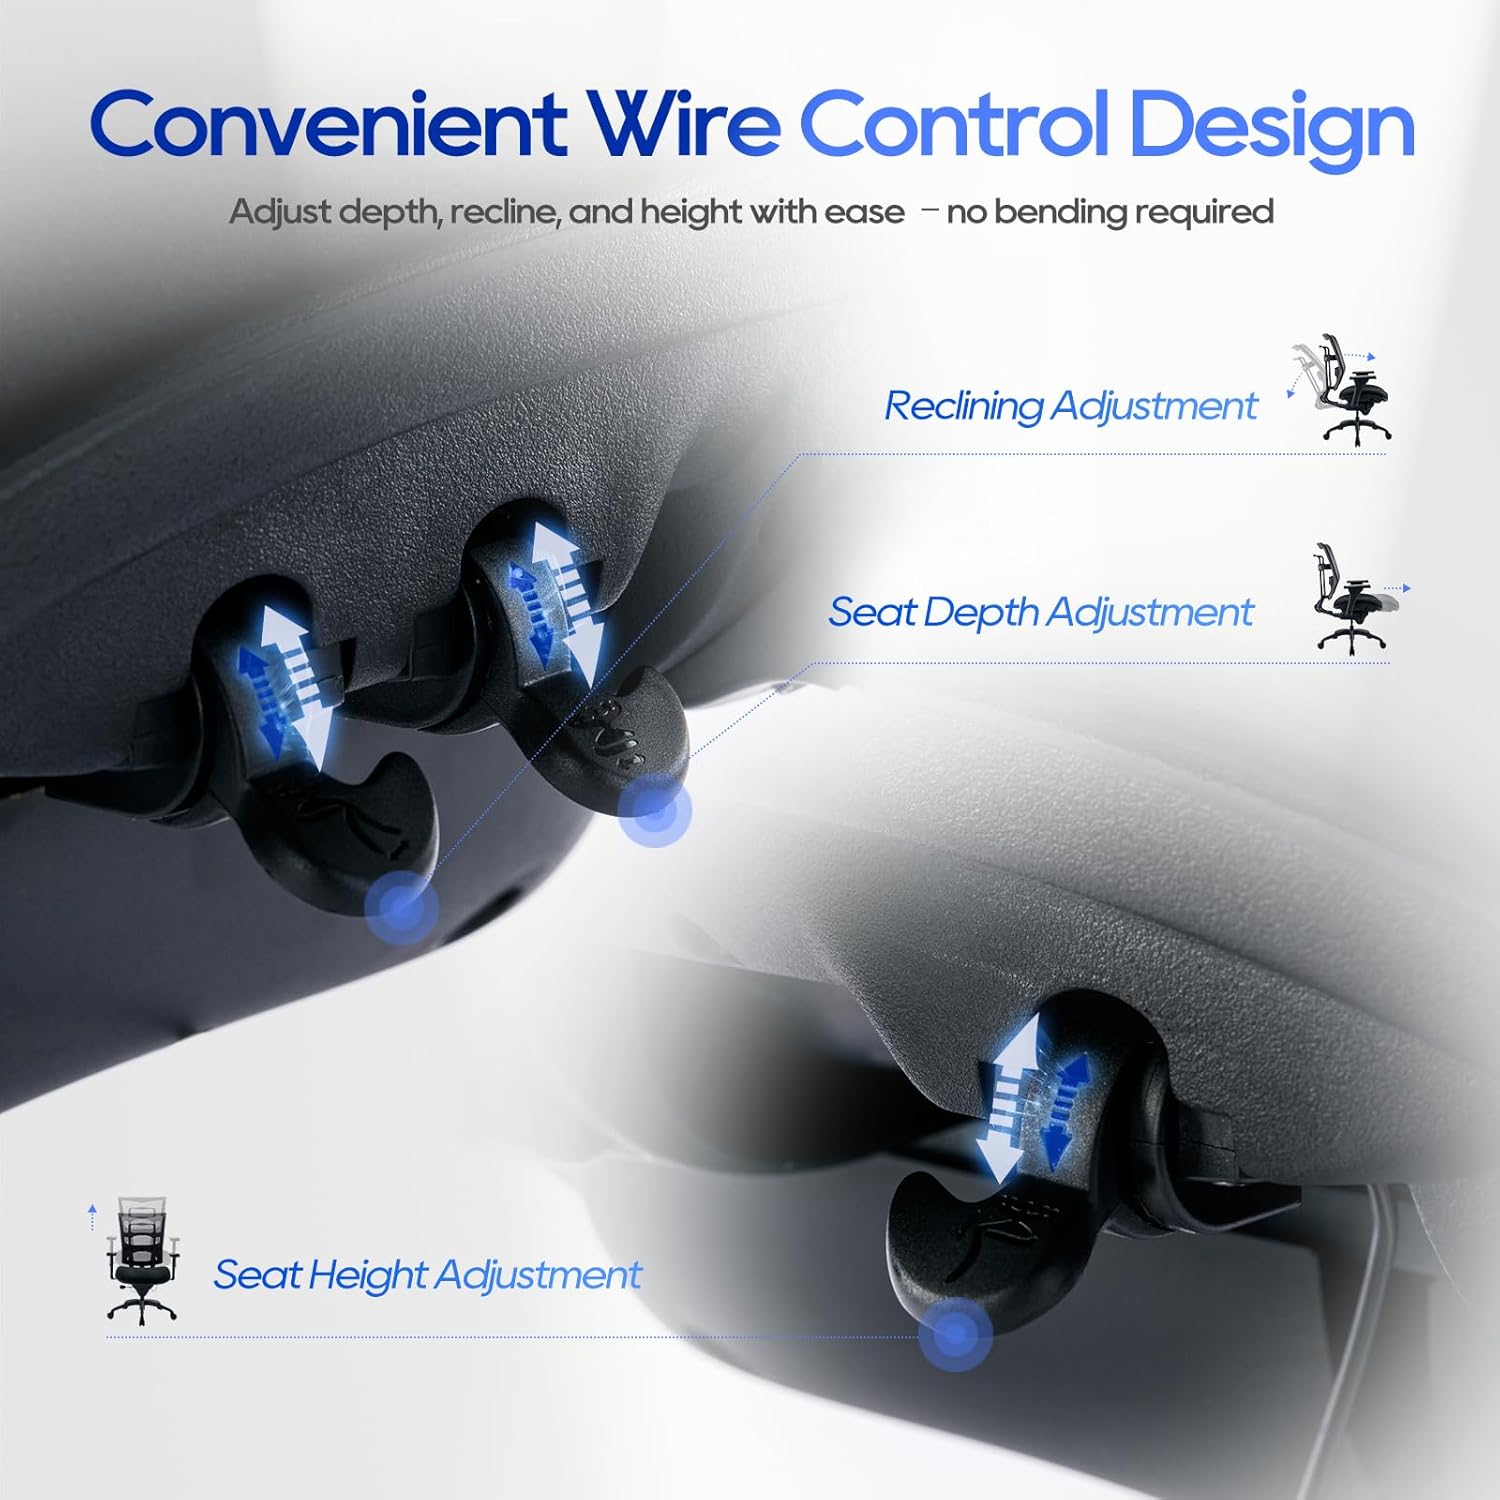
Figure 5.1: Convenient Wire Control Design for Adjustments. This image highlights the levers used for adjusting seat depth, recline, and seat height without bending.
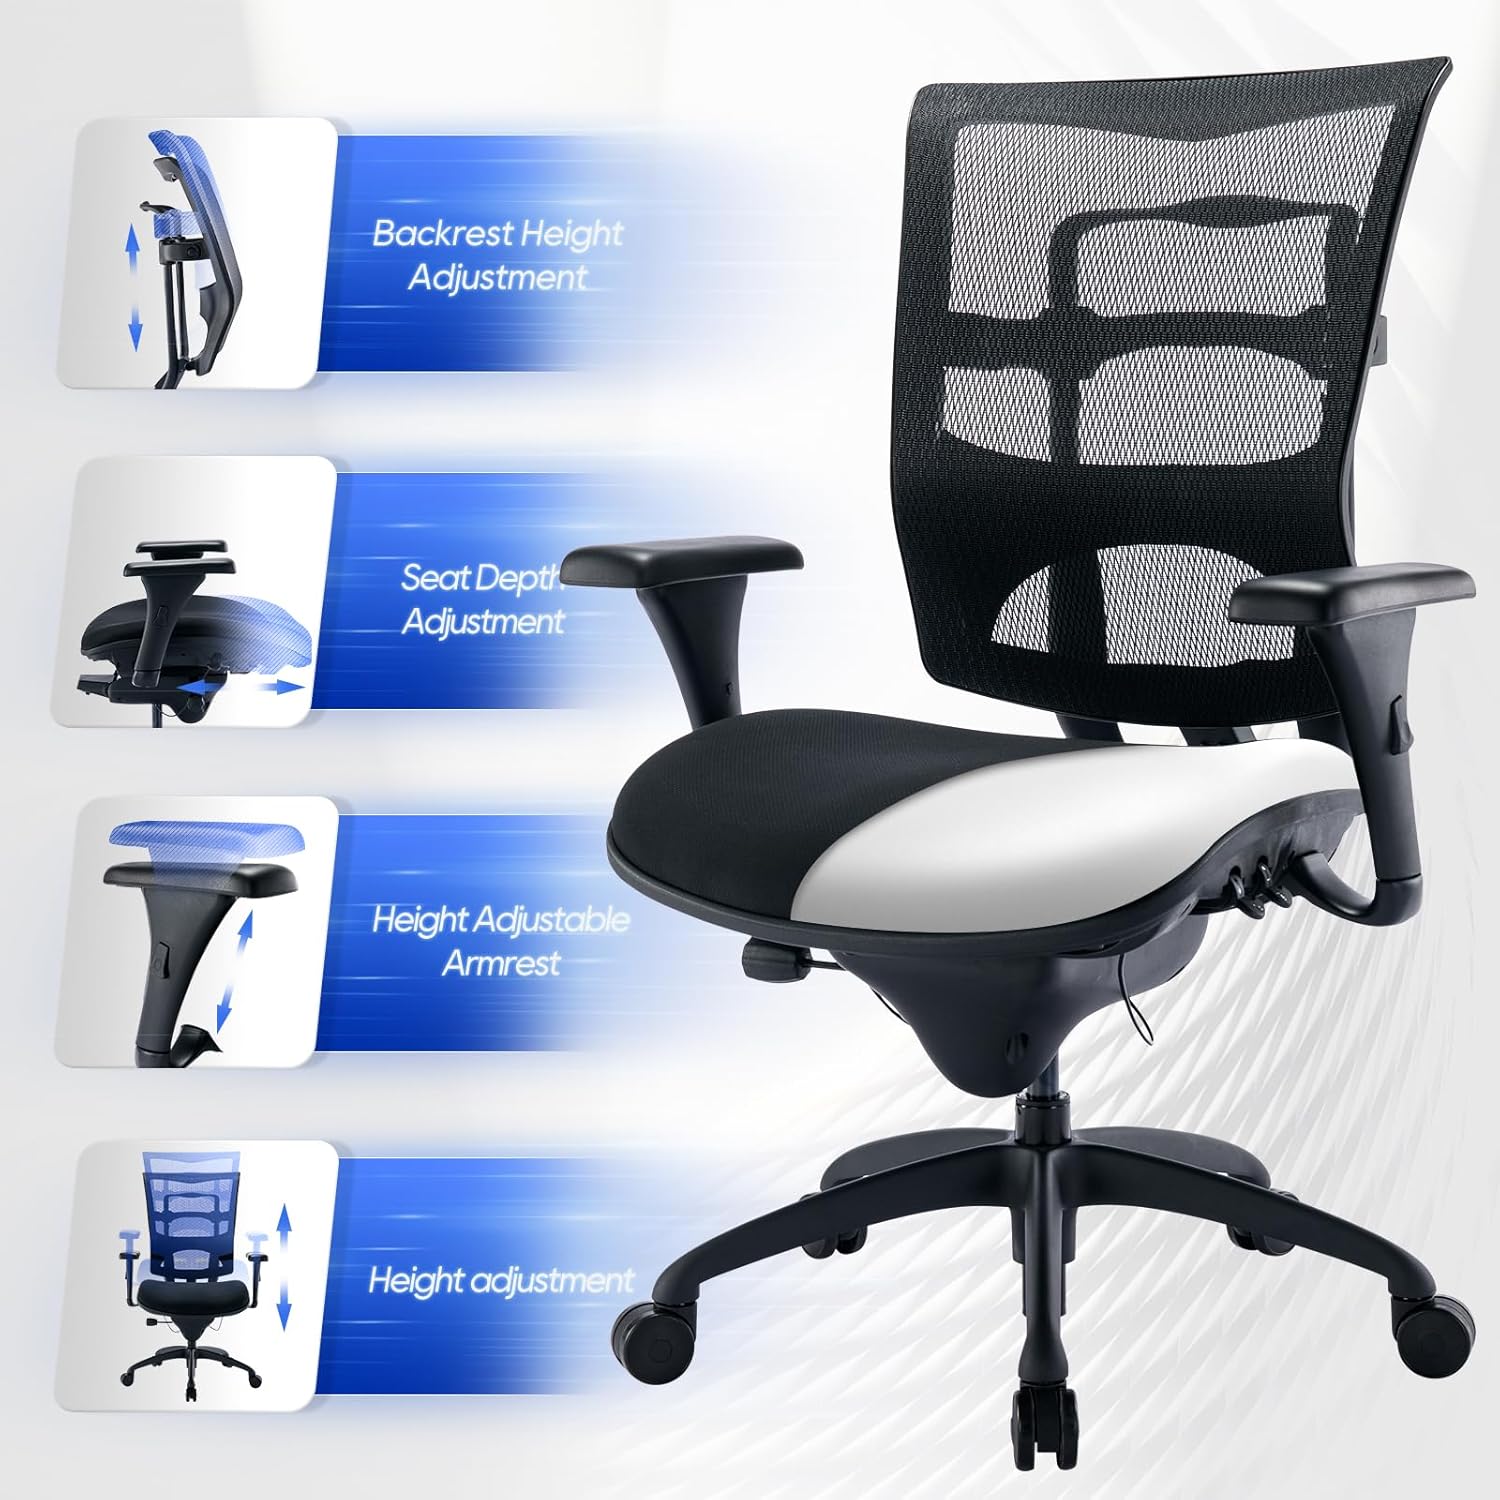
Figure 5.2: Overview of Adjustable Features. This image visually explains the different adjustable components of the chair, including backrest, seat, and armrests.

Figure 5.3: Recline and Seat Depth Adjustments. This image illustrates the various recline angles and the 2-inch seat depth adjustment feature.

Figure 5.4: Backrest and Lumbar Support Adjustment. This image details how the backrest height and integrated lumbar support can be customized for optimal comfort.
6. Maintenance
- Cleaning: For general cleaning, wipe the chair with a soft, damp cloth. For spot removal on the mesh or upholstered parts, use a mild fabric cleaner and blot the area gently. Avoid harsh chemicals or abrasive cleaners.
- Regular Checks: Periodically inspect all screws, bolts, and connections to ensure they are tight. Re-tighten if necessary to maintain stability and safety.
- Caster Care: Keep casters free of hair and debris to ensure smooth movement.
7. Troubleshooting
If you encounter any issues with your chair, refer to the following common problems and solutions:
| Problem | Possible Cause | Solution |
|---|---|---|
| Chair does not adjust height | Gas lift not engaged or faulty | Ensure the height adjustment lever is fully engaged. If the issue persists, the gas lift may need replacement. |
| Chair wobbles or feels unstable | Loose screws or uneven assembly | Check and tighten all screws and bolts. Ensure the chair is assembled on a flat surface. |
| Casters do not roll smoothly | Debris in casters or damaged casters | Remove any hair or debris from the caster wheels. If damaged, casters may need replacement. |
| Recline function is stiff or not locking | Tilt tension too high or mechanism issue | Adjust the tilt tension knob counter-clockwise. Ensure the recline lock lever is fully engaged or disengaged. |
8. Specifications
- Model Number: H6
- Brand: COLAMY
- Color: Black
- Product Dimensions (L x W x H): 75.49 x 76.99 x 116.84 cm (29.72 x 30.31 x 45.99 inches)
- Item Weight: 27.22 kg (60 pounds)
- Weight Capacity: 450 pounds
- Main Material: Carbon Fiber (Mesh)
- Frame Material: Metal
- Finish Type: Plated
- Style: Modern
- Back Style: Solid Back
- Comfortable Cushion: Upholstered, 3.9 inches thick
- Gas Lift: Class 4 SGS Certified
- Certifications: BIFMA Certified
- Assembly: Required
- Recommended Uses: Gaming, Reading, Office
9. Warranty and Support
COLAMY is committed to full customer satisfaction. All necessary tools and hardware are included for easy assembly. If you have any questions, concerns, or require assistance with your COLAMY H6 office chair, please do not hesitate to contact our customer support team. We are dedicated to providing prompt and helpful service.
For support, please refer to the contact information provided at the point of purchase or on the official COLAMY website.


