1. Introduction
This manual provides comprehensive instructions for the setup, operation, and maintenance of your ERATEC AZ-6500 Azan Prayer Clock. Please read this guide carefully to ensure optimal performance and longevity of your device. This clock is designed to display current time, date, and automatically calculate and announce prayer times (Azan) based on your configured location.
2. Product Overview
The ERATEC AZ-6500 is a digital Azan prayer clock featuring a large, clear display and intuitive controls. It is designed for indoor use and provides accurate prayer times for various cities worldwide.

Figure 2.1: Front View of ERATEC AZ-6500. This image displays the clock's front panel, highlighting the large digital screen that shows time, date, city, temperature, and prayer times. The right side features various control buttons for navigation and settings.
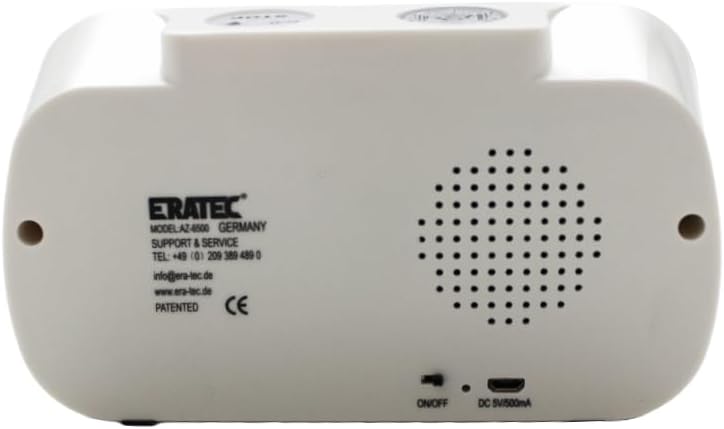
Figure 2.2: Rear View of ERATEC AZ-6500. The back of the clock includes a speaker grille for Azan playback, an ON/OFF switch, and a DC 5V/500mA USB power input port. Manufacturer information and support contact details are also visible.

Figure 2.3: Top View of ERATEC AZ-6500. This image shows the top panel of the clock, featuring a 'STOP' button (likely for alarms/Azan) and a button for display backlight or light function.
3. Setup
3.1 Powering the Device
- Battery Installation: Open the battery compartment on the back of the clock. Insert the required batteries (e.g., AA or AAA, refer to the battery compartment label) ensuring correct polarity (+/-).
- USB Power Connection: Alternatively, connect the provided USB power adapter to the DC 5V/500mA port on the back of the clock and plug it into a standard wall outlet.
- Power On: Slide the ON/OFF switch on the back of the clock to the 'ON' position. The display should illuminate.
3.2 Initial Configuration (Time, Date, Location)
Upon first power-on or after a reset, you will need to set the current time, date, country, and city to ensure accurate prayer time calculations.
- Enter Setup Mode: Press and hold the SET button for a few seconds until the display indicates setup mode (e.g., flashing digits).
- Set Current Time: Use the UP and DOWN arrow buttons (located around the SET button) to adjust the hour, then press SET to move to minutes. Repeat for minutes.
- Set Date: After setting the time, press SET again to move to date settings. Adjust year, month, and day using the arrow buttons and SET to confirm each.
- Select Country: Press SET to proceed to country selection. Use the ULKE (Country) button and arrow keys to find your country. Press SET to confirm.
- Select City: After country selection, press SET to move to city selection. Use the SEHIR (City) button and arrow keys to find your city. Press SET to confirm.
- Exit Setup: Once all settings are configured, press the EXIT button to save and exit setup mode.
4. Operating Instructions
4.1 Viewing Prayer Times
The clock automatically displays the current time and upcoming prayer times. You can cycle through different prayer times (Fajr, Dhuhr, Asr, Maghrib, Isha) using the dedicated prayer time buttons (e.g., FAJR, MUEZZIN, etc.) or the arrow keys in normal display mode.
4.2 Azan Sound Settings
The clock will automatically play the Azan at the calculated prayer times. You can adjust the volume or select different Muezzin voices if available.
- Volume Adjustment: Use the volume control buttons (often indicated by speaker icons) to increase or decrease the Azan volume.
- Muezzin Selection: Press the MUEZZIN button to cycle through available Azan recitations.
- Stop Azan: Press the STOP button (on top of the clock) to silence the Azan once it starts.
4.3 Alarm Functions
The ERATEC AZ-6500 may include additional alarm functions for daily use.
- Setting Daily Alarms: Refer to the specific alarm setting instructions in the display menu, typically accessed by pressing a dedicated ALARM or SET button repeatedly until alarm settings appear. Use arrow keys to set the alarm time and SET to confirm.
- Teheccüd Alarm: The TEHECCÜD button likely activates a special alarm for the Tahajjud prayer. Press it to enable/disable this feature.
4.4 Daylight Saving Time (DST)
To adjust for Daylight Saving Time:
- Press the DST button to toggle Daylight Saving Time ON or OFF. The display will indicate if DST is active.
4.5 Ramazan Mode
The RAMAZAN button activates a special mode for the month of Ramadan, which may adjust prayer time calculations or display specific information relevant to fasting.
- Press the RAMAZAN button to activate or deactivate Ramadan mode.
5. Maintenance
- Cleaning: Use a soft, dry cloth to clean the clock's exterior. Do not use abrasive cleaners or solvents.
- Battery Replacement: If the clock is battery-powered and the display dims or functions become erratic, replace all batteries with new ones of the same type. Ensure correct polarity.
- Storage: If storing the clock for an extended period, remove the batteries to prevent leakage.
6. Troubleshooting
- Display is blank:
- Ensure the ON/OFF switch is in the 'ON' position.
- Check battery installation and replace if necessary.
- Verify USB power connection if using the adapter.
- Incorrect Prayer Times:
- Re-check the configured country and city settings (Section 3.2).
- Ensure the current time and date are set correctly.
- Verify DST setting is correct for your region (Section 4.4).
- No Azan Sound:
- Check the volume level.
- Ensure the Muezzin sound is enabled.
- Buttons are unresponsive:
- Try turning the clock off and on again.
- Replace batteries if power is low.
7. Specifications
| Feature | Detail |
|---|---|
| Model Number | AZ-6500 |
| Brand | ERATEC |
| Color | White |
| Dimensions (L x W x H) | 21 x 3.81 x 11 cm |
| Weight | 400 grams |
| Material | Acrylonitrile Butadiene Styrene (ABS) |
| Display Type | Digital (Large Screen) |
| Power Source | Battery powered with USB power option (DC 5V/500mA) |
| Usage | Indoor |
8. Support & Warranty
For technical support or inquiries, please contact ERATEC customer service:
- Telephone: +49 (0) 209 389 489 0
- Email: info@era-tec.de
- Website: www.era-tec.de
Information regarding product warranty may be available on the manufacturer's website or included with your purchase documentation.