Product Overview
The Feonase Queen Size Bed Frame is designed for comfort and convenience, featuring an ergonomic storage headboard with a built-in charging station and adjustable LED lights. Its heavy-duty metal slat construction eliminates the need for a box spring, providing robust support for your mattress. This manual provides detailed instructions for assembly, operation, maintenance, and troubleshooting to ensure optimal use of your bed frame.

Image: Front view of the Feonase Queen Size Bed Frame with its ergonomic headboard, LED lighting, and under-bed storage space.
Safety Information
Please read and understand all safety warnings before assembly and use. Failure to follow these instructions may result in injury or damage to the product.
- Always assemble according to the provided instructions to ensure stability.
- Do not exceed the maximum weight recommendation of 1000 pounds.
- Be cautious of the sharp edges and avoid placing heavy objects on the headboard to prevent tilting.
- Keep the bed frame away from heat sources to prevent damage to the LED lights.
- Ensure all connections are securely tightened before use. Periodically check and re-tighten fasteners.
- Keep small parts and packaging materials away from children to prevent choking hazards.
Package Contents
Before beginning assembly, verify that all parts and hardware are present. Refer to the parts list provided in your physical manual or the assembly video for a complete overview.

Image: Illustration showing the heavy metal slats, easy assembly features, and safe arc corner design of the bed frame components.
Assembly Instructions
Assembly of the Feonase Queen Size Bed Frame is designed to be straightforward. We recommend assembling the bed frame with at least two people.
Assembly Video Guide:
Video: Official Feonase LED Metal Bed Frame Installation Guide. This video provides a step-by-step visual walkthrough of the entire assembly process, including attaching the headboard, connecting side rails, installing support legs, and placing the slats.
Key Assembly Steps (Refer to video for details):
- Unpack and Identify Parts: Lay out all components and hardware. Match them with the parts list in your manual or the video's initial overview.
- Assemble the Headboard Frame: Connect the vertical and horizontal headboard frame pieces using the specified screws (e.g., C screws as shown in the video).
- Attach Headboard Panel: Secure the wooden headboard panel to the assembled headboard frame using the designated fasteners (e.g., F and E screws).
- Assemble Side Rails and Footboard: Connect the side rails to the headboard and footboard sections. Ensure all connections are firm.
- Install Center Support Legs: Attach the central support legs to the main frame, ensuring they are properly aligned and tightened.
- Place Metal Slats: Lay the metal slats across the frame. The design allows for easy placement and secure fitting.
- Install Charging Station: Insert the charging station into the designated slot on the headboard and secure it with the provided screws (e.g., J and G screws).
- Apply LED Strip: Carefully adhere the LED light strip to the underside of the headboard shelf, ensuring it is properly positioned and connected.
- Final Checks: Double-check all screws and connections to ensure they are tight and the frame is stable.
Operating Instructions
LED Lighting System:
The integrated LED lights offer customizable ambiance for your bedroom. They can be controlled via a dedicated mobile application or the included remote control.
- Power On/Off: Use the power button on the remote or within the app to turn the lights on or off.
- Color Adjustment: Select from over 60,000 colors using the color wheel in the app or preset color buttons on the remote.
- Brightness Control: Adjust the light intensity to your preference via the app or remote.
- Mode Selection: Choose from various dynamic modes, including music sync mode where lights change with the rhythm of music.
- Timing Function: Set timers for the lights to automatically turn on or off.

Image: The Feonase bed frame with its LED lights illuminated, showcasing various color options and the mobile app interface for control.
Charging Station:
The headboard features a convenient charging station to power your electronic devices.
- Power Outlets: Two 110V/12A AC outlets are available for standard plugs.
- USB Ports: One USB port and one Type-C port are provided for charging mobile devices.
- Usage: Simply plug your devices into the appropriate ports. Ensure the bed frame is connected to a power source for the charging station to function.

Image: Close-up view of the headboard's integrated charging station, showing the 110V/12A AC outlets, USB port, and Type-C port.
Maintenance
Regular maintenance will help prolong the life and appearance of your Feonase bed frame.
- Cleaning: Wipe down metal and wood surfaces with a soft, damp cloth. Avoid harsh chemicals or abrasive cleaners.
- Fastener Checks: Periodically (e.g., every 3-6 months) check all screws and bolts to ensure they remain tight. Re-tighten as necessary to prevent squeaking and maintain stability.
- LED Lights: The LED strip is designed for durability. If issues arise, check the power connection. Do not attempt to repair the LED strip yourself; contact customer support.
- Charging Station: Keep the charging ports free of dust and debris. Do not expose the charging station to liquids.
Troubleshooting
This section addresses common issues you might encounter with your bed frame.
| Problem | Possible Cause | Solution |
|---|---|---|
| Bed frame squeaks. | Loose fasteners; uneven floor. | Tighten all screws and bolts. Ensure the bed frame is on a level surface. Consider using felt pads under legs if the floor is uneven. |
| LED lights not working. | Power connection issue; remote battery low; app not connected. | Check if the LED strip is properly plugged into the power source. Replace remote batteries. Ensure your mobile device is correctly paired with the LED system via the app. |
| Charging station not providing power. | Bed frame not plugged in; power strip switch off; device cable faulty. | Ensure the bed frame's power cord is securely plugged into a working wall outlet. Check if the power switch on the charging station is in the 'ON' position. Try a different charging cable or device. |
| Headboard feels wobbly. | Loose connections at headboard. | Re-tighten all screws connecting the headboard to the main frame. |
Specifications
Detailed specifications for the Feonase Queen Size Bed Frame.
| Feature | Detail |
|---|---|
| Size | Queen |
| Product Dimensions | 88"L x 62"W x 40"H |
| Weight Capacity | 1000 lbs |
| Material | Steel & Wood |
| Color | Black |
| Special Feature | Squeak Resistant, Ergonomic Backrest, LED Lights, Charging Station |
| Under-bed Clearance | 12 Inches |
| Assembly Required | Yes |
| Model Number | BED916 |
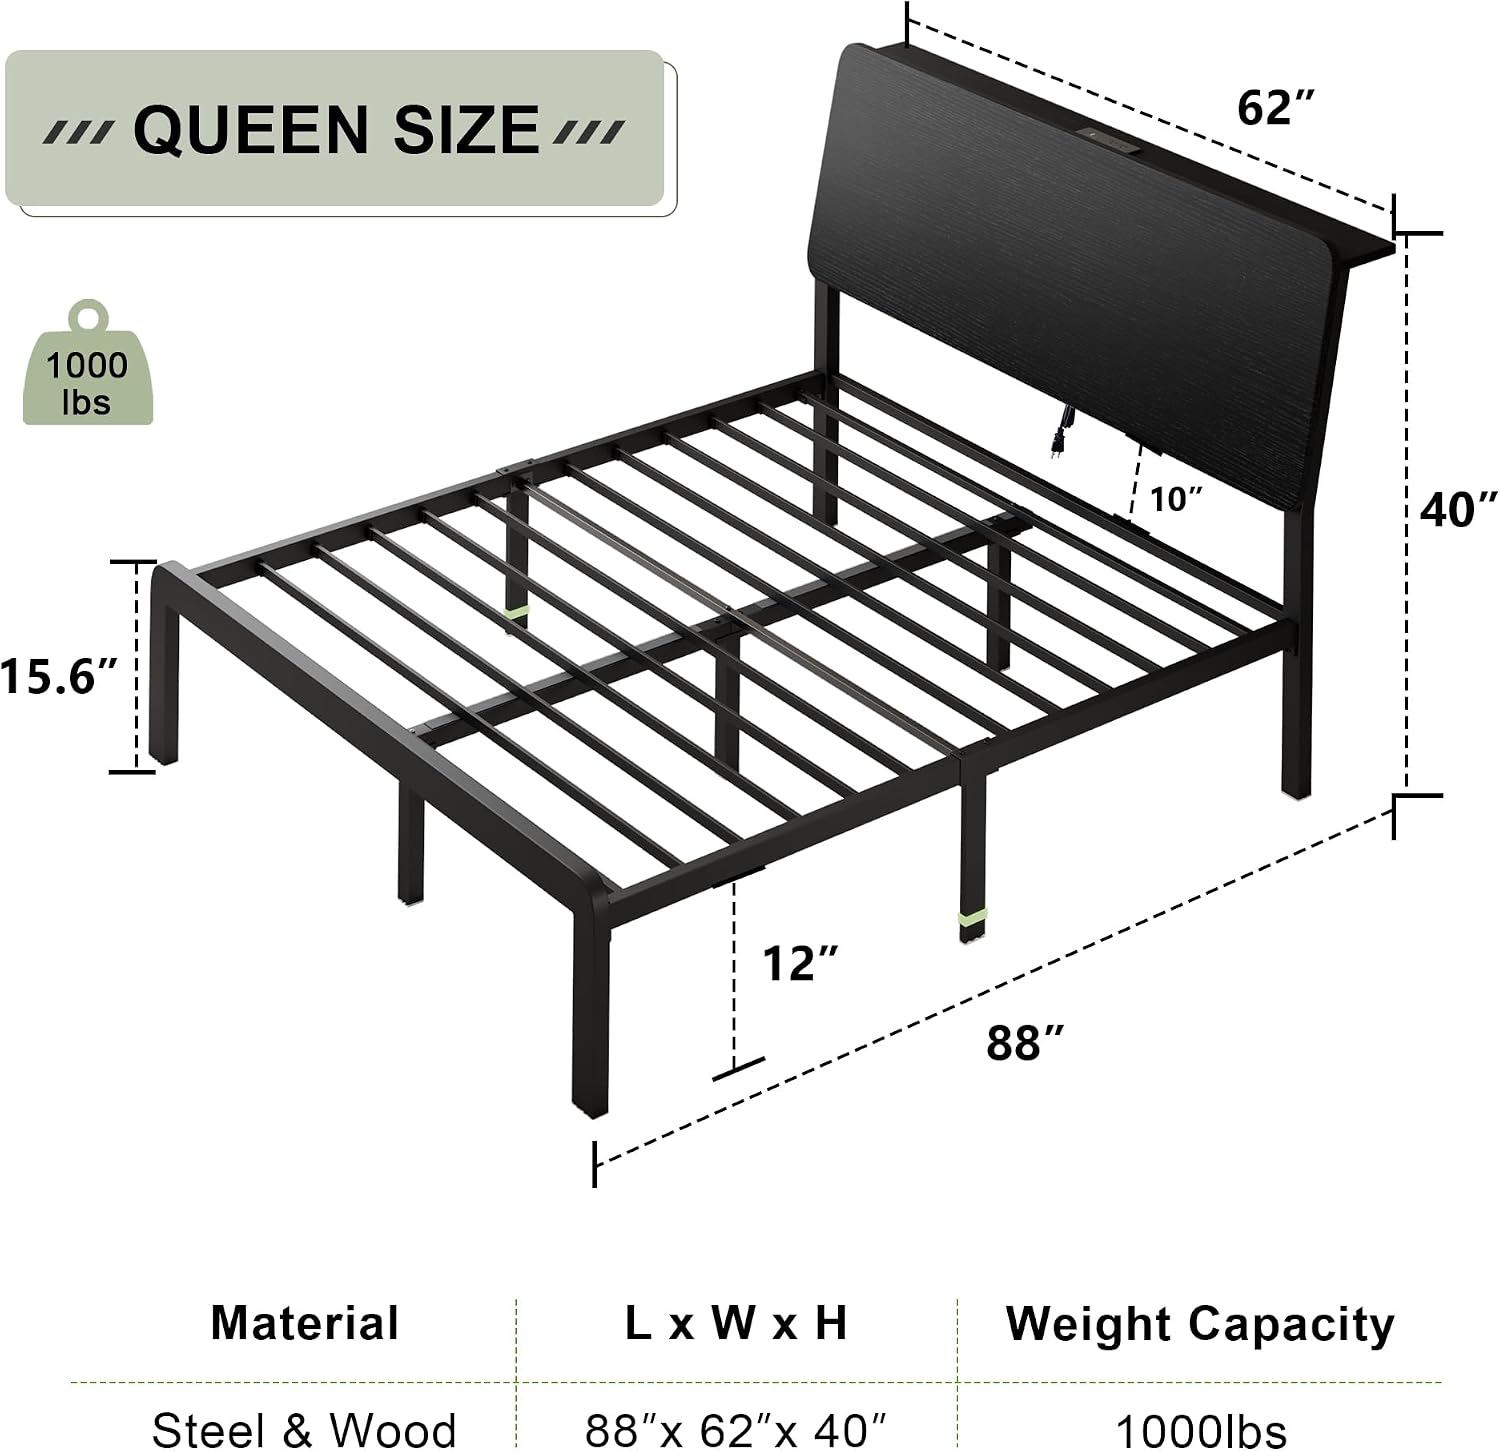
Image: Diagram illustrating the dimensions (length, width, height, under-bed clearance) and weight capacity of the Feonase Queen Size Bed Frame.
Warranty and Support
Feonase is committed to providing high-quality products and excellent customer service.
- Warranty Information: For specific warranty details regarding your Feonase bed frame, please refer to the warranty card included with your product or visit the official Feonase brand store.
- Customer Support: If you have any questions, require assistance with assembly, or encounter any issues not covered in this manual, please contact Feonase customer support.
- Online Resources: Visit the Feonase Store on Amazon for additional product information, FAQs, and contact options.