1. Introduction
This manual provides essential information for the safe and efficient operation, maintenance, and troubleshooting of your SANITMAX SM860 Ride-On Floor Scrubber Machine. Please read this manual thoroughly before operating the machine to ensure proper usage and to prevent injury or damage.
Safety Information
Always observe the following safety precautions:
- Read and understand all instructions before use.
- Wear appropriate personal protective equipment (PPE) such as safety glasses and non-slip footwear.
- Ensure the machine is turned off and disconnected from power before performing any maintenance or adjustments.
- Do not operate the machine on inclines exceeding its specified climbing degree.
- Keep children and unauthorized personnel away from the operating area.
- Use only recommended cleaning solutions and parts.
2. Product Overview and Components
The SANITMAX SM860 is a high-productivity ride-on floor scrubber designed for commercial and industrial environments. Familiarize yourself with its main components for effective operation.

Figure 2.1: Side view of the SM860 scrubber with key components labeled, including the Steering Wheel, Control Panel, Accelerator Pedal, Brake Pedal, Clear Water Tank, Brush Guard, Vacuum Motor Box, Sewage Tank, Warning Light, Key Switch, Suction Hose, Sewage Hose, Driving Motor, Wheels, Brush Plate, and Squeegee Assembly.

Figure 2.2: Detailed view of the SM860 control panel, showing the Voltage Display, Battery Indicator, Accelerator, Slow Down, Forward, Reverse, Brush Button, One-Button Start, Vacuum Button, Horn, and Machine Headlight controls.
3. Technical Specifications
The following table outlines the key technical specifications of the SANITMAX SM860 Ride-On Floor Scrubber Machine.
| Feature | Specification |
|---|---|
| Brush Scrubbing Width | 34 inches |
| Squeegee Suction Width | 39.4 inches |
| Cleaning Efficiency (theoretical) | 80,000 sq.ft/h |
| Battery Capacity | 24V/150Ah |
| Continuous Working Time | 4+ hours |
| Charging Time | 6-8 hours |
| Solution Tank Capacity | 34.3 gal (130 L) |
| Recovery Tank Capacity | 37 gal (140 L) |
| Brushes | 2 Disc Brushes (17 inches each, automatic lifting) |
| Brush Pressure | 90 lbs |
| Brush Motors | 2 x 380 W |
| Vacuum Motor | 360W Brushless Motor |
| Noise Level | 65 dB |
| Climbing Degree (no load) | <25% |
| Dimensions (L*W*H) | 59"D x 34"W x 48"H |
| Weight (with battery) | 772 lbs |

Figure 3.1: Visual representation of the SM860's technical specifications.
4. Setup
Before operating your SM860 scrubber, ensure it is properly set up.
4.1 Initial Assembly
The SM860 comes largely pre-assembled. Attach the squeegee assembly and ensure all connections are secure. Refer to the included assembly guide for detailed steps.

Figure 4.1: Squeegee assembly, which needs to be attached during initial setup.
4.2 Battery Charging
The machine is powered by a 24V lead-acid battery system. Fully charge the battery before first use and after each work shift.
- Connect the charger to the machine's charging port.
- Plug the charger into a standard electrical outlet.
- The charging indicator on the control panel or charger will show charging status. A full charge typically takes 6-8 hours.
- Disconnect the charger once charging is complete.

Figure 4.2: Included battery charger for the SM860.
4.3 Filling Tanks
- Solution Tank: Open the fill cap for the clean water tank (34.3 gallons capacity). Fill with clean water and an appropriate low-foam floor cleaning solution. Do not overfill.
- Recovery Tank: Ensure the recovery tank (37 gallons capacity) is empty before starting operation.
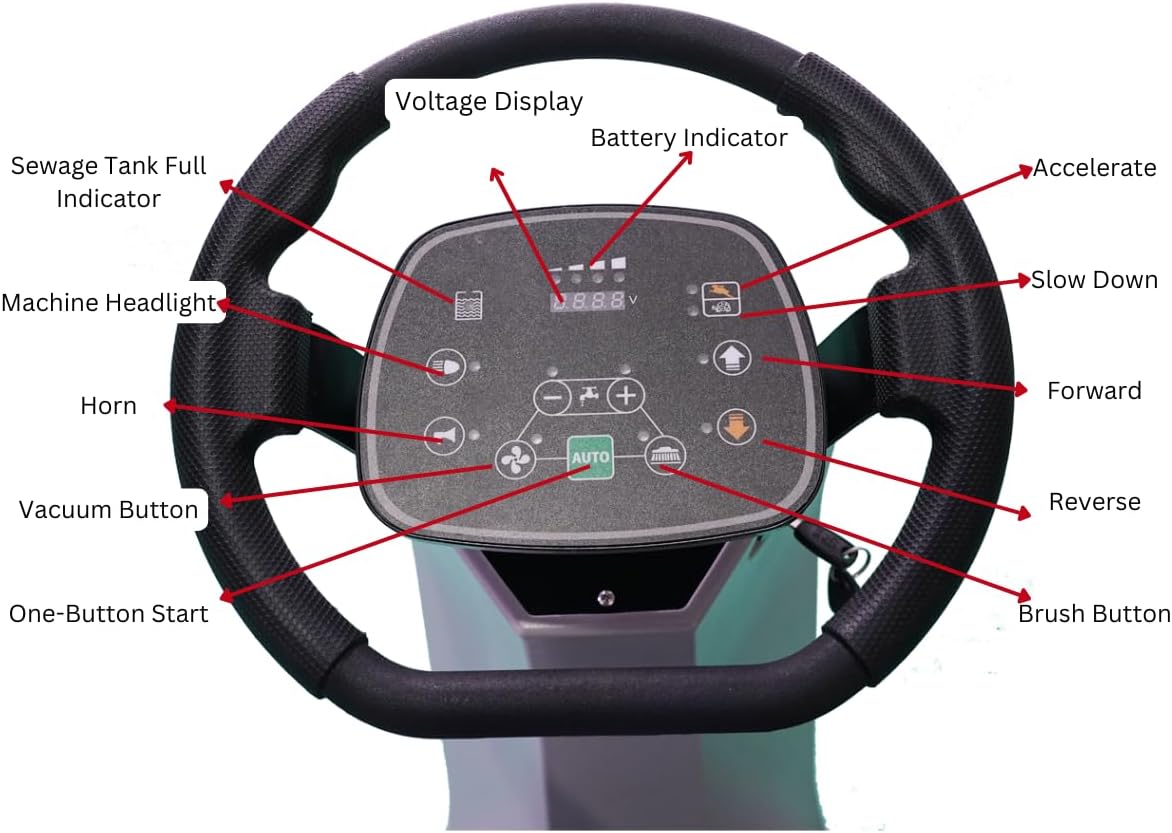
Figure 4.3: Side view of the SM860, highlighting the solution tank with its visible level indicator.
5. Operating Instructions
Follow these steps for safe and effective operation of your SM860 scrubber.
5.1 Starting the Machine
- Ensure the battery is charged and tanks are filled.
- Turn the key switch to the ON position.
- Press the "One-Button Start" on the control panel. The machine will initiate its systems.
5.2 Driving and Scrubbing
- Sit comfortably in the operator's seat.
- Gently press the accelerator pedal to move forward. Use the steering wheel to guide the machine.
- To engage scrubbing, press the brush button on the control panel. The dual brushes will automatically lower and begin rotating.
- To engage vacuuming and water suction, press the vacuum button. The squeegee will lower, and the vacuum motor will activate to recover dirty water.
- Adjust water flow and brush speed using the controls on the panel as needed for different floor conditions.
- Maintain a steady speed for optimal cleaning results.
Video 5.1: An overview of the SANITMAX SM860 Ride-On Scrubber, demonstrating its features and ease of use. This video shows the machine in operation, highlighting its design and functionality.
Video 5.2: Demonstration of the SM860 Ride-On Floor Scrubber's cleaning performance. This video illustrates the machine effectively scrubbing and vacuuming a floor, showcasing its cleaning capabilities.
5.3 Stopping the Machine
- Release the accelerator pedal to slow down.
- Press the brush button to lift the brushes and stop scrubbing.
- Press the vacuum button to lift the squeegee and stop vacuuming.
- Turn the key switch to the OFF position.
- Engage the parking brake if available or park on a level surface.
6. Maintenance
Regular maintenance ensures the longevity and optimal performance of your SM860 scrubber.
6.1 Daily Maintenance
- Empty and rinse the recovery tank thoroughly to prevent odor and bacterial growth.
- Drain any remaining solution from the clean water tank.
- Clean the squeegee blades and check for wear or damage. Replace if necessary.
- Inspect brushes for debris and wear. Clean or replace as needed.
- Wipe down the exterior of the machine.
- Charge batteries after each work shift.


Figure 6.1: Examples of brushes and burnishing pads used with the SM860, requiring regular inspection and cleaning.
6.2 Weekly Maintenance
- Check the vacuum filter and clean or replace if clogged.
- Inspect all hoses and connections for leaks or damage.
- Check battery terminals for corrosion and clean if necessary.
6.3 Monthly Maintenance
- Lubricate moving parts as specified in the detailed service manual (if applicable).
- Check tire pressure and condition.
- Perform a thorough inspection of the entire machine for any signs of wear, damage, or loose fasteners.
7. Troubleshooting
This section provides solutions to common operational issues. For problems not listed here, contact customer support.
| Problem | Possible Cause | Solution |
|---|---|---|
| Machine does not start | Low battery charge; Key switch off; Emergency stop engaged. | Charge battery; Turn key switch on; Release emergency stop button. |
| Poor scrubbing performance | Worn brushes; Insufficient water flow; Incorrect cleaning solution. | Replace brushes; Check solution tank level and flow settings; Use recommended cleaning solution. |
| Water not being recovered | Clogged squeegee; Worn squeegee blades; Full recovery tank; Clogged vacuum hose/filter. | Clean squeegee; Replace blades; Empty recovery tank; Clear vacuum hose/filter. |
| Machine loses power during operation | Low battery charge; Overload protection activated. | Recharge battery; Reduce load or check for obstructions. |
8. Warranty and Support
Your SANITMAX SM860 Ride-On Floor Scrubber Machine is backed by comprehensive support and warranty options.
- 2-Year Protection Plan: Available for extended coverage.
- US Local Support: Access to local customer service and technical assistance.
- Nationwide On-site Repair: Professional repair services available across the country.
- Complete OEM Kit: Ensures genuine replacement parts for maintenance and repairs.
For detailed warranty terms, service requests, or technical assistance, please refer to your purchase documentation or contact SANITMAX customer support.