
pepape HSE2-40
pepape Garage Door Opener Remote Control User Manual
Model: HSE2-40
1. Introduction
Thank you for choosing the pepape Garage Door Opener Remote Control. This remote is designed as a high-quality replacement for specific HORMANN and Garador Promatic remote controls operating on the 40.685MHz frequency. It offers a compact, portable design with two buttons for controlling up to two garage doors or gates.

Figure 1.1: The pepape Garage Door Opener Remote Control, featuring a dark grey casing with two light grey buttons and a red LED indicator.
2. Compatibility
This remote control is specifically designed to be compatible with HORMANN and Garador Promatic garage door openers/receivers that operate on the 40.685MHz frequency. It is crucial to verify your existing remote's frequency and button color for proper functionality.
2.1. Compatible Models
The pepape remote is compatible with the following HORMANN and Garador models that use 40.685MHz GRAY BUTTON remotes:
- HORMANN Garador HSE2-40
- HORMANN Garador HS2-40
- HORMANN Garador HS4-40
- HORMANN Garador HSM2-40
- HORMANN Garador HSM4-40
- HORMANN Garador HSE4-40
- VS-HS4-40 / VS-HSM-40
- Hormann S850 E860
- Garador auto expert
- Garador auto M2
- Hormann Ecomatic
- Hormann GTS 100
- Hormann Promatic (serie 1)
- Hormann Supramatic E (serie 1)
- Hormann Supramatic S

Figure 2.1: Visual representation of compatible Hormann and Garador remote models operating on 40MHz with grey buttons.
2.2. Incompatible Models
This remote is NOT COMPATIBLE with:
- Hormann remotes with other button colors (e.g., BLUE, GREEN).
- HORMANN BS model handheld transmitters (e.g., HSE2-868 BS, HS1-868 BS).
- Any remote operating on a frequency other than 40.685MHz.
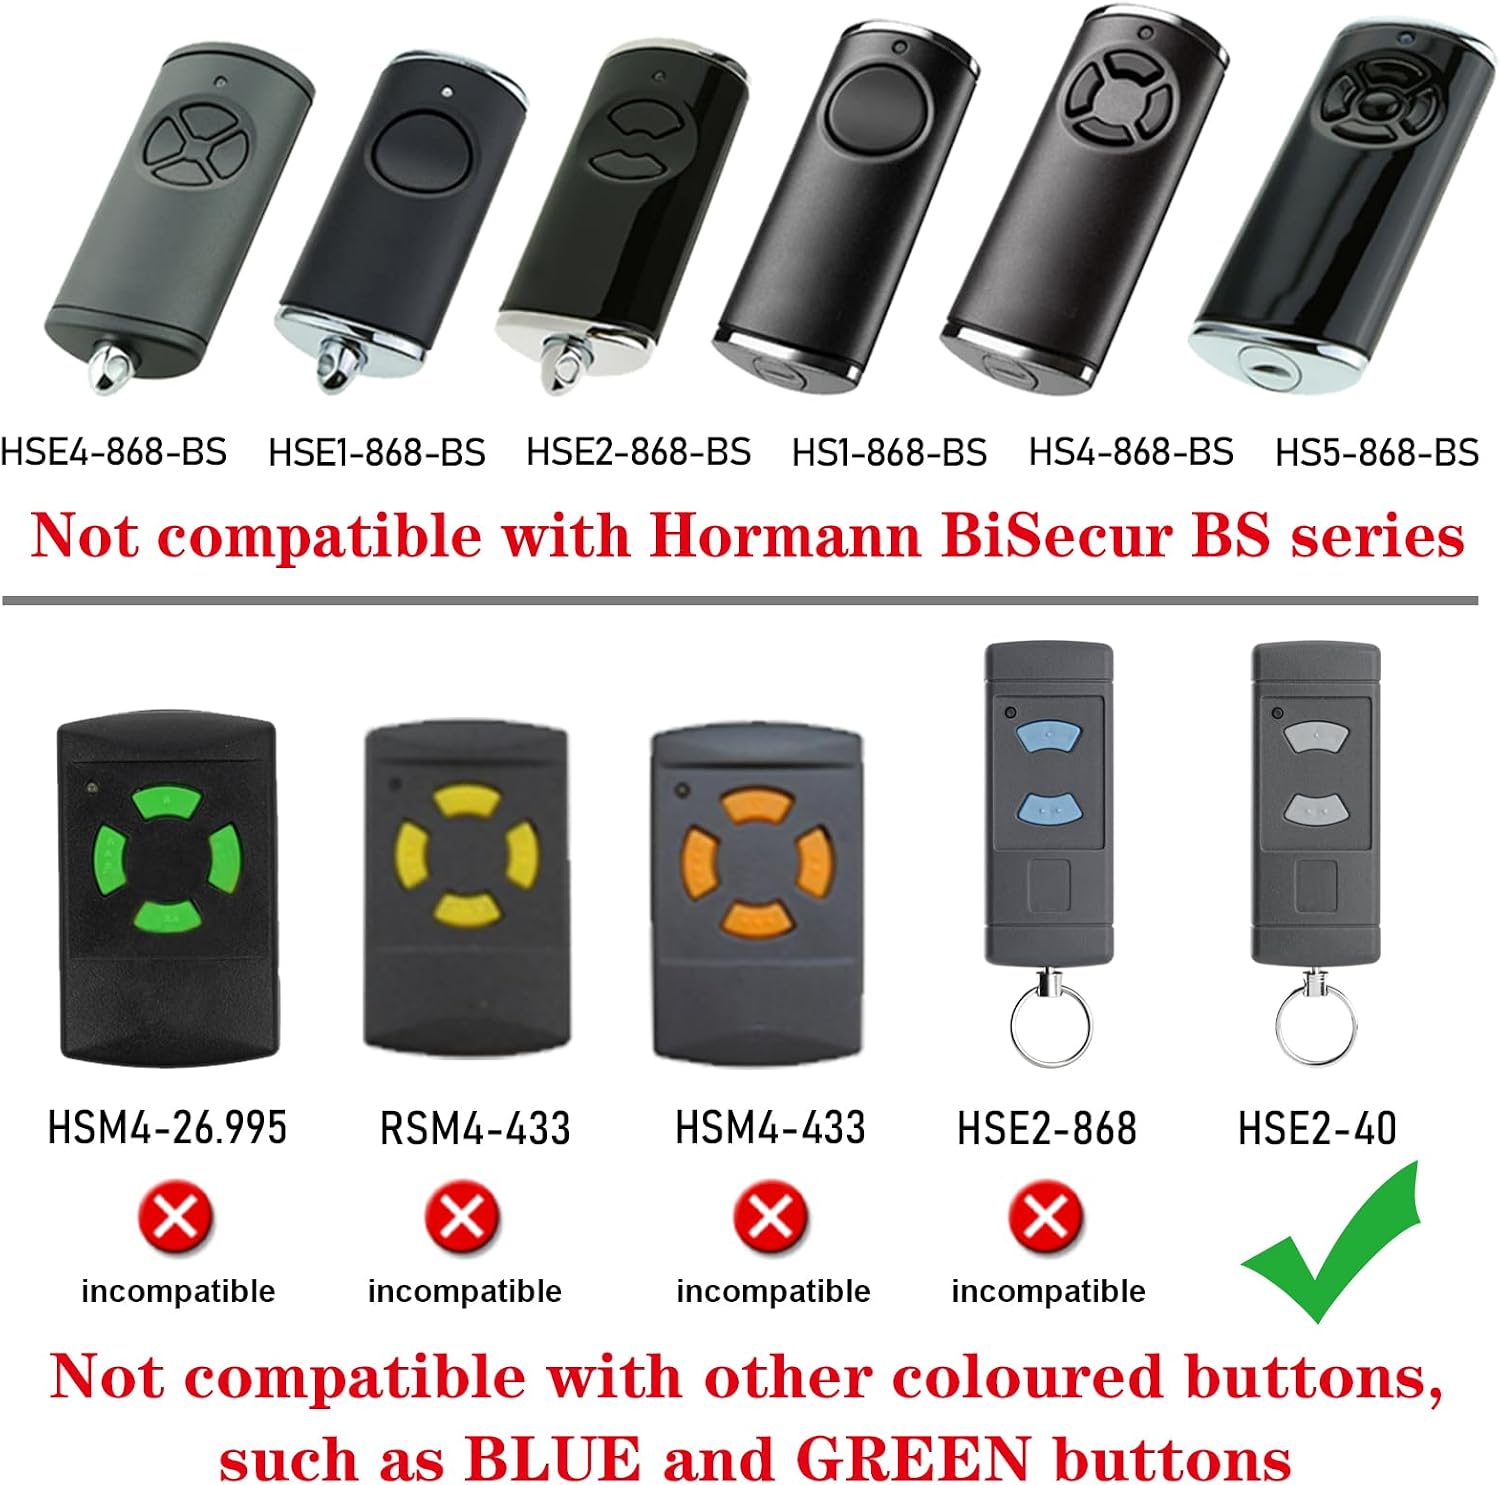
Figure 2.2: Examples of Hormann remotes that are not compatible, including the BiSecur BS series and those with blue or green buttons.
3. Setup and Programming
The pepape remote functions as a replacement and typically requires programming to your existing garage door opener or receiver. The exact programming steps may vary depending on your specific garage door opener model. Below are general steps for common programming methods.
3.1. Programming to Your Garage Door Opener (Common Method)
- Locate the Learn Button: On your garage door opener motor unit (usually mounted on the ceiling of your garage), locate the 'Learn' or 'Program' button. This button is often colored (e.g., red, purple, yellow, green) and may be behind a light cover.
- Activate Learning Mode: Press and immediately release the 'Learn' button on your garage door opener. The LED indicator on the opener will typically light up or flash, indicating it is in programming mode. You usually have about 30 seconds to complete the next step.
- Program the New Remote: Within the active programming window, press and hold the desired button on your new pepape remote control that you wish to use for operating the garage door.
- Confirm Programming: Continue holding the button on the pepape remote until the garage door opener's light flashes or clicks, indicating successful programming. Release the button on the remote.
- Test the Remote: Press the programmed button on your pepape remote control to ensure it operates the garage door correctly.
If these steps do not work, please refer to your specific garage door opener's instruction manual for detailed programming procedures.

Figure 3.1: The pepape remote control being used to operate a garage door, demonstrating its intended function.
4. Operating the Remote Control
The pepape remote control features two distinct buttons, allowing you to control up to two different garage doors or gates once programmed.
- Single Door Operation: If you have programmed only one button for a single garage door, simply press that button once to activate the garage door opener. Pressing it again will stop or reverse the door's movement, depending on its current state and your opener's logic.
- Multiple Door Operation: If you have programmed both buttons for two different garage doors, press the corresponding button for the specific door you wish to operate.
- LED Indicator: A small red LED indicator light on the remote will illuminate when a button is pressed, confirming that the remote is transmitting a signal.
5. Maintenance
5.1. Battery Replacement
The remote control is powered by one 11A 6V Alkaline battery, which is pre-installed. If the remote's LED indicator does not light up when a button is pressed, or if the operating range significantly decreases, it is likely time to replace the battery.
- Open the Casing: Carefully insert a small flat-head screwdriver or a similar tool into the small notch or seam on the side or bottom of the remote control. Gently pry open the casing to reveal the internal circuit board and battery compartment.
- Remove Old Battery: Carefully remove the old 11A 6V Alkaline battery from its compartment. Note the orientation of the positive (+) and negative (-) terminals.
- Insert New Battery: Insert a new 11A 6V Alkaline battery, ensuring it is placed with the correct polarity.
- Close Casing: Align the two halves of the remote control casing and press them firmly together until they snap securely into place.
- Test Remote: Test the remote control to ensure it is functioning correctly.

Figure 5.1: An exploded view showing how to open the remote casing and access the 11A 6V Alkaline battery for replacement.
5.2. Cleaning
Wipe the remote control with a soft, dry cloth. Do not use abrasive cleaners or immerse the remote in water.
6. Troubleshooting
| Problem | Possible Cause | Solution |
|---|---|---|
| Remote does not work / LED does not light up. | Dead or low battery. | Replace the 11A 6V Alkaline battery (refer to Section 5.1). |
| Remote works intermittently or has reduced range. | Low battery. Interference. Remote not properly programmed. | Replace battery. Ensure no strong radio frequency sources nearby. Re-program the remote (refer to Section 3.1). |
| Remote does not program to opener. | Incorrect compatibility. Opener not in programming mode. Incorrect programming steps. | Verify your opener uses 40.685MHz and is a compatible model (refer to Section 2). Ensure the opener's 'Learn' button is pressed correctly. Consult your garage door opener's manual for specific programming instructions. |
| Remote buttons feel sticky or unresponsive. | Dirt or debris under buttons. | Clean the remote surface with a soft, dry cloth. Avoid liquid cleaners. |
7. Specifications
- Model: HSE2-40
- Brand: pepape
- Frequency: 40.685MHz
- Number of Buttons: 2
- Battery Type: 1 x 11A 6V Alkaline battery (included)
- Product Dimensions: 7 cm x 4 cm x 1 cm (2.76 in x 1.57 in x 0.39 in)
- Product Weight: Approximately 20.41 g (0.72 oz)
- Maximum Range: Up to 100 feet (actual range may vary based on environment)
- Special Features: Mini and portable design, built-in keychain fob

Figure 7.1: Detailed dimensions of the pepape remote control, highlighting its compact and portable design.

Figure 7.2: Overview of key features such as the LED indicator, battery type, and integrated keychain for easy portability.
8. Warranty and Support
For any questions regarding your pepape Garage Door Opener Remote Control, including troubleshooting or warranty inquiries, please contact the seller or manufacturer directly through your purchase platform. Please retain your proof of purchase for any warranty claims.
Ask a question about this manual
Ask about setup, troubleshooting, compatibility, parts, safety, or missing instructions. Manuals+ will review the question and use this page’s manual context to help answer it.