1. Product Overview
The ILIHOME Zealtron Industrial Dual Lens Endoscope t31 is a versatile inspection tool designed for detailed visual examination in hard-to-reach areas. It features a 4.3-inch IPS screen, a dual-lens 1080P camera with IP68 waterproofing, and a 10-meter semi-rigid cable. This device supports photo capture and video recording, storing media on a TF card.

Figure 1.1: Main unit of the ILIHOME Zealtron Industrial Dual Lens Endoscope t31 with its coiled cable.

Figure 1.2: Key features of the Zealtron Industrial Borescope, highlighting its dual camera, 10-meter cable, and 1080P resolution.
2. Package Contents
Please verify that all items listed below are included in your package:
- 1 x Endoscope Host (Main Unit)
- 1 x 10-meter (32.8ft) Semi-rigid Cable with Dual Camera Probe
- 1 x Type-C USB Charging Cable
- 1 x Accessory Set (Hook, Magnet, Side Mirror)
- 1 x Multi-language Instruction Manual
- 1 x Black Organizing Bag

Figure 2.1: All components included in the endoscope package.
3. Setup Guide
3.1 Battery Installation and Charging
The endoscope comes with a replaceable rechargeable lithium battery. Ensure the battery is properly installed and charged before first use.
- Open the battery compartment cover on the main unit.
- Insert the provided rechargeable lithium battery, ensuring correct polarity.
- Close the battery compartment cover securely.
- Connect the Type-C USB cable to the charging port on the endoscope and to a standard USB power adapter (not included) or a computer USB port.
- The charging indicator light will show the charging status. A full charge typically takes 3-4 hours and provides 3-4 hours of continuous operation.

Figure 3.1: Battery compartment and two methods for charging the endoscope battery.
3.2 Cable Connection
The endoscope features a detachable semi-rigid cable for easy replacement and storage.
- Locate the USB port on the main endoscope unit.
- Align the USB connector of the semi-rigid cable with the port.
- Firmly push the cable connector into the port until it clicks into place, ensuring a stable and reliable connection for image transfer.

Figure 3.2: Connecting the detachable semi-rigid cable to the main unit.
3.3 Inserting a TF Card
To save photos and videos, a TF (MicroSD) card must be inserted into the device. The endoscope supports internal storage, but a TF card is recommended for extended media storage.
- Locate the TF card slot on the side of the main unit (often near the charging port).
- Gently insert a TF card (up to 32GB, not included) into the slot until it clicks.
- To remove, push the card in slightly until it springs out.
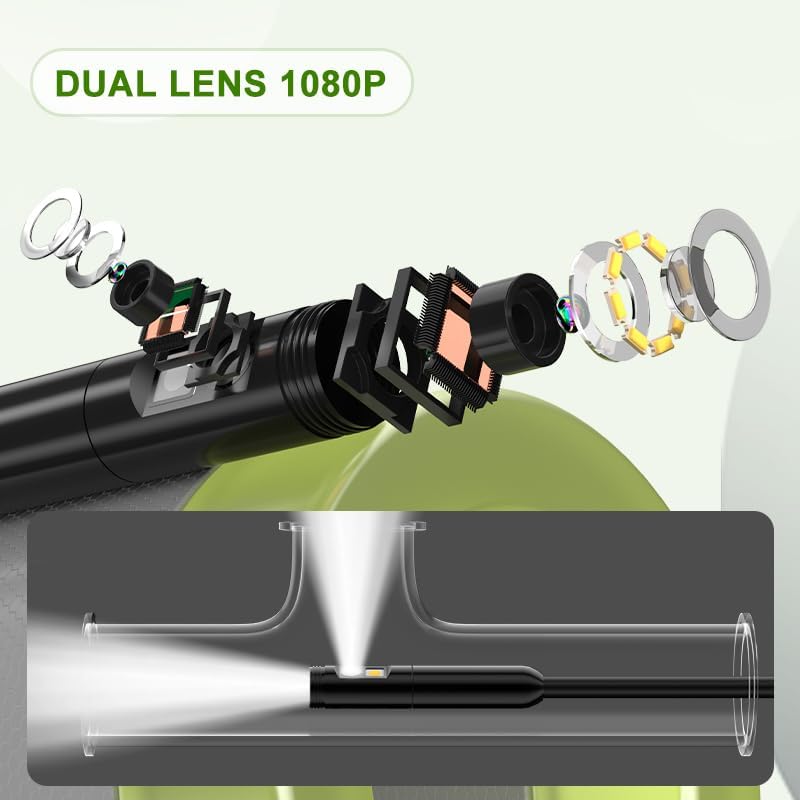
Figure 3.3: Location of the TF card slot, reset button, and charging port.
4. Operating Instructions
4.1 Power On/Off
- To power on: Press and hold the Power button (⏻) for a few seconds until the screen illuminates.
- To power off: Press and hold the Power button (⏻) again until the screen turns off.
4.2 Screen Navigation and Controls
The endoscope features a 4.3-inch IPS screen for clear viewing and intuitive controls.

Figure 4.1: The 4.3-inch IPS screen provides rich colors and sharp images.
- OK Button: Confirm selections or take a photo/start recording.
- Up/Down Arrows: Navigate menus, adjust LED brightness, or zoom.
- Mode Button: Switch between photo, video, and playback modes.
- LED Brightness Button: Adjust the intensity of the LED lights on the camera probe.
4.3 Using the Dual Lens Camera
The endoscope is equipped with a dual-lens camera, allowing you to switch between a front view and a side view for comprehensive inspection.
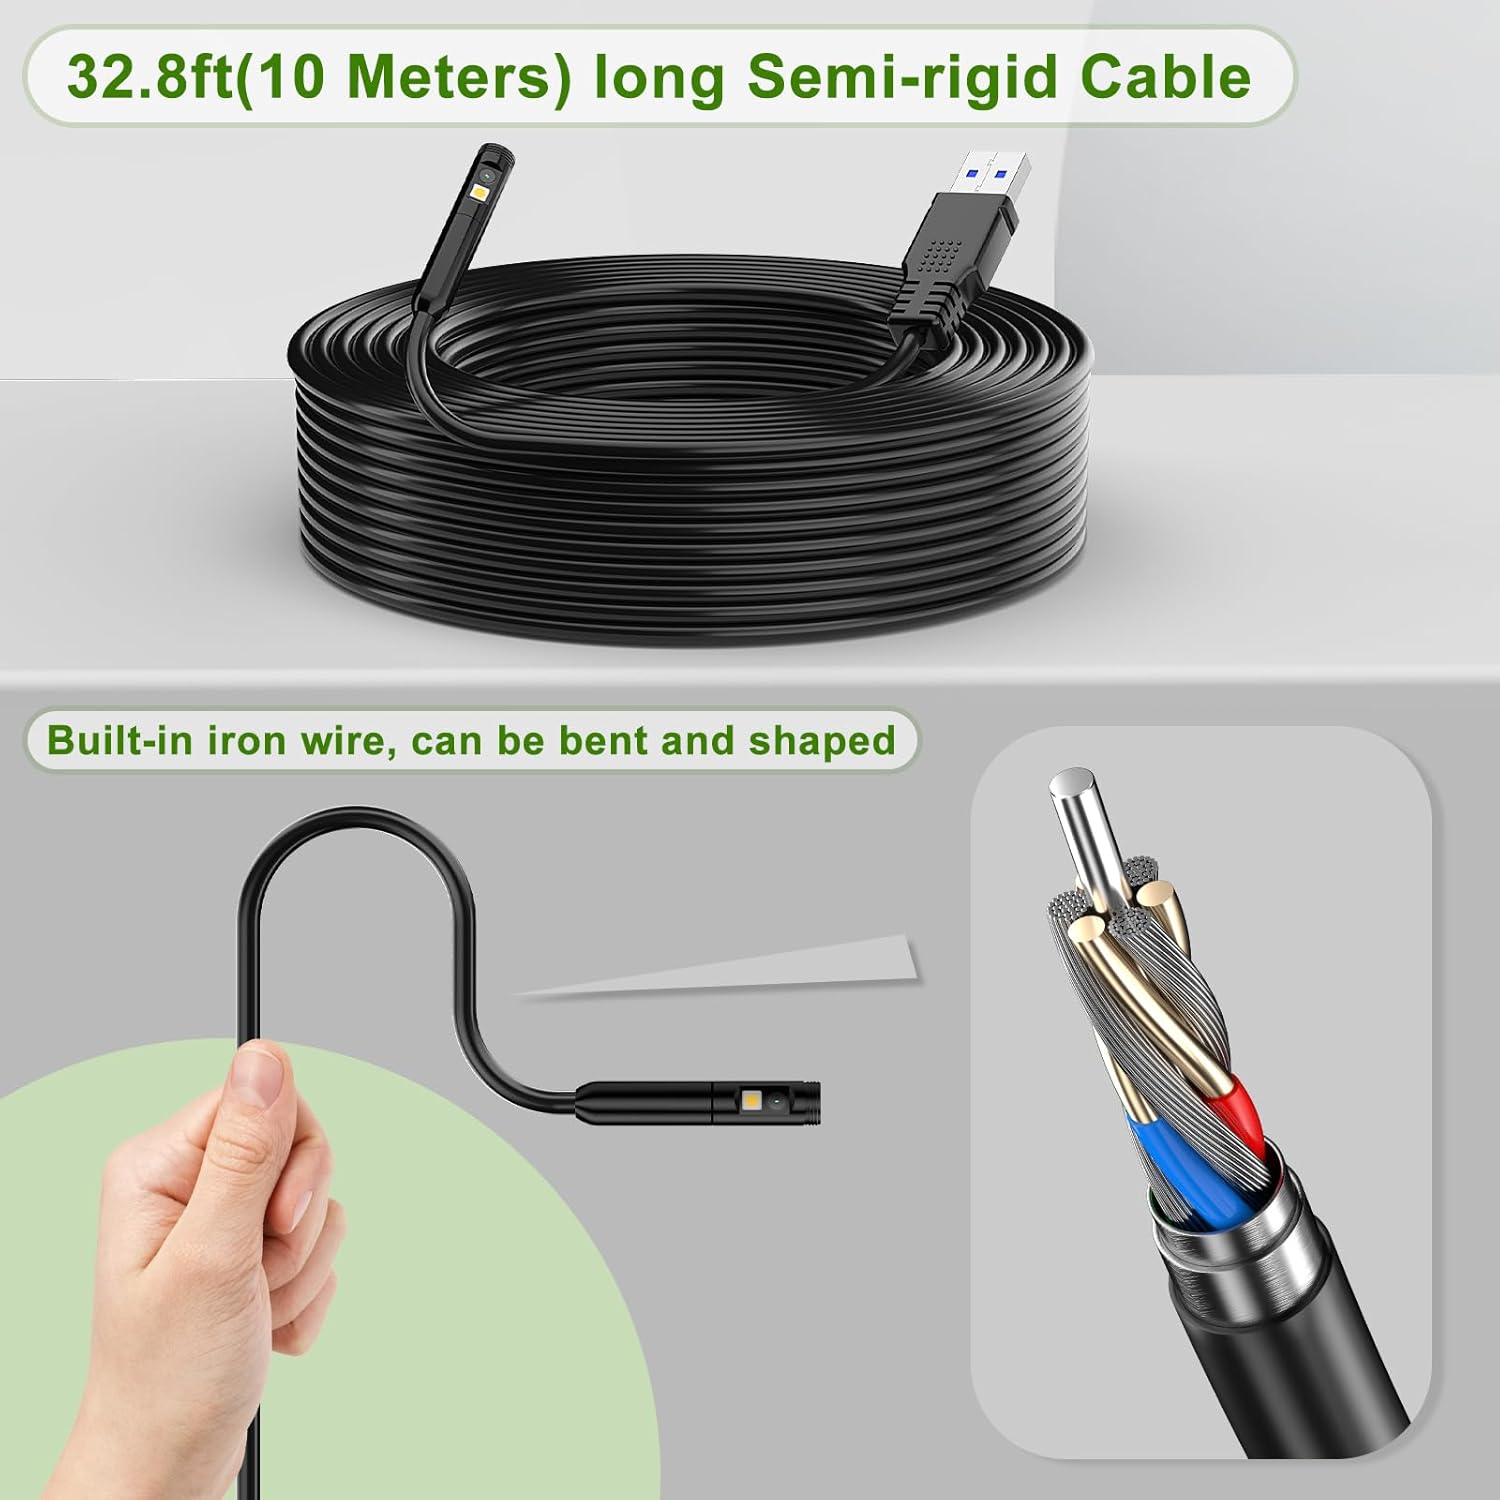
Figure 4.2: Dual lens 1080P camera providing both front and side perspectives.
- To switch between front and side cameras, press the dedicated camera switch button (often labeled with a camera icon or 'M' for mode, refer to your device's specific button layout).
- The front camera typically has a focus range of 4cm-10cm, while the side camera has a focus range of 2cm-6cm.

Figure 4.3: Front and side camera focus distances.
4.4 Photo and Video Capture
The endoscope supports 1080P video recording and photo capture directly to an inserted TF card.
- In Photo mode: Press the OK button to take a picture.
- In Video mode: Press the OK button to start recording. Press again to stop recording.
4.5 Media Playback and Transfer
You can review captured media directly on the endoscope screen or transfer it to a computer.
- On Device: Switch to Playback mode using the Mode button. Use the Up/Down arrows to browse photos and videos.
- To Computer: Connect the endoscope to your computer using the provided Type-C USB cable. The device will appear as a removable storage device, allowing you to copy files.

Figure 4.4: Connecting the endoscope to a PC for media transfer.
5. Maintenance
5.1 Cleaning the Lens and Probe
The camera probe is IP68 waterproof, allowing for use in wet environments. However, proper cleaning is essential for clear images and longevity.

Figure 5.1: The IP68 waterproof lens is designed for challenging environments.
- After each use, especially in dirty or wet conditions, wipe the camera lens and probe with a soft, damp cloth.
- For stubborn dirt, use a small amount of mild soap or lens cleaner on the cloth. Avoid abrasive materials or harsh chemicals.
- Ensure the lens is dry before storing the device.
5.2 Battery Care
- Charge the battery fully before long-term storage.
- If storing for extended periods, recharge the battery every 3-6 months to maintain its health.
- Avoid exposing the battery to extreme temperatures.
5.3 Cable Care and Storage
The 10-meter semi-rigid cable contains a built-in iron wire, allowing it to be bent and shaped for various inspection needs.

Figure 5.2: The semi-rigid cable can be bent and shaped as needed.
- Avoid sharp bends or kinks in the cable that could damage internal wiring.
- When not in use, coil the cable neatly and store it in the provided organizing bag.
- Ensure the cable is clean and dry before storage.
6. Troubleshooting
If you encounter issues with your endoscope, refer to the following common problems and solutions:
| Problem | Possible Cause | Solution |
|---|---|---|
| Device does not power on. | Low battery; Battery not installed correctly; Device malfunction. | Charge the battery fully. Ensure battery is inserted with correct polarity. Try resetting the device (see below). |
| No image on screen. | Cable not connected securely; Camera lens obstructed; Device malfunction. | Ensure the cable is firmly connected to the main unit. Clean the camera lens. Try resetting the device. |
| LED lights not working. | LED brightness set to minimum; Cable not connected securely; Device malfunction. | Adjust LED brightness using the dedicated button. Ensure cable is firmly connected. Try resetting the device. |
| Cannot save photos/videos. | No TF card inserted; TF card full; TF card corrupted; Incorrect mode. | Insert a TF card. Delete old files or use a new TF card. Format the TF card (if data is backed up). Ensure you are in Photo or Video mode. |
| Battery drains quickly. | Old battery; Frequent use of high brightness LEDs. | Consider replacing the battery. Reduce LED brightness when not needed. |
6.1 Resetting the Device
If the device becomes unresponsive or exhibits unusual behavior, a reset may resolve the issue.
- Locate the reset button (a small pinhole) on the main unit (refer to Figure 3.3).
- Use a thin, pointed object (like a paperclip) to gently press and hold the reset button for a few seconds.
- The device should power off and restart.
7. Specifications
Key technical specifications for the ILIHOME Zealtron Industrial Dual Lens Endoscope t31:
| Feature | Specification |
|---|---|
| Model | t31 |
| Screen Size | 4.3-inch IPS Display |
| Camera Resolution | 1080P (Video and Photo) |
| Camera Diameter | 8mm |
| Lens Type | Dual Lens (Front and Side) |
| Water Resistance | IP68 (Camera Probe) |
| Cable Length | 10 meters (32.8 feet) |
| Cable Type | Semi-rigid, Detachable |
| LED Lights | 8+1 Adjustable LEDs |
| Battery Type | Rechargeable Lithium Polymer |
| Battery Life | 3-4 hours (continuous use) |
| Charging Interface | Type-C USB |
| Storage Media | TF Card (up to 32GB, not included) |
| Connectivity | USB (for data transfer) |
| Dimensions (Package) | 20.6 x 14.6 x 7.9 cm |
| Weight (Package) | 860 g |
8. Warranty and Support
This product is covered by a standard manufacturer's warranty against defects in materials and workmanship. For specific warranty terms and conditions, please refer to the documentation included with your purchase or contact the retailer.
For technical support, troubleshooting assistance, or inquiries regarding replacement parts, please contact ILIHOME customer service through the contact information provided on the product packaging or the official ILIHOME website.