1. Introduction
Thank you for choosing the PEXMOR 24-Inch 36V 750W Front Wheel Electric Bike Conversion Kit. This manual provides essential information for the safe and efficient installation, operation, and maintenance of your new e-bike conversion kit. Please read this manual thoroughly before attempting installation or use, and retain it for future reference.
Safety Warnings
- Always wear a helmet and appropriate safety gear when riding.
- Ensure all components are securely fastened before each ride.
- Do not operate the kit in adverse weather conditions.
- Familiarize yourself with local e-bike regulations and laws.
- Keep children and pets away from the installation area.
2. Package Contents
Verify that all items listed below are included in your package. If any parts are missing or damaged, please contact customer support.
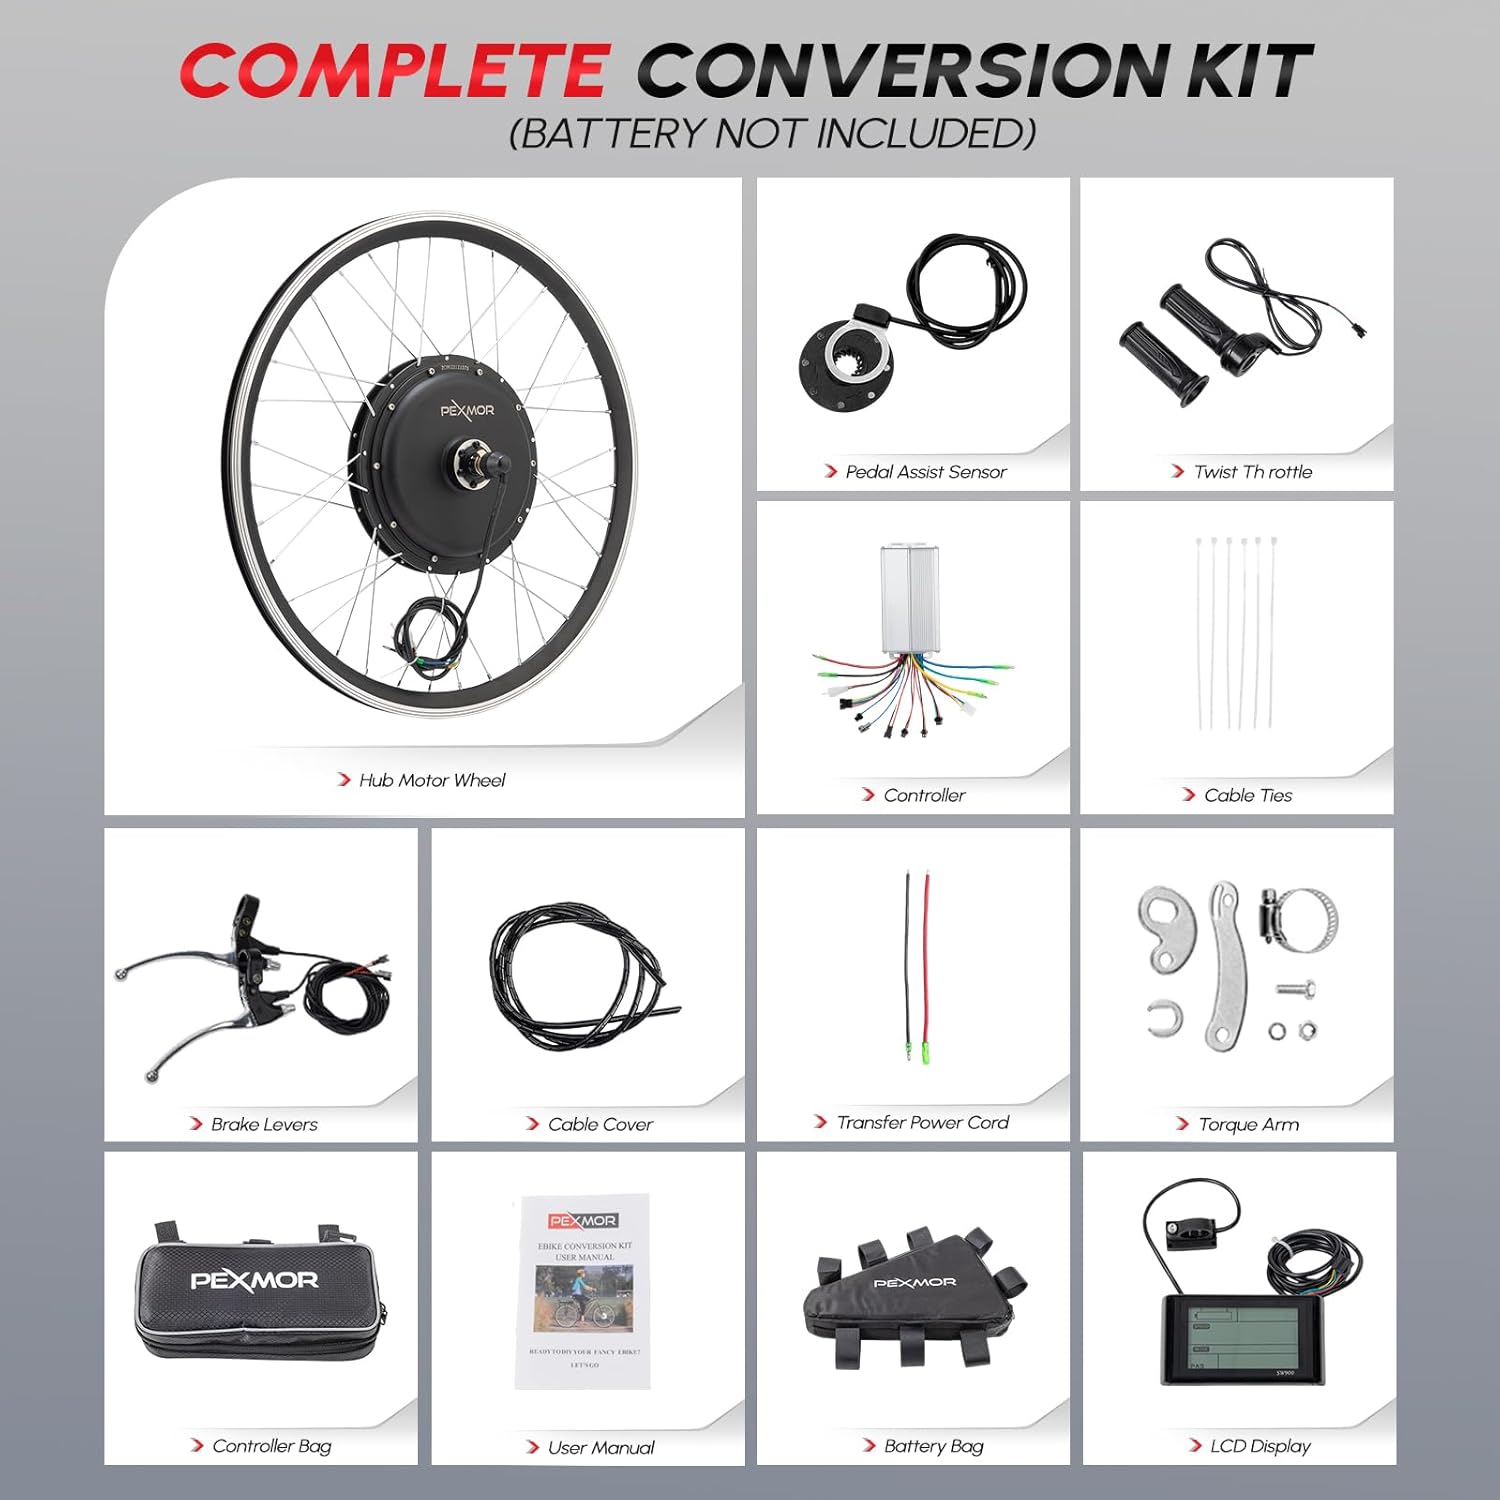
Image: All components of the PEXMOR Electric Bike Conversion Kit.
- 36V 750W Brushless Hub Motor Front Wheel
- 3-Mode Controller
- LCD Display (SW900)
- Twist Throttle
- Brake Levers
- Pedal Assist System (PAS) Sensor
- Torque Arm
- Controller Bag
- Battery Bag (Battery not included)
- Cable Ties
- Cable Cover
- Transfer Power Cord
- Tool Kit
- User Manual
3. Specifications
| Feature | Specification |
|---|---|
| Brand | PEXMOR |
| Model Name | 24Kit750-Fro91 |
| Material | Aluminum |
| Wattage | 750 watts |
| Color | Black |
| Style | 24Inch |
| Size | 24 inch |
| Skill Level | Intermediate |
| Max Speed | 23.5 mph (38 km/h) |
| Front Dropout Spacing | 100mm / 3.93 inches |
| Max Weight Capacity | 220 lbs |

Image: Detailed dimensions and specifications of the motor wheel.

Image: Diagram showing applicable front and rear fork dropout sizes.
4. Setup & Installation
Follow these steps carefully to install your PEXMOR Electric Bike Conversion Kit. It is recommended to watch the provided installation video for visual guidance.
Video: Comprehensive installation guide for the PEXMOR Electric Bike Conversion Kit. This video demonstrates the step-by-step process for installing all components, including the motor wheel, handlebar accessories, PAS sensor, and controller wiring.
4.1 Pre-installation Preparation and Checks
- Position the Bike: Put the bicycle upside down on a stable surface for easier access to the wheels and pedals.
- Remove Front Wheel: Loosen the nuts on the front wheel axle and carefully remove the existing front wheel from the bike fork.
- Remove Disc Brake: If your bike has a disc brake on the front wheel, carefully remove the disc brake rotor from the old wheel. You will transfer this to the new motor wheel.
- Unpack and Verify: Open the kit box and carefully remove all components. Refer to the 'Package Contents' section to ensure all accessories are present and undamaged.
- Install Tire on Motor Wheel: Install your existing tire, inner tube, and rim liner onto the new motor wheel. Ensure the tire is seated correctly on the rim.
- Inflate Tires: Inflate the tire to the recommended pressure indicated on the tire sidew.
- Loosen Hexagonal Screws: Loosen the hexagonal screws on both sides of the motor wheel axle.
- Route Motor Cable: Carefully move the black motor cable into the designated notch on the motor axle. This is crucial for proper installation and to prevent cable damage.
4.2 Handlebar Component Installation
- Remove Original Throttle: Carefully remove the original throttle from your bike's handlebar.
- Brake Levers: You have the option to replace your original brake levers with the new e-bike specific brake levers provided in the kit, which include motor cut-off switches. If your original levers are compatible and you prefer to keep them, ensure they do not interfere with the new components.
- Install New Throttle: Slide the new twist throttle onto the handlebar.
- Tighten Throttle Screw: Secure the throttle by tightening its screw with the provided tool.
- Install LCD Display: Mount the LCD display onto the handlebar.
- Tighten Display Screw: Secure the display by tightening its screw. If your handlebar is thin, use the provided belt to ensure a snug fit.
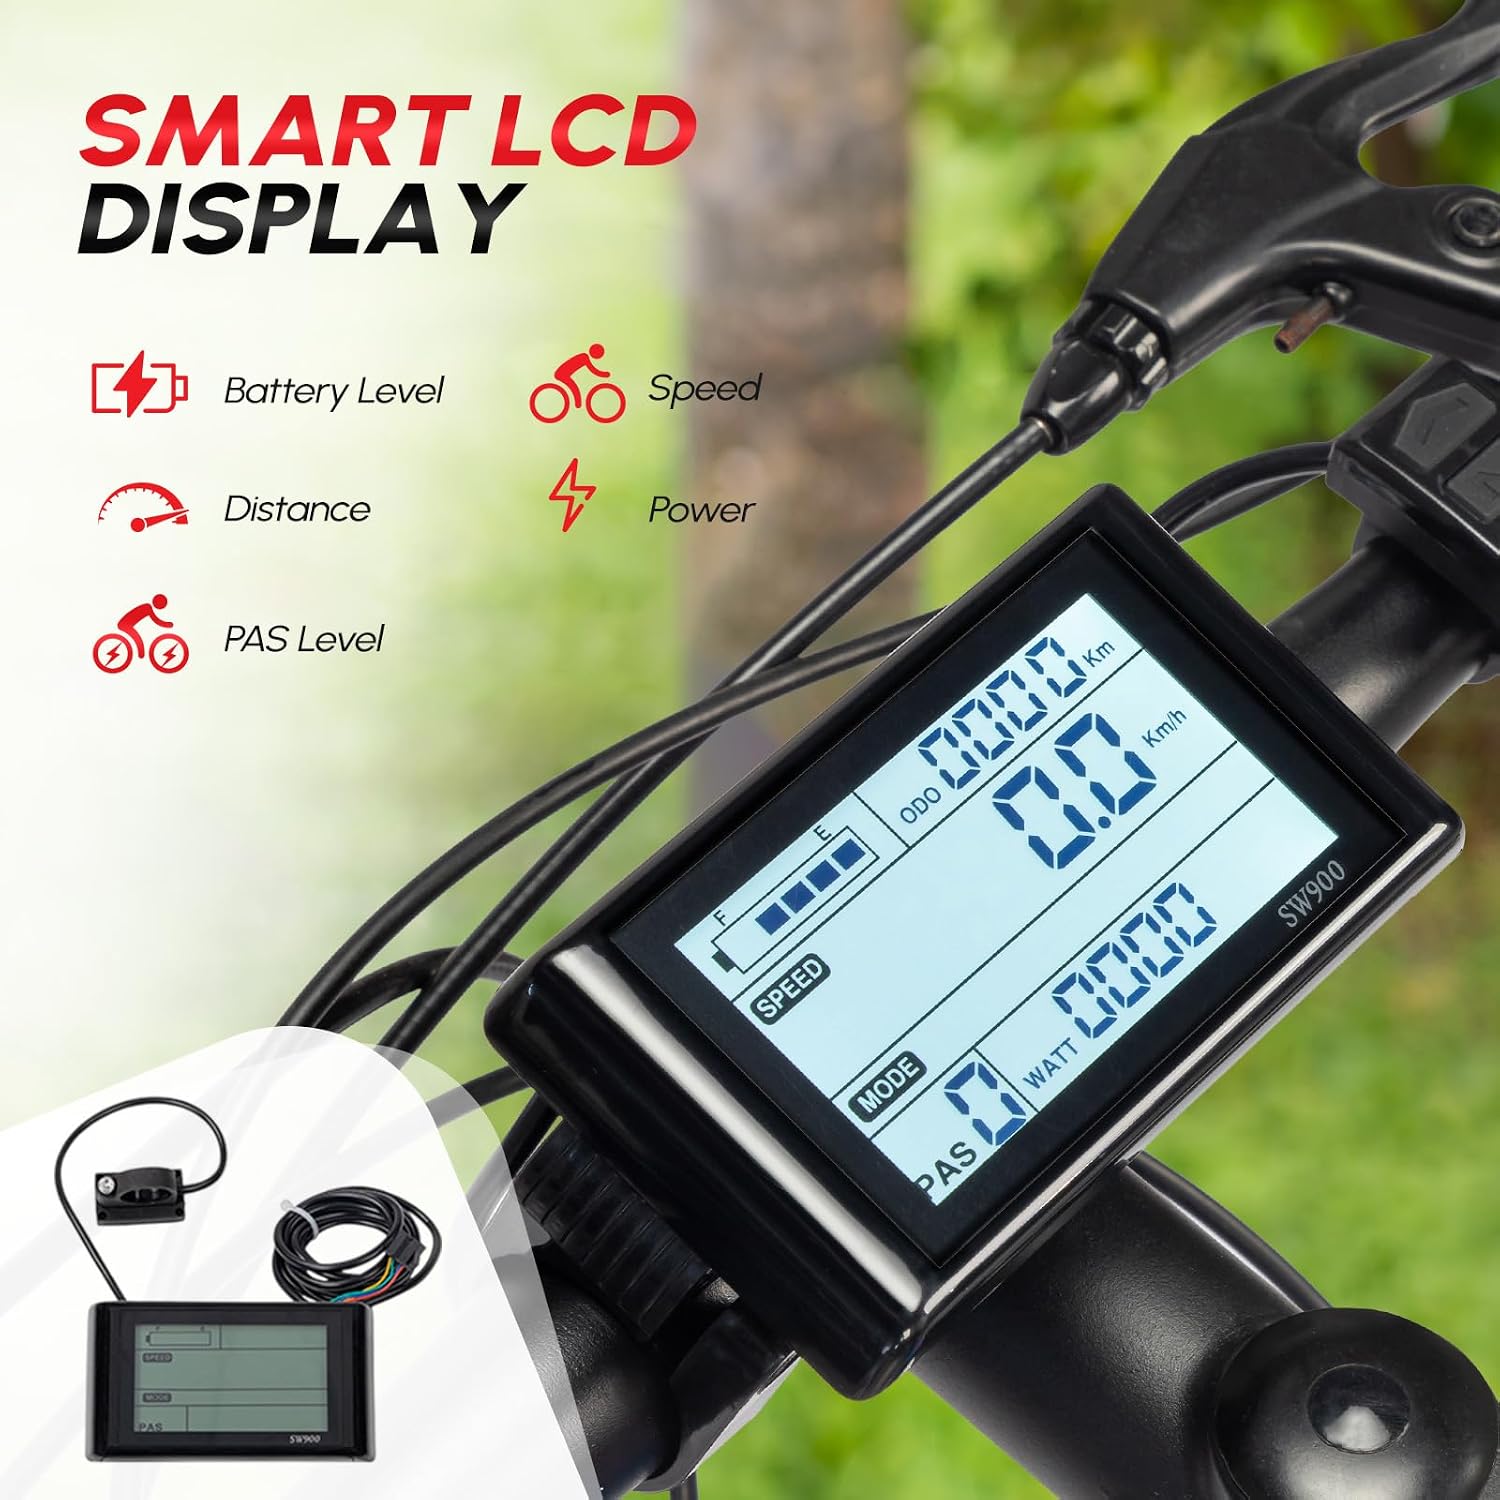
Image: The Smart LCD Display for monitoring riding information.
4.3 PAS (Pedal Assist System) Installation
- Loosen Pedal Shaft Screw: Use the appropriate tool to loosen the screw on the pedal shaft.
- Remove Dental Disc: Carefully remove the dental disc (chainring) from the pedal assembly.
- Remove Shaft: Remove the shaft from the bottom bracket.
- Install PAS Sensor: Install the PAS sensor. The magnetic disc component of the PAS sensor should be placed inside the bottom bracket.
- Tighten Shaft: Reinstall and tighten the shaft securely.
- Install Magnetic Disc: Install the magnetic disc onto the pedal shaft. Ensure the arrow direction on the magnetic disc points towards the forward direction of pedaling. It must not be reversed.
- Verify Rotation: Make sure the magnetic disc rotates freely with the shaft.
- Secure PAS Sensor: If conditions permit, you may use adhesive or zip ties to further secure the PAS sensor in place.
- Reinstall Pedal Components: Reinstall the dental disc and foot pedal, ensuring all screws are tightened.
4.4 Controller Installation and Wiring
- Connect Accessories to Controller: Connect all accessories (motor, display, throttle, brake levers, PAS sensor) to the corresponding ports on the controller. Match the connectors carefully.
- Install and Fix Controller: Place the controller in a suitable location on your bike frame. You can use the provided controller bag or cable ties to fix it securely according to your preference.
- Connect Battery: After all components are connected and secured, connect the battery to the controller to power the system.

Image: The 3-mode sine wave controller and its wiring connections.
5. Operating Instructions
Your PEXMOR Electric Bike Conversion Kit offers multiple riding modes for a versatile experience.
5.1 Riding Modes

Image: The four available riding modes.
- Throttle Mode: Use the twist throttle to control speed directly, similar to a motorcycle. This mode provides instant power.
- Pedal Assist System (PAS) Mode: The PAS system provides motor assistance as you pedal, making riding easier and extending your range. The LCD display allows you to select different PAS levels to adjust the amount of assistance.
- Manual Mode: Ride the bike like a traditional bicycle without any motor assistance.
- Presets: The controller may have preset power levels or modes that can be selected via the LCD display for different riding conditions or preferences.
5.2 LCD Display Functions
The LCD display provides crucial information about your ride:
- Battery Level: Shows the remaining battery charge.
- Speed: Displays current riding speed.
- Distance: Tracks trip distance or total odometer reading.
- Power: Indicates real-time motor power output.
- PAS Level: Shows the currently selected pedal assist level.
Refer to the specific LCD display manual (if provided separately) for detailed instructions on navigating menus and adjusting settings.
6. Maintenance
Regular maintenance ensures the longevity and optimal performance of your e-bike conversion kit.
- Regular Checks: Periodically inspect all bolts, nuts, and connections for tightness. Check tire pressure before each ride.
- Cleaning: Keep the motor, controller, and electrical connections clean and dry. Use a damp cloth for cleaning; avoid high-pressure water jets directly on electrical components.
- Battery Care: If using a separate battery, follow the manufacturer's instructions for charging and storage. Avoid fully discharging the battery.
- Brake Inspection: Regularly check brake pads and rotors for wear. Ensure brake levers engage smoothly and effectively cut motor power.
- Cable Management: Ensure all cables are neatly routed and secured to prevent snagging or damage.
7. Troubleshooting
If you encounter issues with your e-bike kit, refer to the following common troubleshooting tips. For more complex problems, contact customer support.
- No Power: Check battery connection, ensure the battery is charged, and verify all electrical connections to the controller are secure.
- Motor Not Engaging: Ensure the PAS sensor is correctly installed and the magnetic disc is rotating with the pedal. Check throttle connection.
- Inconsistent Power: Inspect all wiring for loose connections or damage. Ensure the controller is securely mounted.
- Display Not Working: Check the display's power connection and ensure it's securely attached to the handlebar.
- Brakes Not Cutting Power: Verify that the brake levers with motor cut-off switches are correctly installed and connected to the controller.
8. Safety Guidelines
Your safety is paramount. Adhere to these guidelines for a safe riding experience:
- Always wear a certified helmet and appropriate protective gear.
- Perform a pre-ride check before every use, including brakes, tires, and all electrical connections.
- Obey all traffic laws and regulations.
- Be aware of your surroundings and ride defensively.
- Avoid riding under the influence of alcohol or drugs.
- Do not exceed the maximum weight capacity of 220 lbs.
9. Warranty & Support
Your PEXMOR Electric Bike Conversion Kit is designed for durability and performance. For any issues or inquiries, please refer to the following:
Return Policy
This product is eligible for a 30-day return policy, allowing for a refund or replacement. Please refer to your purchase platform's specific return instructions.
Customer Support
For technical assistance, troubleshooting, or warranty claims, please contact PEXMOR customer support through the retailer where you purchased the product. Have your model name (24Kit750-Fro91) and UPC (810158426894) ready when contacting support.