1. Introduction
Thank you for choosing the POKIPO Large 4-Layer Heavy Duty Power Tool Organizer. This manual provides essential information for the safe assembly, installation, and use of your new tool organizer. Please read all instructions carefully before beginning assembly and retain this manual for future reference.
This wall-mounted organizer is designed to maximize space and keep your power tools, batteries, and accessories neatly organized in your garage, workshop, or tool room. Constructed from heavy-duty industrial-grade steel, it offers robust support and durability.
2. Safety Information
WARNING: Failure to follow these instructions may result in property damage, injury, or death.
- Always wear appropriate personal protective equipment (PPE) during assembly and installation, including safety glasses and gloves.
- Ensure the mounting surface (wall) is structurally sound and capable of supporting the organizer's weight plus the maximum load capacity (400 lbs).
- Mount the organizer directly into wall studs for optimal stability and weight distribution. If mounting to drywall without studs, use appropriate heavy-duty anchors (not included) rated for the intended load.
- Do not exceed the maximum weight capacity of 400 pounds. Overloading can cause the organizer to detach from the wall, leading to damage or injury.
- Ensure all screws and fasteners are securely tightened during assembly and installation. Periodically check for tightness.
- Keep children and pets away from the work area during assembly and installation.
- For models with an integrated power strip, ensure it is connected to a properly grounded electrical outlet. Do not overload the power strip.
3. Package Contents
Verify that all components listed below are present and undamaged before beginning assembly. If any parts are missing or damaged, please contact customer support.

Figure 1: Exploded view of all components included in the package.
- Main Frame Components (various metal pieces)
- 4 x Shelves (2 wire grid, 2 solid metal)
- 8 x Cordless Drill Holders (integrated into bottom shelf)
- Side Racks for Hammers, Pliers, Screwdrivers
- Mounting Hardware (screws, wall anchors, wrench)
- Instruction Manual
- Integrated Power Strip (for models with charging station)
4. Specifications
| Attribute | Value |
|---|---|
| Material | Alloy Steel |
| Color | Black |
| Special Features | Detachable, Rust Resistant, Scratch Resistant |
| Product Dimensions | 7.95"D x 36.38"W x 14.68"H |
| Shelf Type | Tiered Shelf |
| Number of Shelves | 4 |
| Room Type | Garage |
| Finish Type | Powder Coated |
| Assembly Required | Yes |
| Mounting Type | Wall Mount |
| Recommended Uses | Garage |
| Item Weight | 12.1 Pounds |
| Shelf Weight Capacity | 400 Pounds |
| Item Model Number | PKP231128 |
| UPC | 752870989809 |
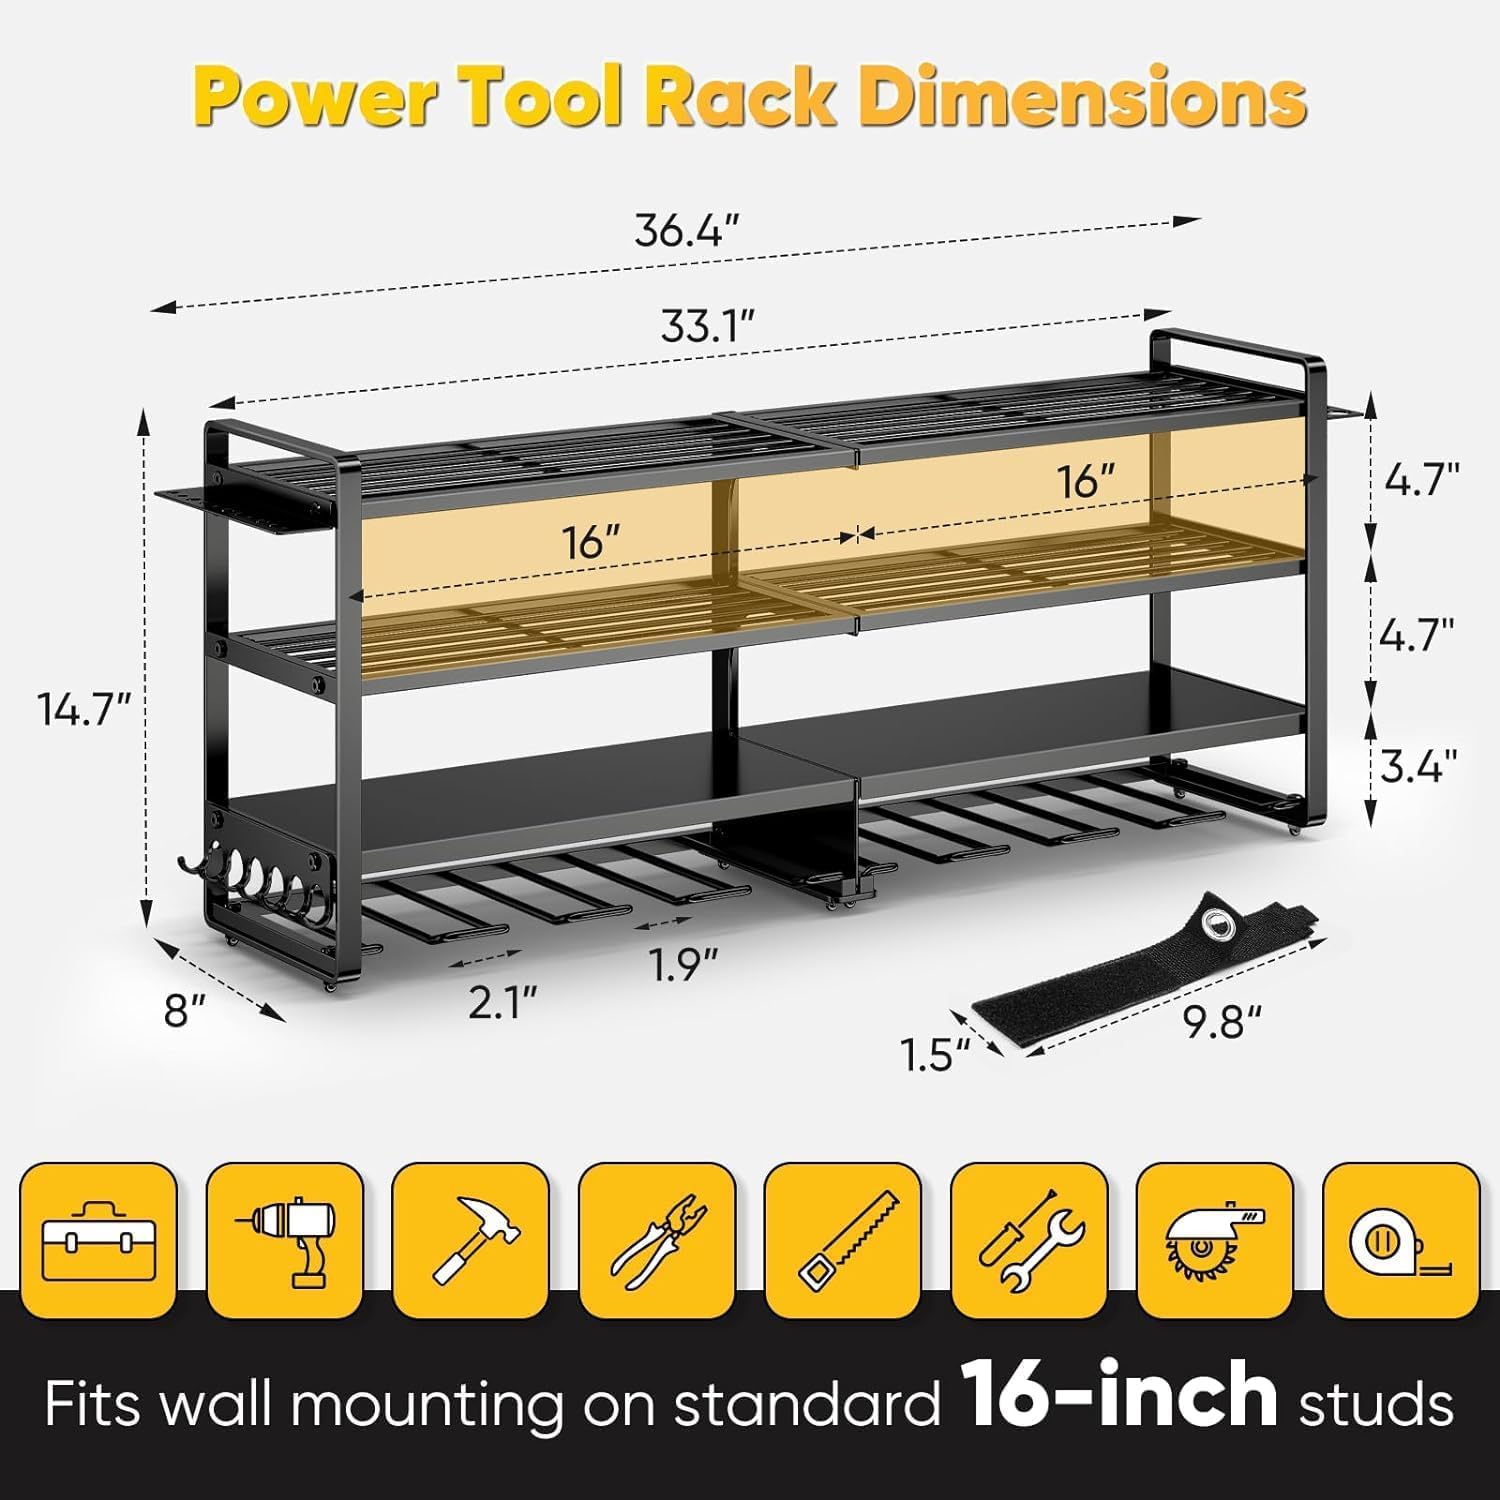
Figure 2: Product dimensions and layout.
5. Setup and Installation
The POKIPO Power Tool Organizer is designed for easy assembly and wall mounting. Follow these steps carefully:
5.1. Assembly
- Unpack Components: Carefully remove all parts from the packaging. Lay them out on a clean, flat surface. Refer to the 'Package Contents' section to ensure all parts are present.
- Assemble Main Frame: Connect the vertical support frames to the horizontal shelves using the provided screws and wrench. Ensure all connections are secure but do not overtighten until the entire frame is assembled.
- Attach Drill Holders: The cordless drill holders are integrated into the bottom shelf. Ensure they are correctly oriented to securely hold your drills.
- Install Side Racks: Attach the side racks for screwdrivers, pliers, and hammers to the designated slots on the main frame.
- Integrated Power Strip (if applicable): Secure the power strip to the top shelf if your model includes this feature. Ensure the power cord is routed safely.
5.2. Wall Mounting
- Choose Location: Select a suitable wall location in your garage, workshop, or tool room. Consider accessibility, proximity to power outlets (if using the power strip), and wall stud locations.
- Locate Wall Studs: Use a stud finder to locate and mark the center of at least two vertical wall studs. The mounting holes on the organizer are spaced to align with standard 16-inch on-center studs.
- Mark Drilling Points: Hold the assembled organizer against the wall at the desired height. Use a level to ensure it is straight. Mark the positions of the mounting holes on the wall.
- Drill Pilot Holes: Drill pilot holes at the marked locations. If mounting into studs, use a drill bit slightly smaller than the mounting screws. If mounting into drywall without studs, use a drill bit appropriate for the provided wall anchors.
- Secure Organizer: Align the organizer's mounting holes with the pilot holes. Insert the mounting screws and tighten them securely. If using wall anchors, insert them into the pilot holes first, then secure the organizer with screws.

Figure 3: Properly mounted tool organizer with various tools.
Video 1: Assembly and Installation Guide for a similar power tool organizer.
Video 2: Quick overview of the Power Tool Organizer Wall Mount.
6. Operating Instructions
Once installed, the POKIPO Power Tool Organizer provides convenient storage for your tools:
- Placing Cordless Drills: Insert the base of your cordless drills into the dedicated slots on the bottom tier. The design allows for easy access and secure storage.
- Storing Larger Tools: Use the top three shelves to store larger power tools such as circular saws, sanders, toolboxes, and battery charging stations. The wire grid shelves provide ventilation and visibility.
- Utilizing Side Racks: Hang screwdrivers, pliers, hammers, and other hand tools on the side racks for quick retrieval.
- Charging Station (if applicable): Plug your battery chargers into the integrated power strip to keep your batteries ready for use. Ensure the power strip is switched on.
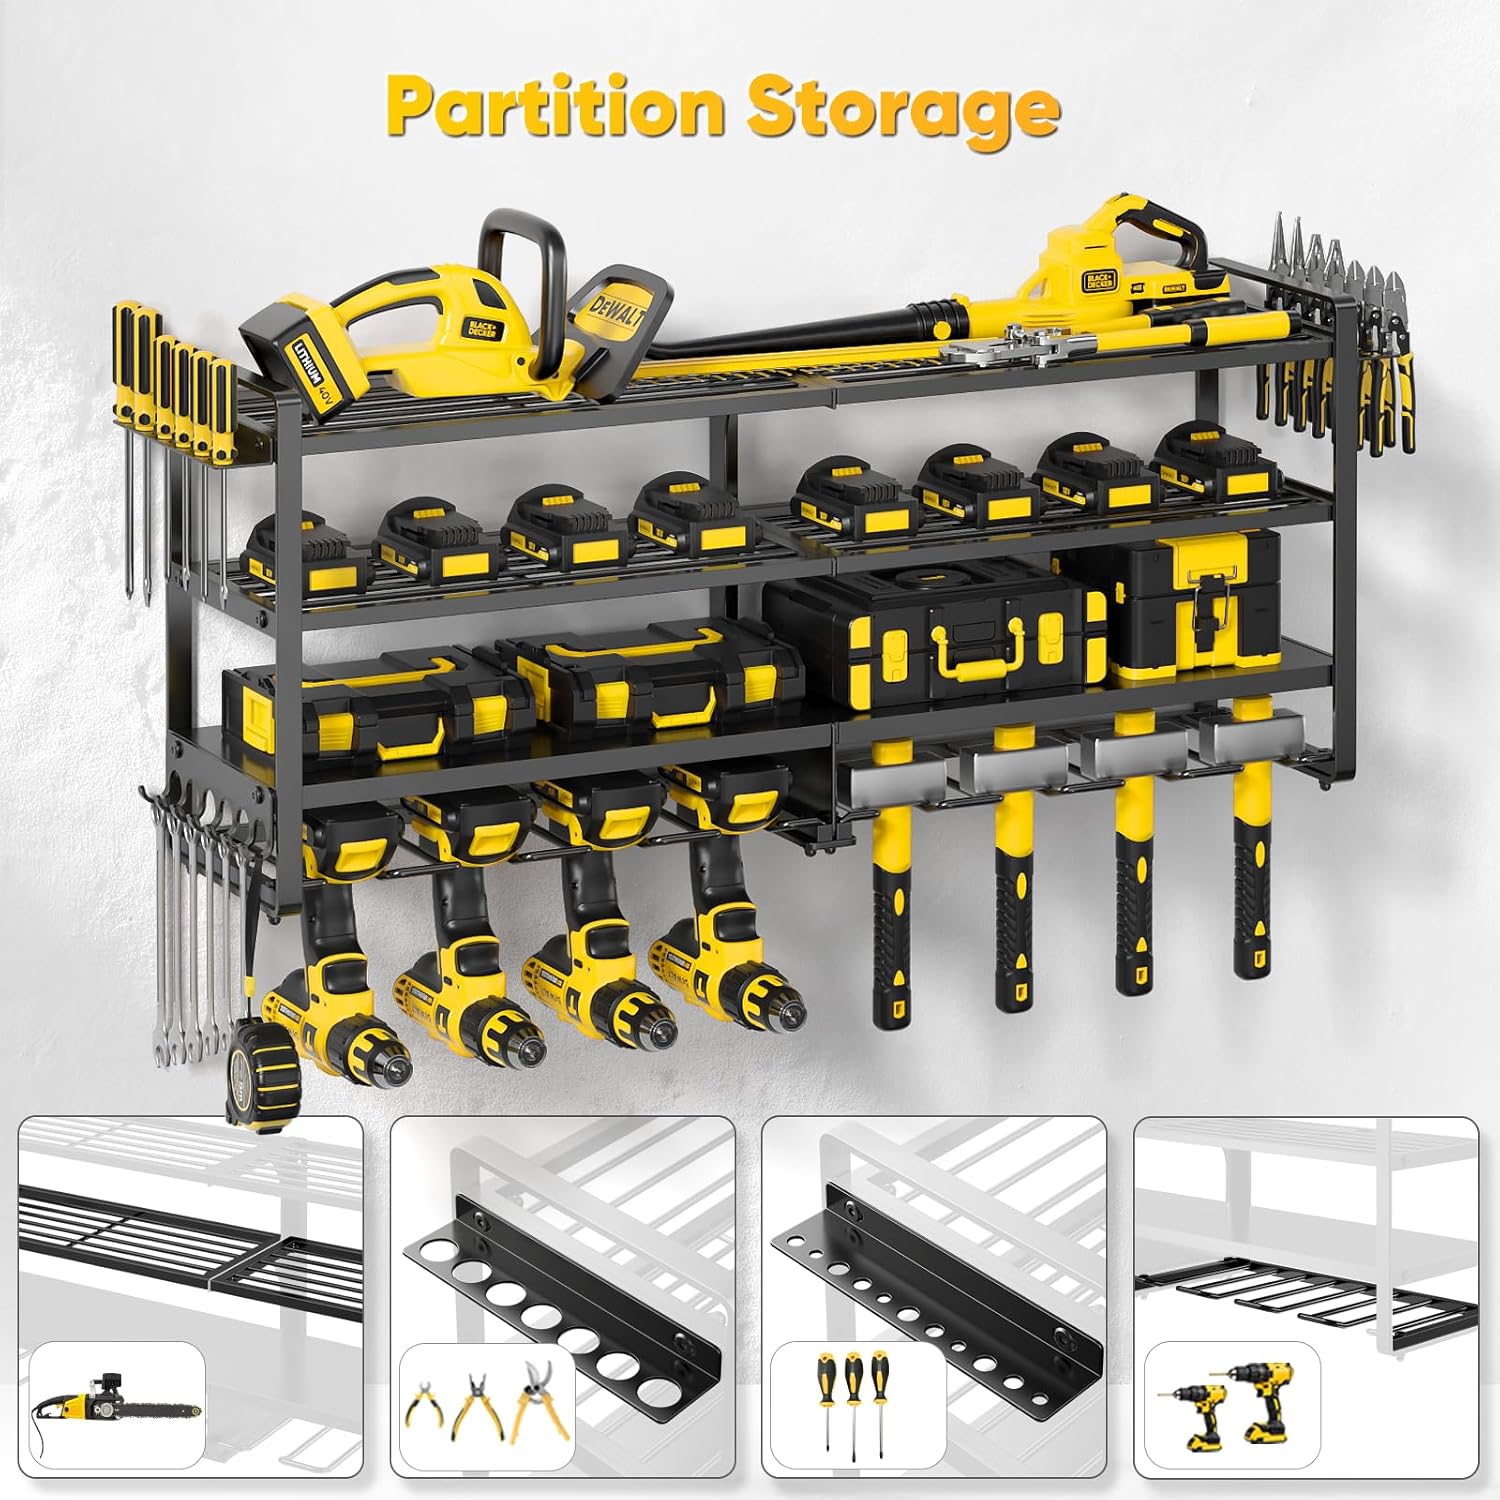
Figure 4: Example of tools organized on the shelves and holders.

Figure 5: A comprehensive view of the organizer fully utilized.
7. Maintenance
- Cleaning: Wipe down the organizer regularly with a damp cloth to remove dust and debris. Avoid abrasive cleaners that could damage the powder-coated finish.
- Inspection: Periodically inspect all mounting screws and frame connections to ensure they remain tight and secure. Retighten if necessary.
- Weight Distribution: Ensure weight is evenly distributed across the shelves and within the stated capacity to prevent undue stress on the mounting points.
8. Troubleshooting
- Organizer feels unstable: Check all mounting screws and ensure they are securely fastened into wall studs. If mounted to drywall, verify anchors are correctly installed and rated for the load. Reduce weight if overloaded.
- Power strip not working: Ensure the power strip is plugged into a live electrical outlet and its power switch is in the 'ON' position. Check for tripped circuit breakers. Do not overload the power strip.
9. Warranty and Support
For warranty information or customer support, please refer to the product packaging or contact POKIPO directly through their official website or the retailer where the product was purchased. Keep your purchase receipt for warranty claims.
Protection plans may be available for purchase separately. Please check with your retailer for details on extended protection options.