Introduction
This manual provides detailed instructions for the installation, operation, and maintenance of your AKLFGN High Pressure Shower Head with Handheld Spray Combo. Designed for optimal water flow and user comfort, this shower head features multiple spray settings and a durable construction. Please read this manual thoroughly before installation and use to ensure proper function and longevity of your product.
Safety Information
- Ensure all water connections are securely tightened to prevent leaks.
- Do not overtighten connections, as this may damage components.
- Use only the provided components for installation.
- If you encounter any difficulties during installation, consult a qualified plumber.
- Keep small parts away from children to prevent choking hazards.
Package Contents
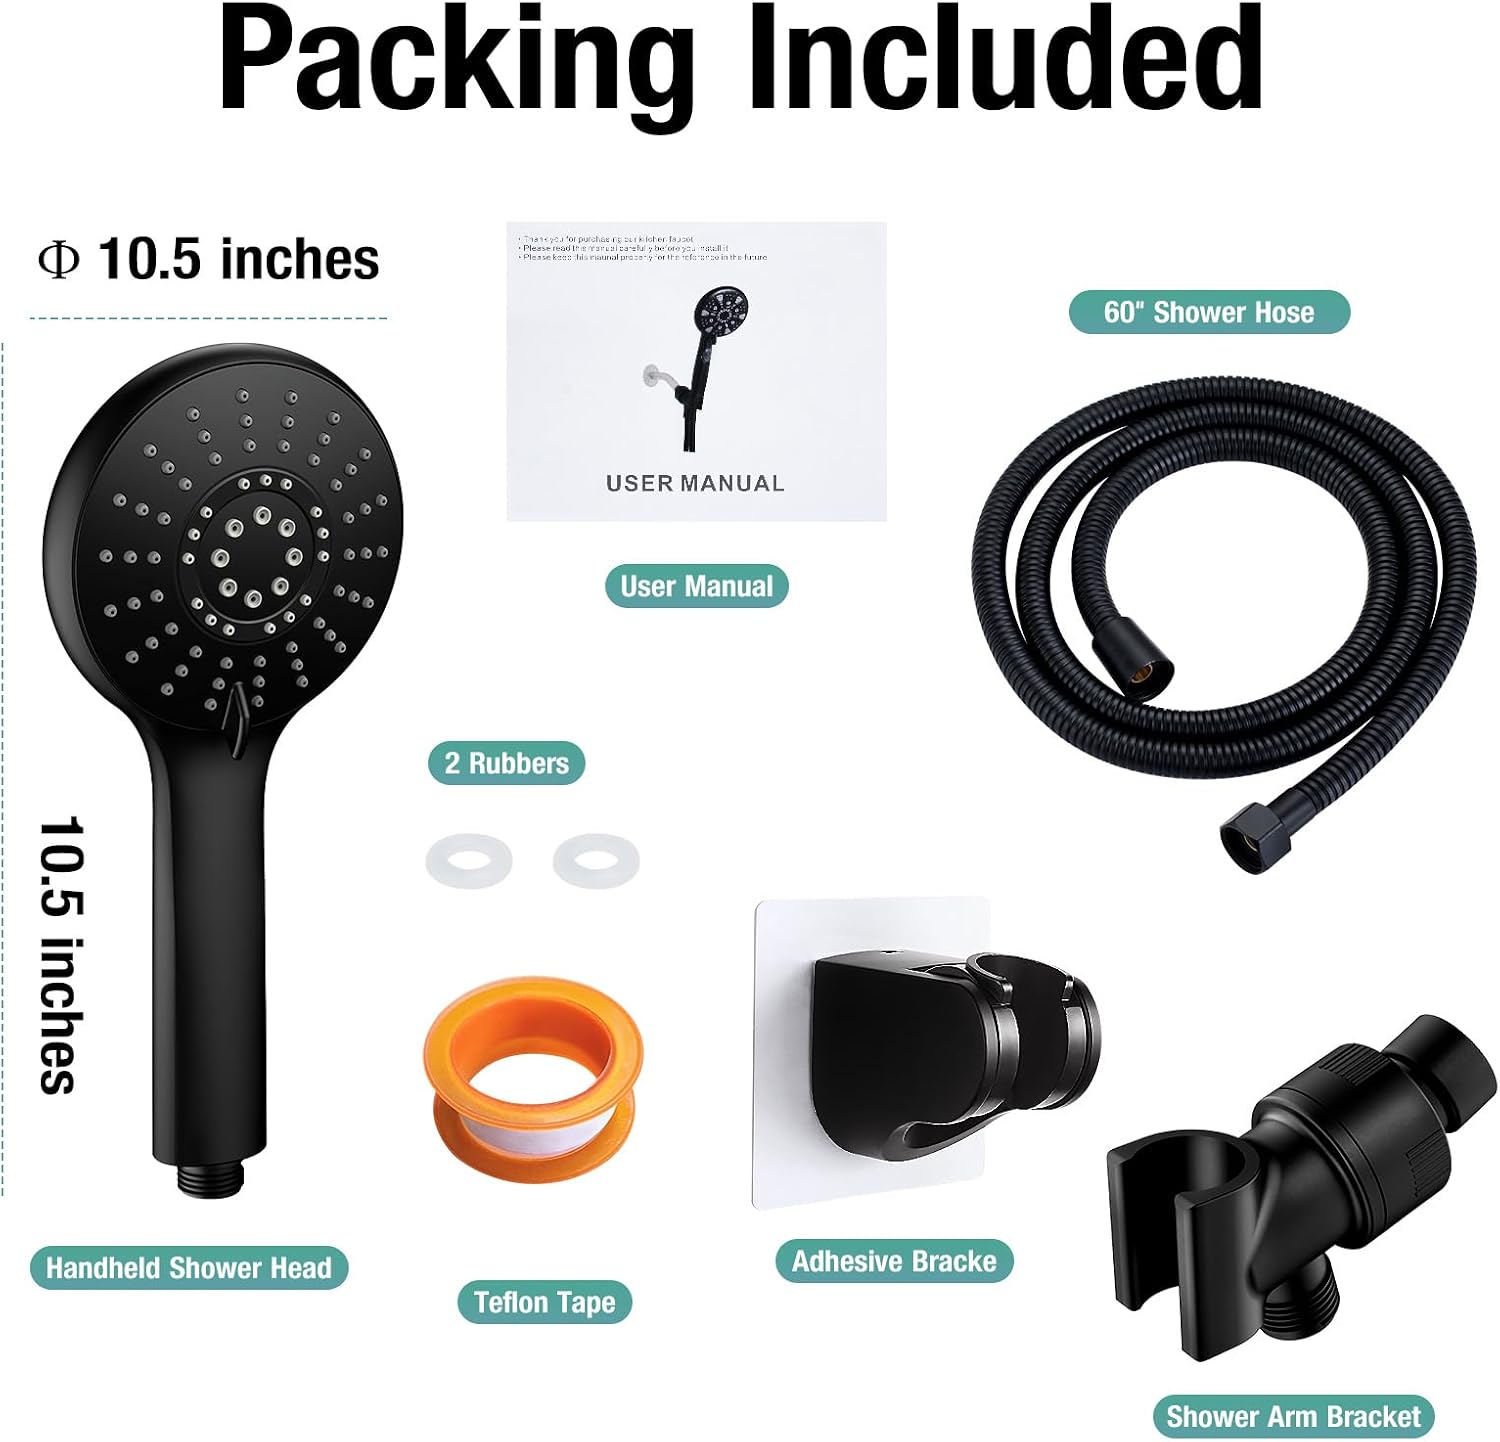
Figure 1: Package Contents. This image displays all items included in the product packaging, ensuring you have everything needed for installation.
Please verify that all the following components are present in your package:
- Handheld Shower Head (Matte Black)
- 60-inch Stainless Steel Hose
- Adjustable Shower Arm Bracket (Fixed)
- Adhesive Bracket
- Teflon Tape
- Rubber Gaskets (2 pieces)
- User Manual
Specifications
| Feature | Detail |
|---|---|
| Brand | AKLFGN |
| Model Number | AKL-SPTZ-003H |
| Style | Shower Hand Set 5 Setting |
| Shape | Round |
| Material | Acrylonitrile Butadiene Styrene (ABS) |
| Finish Type | Matte Black |
| Installation Type | Wall Mounted |
| Product Dimensions | 10"L x 4.9"W |
| Number of Settings | 5 |
| Hose Length | 60 Inches |
| Special Feature | Adjustable Height (with two bracket options) |
| Item Weight | 1.65 pounds |
Installation Guide
This shower head is designed for quick and easy DIY installation without the need for specialized tools. Follow these steps for a seamless setup.
Tools Required:
- Adjustable Wrench (optional, for tightening if needed)
- Cloth or Towel
Installation Steps:
- Prepare the Shower Arm: Ensure your existing shower arm is clean and free of debris. Remove any old shower head if present.
- Apply Teflon Tape: Wrap the threads of your shower arm with the provided Teflon tape (clockwise direction, 3-5 wraps) to ensure a watertight seal.
- Install Shower Arm Bracket: Screw the adjustable shower arm bracket onto the shower arm. Hand-tighten first, then use a wrench if necessary, but do not overtighten. Ensure the bracket is facing downwards to hold the handheld shower head.
- Connect Shower Hose to Bracket: Connect one end of the 60-inch stainless steel hose to the shower arm bracket. Ensure a rubber gasket is inside the hose connector before tightening.
- Connect Shower Hose to Handheld Head: Connect the other end of the hose to the handheld shower head. Ensure a rubber gasket is inside this connector as well. Hand-tighten securely.
- Test for Leaks: Turn on the water supply and check all connections for leaks. If leaks occur, tighten the connections slightly.

Figure 2: Quick DIY Installation. This illustration demonstrates the simple steps to install the shower head and its components.
Using the Adhesive Bracket (Optional):
The adhesive bracket provides an alternative mounting option, particularly useful for adjusting the shower head height for children or specific needs.
- Choose Location: Select a flat, smooth, and clean surface on your shower wall.
- Clean Surface: Thoroughly wipe the intended area with water and dry it completely using a cloth.
- Apply Bracket: Remove the protective backing from the adhesive bracket and firmly press it onto the cleaned surface. Hold for 30 seconds.
- Allow Adhesion: Allow 24 hours for the adhesive to fully cure before placing the handheld shower head in the bracket.

Figure 3: Two Bracket Options. This image illustrates the fixed shower arm bracket and the adhesive bracket, offering flexibility for different user heights.
Operating Instructions
Your AKLFGN shower head offers 5 distinct spray settings to customize your shower experience. The settings can be easily adjusted using the switch located on the shower head.
Spray Modes:

Figure 4: 5 Setting Modes. This image illustrates the various spray patterns available and the switch for selection.
- Massage: A focused, pulsating spray for muscle relaxation.
- Rain & Mist: A combination of gentle rain and fine mist for a soothing experience.
- Mist: A soft, fine spray for a delicate rinse.
- Rain & Massage Mist: A blend of rain, massage, and mist for a comprehensive shower.
- Rain: A classic, full-coverage spray for everyday showering.
Adjusting Spray Modes:
To change the spray mode, simply rotate the switch located on the face of the shower head. Turn it clockwise or counter-clockwise until you reach your desired setting.

Figure 5: High Pressure Spray. This image demonstrates the shower head's capability to deliver a strong, consistent water flow.
Maintenance
Regular maintenance will ensure the longevity and optimal performance of your AKLFGN shower head.
- Cleaning the Nozzles: The shower head features anti-clogging silicone spray nozzles. To clean, gently rub the silicone nozzles with your finger or a soft brush to dislodge any mineral buildup.
- General Cleaning: Wipe the exterior of the shower head and hose with a soft cloth and mild soap solution. Avoid abrasive cleaners or harsh chemicals, as these can damage the matte black finish.
- Hose Inspection: Periodically inspect the 60-inch stainless steel hose for any signs of wear or damage. Replace if necessary.
Troubleshooting
If you encounter any issues with your shower head, please refer to the following common problems and solutions:
| Problem | Possible Cause | Solution |
|---|---|---|
| Low Water Pressure | Mineral buildup in nozzles; partially closed water valve; low household water pressure. | Clean silicone nozzles (see Maintenance); ensure main water valve is fully open; consult a plumber if household water pressure is consistently low. |
| Leaking Connections | Connections not tight enough; missing or improperly seated rubber gaskets; insufficient Teflon tape. | Ensure all connections are hand-tightened securely; verify rubber gaskets are correctly placed; reapply Teflon tape if necessary. |
| Shower Head Not Staying in Bracket | Bracket not installed correctly; adhesive not fully cured (for adhesive bracket). | Ensure the shower arm bracket is tightened and oriented correctly; for the adhesive bracket, ensure the surface was clean and dry, and allow 24 hours for curing. |
Customer Support
AKLFGN is committed to providing high-quality products and excellent customer service. If you have any questions, concerns, or require assistance with your product, please do not hesitate to contact our professional customer support team. We are dedicated to ensuring your utmost satisfaction.
Please refer to your product packaging or the retailer's website for specific contact information.