Artudatech M553-A162-Silver~PMS002AMZUS
Artudatech Fuel Pump User Manual
Model: M553-A162-Silver~PMS002AMZUS
1. Introduction
This manual provides essential information for the installation, operation, and maintenance of your Artudatech Fuel Pump. Please read this manual thoroughly before installation and use to ensure proper function and safety. This product is designed as a replacement part for specific Honda motorcycle models.
2. Product Overview
The Artudatech Fuel Pump is a critical component of your vehicle's fuel delivery system, responsible for transferring fuel from the tank to the engine at the correct pressure. This aftermarket fuel pump assembly is engineered to meet or exceed original equipment specifications, ensuring reliable performance.
- Reliable Fuel Delivery: Ensures consistent fuel supply to your engine.
- Precise Pressure Control: Maintains correct fuel pressure for smooth operation.
- Built to Last: Designed for durability and longevity.
- Enhances Engine Performance: Contributes to optimal power and responsiveness.
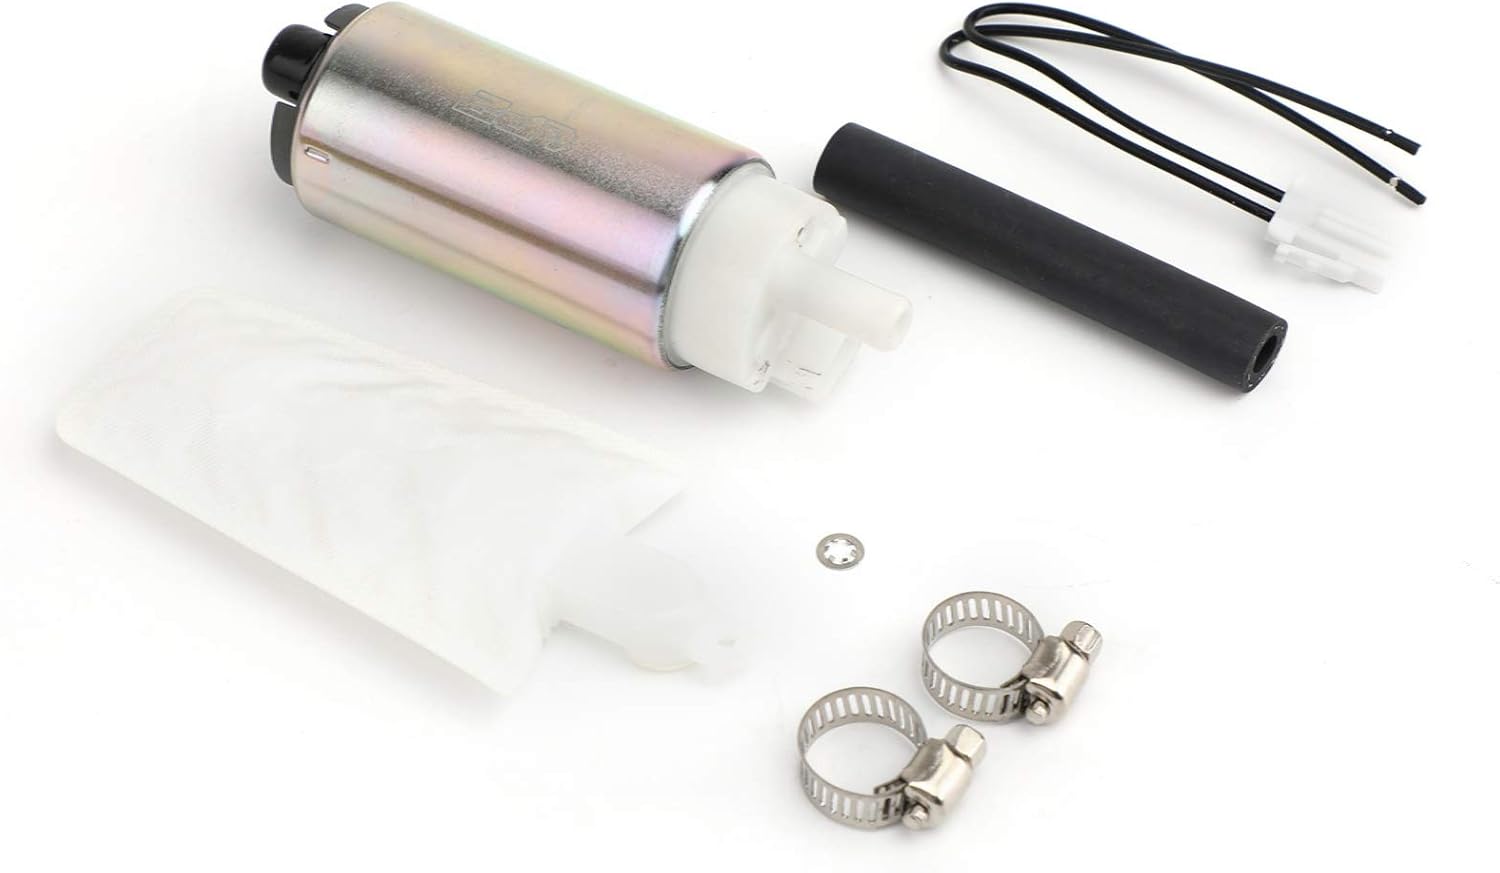
Figure 2.1: Artudatech Fuel Pump Assembly. This image shows the main fuel pump unit, which is a cylindrical metallic component with electrical connectors and fuel outlets.
3. Compatibility
This fuel pump is designed as a direct replacement for the following Honda models. Please verify the part number and compare with your existing unit before purchase and installation.
Replacement Part Number: 16700-KRJ-903
| Model | Years |
|---|---|
| Honda FES125 Pantheon | 2003-2005 |
| Honda FES150 Pantheon | 2003-2005 |
| Honda FES150 S-Wing | 2007-2013 |
| Honda FES150 (ABS) S-Wing | 2007-2013 |
Important Note: Compatibility charts are for reference only. Always compare with your faulty unit and the provided images to confirm fitment before installation. This is an aftermarket part, not an original equipment manufacturer (OEM) part.
4. Package Contents
Upon opening the package, please ensure all the following components are present and undamaged:
- 1x Fuel Pump Assembly
- 1x Fuel Strainer (pre-attached or separate)
- Necessary wiring and connectors
- Hose clamps (if applicable)

Figure 4.1: Package Contents. This image displays the complete kit, including the fuel pump, fuel strainer, electrical wiring, and hose clamps.
5. Installation (Setup)
Installation of a fuel pump requires mechanical aptitude and specific tools. If you are not confident in performing this procedure, it is highly recommended to seek professional assistance from a qualified mechanic. Improper installation can lead to fuel leaks, fire hazards, or damage to your vehicle.
Safety Precautions:
- Ensure the vehicle is parked on a level surface and the engine is cool.
- Disconnect the negative terminal of the battery before starting any work.
- Relieve fuel system pressure according to your vehicle's service manual.
- Wear appropriate personal protective equipment (PPE), including safety glasses and gloves.
- Have a fire extinguisher readily available.
- Work in a well-ventilated area, away from open flames or sparks.
General Installation Steps:
- Access the Fuel Pump: Locate the fuel pump assembly, typically found inside the fuel tank or mounted externally near the tank. This may require removing seats, trim panels, or dropping the fuel tank. Consult your vehicle's service manual for exact location and access procedures.
- Disconnect Fuel Lines and Electrical Connectors: Carefully disconnect all fuel lines and electrical wiring connected to the old fuel pump. Be prepared for residual fuel leakage and use appropriate containers to catch it.
- Remove Old Fuel Pump: Unfasten any retaining rings, bolts, or clamps securing the old fuel pump assembly. Remove the old pump from its housing.
- Install New Fuel Pump: Install the new Artudatech fuel pump assembly, ensuring all seals and gaskets are correctly seated. Connect the fuel lines and electrical connectors securely. Double-check all connections for tightness.
- Reassemble: Reinstall any components removed to access the fuel pump (e.g., fuel tank, seats, trim).
- Reconnect Battery: Reconnect the negative terminal of the battery.
- Test System: Turn the ignition key to the "ON" position (without starting the engine) several times to prime the fuel system and check for any leaks. Start the engine and observe for proper operation and any unusual noises or smells.
6. Operation
Once correctly installed, the Artudatech Fuel Pump operates automatically as part of your vehicle's fuel system. It is activated when the ignition is turned on, pressurizing the fuel lines to deliver fuel to the engine's fuel injectors or carburetor. The pump maintains a consistent fuel pressure to ensure efficient combustion and optimal engine performance.
No direct user interaction is required for the operation of the fuel pump itself after installation.
7. Maintenance
While the fuel pump itself is generally a sealed unit requiring no routine maintenance, proper care of your vehicle's fuel system can extend its lifespan and prevent premature failure.
- Fuel Filter Replacement: Regularly replace your vehicle's fuel filter according to the manufacturer's recommended service intervals. A clogged fuel filter can put excessive strain on the fuel pump, leading to premature wear.
- Use Quality Fuel: Always use clean, high-quality fuel from reputable sources. Contaminated fuel can damage the fuel pump and other fuel system components.
- Avoid Running on Low Fuel: Consistently running your fuel tank to near empty can cause the fuel pump to overheat, as fuel acts as a coolant for the pump motor. Try to keep your fuel tank at least a quarter full.
- Check for Leaks: Periodically inspect fuel lines and connections for any signs of leaks or damage.
8. Troubleshooting
If you experience issues with your vehicle's fuel delivery after installing the Artudatech Fuel Pump, consider the following common troubleshooting steps:
| Symptom | Possible Cause | Solution |
|---|---|---|
| Engine cranks but won't start | No fuel pressure, clogged fuel filter, faulty electrical connection. | Check fuel pump fuse/relay. Verify electrical connections to the pump. Check fuel filter for clogging. Listen for pump priming sound when ignition is turned on. |
| Engine misfires or lacks power | Insufficient fuel pressure, restricted fuel flow. | Check fuel pressure with a gauge. Inspect fuel lines for kinks or blockages. Replace fuel filter if old. |
| Whining noise from fuel tank | Fuel pump working harder than usual, low fuel level. | Ensure adequate fuel level. Check for restricted fuel lines or clogged filter. |
| Fuel leak | Improperly seated fuel lines or seals. | Immediately address any fuel leaks. Re-check all connections and seals around the fuel pump. |
If these steps do not resolve the issue, it is advisable to consult a professional mechanic for diagnosis and repair.
9. Specifications
| Attribute | Detail |
|---|---|
| Brand | Artudatech |
| Model Number | M553-A162-Silver~PMS002AMZUS |
| Replacement Part Number | 16700-KRJ-903 |
| Fit Type | Vehicle Specific Fit |
| Vehicle Service Type | Car (Note: Product description specifies Honda FES/S-Wing, which are motorcycles/scooters. "Car" might be a generic category from Amazon data.) |
| Item Dimensions (L x W x H) | 5.91 x 2.76 x 1.97 inches |
| Item Weight | 12.3 ounces (approx. 350 Grams) |
| Operation Mode | Mechanical (Note: Refers to the pump's internal mechanism, it is an electric pump) |
| Country of Origin | China |
10. Warranty and Support
Artudatech stands behind the quality of its products. While specific warranty terms may vary, customers typically benefit from a 30-day return policy as per Amazon's terms for this product. For any product-related inquiries, technical support, or warranty claims, please contact Artudatech directly through their official store or customer service channels.
You can visit the official Artudatech Store for more information: Artudatech Store on Amazon