Introduction
The lifcasual HRD-104 is a compact and portable AM/FM stereo radio designed for convenient listening on the go. Featuring a digital tuning system, LCD display, and dual-band reception, it offers a versatile audio experience. This manual provides detailed instructions for setting up, operating, and maintaining your HRD-104 radio.
Setup
1. Battery Installation
The HRD-104 radio requires two (2) AAA batteries (not included) for operation. Follow these steps to install them:
- Locate the battery compartment cover on the back of the radio.
- Slide the cover downwards or in the direction indicated by the "OPEN" arrow to open it.
- Insert two AAA batteries, ensuring the correct polarity (+ and -) as marked inside the compartment.
- Close the battery compartment cover securely.
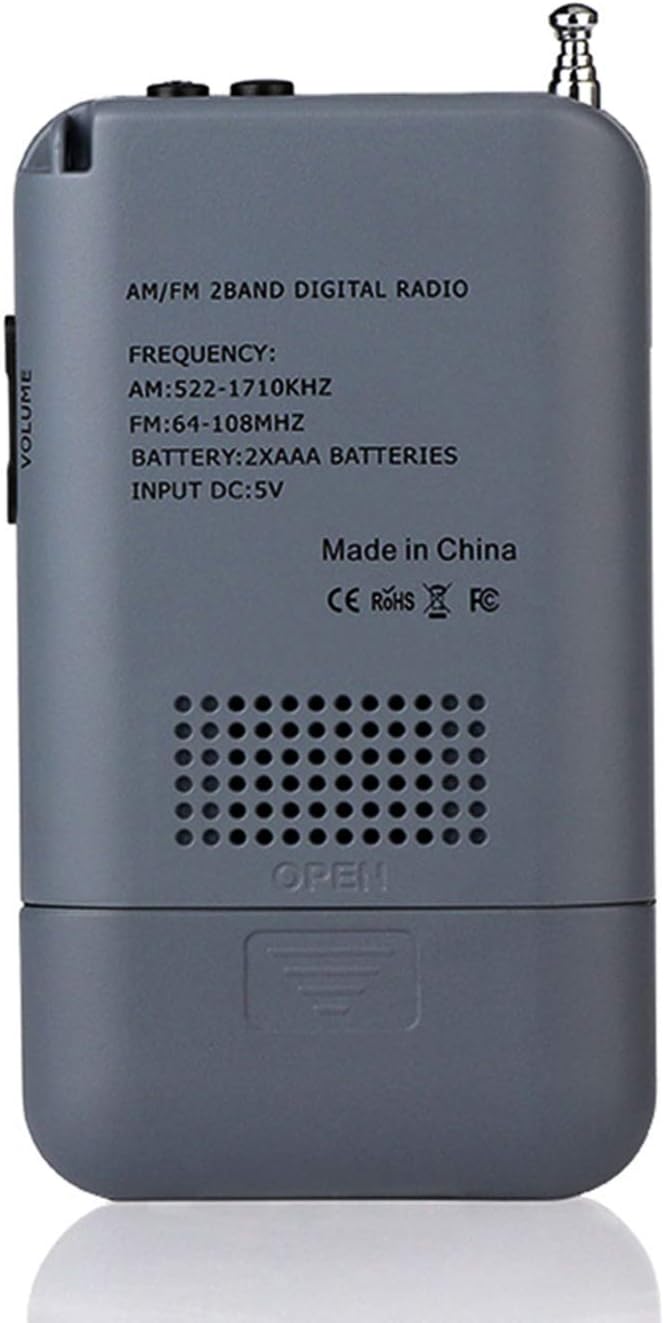
Image: Back of the HRD-104 radio with the battery compartment open, illustrating the insertion of two AAA batteries. Note that batteries are not included with the product.

Image: Rear view of the HRD-104 radio with the battery compartment closed, showing the printed specifications including frequency ranges (AM: 522-1710KHz, FM: 64-108MHz) and battery type (2xAAA).
2. Powering the Device
The radio can be powered by the installed AAA batteries or via a DC 5V USB connection.
- Battery Power: Ensure batteries are correctly installed.
- USB Power: Connect a standard micro USB cable (not included) to the DC 5V port on the side of the radio and to a compatible USB power source.

Image: Side profile of the HRD-104 radio, highlighting the DC 5V micro USB charging port, the 3.5mm headphone jack, and the Power/Sleep button.
3. Connecting Headphones
For private listening, connect the included 3.5mm headphones to the headphone jack located on the side of the radio. The radio will automatically switch from the internal speaker to headphone output when headphones are connected.
Operating Instructions
1. Power On/Off
Press and hold the POWER / SLEEP button (located on the top/side) to turn the radio on or off.
2. Button Functions Overview

Image: Detailed diagram showing the layout and function of each button and port on the HRD-104 radio, including tuning, memory, volume, and input/output connections.
- 1. Power/Sleep: Turns the radio on/off.
- 2. Lock: Locks/unlocks buttons to prevent accidental presses.
- 3. DC 5V external power supply: Micro USB port for external power.
- 4. 3.5mm headphone socket: For connecting headphones.
- 5. Antenna: Extendable antenna for improved reception.
- 6. LCD display: Shows frequency, time, and other information.
- 7. TUN+: Tunes frequency up.
- 8. TUN-: Tunes frequency down.
- 9. M+: Recalls next preset station.
- 10. M-: Recalls previous preset station.
- 11. AM/FM & SCAN: Switches between AM/FM bands; long press for auto scan.
- 12. MEMO/DEL: Saves current station to memory; long press to delete.
- 13. Volume+: Increases volume.
- 14. Volume-: Decreases volume.
- 15. Lanyard: Attachment point for the included lanyard.
- 16. External loudspeaker: Built-in speaker.
3. Band Selection (AM/FM)
Press the AM/FM button to switch between AM and FM radio bands. The selected band will be displayed on the LCD screen.
4. Tuning and Presets
- Manual Tuning: Press the TUN+ or TUN- buttons to manually adjust the frequency.
- Auto Scan: Press and hold the AM/FM & SCAN button to automatically scan for available stations and save them to presets. The radio can store up to 29 presets per band.
- Recalling Presets: Press the M+ or M- buttons to cycle through your saved preset stations.
- Saving Presets: Tune to your desired station, then press the MEMO/DEL button to save it. The display will show a memory location number.
- Deleting Presets: Select the preset you wish to delete using M+ or M-, then press and hold the MEMO/DEL button.
5. Antenna Usage
For optimal FM reception, extend the telescopic antenna fully. For AM reception, the radio uses an internal magnetic rod antenna, and its orientation may affect signal strength. If reception is poor, try repositioning the radio or shortening the antenna if the signal is too strong.

Image: The HRD-104 radio shown with its telescopic antenna extended, demonstrating how to improve radio signal reception, particularly for FM broadcasts.
6. Volume Control
Adjust the listening volume using the Volume+ and Volume- buttons located on the side of the radio.
7. LCD Display and Backlight
The 1.3-inch LCD screen displays the current frequency, time, and other operational information. To activate the orange backlight for night use, press any button. The backlight will illuminate for approximately 5 seconds.

Image: The HRD-104 radio's LCD screen illuminated with an orange backlight, displaying the time (12:10) and indicating the AM band, designed for improved visibility in low-light conditions.
8. Time and Alarm Setting
The radio includes a digital clock and an alarm function. Refer to the on-screen prompts and button functions (M+, M-, MEMO/DEL) to set the time and configure the alarm.

Image: The HRD-104 radio's LCD screen showing the current time (12:10), highlighting its integrated alarm clock feature.
Maintenance
1. Cleaning
Wipe the radio's exterior with a soft, dry cloth. Do not use abrasive cleaners or solvents, as they may damage the finish.
2. Battery Care
- If the radio will not be used for an extended period, remove the batteries to prevent leakage and damage.
- Replace batteries when the sound becomes weak or distorted, or if the radio emits beeping sounds, indicating low battery power.
Troubleshooting
- No Power:
- Check if batteries are installed correctly and have sufficient charge.
- Ensure the power button is pressed and held until the display turns on.
- If using USB power, ensure the cable and power source are functional. - Poor Reception:
- Extend the telescopic antenna fully for FM.
- For AM, try rotating the radio to find the best signal.
- Move away from sources of interference (e.g., computers, large metal objects). - No Sound:
- Check the volume level.
- If headphones are connected, ensure they are fully plugged in and functional. Disconnect headphones to use the internal speaker. - Buttons Not Responding:
- Check if the Lock function is activated. Press the Lock button to unlock the controls.
Specifications
| Model Number | HRD-104 |
| Brand | Generic |
| Frequency Range (FM) | 64-108 MHz |
| Frequency Range (AM) | 520-1710 KHz (9K/10K selectable) |
| Built-in Speaker | φ40mm, 8Ω, 0.5W |
| Reception Sensitivity (FM) | 8dB |
| Reception Sensitivity (AM) | 3mV/m |
| Stereo Separation | ≥32dB |
| Distortion | ≤1% |
| Output Power | ≤200mW |
| Headphone Port | φ3.5mm/32Ω |
| Antenna | External, 4 sections telescopic |
| Power Supply | 2 * 1.5V AAA batteries (not included) |
| Charging Port | DC 5V, Micro USB |
| Lowest Working Voltage | 2V |
| Dimensions | 13 x 8.8 x 4.5 cm |
| Material | ABS Plastic |
Warranty and Support
Specific warranty information for the lifcasual HRD-104 radio is not provided in the product details. Please refer to the retailer or manufacturer's website for details regarding warranty coverage and customer support. Keep your purchase receipt as proof of purchase.