
1. Introduction
This instruction manual provides comprehensive guidance for the safe and effective use of your ASCENDAS Mitre Gauge with 450mm Enhanced Fence Set. This precision woodworking tool is designed to assist in making accurate angled cuts on various woodworking machines. Please read this manual thoroughly before initial use and retain it for future reference.
2. Product Overview
The ASCENDAS Mitre Gauge is a robust tool featuring a 450mm T-bar, a brass handle for secure locking, and a fence with a repetitive cut flip stop. It offers 27 angle stops and 60-degree angled ends for maximum versatility in cutting angles.
2.1 Components
- Mitre Gauge Body with Angle Scale
- 450mm T-Bar
- Brass Locking Handle
- Enhanced Fence
- Repetitive Cut Flip Stop
- Adjustable Limit Parts

Figure 2.1: Overview of the ASCENDAS Mitre Gauge with 450mm Enhanced Fence Set.

Figure 2.2: Close-up view of the precision angle scale and brass locking handle for accurate adjustments.

Figure 2.3: Detailed dimensions of the mitre gauge components, including the T-bar and fence profiles.
3. Setup
Proper setup ensures accuracy and safety. Follow these steps to prepare your mitre gauge for use.
3.1 Initial Assembly
- Attach the Fence: Secure the enhanced fence to the mitre gauge body using the provided fasteners. Ensure it is firmly seated.
- Install Limit Parts: Insert the adjustable limit parts into the fence track. These are used to set the length of repetitive cuts.
- Install Push Handle: Attach the push handle to the designated slot on the fence. This provides a secure grip for guiding material.
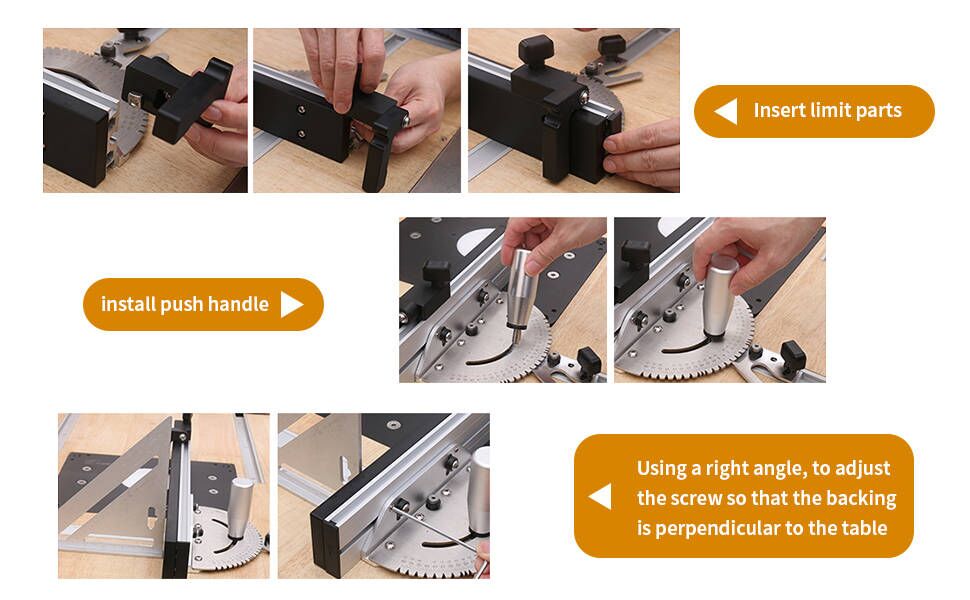
Figure 3.1: Visual guide for inserting limit parts, installing the push handle, and adjusting the fence for perpendicularity.
3.2 Calibrating for Perpendicularity
Before making cuts, ensure the fence is perfectly perpendicular to the table saw blade at 0 degrees.
- Insert the T-bar into your table saw's miter slot.
- Loosen the brass locking handle on the mitre gauge.
- Using a reliable right-angle square, adjust the fence until it is exactly 90 degrees to the saw blade.
- Tighten the brass locking handle to secure the angle.
- Verify the 0-degree mark on the angle scale aligns correctly. Adjust if necessary using the fine-tuning screw.

Figure 3.2: The mitre gauge properly installed in a table saw's miter slot.
4. Operating Instructions
This section details how to use your mitre gauge for various cutting operations.
4.1 Setting an Angle
- Loosen the brass locking handle.
- Rotate the mitre gauge body to the desired angle on the scale. The gauge supports angles from 0 to 60 degrees in both directions.
- Utilize the 27 positive stops for common angles to ensure quick and precise setting.
- Once the desired angle is set, firmly tighten the brass locking handle to prevent movement during the cut.

Figure 4.1: The mitre gauge allows angle adjustments from 0 to 60 degrees, facilitating various angled cuts.

Figure 4.2: The angle stops ensure repeatable and accurate angle settings.
4.2 Making a Cut
- Ensure the mitre gauge is securely seated in the miter slot and the desired angle is locked.
- Place your workpiece firmly against the fence.
- If making repetitive cuts, adjust the flip stop to the desired length.
- Using the push handle, slowly and steadily guide the workpiece and mitre gauge through the saw blade. Maintain firm pressure against the fence and down onto the table.
- Allow the blade to come to a complete stop before removing the cut piece and the mitre gauge.

Figure 4.3: Examples of precise angled cuts achievable with the mitre gauge.
5. Maintenance
Regular maintenance will prolong the life and accuracy of your mitre gauge.
- Cleaning: After each use, wipe down the mitre gauge and fence to remove sawdust and debris. A dry cloth is usually sufficient.
- Lubrication: Periodically apply a light coat of dry lubricant to the T-bar and any moving parts to ensure smooth operation. Avoid excessive lubrication, which can attract dust.
- Inspection: Regularly check all fasteners for tightness. Ensure the angle scale is clear and readable. Inspect the T-bar for any signs of wear or damage that could affect accuracy.
- Storage: Store the mitre gauge in a clean, dry environment to prevent rust and damage.
6. Troubleshooting
This section addresses common issues you might encounter.
6.1 Inaccurate Cuts
- Issue: Cuts are not at the set angle or are inconsistent.
- Solution:
- Verify the mitre gauge is securely locked at the desired angle.
- Check the calibration of the 0-degree setting (refer to Section 3.2).
- Ensure the T-bar fits snugly in the miter slot without excessive play.
- Confirm the workpiece is held firmly against the fence throughout the cut.
6.2 Difficulty Sliding in Miter Slot
- Issue: The T-bar is stiff or binds in the table saw's miter slot.
- Solution:
- Clean the miter slot and the T-bar thoroughly to remove any debris or buildup.
- Apply a dry lubricant (e.g., silicone spray or paste wax) to the T-bar.
- Ensure the T-bar is correctly oriented in the slot.
7. Specifications
| Feature | Specification |
|---|---|
| Brand | ASCENDAS |
| Model Number | mitre gauge-02 |
| Part Number | JD-0801 |
| T-Bar Length | 450 mm |
| Cutting Angle Range | 0 to 60 Degrees (both directions) |
| Angle Stops | 27 Positive Stops |
| Blade Material | Stainless Steel (for gauge components) |
| Handle Material | Aluminum (for fence), Brass (for locking knob) |
| Product Dimensions | 17.7 x 0.19 x 17.7 inches (approximate overall) |
| Item Weight | 6.69 pounds |
| Surface Recommendation | Wood |
8. Warranty and Support
For warranty information or technical support, please refer to the product packaging or contact ASCENDAS customer service directly. Keep your purchase receipt as proof of purchase.