1. Introduction
Thank you for choosing the Mondeer L-Shaped Computer Desk. This manual provides essential information for the safe assembly, operation, and maintenance of your new desk. Please read these instructions carefully before beginning assembly and retain them for future reference.
Safety Warnings
- Assemble the desk with care, strictly following all instructions provided.
- Ensure the desk is stable and secure before placing any items on it or using it.
- Do not overload the desk or its shelves to maintain stability and prevent damage. The main desktop supports up to 40 kg, and each shelf supports up to 15 kg.
- Keep small parts and packaging materials away from children to prevent choking hazards.
- Use the desk on a level surface to prevent tipping.
2. Package Contents
Before assembly, verify that all parts and hardware are present. Refer to the included parts list in your package. Each component and accessory is typically numbered for easy identification.

Figure 2.1: The Mondeer L-Shaped Computer Desk in its assembled form, showcasing its rustic brown finish and integrated storage shelves.
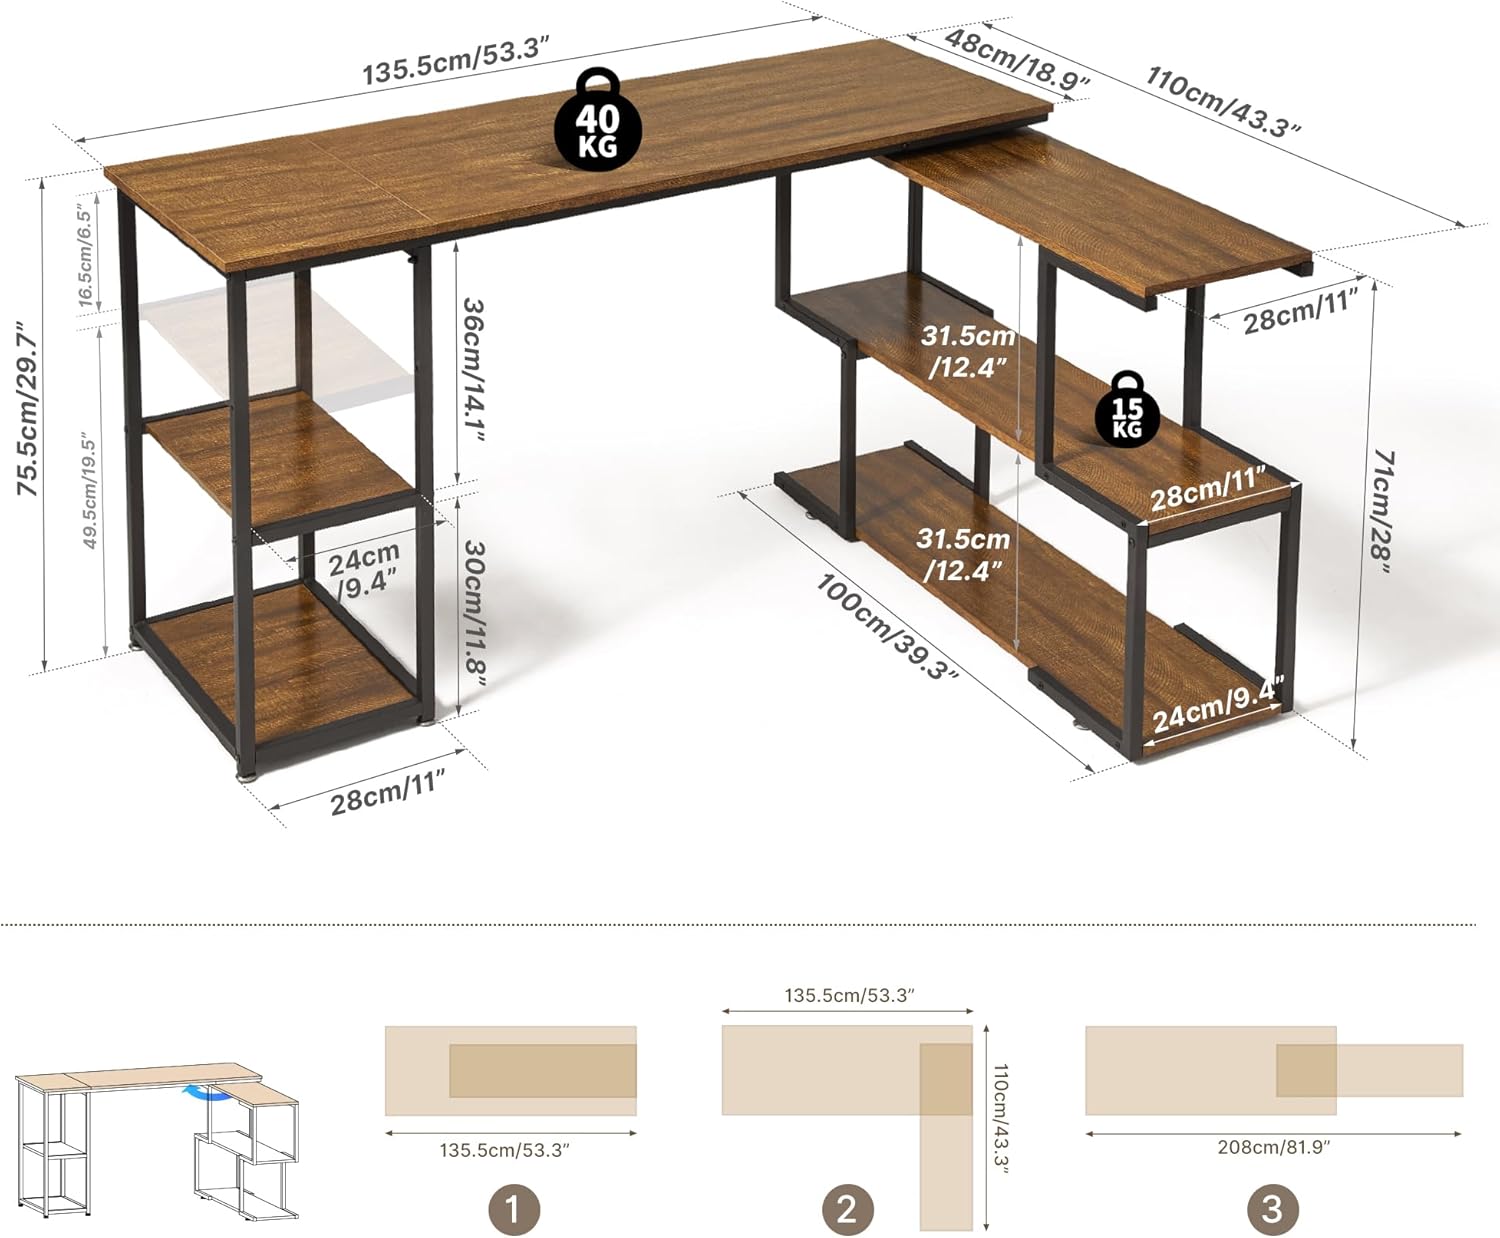
Figure 2.2: Overview of desk dimensions and weight capacities. The main desktop can support up to 40 kg, and individual shelves can support up to 15 kg. Dimensions are provided in both centimeters and inches.
3. Setup and Assembly
Assembly is designed to be straightforward. Follow the step-by-step instructions provided in your package. Ensure you have adequate space and the necessary tools (usually an Allen key, which is included).
Assembly Steps (General Guidance):
- Unpack and Identify: Carefully unpack all components and lay them out. Match each part to the corresponding number in the parts list.
- Assemble Frame: Begin by assembling the metal frame components according to the diagrams. Do not overtighten screws until all parts are loosely fitted.
- Attach Desktop Panels: Secure the main desktop panels to the assembled frame.
- Install Rotating Shelf Mechanism: Attach the high-quality metal turntable that connects the L-shaped desk section, allowing for 360° rotation.
- Install Storage Shelves: Place the storage shelves into their designated positions. Note that the height of the central left shelf is adjustable.
- Final Tightening: Once all components are in place and the desk is in your desired configuration, tighten all screws securely.
- Adjust Leveling Feet: Use the adjustable leveling feet to ensure the desk is stable and level on uneven floors.
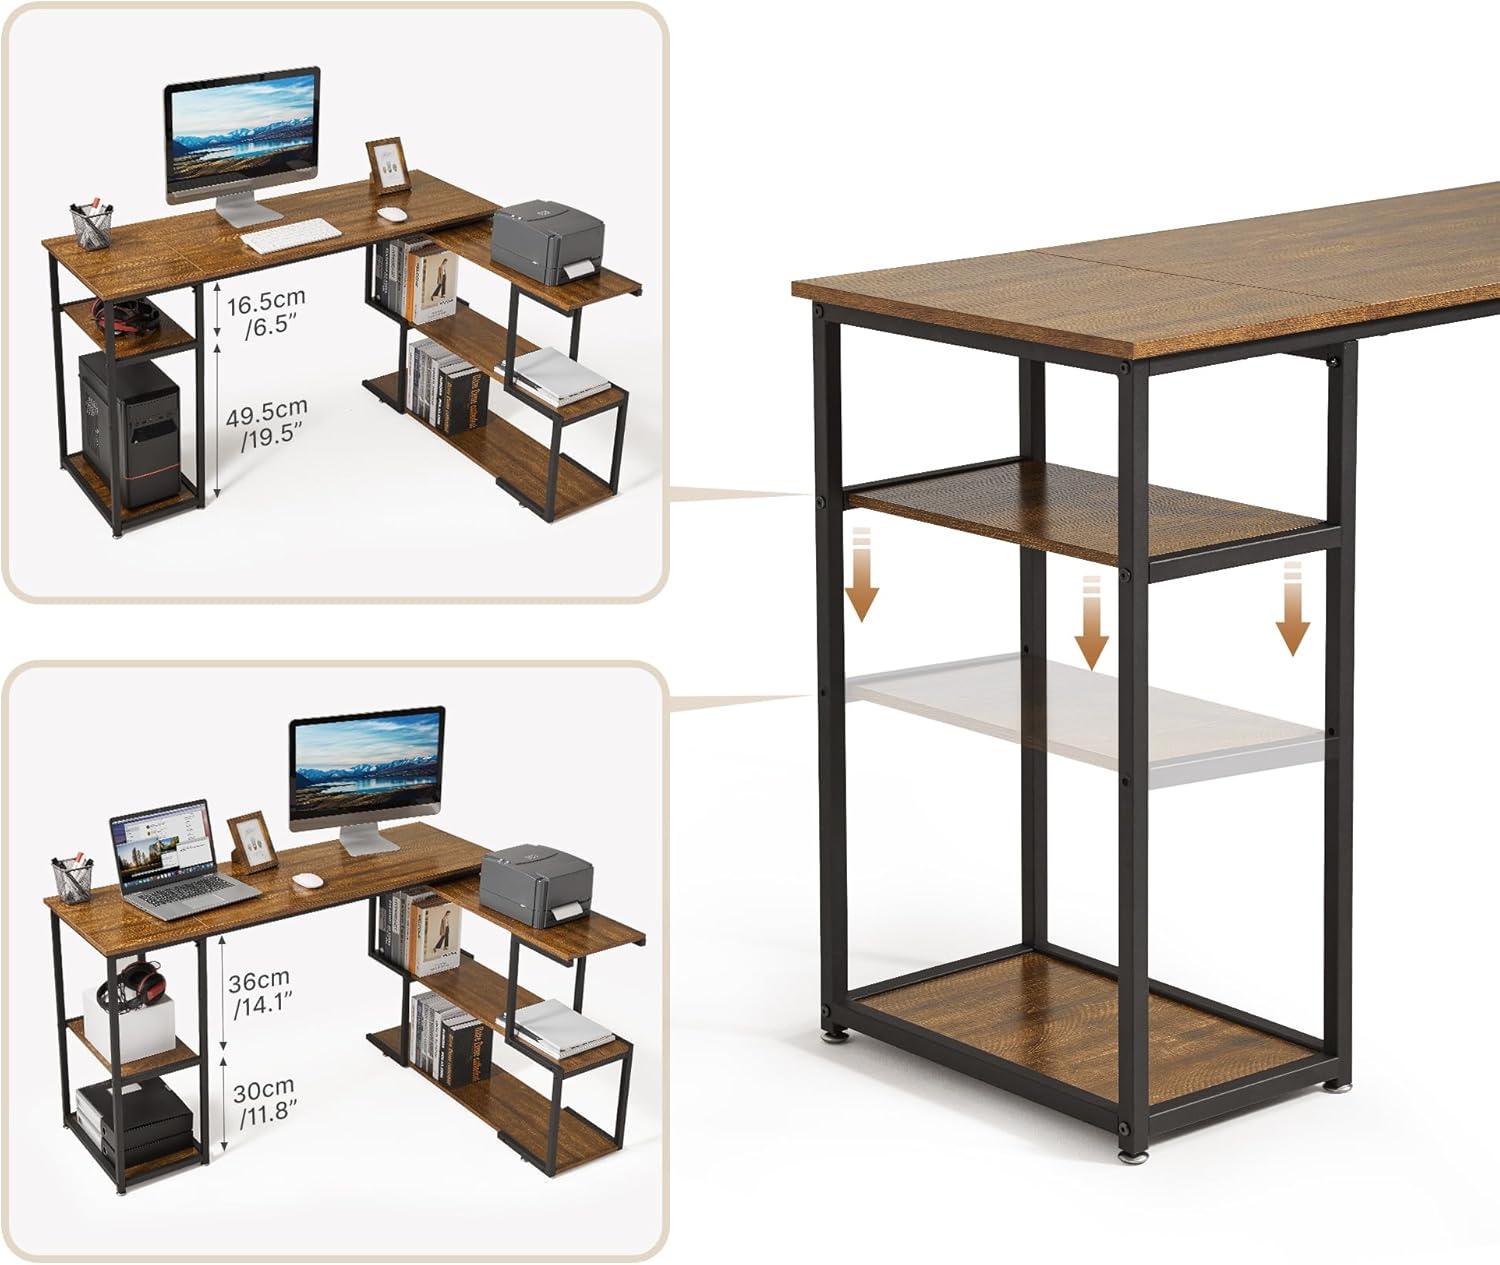
Figure 3.1: The desk can be configured in various ways, including an L-shape or a straight layout, thanks to its 360° rotating shelf section.

Figure 3.2: Detail of the 360-degree rotating mechanism, allowing flexible placement of the L-shaped section.

Figure 3.3: Illustration of the adjustable shelf feature, allowing customization of storage space.
4. Operating Instructions
Adjusting the Rotating Shelf
The L-shaped section of the desk is connected by a high-quality metal turntable, allowing it to rotate 360 degrees. This feature enables you to adjust the desk's configuration to suit your specific space requirements or workflow. Gently rotate the shelf section to the desired angle and position.
Adjusting Shelf Height
The height of the central left shelf can be adjusted to accommodate different-sized items. To adjust, carefully remove any items from the shelf, then reposition the shelf supports to the desired height. Ensure the shelf is securely seated before placing items back on it.
5. Maintenance
To ensure the longevity and appearance of your Mondeer L-Shaped Computer Desk, follow these simple maintenance guidelines:
- Cleaning: The desk features a smooth, easy-to-clean surface. Wipe regularly with a soft, damp cloth. Avoid harsh chemicals or abrasive cleaners, which can damage the finish.
- Spills: Immediately wipe up any spills to prevent water damage or staining. The surface is designed to be water-resistant, but prolonged exposure to liquids should be avoided.
- Inspection: Periodically check all screws and connections to ensure they remain tight. Retighten if necessary to maintain stability.
- Avoid Extreme Conditions: Do not expose the desk to extreme temperatures or humidity, as this can affect the material integrity.

Figure 5.1: Key features of the desk, including its water-resistant surface, 360-degree rotating mechanism, adjustable shelves, and adjustable leveling feet.
6. Troubleshooting
If you encounter any issues with your Mondeer L-Shaped Computer Desk, please refer to the following common solutions:
- Desk is Unstable/Wobbly:
- Ensure all screws are fully tightened.
- Adjust the leveling feet at the bottom of the desk legs to compensate for uneven flooring.
- Verify that the desk is placed on a flat, stable surface.
- Rotating Shelf is Stiff:
- Ensure no objects are obstructing the rotation mechanism.
- Check if the desk is overloaded, which might impede smooth rotation.
- Missing Parts:
- Double-check all packaging materials. If parts are still missing, contact customer support immediately.
7. Specifications
| Feature | Detail |
|---|---|
| Brand | Mondeer |
| Model Number | FSDK15RB-G1N |
| Color | Rustic Brown |
| Product Dimensions (L x W x H) | 110 x 135.5 x 75.5 cm (43.3 x 53.3 x 29.7 inches) |
| Material | Engineered Wood (Particle Board) and Metal |
| Special Features | 360° Rotating Shelves, Adjustable Shelf Height, Adjustable Leveling Feet, Water-resistant Surface |
| Item Weight | 26 Kilograms (57.3 lbs) |
| Maximum Load Capacity (Desktop) | 40 kg (88 lbs) |
| Maximum Load Capacity (Each Shelf) | 15 kg (33 lbs) |
8. Warranty and Support
Mondeer is committed to providing high-quality products. While specific warranty details are not provided in this manual, if you have any questions, require assistance with assembly, or encounter any issues with your desk, please do not hesitate to contact Mondeer customer support. Refer to your purchase documentation or the retailer's website for contact information.


