PSIDE SILVERCREST® SSMP 1770 A2
PSIDE SILVERCREST® KITCHEN TOOLS Professional Portafilter Espresso Machine SSMP 1770 A2 User Manual
Model: SSMP 1770 A2
Introduction
This manual provides essential information for the safe and efficient operation, maintenance, and troubleshooting of your PSIDE SILVERCREST® KITCHEN TOOLS Professional Portafilter Espresso Machine SSMP 1770 A2. Please read this manual thoroughly before first use and keep it for future reference.
Important Safety Instructions
- Always ensure the machine is placed on a stable, level surface.
- Do not immerse the appliance, power cord, or plug in water or other liquids.
- Unplug from outlet when not in use and before cleaning.
- Keep hands and utensils away from moving parts during operation.
- Do not operate any appliance with a damaged cord or plug.
- This appliance is for household use only.
- Use only cold water in the water tank.
- Beware of hot surfaces and steam during operation.
What's in the Box
Upon unpacking, please verify that all components are present and undamaged:
- PSIDE SILVERCREST® KITCHEN TOOLS Professional Portafilter Espresso Machine SSMP 1770 A2
- Portafilter
- Small Filter Basket (for single espresso)
- Large Filter Basket (for double espresso)
- Tamper
- Milk Jug
- Cleaning Brush
- Durgol Descaler
- Instruction Manual

Image: Included accessories for the espresso machine, featuring a tamper, a stainless steel milk jug, two filter baskets (one small, one large), and a cleaning brush.

Image: A close-up view of the two stainless steel filter baskets, one smaller for single shots and one larger for double shots, designed to fit into the portafilter.
Setup
- Unpacking: Carefully remove all packaging materials and ensure no parts are missing or damaged.
- Placement: Place the espresso machine on a dry, stable, and level surface, away from heat sources and direct sunlight. Ensure adequate ventilation around the machine.
- Water Tank: Remove the water tank (2.3 L capacity) from the back of the machine. Fill it with fresh, cold water up to the MAX line. Reinsert the tank securely.
- Bean Hopper: Open the lid of the bean hopper and fill it with fresh coffee beans (approx. 250g capacity). Close the lid.
- Power Connection: Plug the power cord (approx. 100 cm length) into a grounded electrical outlet.
- Initial Rinse: Before first use, perform an initial rinse cycle without coffee to clean the internal components. Refer to the "Operating" section for instructions on dispensing water.

Image: Side view of the espresso machine, highlighting the transparent, removable water tank located at the back, with visible water level markings.
Operating Instructions
Control Panel Overview
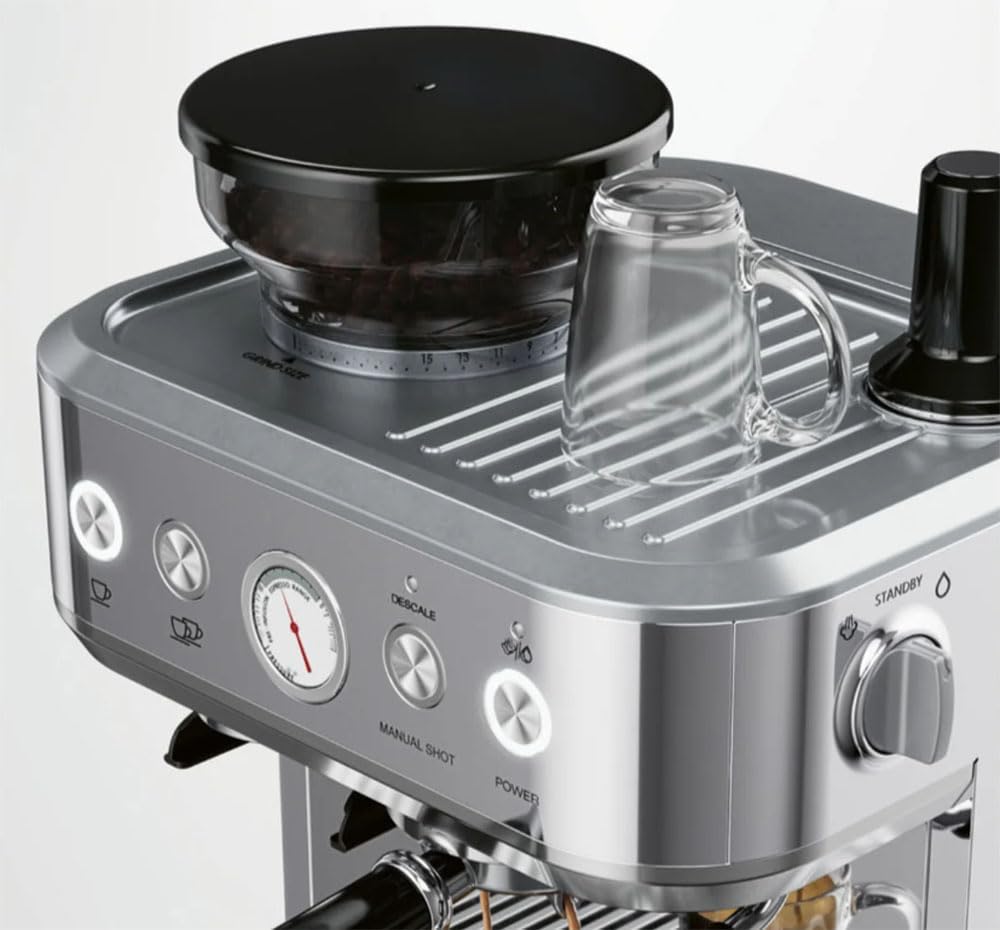
Image: A detailed view of the espresso machine's control panel, showing illuminated buttons for single and double shots, a pressure gauge, 'Descale' and 'Manual Shot' buttons, and the 'Power' button. The bean hopper with grind settings is visible at the top.
- Power Button: Turns the machine on/off.
- Single Shot Button: Dispenses a single espresso shot with automatic stop.
- Double Shot Button: Dispenses a double espresso shot with automatic stop.
- Manual Shot Button: Allows for manual control of espresso extraction time. Press once to start, press again to stop.
- Descale Button: Activates the descaling program.
- Steam Wand/Hot Water Dial: Controls steam for milk frothing and hot water dispensing.
- Pressure Gauge: Indicates brewing pressure.
- Grind Size Dial: Adjusts the fineness of the coffee grind (15 settings).
Making Espresso
- Power On: Press the Power button. The machine will heat up. The indicator lights will stop flashing when ready.
- Select Filter Basket: Choose the small filter basket for a single shot or the large filter basket for a double shot. Place it into the portafilter.
- Grind Coffee: Adjust the grind size using the dial on the bean hopper (15 settings available). Insert the portafilter into the grinding outlet and press to activate the grinder. Fill the filter basket with freshly ground coffee.
- Tamp Coffee: Use the included tamper to press the coffee grounds firmly and evenly into the filter basket.
- Insert Portafilter: Insert the portafilter into the group head and twist firmly to lock it into place.
- Place Cup(s): Place one or two pre-warmed cups on the drip tray beneath the portafilter. The machine has a cup warming function on top.
- Brew Espresso: Press the Single Shot or Double Shot button. The machine will automatically stop when the desired volume is reached. For manual control, press the Manual Shot button to start and press again to stop.
- Remove Portafilter: Once brewing is complete, carefully remove the portafilter and discard the used coffee grounds.

Image: The PSIDE SILVERCREST® espresso machine actively brewing two cups of espresso, with rich crema visible, demonstrating its dual-shot capability. A glass of layered milk coffee is visible on the left.

Image: The PSIDE SILVERCREST® espresso machine brewing a single shot of espresso into a clear glass cup, showcasing the extraction process and the machine's sleek design.
Frothing Milk / Hot Water
- Prepare Milk: Fill the included milk jug with cold milk.
- Activate Steam: Turn the Steam Wand/Hot Water dial to the steam position. Wait for the machine to reach steaming temperature.
- Froth Milk: Submerge the steam wand tip just below the surface of the milk. Turn the dial to release steam. Move the jug up and down to create foam. Once desired texture is achieved, turn off the steam.
- Dispense Hot Water: To dispense hot water, place a cup under the steam wand and turn the dial to the hot water position.
- Clean Steam Wand: Immediately after use, wipe the steam wand with a damp cloth to prevent milk residue from drying. Briefly purge steam to clear any internal blockages.
Maintenance and Cleaning
Regular cleaning and maintenance ensure optimal performance and longevity of your espresso machine.
- Daily Cleaning:
- Empty and clean the drip tray and grid daily.
- Wipe down the exterior of the machine with a damp cloth.
- Clean the portafilter and filter baskets after each use.
- Clean the steam wand immediately after frothing milk.
- Water Tank: Clean the water tank regularly with mild detergent and rinse thoroughly.
- Descaling: The machine has a descaling function. Use the included Durgol descaler or a suitable descaling solution as per the instructions on the descaler packaging. Follow the machine's descaling program (refer to the "Descale" button). Descale regularly based on water hardness and usage.
- Grinder Cleaning: Periodically clean the integrated conical burr grinder to prevent blockages and ensure consistent grinding. Refer to the manual for specific instructions on accessing and cleaning the burrs.
- Storage: If storing the machine for an extended period, ensure it is clean, dry, and unplugged.
Troubleshooting
| Problem | Possible Cause | Solution |
|---|---|---|
| No coffee dispenses. | Water tank empty; portafilter not inserted correctly; coffee too finely ground/tamped too hard; machine not heated. | Fill water tank; reinsert portafilter; adjust grind size/tamping pressure; wait for machine to heat up. |
| Espresso flows too fast. | Coffee too coarsely ground; not enough coffee; tamping too light. | Adjust grind to finer setting; increase coffee dose; tamp more firmly. |
| Espresso flows too slow or drips. | Coffee too finely ground; too much coffee; tamping too hard; machine needs descaling. | Adjust grind to coarser setting; reduce coffee dose; tamp lighter; perform descaling. |
| No steam from wand. | Steam wand blocked; machine not at steaming temperature. | Clean steam wand with cleaning brush; wait for machine to heat up for steam. |
| Machine not turning on. | Not plugged in; power outage; faulty power cord. | Check power connection; check circuit breaker; contact customer support if cord is damaged. |
Specifications
| Model: | SILVERCREST® SSMP 1770 A2 |
| Brand: | PSIDE |
| Power Consumption: | Max. 1770 W |
| Voltage: | 230 V (AC) |
| Pump Pressure: | 15 bar |
| Water Tank Capacity: | 2.3 L |
| Bean Hopper Capacity: | Approx. 250 g |
| Grind Settings: | 15 (Conical Burr Grinder) |
| Material: | Stainless Steel |
| Dimensions (W x H x D): | Approx. 34 x 41 x 32 cm |
| Weight: | 7.5 kg |
| Cable Length: | Approx. 100 cm |
Warranty and Support
For warranty information, technical support, or service inquiries, please refer to the contact details provided with your purchase documentation or visit the official PSIDE website. Keep your proof of purchase for warranty claims.
This product is from a small or medium-sized enterprise from Germany, Austria, or Switzerland that sells its brand on Amazon.