1. Introduction
This manual provides essential information for the safe operation, maintenance, and troubleshooting of your VITO 1800W 2-in-1 Combined Circular Saw and Miter Saw, model VISCC18250. This versatile tool is designed for precise cutting of wood and aluminum materials, offering both miter saw and table saw functionalities. Please read this manual thoroughly before operating the machine to ensure safe and efficient use.

Figure 1: Overview of the VITO 2-in-1 Combined Circular Saw and Miter Saw.
2. Safety Instructions
Always follow basic safety precautions to reduce the risk of fire, electric shock, and personal injury. Keep this manual for future reference.
2.1 General Power Tool Safety
- Work Area Safety: Keep the work area clean and well-lit. Cluttered or dark areas invite accidents. Do not operate power tools in explosive atmospheres, such as in the presence of flammable liquids, gases, or dust.
- Electrical Safety: Power tool plugs must match the outlet. Never modify the plug in any way. Avoid body contact with earthed or grounded surfaces such as pipes, radiators, ranges, and refrigerators.
- Personal Safety: Always wear eye protection, hearing protection, and a dust mask. Dress properly; avoid loose clothing or jewelry. Keep hair, clothing, and gloves away from moving parts.
- Tool Use and Care: Do not force the power tool. Use the correct power tool for your application. Disconnect the plug from the power source before making any adjustments, changing accessories, or storing power tools.
2.2 Specific Saw Safety
- Always use the blade guard. Ensure it operates correctly before each use.
- Secure the workpiece firmly. Do not hold small pieces by hand.
- Never reach into the blade area while the saw is running or connected to power.
- Use only blades specified for this tool and suitable for the material being cut.
- Maintain a safe distance from the blade. Keep hands clear of the cutting path.
3. Components Overview
Familiarize yourself with the main components of your VITO combined saw:
- Motor Housing: Contains the 1800W motor.
- Blade Guard: Protects the user from the rotating blade.
- Cutting Blade: 250mm diameter, 30mm bore, 36 teeth.
- Miter Table: Rotates for angle adjustments in miter saw mode.
- Table Saw Top: Upper cutting surface for table saw mode.
- Rip Fence: Adjustable guide for straight cuts in table saw mode.
- Miter Gauge: For angled cuts in table saw mode (not explicitly shown but implied).
- Bevel Adjustment: Mechanism to tilt the blade for angled cuts.
- Dust Collection Port: For connecting a dust extraction system.
- On/Off Switch: Power control for the tool.

Figure 2: Side view of the saw in miter saw configuration, showing blade guard and motor.

Figure 3: Top view of the saw in table saw configuration, showing the rip fence and table surface.
4. Setup
4.1 Unpacking and Inspection
Carefully remove the saw from its packaging. Inspect for any damage that may have occurred during shipping. Ensure all components listed in the packing list are present. Do not operate the tool if any damage is found.
4.2 Securing the Saw
For stable and safe operation, the saw must be securely mounted to a workbench or a dedicated saw stand. Use appropriate bolts and nuts to fasten the saw through the mounting holes in its base.
4.3 Blade Installation/Replacement
- Disconnect Power: Always unplug the saw from the power source before performing any maintenance or blade changes.
- Access Blade: Depending on the mode (miter or table saw), lift or remove the necessary guards to access the blade.
- Loosen Arbor Nut: Use the provided wrench to loosen the arbor nut while holding the arbor lock button.
- Remove Old Blade: Carefully remove the old blade, noting its rotation direction.
- Install New Blade: Place the new 250mm blade onto the arbor, ensuring the teeth are oriented correctly for cutting (usually indicated by an arrow on the blade matching an arrow on the guard).
- Tighten Arbor Nut: Securely tighten the arbor nut with the wrench while holding the arbor lock.
- Replace Guards: Ensure all guards are properly reinstalled and functioning before reconnecting power.
5. Operating Instructions
This saw offers two primary modes of operation: miter saw and table saw. Ensure the saw is in the correct configuration for your desired cut.
5.1 Switching Between Miter Saw and Table Saw Modes
The saw features a 2-in-1 design. To switch modes, carefully follow the instructions in your saw's specific manual for unlocking and rotating the cutting head assembly. Ensure the mechanism is fully locked in place for the chosen mode before operation.
5.2 Miter Saw Operation
- Set Miter Angle: Loosen the miter lock knob, rotate the miter table to the desired angle (from -45° to 45°), and tighten the knob securely.
- Set Bevel Angle: For bevel cuts, loosen the bevel lock, tilt the motor/blade assembly to the desired angle (from 0° to 45°), and tighten the lock.
- Position Workpiece: Place the workpiece firmly against the fence and the miter table. Use clamps if necessary.
- Start Saw: Press the ON switch. Allow the blade to reach full speed.
- Make Cut: Slowly and steadily bring the blade down through the workpiece. Do not force the cut.
- Return Blade: Once the cut is complete, release the switch and allow the blade to stop before raising it.
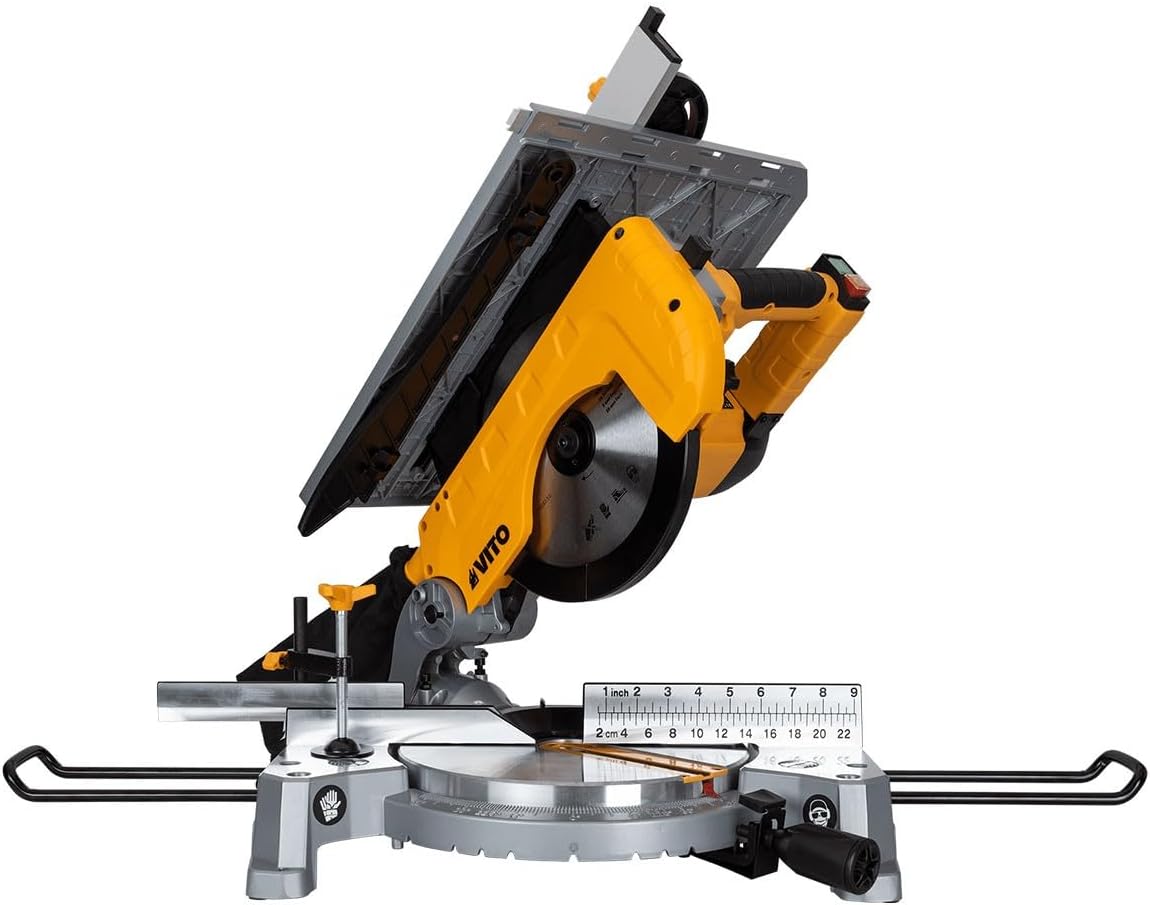
Figure 4: Miter saw configuration demonstrating blade tilt for bevel cuts.
5.3 Table Saw Operation
- Configure for Table Saw: Ensure the saw head is locked in the upright table saw position.
- Adjust Rip Fence: Position the rip fence to the desired cutting width. Lock it securely.
- Adjust Blade Height: Use the blade height adjustment mechanism to set the blade exposure slightly above the workpiece thickness.
- Position Workpiece: Place the workpiece flat on the table, against the rip fence.
- Start Saw: Press the ON switch. Allow the blade to reach full speed.
- Make Cut: Using a push stick, slowly and steadily feed the workpiece into the blade. Keep hands clear of the blade path.
- Complete Cut: Continue feeding until the cut is complete. Turn off the saw and wait for the blade to stop before removing the workpiece.

Figure 5: Table saw configuration, showing the rip fence and cutting surface.
6. Maintenance
Regular maintenance ensures the longevity and safe operation of your saw. Always disconnect the power before performing any maintenance.
- Cleaning: After each use, clean the saw thoroughly. Remove sawdust and debris from the motor vents, blade guard, and table surfaces. Use a brush or compressed air. Do not use solvents that could damage plastic parts.
- Blade Inspection: Regularly inspect the blade for sharpness, missing teeth, or cracks. A dull or damaged blade can cause kickback and poor cut quality. Replace damaged blades immediately.
- Guard Functionality: Ensure all blade guards move freely and return to their protective position automatically.
- Fasteners: Check all nuts, bolts, and screws for tightness. Tighten any loose fasteners.
- Carbon Brushes: If the motor performance decreases, the carbon brushes may need inspection and replacement. This should ideally be done by a qualified service technician.
7. Troubleshooting
Refer to this section for common issues and their solutions. If the problem persists, contact customer support.
| Problem | Possible Cause | Solution |
|---|---|---|
| Saw does not start | No power supply; faulty switch; carbon brushes worn. | Check power connection and circuit breaker. Test switch. Replace carbon brushes (professional service recommended). |
| Poor cut quality (rough, splintering) | Dull or incorrect blade; improper feed rate; workpiece not secured. | Replace blade with a sharp, appropriate one. Adjust feed rate. Secure workpiece firmly. |
| Excessive vibration | Loose blade; damaged blade; saw not securely mounted. | Check blade for tightness and damage. Ensure saw is securely mounted to a stable surface. |
| Motor overheating | Blocked ventilation slots; continuous heavy use; dull blade. | Clean ventilation slots. Allow motor to cool. Use a sharp blade to reduce motor strain. |
8. Specifications
| Feature | Value |
|---|---|
| Model Number | VISCC18250 |
| Power Input | 1800 W |
| No-Load Speed | 4500 rpm |
| Blade Diameter | 250 mm |
| Blade Bore | 30 mm |
| Number of Teeth | 36 |
| Miter Angle Range | -45° to 45° |
| Bevel Angle Range | 0° to 45° |
| Weight | 13.9 kg |
| Recommended Surfaces | Wood, Aluminum |
9. Warranty and Support
This VITO product is covered by a manufacturer's warranty against defects in materials and workmanship. For specific warranty terms and conditions, please refer to the warranty card included with your product or visit the official VITO website. For technical support, spare parts, or service inquiries, please contact your retailer or the authorized VITO service center in your region. Always provide the model number (VISCC18250) and serial number when contacting support.