Product Overview
The Jansite 4K WiFi Mirror Dash Cam is a high-performance vehicle recording system designed to enhance driving safety and provide comprehensive video evidence. It features a 12-inch IPS touch screen, 4K front camera, 1080P IP69 waterproof rear camera, and integrated 5G WiFi for easy file management. This manual provides detailed instructions for setup, operation, maintenance, and troubleshooting.
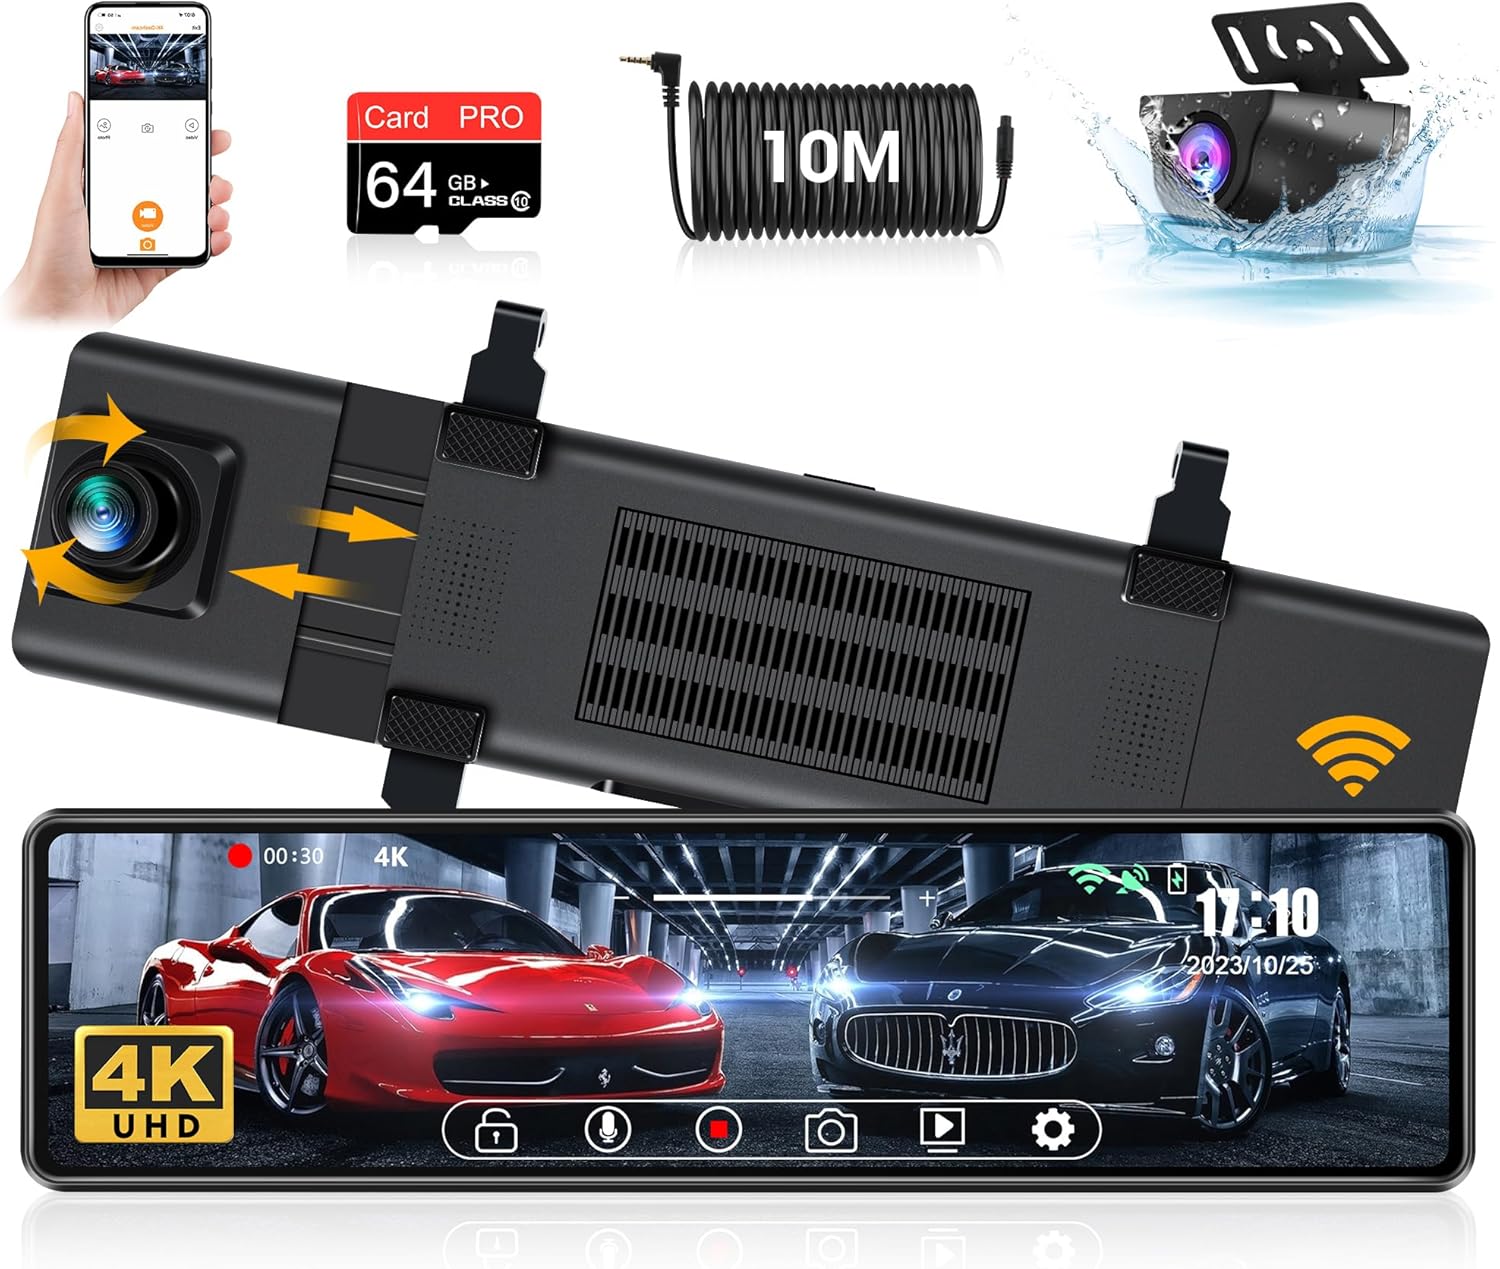
Figure 1: Overview of the Jansite 4K WiFi Mirror Dash Cam and its included accessories, including the main mirror unit, rear camera, 64GB SD card, and 10-meter cable.
Key Features:
- High Resolution 4K Front Camera: Captures clear, detailed video footage.
- 12-inch IPS Touch Screen: Provides a wide field of view and intuitive control.
- Integrated 5G WiFi: For fast and convenient preview, download, and sharing of footage via a mobile app.
- IP69 Waterproof Rear Camera: Durable and reliable for all weather conditions, with a 10-meter cable for flexible installation.
- Super Night Vision with WDR: Ensures clear recordings even in low-light environments.
- Advanced Functions: Includes Loop Recording, G-Sensor for emergency locking, and 24-hour Parking Monitor (requires hardwire kit).
- Type-C Interface: Enhanced durability and faster charging/data transfer.
Package Contents
Please verify that all items are present and in good condition upon opening the package:
- Jansite 4K Front Dash Cam (Mirror Unit)
- Rear Camera (1080P, IP69 Waterproof)
- 10-meter Rear Camera Cable
- 64GB Class 10 Micro SD Card
- Car Charger (Type-C)
- Mounting Straps/Bands
- User Manual (this document)
Setup Instructions
1. Installing the Front Dash Cam (Mirror Unit)
- Secure the mirror dash cam over your vehicle's original rearview mirror using the provided rubber straps. Ensure it is firmly attached and does not obstruct your view.
- Insert the included 64GB Micro SD card into the designated slot on the dash cam. Ensure it clicks into place.
- Connect the Type-C car charger to the dash cam's power input and plug the other end into your vehicle's cigarette lighter socket. Route the cable neatly along the windshield trim to avoid interference with driving.

Figure 2: The dash cam features a durable Type-C interface for power and data, and includes a 64GB high-speed memory card for reliable recording.
2. Installing the Rear Camera
- Determine the optimal mounting location for the rear camera. Common locations include above the license plate or inside the rear window. The IP69 rating allows for external mounting.
- Secure the rear camera using screws or adhesive (not explicitly mentioned but implied for mounting).
- Connect the rear camera cable to the rear camera.
- Route the 10-meter rear camera cable from the rear of the vehicle to the front dash cam. Carefully tuck the cable along the vehicle's interior trim, headliner, and door sills to conceal it and prevent damage.
- Plug the rear camera cable into the dedicated input port on the main mirror dash cam unit.

Figure 3: The 10-meter rear camera cable provides ample length for installation in various vehicle types, ensuring flexible routing options.
Operating Instructions
1. Basic Operation
- Power On/Off: The dash cam will automatically power on and begin recording when the vehicle's ignition is turned on. It will power off automatically when the ignition is turned off. You can also manually power it on/off using the power button.
- Screen Display: The 12-inch IPS touch screen displays the live view from the front and/or rear cameras.
- Switching Views: Swipe left or right on the touch screen to switch between front camera view, rear camera view, or split-screen display.

Figure 4: The dash cam allows for easy switching between front and rear camera views, including a mirror image option for the rear camera, and is IP69 waterproof.
2. Recording Functions
- Loop Recording: The dash cam continuously records video in segments (e.g., 1, 3, or 5 minutes). When the SD card is full, the oldest unlocked files will be overwritten.
- G-Sensor (Emergency Recording): In the event of a sudden impact or collision, the built-in G-sensor will automatically detect the event and lock the current video segment, preventing it from being overwritten by loop recording.
- Parking Monitor (Requires Hardwire Kit): When connected to a hardwire kit (sold separately), the dash cam can monitor your vehicle for impacts or motion even when parked, recording incidents to protect your vehicle.

Figure 5: The dash cam supports essential recording features such as Parking Monitor (requires hardwire kit), G-Sensor for impact detection, and continuous Loop Recording.
3. WiFi Connectivity and App Usage
The dash cam features 5G WiFi for quick connection to your smartphone via a dedicated app. This allows for easy management of recorded footage.
- Download the official Jansite app from the App Store (iOS) or Google Play Store (Android).
- Enable WiFi on your dash cam (refer to on-screen menu for WiFi activation).
- On your smartphone, connect to the dash cam's WiFi network (SSID and password will be displayed on the dash cam screen).
- Open the Jansite app. You can now preview live footage, browse recorded videos, download files to your phone, and share them.

Figure 6: The dedicated mobile app allows users to wirelessly check, download, edit, and share video footage directly from their smartphone, eliminating the need for a card reader.
4. Adjustable Reversing Line
When in reverse gear (if properly wired), the dash cam display will show the rear camera view with adjustable guidelines.
- Swipe left or right on the reversing screen to adjust the height of the parking guidelines to best suit your vehicle and parking preferences.
Figure 7: The adjustable reversing line feature allows users to customize the height of the parking guidelines on the screen for more accurate and convenient reversing.
Maintenance
- SD Card Formatting: It is recommended to format the Micro SD card regularly (e.g., once a month) within the dash cam's settings to ensure optimal performance and prevent data corruption.
- Cleaning the Lenses: Use a soft, lint-free cloth to gently clean the front and rear camera lenses. Avoid abrasive materials or harsh chemicals.
- Screen Cleaning: Wipe the touch screen with a clean, soft cloth. For stubborn smudges, a screen cleaner designed for electronics can be used sparingly.
- Cable Management: Periodically check all cables to ensure they are securely tucked away and not exposed to excessive wear or damage.
- Firmware Updates: Check the official Jansite website or app periodically for any available firmware updates to ensure your dash cam has the latest features and bug fixes.
Figure 8: The rear camera is IP69 waterproof and dustproof, designed to withstand harsh environmental conditions, simplifying maintenance.
Troubleshooting
| Problem | Possible Cause | Solution |
|---|---|---|
| Dash cam does not power on. | No power from car charger; loose connection; faulty charger. | Check car charger connection and vehicle's cigarette lighter socket. Try another power source if available. Ensure vehicle ignition is on. |
| Recording stops or freezes. | SD card full or corrupted; low-speed SD card; firmware issue. | Format the SD card in the dash cam. Ensure you are using a Class 10 or higher speed SD card. Update firmware if available. |
| Rear camera not displaying. | Loose cable connection; faulty rear camera. | Check the connection of the rear camera cable to both the rear camera and the main unit. Ensure the cable is not damaged. |
| WiFi connection issues. | Incorrect password; too far from dash cam; app issue. | Ensure correct WiFi password. Stay close to the dash cam. Restart the app and dash cam. |
| Poor video quality at night. | Dirty lens; extreme lighting conditions. | Clean camera lenses. Ensure WDR function is enabled. While the dash cam has Super Night Vision, extreme darkness or glare can still affect quality. |
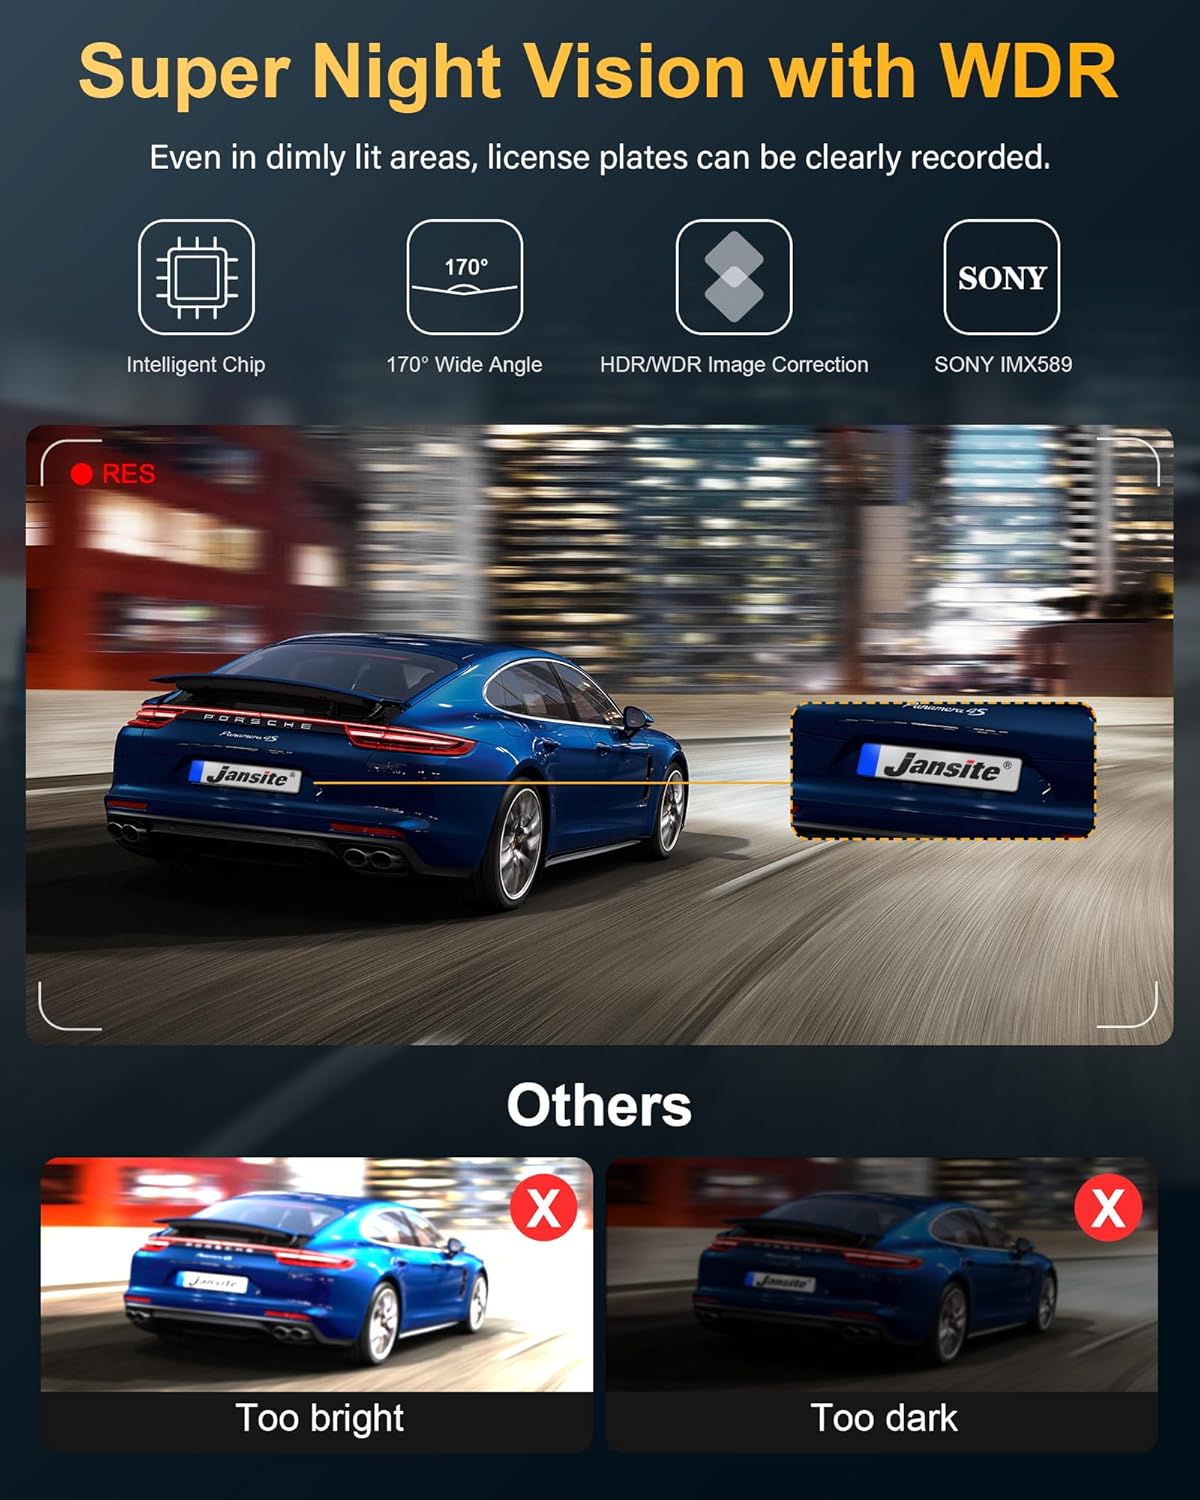
Figure 9: The Super Night Vision with WDR technology helps capture clear images even in challenging low-light conditions, preventing overexposure or underexposure.
Specifications
| Feature | Detail |
|---|---|
| Model Name | 4K Mirror Dash Cam T95 |
| Model Number | JM-T95D+H35D+10M+64G-UK2 |
| Screen Size | 12 inches IPS Touch Screen |
| Front Camera Resolution | 4K (2160p) |
| Rear Camera Resolution | 1080P |
| Rear Camera Waterproof Rating | IP69 |
| Connectivity | 5G WiFi |
| Included SD Card | 64GB Class 10 |
| Rear Camera Cable Length | 10 meters (32.8 ft) |
| Special Features | WDR Night Vision, G-Sensor, Loop Recording, Parking Monitor (with hardwire kit), Adjustable Reversing Line, Type-C Interface |
| Compatible Vehicles | RV, Minivans, Cars |
| Mounting Type | Rearview Mirror Mount |
| Color | Black |

Figure 10: A comparison highlighting the advantages of the Jansite dash cam, such as its Type-C port, 10m cable, adjustable reversing line, and WDR technology, compared to other models.
Warranty and Support
Jansite stands behind the quality of its products. This product comes with a 24-month warranty from the date of purchase.
The warranty covers manufacturing defects and malfunctions under normal use. It does not cover damage caused by misuse, accidents, unauthorized modifications, or natural disasters.
For technical support, warranty claims, or inquiries about accessories, please contact Jansite customer service via email:
Jenny@jansite.cn
Please provide your product model number and a detailed description of the issue when contacting support to ensure a prompt resolution.