Hodozzy 3 Channel Dashcam
Hodozzy 3-Channel Dashcam
User Manual
Introduction
This manual provides comprehensive instructions for the installation, operation, and maintenance of your Hodozzy 3-Channel Dashcam. This advanced dash camera system is designed to provide complete vehicle surveillance with its front, interior, and rear cameras, ensuring vital evidence capture in various driving scenarios.
Key features include 1296P high-definition recording, super night vision with IR cabin lighting, automatic collision footage backup via G-sensor, continuous loop recording, and 24-hour parking monitoring. Please read this manual carefully before using the device to ensure proper functionality and safety.
Package Contents
Please verify that all items listed below are included in your package:
- 1 x Car DVR (Main Dashcam Unit)
- 1 x Mounting Bracket (Suction Cup Mount)
- 1 x Car Charger
- 1 x User Manual
- 1 x 64GB TF Card
- 1 x Rear View Camera with Extended Cable

Image: The Hodozzy 3-Channel Dashcam, showing the main unit, interior camera, rear camera, suction cup mount, and a 64GB SD card.

Image: A diagram illustrating the product dimensions, various ports and buttons, and a visual representation of the packing list components including the DVR, bracket, car charger, user manual, and 64GB card.
Specifications
| Feature | Specification |
|---|---|
| Screen Size | 2.0 inches |
| Power Interface | DC 5V/2A |
| USB Interface | Type C |
| Video Format | PAL/NTSC |
| Image Format | JPEG |
| Image Sensor | 1/4 Color Sensor |
| Effective Pixels | 1296P |
| Lens Angle | Front: 150°, Interior: 120°, Rear: 130° |
| Operating Temperature | -20°C to +50°C |
| Operating Humidity | RH95% |
| Operating Power (DCV) | 12V |
| Built-in Battery | 200mAh |
| Current Frequency | 50 / 60Hz |
| Reverse Video Support | Yes |
| TF Card Support | Up to 64GB (maximum) |
| Supported Languages | Chinese, Japanese, French, German, Italian, Spanish, Korean, Russian, Polish |
Setup and Installation
Follow these steps to properly install your Hodozzy 3-Channel Dashcam in your vehicle.
- Prepare the Windshield:
Before attaching the dashcam, use a clean rag to wipe the glass surface where you intend to mount the device. Ensure the area is clean and dry for optimal adhesion of the suction cup mount.
Image: A hand wiping the car's windshield with a cloth, indicating the first step of installation.
- Install the Mounting Bracket:
Attach the suction cup bracket to the cleaned area of the windshield. Peel off any protective film from the suction cup. Press firmly and engage the locking mechanism (if present) to secure the bracket.
Image: The dashcam with its suction cup mount being attached to the car's windshield.
- Secure the Dashcam:
Once the bracket is firmly in place, attach the main dashcam unit to the bracket. Rotate or adjust the dashcam as needed to ensure it is securely fastened and facing the desired direction.
Image: The dashcam unit being rotated and tightened onto the suction cup mount on the windshield.
- Connect and Route the Rear Camera Cable:
Connect the rear camera to the main dashcam unit using the provided extended cable. Carefully route the cable along the vehicle's interior trim to the rear of the car. The rear camera can be mounted on the rear windshield or near the license plate (depending on your preference and the camera's design, no need to remove the reverse light for this model).
Image: A diagram showing the routing of the rear camera cable from the front dashcam unit to the back of the car, indicating a length of 6.0 meters.
- Connect the Power Supply:
Plug the car charger into your vehicle's cigarette lighter socket and connect the other end to the dashcam's power interface (Type C USB port). Ensure the connection is secure.
Image: A diagram showing the power cable connected from the dashcam to the car's power outlet, indicating a length of 3.4 meters.
- Adjust the Angle:
Once all connections are made, adjust the angle of the front, interior, and rear cameras to ensure they capture the desired fields of view. The front camera has a 150° angle, the interior camera 120°, and the rear camera 130°.

Image: An overhead diagram of a car showing the wide-angle coverage of the front (150°), interior (120°), and rear (130°) cameras, illustrating the comprehensive monitoring.
Image: A red car viewed from the front, symbolizing the completion of the dashcam installation and angle adjustment.
Operating Instructions
Power On/Off
- Automatic Power: The dashcam will automatically power on and begin recording when your vehicle's engine starts and power is supplied.
- Manual Power: Press and hold the power button (usually marked with a power symbol) to manually turn the device on or off.
Menu Navigation
Use the physical buttons on the side of the dashcam to navigate through the menu options. Typically, there are 'Up', 'Down', 'Mode', and 'OK' (or 'M' for Mode, and a central button for OK/confirm) buttons. Refer to the product display diagram in the 'Package Contents' section for button layout.
Recording Modes and Features
- Loop Recording:
The dashcam continuously records video in short segments (e.g., 1, 3, or 5 minutes). When the memory card is full, the oldest unprotected files are automatically overwritten to make space for new recordings. This ensures continuous recording without manual intervention.
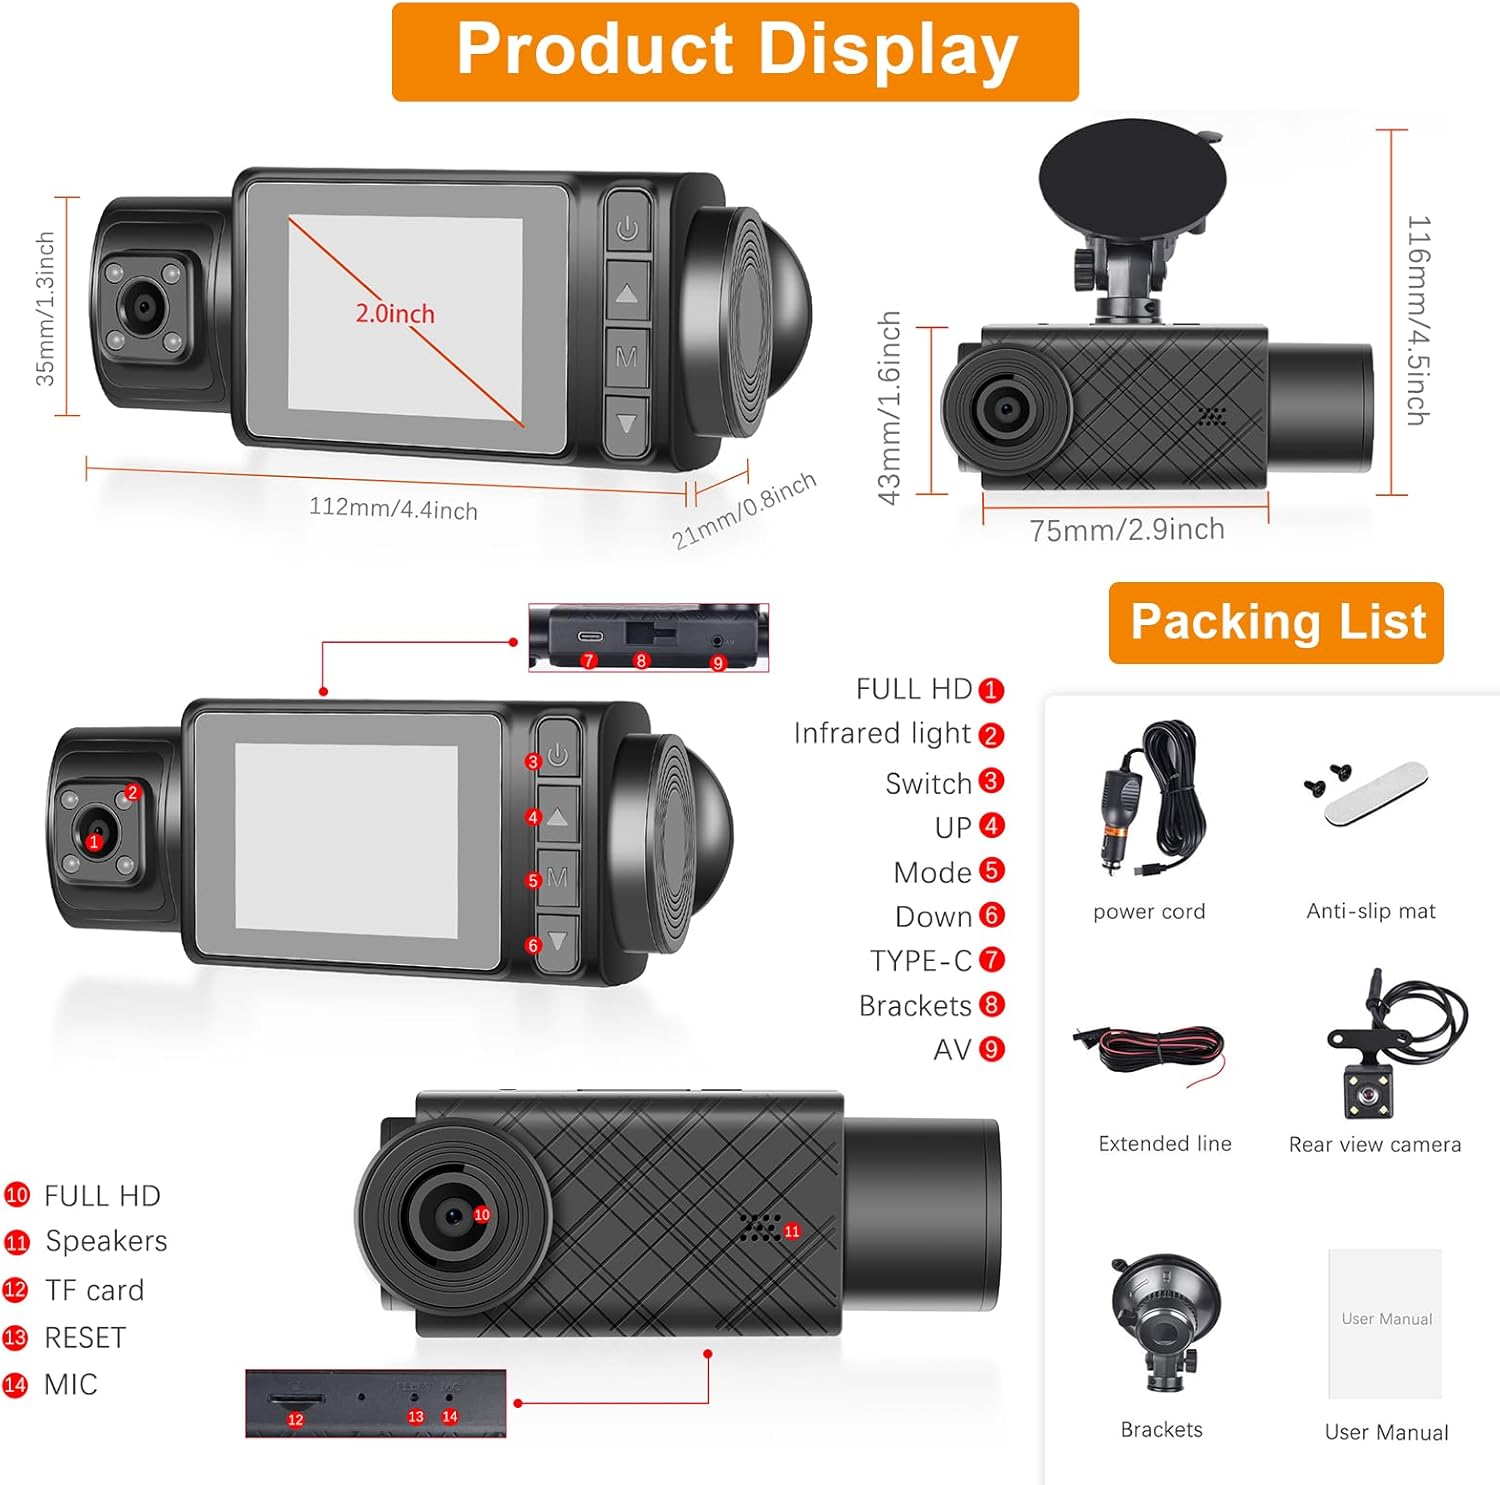
Image: Visual representation of loop recording, showing older footage being overwritten by new footage on a continuous timeline.
- G-Sensor (Gravity Sensor):
The built-in G-sensor detects sudden impacts or collisions. When an event is detected, the current video segment is automatically locked and saved to prevent it from being overwritten by loop recording. These files are stored in a separate, protected folder on the SD card.
Image: An illustration depicting two cars colliding, with a shield icon, symbolizing the G-sensor's function to protect video footage during impacts.
- 24H Parking Monitor:
When enabled, the parking monitor feature allows the dashcam to continue surveillance even when the vehicle is parked and the engine is off. It typically uses the G-sensor to detect impacts or motion detection to record events while parked, providing protection against vandalism or hit-and-runs.
Image: A car parked in a garage with a blue glow, indicating continuous 24-hour parking monitoring by the dashcam.
- Super Night Vision and IR Cabin Lighting:
Equipped with WDR (Wide Dynamic Range) technology and 4 IR lights facing the cabin, the dashcam performs exceptionally well in low-light conditions. It captures clear and accurate video footage both day and night, including detailed views of the driver and passengers even in complete darkness, making it ideal for rideshare drivers.

Image: A split image showing a road scene during the day and at night, highlighting the dashcam's "Super Night Vision" capability with WDR technology for clear recording in low light.
- Triple Camera View (Split Screen):
The dashcam's display can show simultaneous feeds from the front, interior, and rear cameras. This split-screen view provides real-time feedback from all three perspectives of your vehicle.

Image: The dashcam screen displaying a split view of the internal, front, and rear camera feeds, labeled "Split Screen".
Viewing and Transferring Footage
- On-Device Playback: Use the menu buttons to navigate to the playback mode. You can view recorded videos directly on the 2.0-inch IPS screen.
- PC Transfer: To transfer footage to a computer, remove the TF card from the dashcam and insert it into a card reader connected to your PC. Alternatively, connect the dashcam directly to your PC using a Type C USB cable (ensure the dashcam is in mass storage mode if prompted).
Maintenance
- SD Card Management:
It is recommended to format the TF card regularly (e.g., once a month) to maintain optimal performance and prevent data corruption. This can usually be done through the dashcam's menu settings. Always back up important footage before formatting.
- Cleaning the Lenses:
Periodically clean the lenses of the front, interior, and rear cameras with a soft, lint-free cloth. Avoid using abrasive cleaners that could scratch the lens surface. A clean lens ensures clear video quality.
- Firmware Updates:
Check the Hodozzy official website periodically for any available firmware updates. Keeping your dashcam's firmware up-to-date can improve performance, add new features, or fix bugs.
Troubleshooting
If you encounter any issues with your Hodozzy Dashcam, please refer to the following common problems and solutions:
- Dashcam does not power on:
- Ensure the car charger is securely plugged into both the dashcam and the vehicle's power outlet.
- Check if the vehicle's power outlet is functioning (e.g., by plugging in another device).
- The built-in battery (200mAh) is primarily for parking monitoring and saving the last file; it's not for extended operation without external power.
- "No SD Card" or "Card Error" message:
- Ensure the 64GB TF card is inserted correctly into the slot.
- Format the TF card using the dashcam's menu settings. If the issue persists, try a different compatible TF card (Class 10 or higher, up to 64GB).
- Note: Some users have reported not receiving an SD card with their purchase. Please check your package contents carefully. The device requires an SD card to function.
- Video recording stops or is not continuous (Loop Recording issue):
- Ensure loop recording is enabled in the settings.
- Format the TF card. A corrupted or full card with too many locked files can prevent new recordings.
- Check if the G-sensor sensitivity is set too high, causing too many files to be locked unnecessarily. Adjust sensitivity if needed.
- Poor video quality or blurry images:
- Clean the camera lenses with a soft cloth.
- Ensure the protective film has been removed from all lenses.
- Check if the dashcam is securely mounted and not vibrating excessively during driving.
- Cannot connect to Wi-Fi/Smartphone (if applicable):
- Note: This model's specifications do not explicitly list Wi-Fi connectivity. If you are attempting to connect via Wi-Fi, please verify if your specific model supports this feature. Based on available information, this model primarily uses USB for data transfer.
If these steps do not resolve your issue, please contact customer support.
Warranty and Support
Hodozzy is committed to providing excellent customer service.
- Warranty: Your Hodozzy Dashcam is covered by a 2-year manufacturer's warranty.
- Returns: You are eligible for a full refund within 30 days of purchase if you are not satisfied with the product.
- Technical Support: We provide 24/7 technical assistance with responses typically within 12 hours.
- Contact: For any questions, issues, or support inquiries, please email our customer service team at hodozzyofficial@163.com.

Image: A graphic indicating customer support availability and the email address for inquiries.
Related Documents - 3 Channel Dashcam
 |
User Manual for 10.1 Inch Android Double Din Car Stereo This user manual provides comprehensive instructions for operating and installing the 10.1 inch Android Double Din Car Stereo, including features, specifications, wiring, troubleshooting, and advanced functions like GPS navigation, Bluetooth, and mirror link. |
 |
Hodozzy Android Car Navigation System Operation Manual This operation manual provides detailed instructions for the Hodozzy Android car navigation system, covering its interface, features, modes, settings, installation, and offline map functionality. |
 |
EU Data Act Transparency Declaration for Android In-Vehicle Multimedia Device This document outlines the transparency declaration for an Android-based in-vehicle multimedia device in accordance with the EU Data Act, detailing data generation, processing, transmission, and software updates. |
 |
GT806 3-Channel Dash Cam User Manual Explore the features and setup of the GT806 3-Channel Dash Cam, offering 2.5K+1080P+1080P recording, Wi-Fi connectivity, G-sensor, night vision, and 24-hour parking monitoring. Supports up to 256GB storage. |
 |
CIEVIE C200 4K Dash Camera User Manual: Installation, Features, and Support Comprehensive user manual for the CIEVIE C200 4K dash camera. Covers installation, 5G WiFi, 64GB card compatibility, 24H parking mode, G-sensor, WDR night vision, and support details. |
 |
70mai Dash Cam A800SE User Manual: 4K Car Camera with GPS, Wi-Fi, and ADAS This user manual provides comprehensive guidance for the 70mai Dash Cam 4K A800SE Set. It details safety, installation, product overview, features including 4K recording, GPS, Wi-Fi, ADAS, parking surveillance, and app integration. It also covers operation, settings, troubleshooting, and compliance for safe and effective use. |
Ask a question about this manual
Ask about setup, troubleshooting, compatibility, parts, safety, or missing instructions. Manuals+ will review the question and use this page’s manual context to help answer it.