1. Introduction
The ARRAROWN BT-298Pro is a versatile HiFi Stereo Audio Amplifier designed to enhance your home audio experience. Featuring Bluetooth 5.0 connectivity, it delivers 50W x 2 rated power with a maximum output of 600W, suitable for 4-16 inch passive speakers. This mini digital power amplifier receiver includes multiple input options such as USB, SD card, AUX, and FM Radio, along with microphone inputs and an echo function for karaoke. Its compact design and powerful performance make it ideal for various applications, from home theater systems to parties and multimedia teaching environments.
2. Safety Instructions
- Read all instructions carefully before operating the device.
- Keep the amplifier away from water, moisture, and direct sunlight.
- Ensure proper ventilation; do not block any ventilation openings.
- Use only the power supply specified by the manufacturer.
- Do not attempt to repair or modify the unit yourself. Refer all servicing to qualified personnel.
- Disconnect the power plug from the wall outlet if the unit is not used for a long period.
- Avoid placing heavy objects on top of the amplifier.
- Do not expose the unit to extreme temperatures or humidity.
3. Package Contents
Please check the package contents upon opening to ensure all items are present and in good condition.
- 1 x ARRAROWN BT-298Pro Power Amplifier
- 1 x Remote Control (with battery)
- 1 x FM Antenna
- 1 x AC Power Cable (110-240V)
- 1 x User Manual (this document)

Figure 3.1: Package Contents (Amplifier, Remote Control, Manuals)
4. Product Overview
Familiarize yourself with the various components and controls of your BT-298Pro amplifier.
4.1 Front Panel Controls

Figure 4.1: Front Panel Layout
- USB/SD Jack: For playing audio files from USB drives or SD cards.
- Display: Shows current mode, FM frequency, or track information.
- Mode Conversion: Button to switch between input modes (Bluetooth, AUX, USB/SD, FM).
- Song Control: Buttons for Play/Pause, Next/Previous track.
- Treble Control: Adjusts high-frequency audio output.
- Bass Control: Adjusts low-frequency audio output.
- ECHO Control: Adjusts the echo effect for microphone inputs.
- MIC 1/MIC 2 Jacks: Inputs for microphones.
- MIC Volume: Adjusts the volume of the connected microphones.
- Main Volume: Controls the overall audio output volume.
4.2 Rear Panel Connections
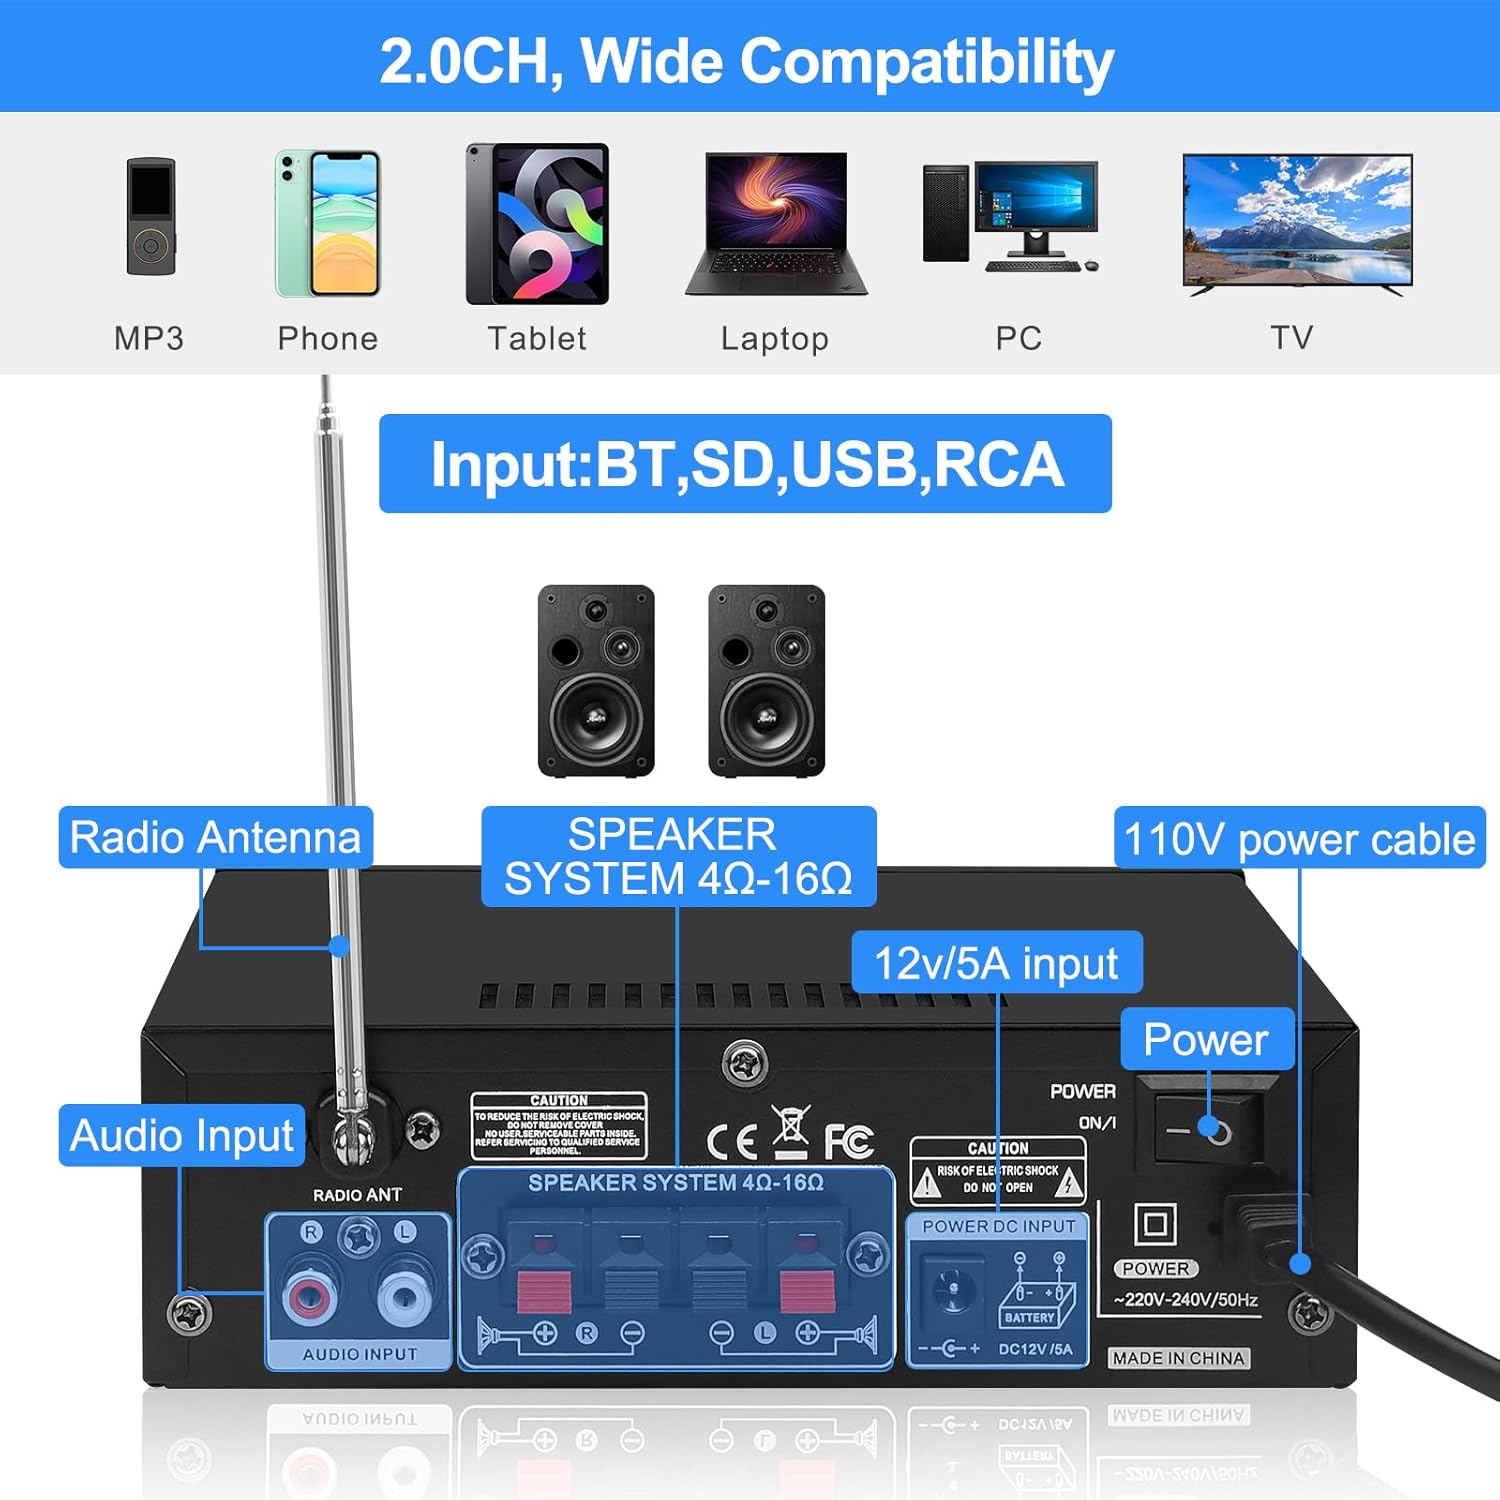
Figure 4.2: Rear Panel Connections
- Radio Antenna: Connection point for the FM antenna.
- Audio Input (RCA): For connecting external audio sources via RCA cables (e.g., CD player, DVD player, TV).
- Speaker System (4Ω-16Ω): Terminals for connecting passive speakers. Ensure correct polarity (+ to + and - to -).
- DC 12V/5A Input: Alternative power input for 12V DC sources.
- AC Power Input: For connecting the provided AC power cable (110-240V).
- Power Switch: Main power on/off switch for the unit.
5. Setup Guide
Follow these steps to set up your amplifier for optimal performance.
5.1 Connecting Speakers
- Ensure the amplifier is turned off and unplugged from the power outlet.
- Connect your passive speakers to the "Speaker System" terminals on the rear panel.
- Match the positive (+) terminal on the amplifier to the positive (+) terminal on your speaker, and the negative (-) terminal on the amplifier to the negative (-) terminal on your speaker. Use appropriate speaker wire.
- Ensure all connections are secure to prevent short circuits.

Figure 5.1: Speaker Connection Diagram
5.2 Connecting Audio Sources
- AUX Input: Connect external audio devices (e.g., CD player, TV, PC) to the RCA "Audio Input" jacks on the rear panel using an RCA cable.
- USB/SD Input: Insert a USB flash drive or SD card containing MP3 audio files into the respective slots on the front panel.
- Microphone Input: Plug microphones into the MIC 1 or MIC 2 jacks on the front panel.
5.3 Power Connection
- Connect the provided AC power cable to the AC power input on the rear panel of the amplifier.
- Plug the other end of the AC power cable into a standard wall outlet (110-240V).
- Alternatively, for DC power, connect a 12V/5A DC power supply (not included) to the DC 12V/5A input.
5.4 FM Antenna Connection
Connect the included FM antenna to the "Radio ANT" terminal on the rear panel for improved FM radio reception.
Video 5.1: Demonstrates the physical setup of the amplifier, including connecting speakers, antenna, and power, followed by Bluetooth pairing.
6. Operating Instructions
6.1 Power On/Off
Flip the power switch on the rear panel to the "ON" position to power on the amplifier. The front display will light up. Flip it to "OFF" to power down.

Figure 6.1: Power Button
6.2 Input Selection
Press the "MODE" button on the front panel or the remote control to cycle through available input sources: Bluetooth (BT), AUX, USB, SD, and FM Radio. The selected mode will be displayed on the front screen.
6.3 Bluetooth Pairing
- Switch the amplifier to Bluetooth mode using the "MODE" button. The display will show "BT".
- On your mobile device (smartphone, tablet, etc.), enable Bluetooth and search for available devices.
- Select "BT" from the list of devices to pair. A confirmation sound will indicate successful pairing.
- Once paired, you can play audio from your device through the amplifier.

Figure 6.2: Bluetooth Connectivity
6.4 USB/SD Playback
Insert a USB drive or SD card into the corresponding slot. The amplifier will automatically switch to USB/SD mode and begin playing compatible audio files (MP3). Use the "Song Control" buttons (Play/Pause, Next/Previous) to manage playback.

Figure 6.3: USB/SD Jack
6.5 FM Radio Operation
Switch to FM mode. Press and hold the "Play/Pause" button to initiate an automatic scan for FM stations. The amplifier will save found stations. Use the "Next/Previous" buttons to navigate through saved stations.

Figure 6.4: FM Radio Display
6.6 Microphone and Echo Function
Connect one or two microphones to the MIC 1 and MIC 2 jacks. Adjust the microphone volume using the "MIC VOL" knob. Use the "ECHO" knob to add or reduce the echo effect for vocal performances.

Figure 6.5: ECHO & MIC Jacks

Figure 6.6: Karaoke Functionality
6.7 Volume, Treble, and Bass Control
- Main Volume: Rotate the large "VOLUME" knob on the front panel to adjust the overall sound level.
- Treble: Use the "TREBLE" knob to increase or decrease high-frequency sounds.
- Bass: Use the "BASS" knob to increase or decrease low-frequency sounds.
7. Maintenance
- Cleaning: Use a soft, dry cloth to clean the exterior of the amplifier. Do not use liquid cleaners or aerosols.
- Ventilation: Ensure the ventilation openings are free from dust and debris to prevent overheating.
- Storage: If storing the unit for an extended period, unplug it from the power source and store it in a cool, dry place.
8. Troubleshooting
| Problem | Possible Cause | Solution |
|---|---|---|
| No power | Power cable not connected; Power switch off; Outlet malfunction. | Check power cable connection; Ensure power switch is ON; Test outlet with another device. |
| No sound output | Incorrect input mode; Volume too low; Speaker wires loose/incorrectly connected; Faulty audio source. | Select correct input mode; Increase volume; Check speaker wire connections and polarity; Test with a different audio source. |
| Bluetooth not connecting | Amplifier not in BT mode; Device Bluetooth off; Device too far; Interference. | Switch amplifier to BT mode; Enable Bluetooth on your device; Move device closer; Reduce interference from other wireless devices. |
| Poor FM reception | Antenna not connected; Weak signal. | Connect FM antenna securely; Adjust antenna position for better reception; Perform auto-scan again. |
| Microphone not working | Microphone not plugged in correctly; MIC volume too low; Microphone faulty. | Ensure microphone is fully inserted; Increase MIC VOL knob; Test with another microphone. |
9. Specifications
| Feature | Detail |
|---|---|
| Model | BT-298Pro |
| Rated Power | 50W x 2 (RMS) |
| Max. Output Power | 600W P.M.P.O. |
| Bluetooth Version | 5.0 |
| Speaker Impedance | 4-16 Ω |
| Inputs | Bluetooth, AUX (RCA), USB, SD, MIC (x2) |
| Audio Output Mode | Stereo (2.0 Channel) |
| Power Input | AC 110-240V / DC 12V/5A |
| Product Dimensions (D x W x H) | 2.16" x 5.51" x 2.16" (approx. 5.5cm x 14cm x 5.5cm) |
| Item Weight | 2.7 pounds (approx. 1.22 kg) |
| Special Features | Echo Function, FM Radio, Treble/Bass Control |
10. Warranty and Support
The ARRAROWN BT-298Pro amplifier comes with a One (1) Year Warranty from the date of purchase, covering manufacturing defects. Please retain your proof of purchase for warranty claims.
For technical support, troubleshooting assistance, or warranty inquiries, please contact ARRAROWN customer service through the platform where you purchased the product or visit the official ARRAROWN store page for contact information.
ARRAROWN Store: https://www.amazon.com/stores/ARRAROWN/page/CBA5C34F-F561-49E7-8E49-13108051C637


