SHUOHAO SH015D
SHUOHAO 15-in-1 Heat Press Machine User Manual
Model: SH015D | Brand: SHUOHAO
1. Introduction
This manual provides detailed instructions for the safe and efficient operation, setup, and maintenance of your SHUOHAO 15-in-1 Heat Press Machine, Model SH015D. This versatile machine is designed for heat transfer applications on a variety of items, including textiles, ceramics, and other flat or curved surfaces. Please read this manual thoroughly before operating the machine to ensure proper usage and to prevent damage or injury.
2. Safety Instructions
- Always operate the heat press on a stable, heat-resistant surface.
- Keep hands and body clear of the heating element during operation to prevent burns. The machine reaches high temperatures.
- Ensure proper ventilation in the work area, as some heat transfer materials may emit fumes.
- Do not leave the machine unattended while it is powered on or operating.
- Unplug the machine from the power outlet when not in use or before cleaning and maintenance.
- Do not use the machine in wet or damp conditions.
- Keep children and pets away from the heat press during operation.
- Use only original or approved replacement parts and attachments.
- The machine features a 360-degree rotation and swing-away arm design to minimize safety hazards by allowing the heating element to be moved away from the working area. Utilize this feature.
- The machine includes dual insulation technology and an automatic shutdown mechanism for enhanced safety.
3. Product Components
Your SHUOHAO 15-in-1 Heat Press Machine comes with the following main components and attachments:
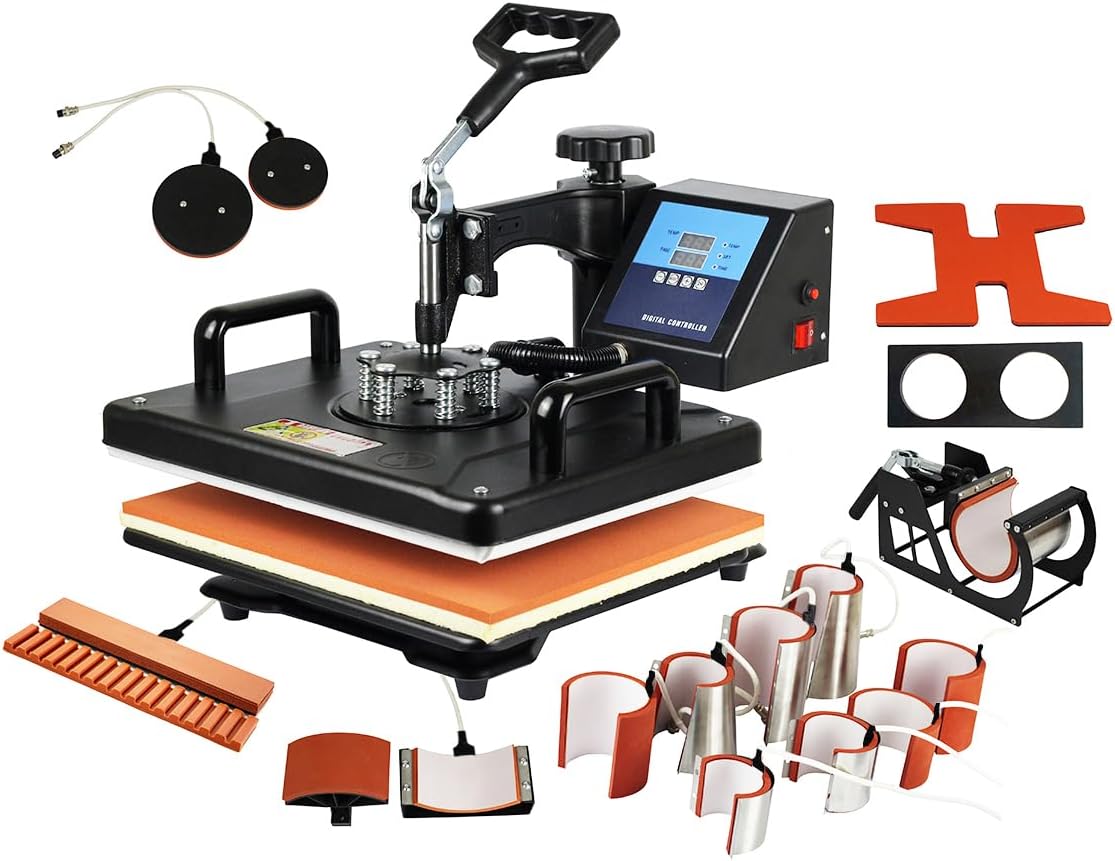
Figure 3.1: Overview of the SHUOHAO 15-in-1 Heat Press Machine and its various attachments.
- Main Platen Press (12" x 15"): For flat items like T-shirts, pillows, and bags.
- Hat/Cap Press (6" x 3" curved): For heat transfer on caps and hats.
- Mug Presses (8 different sizes):
- 1.8"-2.5" diameter (3oz, 5oz, 7oz)
- 2"-2.75" diameter (10oz)
- 3"-3.5" diameter (11oz)
- 11oz lengthened
- 12oz latte mug (cone)
- 17oz latte mug (cone)
- Plate Presses (2 different sizes): 8" and 10" diameter.
- Shoe Press Part: For heat transfer on shoes.
- Pen Press Part: For heat transfer on pens.
- Football Press Part: For heat transfer on footballs or similar spherical items.
- Removable Silicone Pad and Cotton Pad: Provides even pressure and heat distribution.
- Digital Control Box: Manages temperature and time settings.
- Pressure Adjustment Knob: Located on top of the platen, allows adjustment of pressure.
- Anti-Scalding Handle: Designed for safe operation.
- Fused Power Switch: Provides electrical protection.

Figure 3.2: Detailed view of key components such as the pressure handle, anti-scalding handle, and control box.
4. Assembly and Setup
The main unit of the heat press machine comes fully assembled. You will need to attach the desired heating elements for specific applications.
- Unpacking: Carefully remove all components from the packaging. Inspect for any shipping damage.
- Placement: Place the main heat press unit on a sturdy, level, and heat-resistant workbench or table. Ensure there is adequate space around the machine for safe operation and ventilation.
- Attaching Heating Elements:
- For mug, plate, hat, pen, shoe, or football attachments, identify the corresponding connection ports on the main unit.
- Align the attachment's connector with the port and securely fasten it. Ensure a snug fit to prevent heat loss and ensure proper function.
- The platen press is typically pre-installed.
- Power Connection: Ensure the power switch on the control box is in the "OFF" position. Plug the power cord into a grounded 110V AC electrical outlet.
- Initial Test (Optional but Recommended): Before first use with materials, power on the machine and set a low temperature (e.g., 200°F) and short time (e.g., 30 seconds) to ensure all elements heat up correctly. Observe for any unusual smells or sounds.
5. Operation Guide
5.1 Control Panel Overview

Figure 5.1: The digital control panel for setting temperature and time.
The digital control panel allows precise adjustment of temperature and time. It features a dual display for current temperature/time and set temperature/time, and allows toggling between Celsius and Fahrenheit.
- MODE Button: Used to cycle through temperature setting, time setting, and temperature unit (Celsius/Fahrenheit) selection.
- "+" and "-" Buttons: Adjust the values for temperature and time.
- Start/Pause Button: Initiates or pauses the heating cycle.
- Bell Alarm: Indicates when the set time has elapsed.
5.2 General Operation Steps
- Power On: Flip the main power switch to the "ON" position. The digital display will light up.
- Set Temperature: Press the "MODE" button until the temperature setting is active (usually indicated by a flashing display or specific indicator). Use the "+" and "-" buttons to set the desired temperature. The machine supports a range of 200-450°F (95-232°C).
- Set Time: Press the "MODE" button again to activate the time setting. Use the "+" and "-" buttons to set the desired transfer time in seconds (0-999 seconds).
- Preheat: Allow the machine to reach the set temperature. The display will show the current temperature rising until it matches the set temperature.
- Prepare Item: Place your item (e.g., T-shirt, mug) on the appropriate heating element. Position your transfer material (e.g., sublimation paper, vinyl) onto the item.
- Adjust Pressure: Use the pressure adjustment knob on top of the platen to set the desired pressure. Turn clockwise for more pressure, counter-clockwise for less. Test on a scrap item if unsure.
- Initiate Transfer:

Figure 5.2: The 360-degree rotation design allows for safe placement and removal of items.
- For platen press: Swing the heating element over the item. Press down the handle firmly to engage the press. The timer will start automatically.
- For other attachments: Secure the item in the attachment, then press the start button if applicable, or the timer will start upon closing.
- Completion: Once the timer reaches zero, an alarm will sound. Lift the handle to release the pressure and swing the heating element away (for platen press). Carefully remove the transferred item.
- Power Off: When finished, turn the main power switch to "OFF" and unplug the machine.
5.3 Specific Attachment Usage
The machine's dual heating tube technology ensures faster and more uniform heat distribution, reducing temperature discrepancies for superior transfer quality.

Figure 5.3: Illustration of the dual heating tube technology for even heat distribution.
Refer to the following guidelines for specific attachments. Optimal temperature and time settings vary greatly depending on the material of your item and the type of transfer paper/vinyl used. Always consult the instructions provided with your transfer materials.

Figure 5.4: Examples of items that can be pressed with the 15-in-1 machine.
- Platen Press (T-shirts, Flat Items):
- Ensure the silicone and cotton pads are correctly placed on the lower platen.
- Lay the garment flat, smooth out wrinkles, and place the transfer.
- Adjust pressure for a firm, even contact.
- Hat/Cap Press:
- Attach the curved hat press element.
- Place the hat onto the lower curved platen, ensuring it is snug.
- Position the transfer and close the press.
- Mug Presses:
- Select the appropriate mug wrap for your mug size.
- Secure the transfer paper tightly around the mug.
- Insert the mug into the wrap and close the clamp.
- Plate Presses:
- Attach the correct size plate heating element.
- Place the plate onto the lower platen, with the transfer positioned.
- Close the press, ensuring even pressure on the plate's surface.
- Pen, Shoe, Football Presses: Follow similar principles of securing the item and transfer, then applying heat and pressure. Ensure the item fits securely within the attachment.
6. Maintenance and Care
Proper maintenance ensures the longevity and optimal performance of your heat press machine.
- Cleaning the Platen: The heat platen is coated with a non-stick Teflon layer. If any residue accumulates, allow the platen to cool completely. Wipe it gently with a soft, damp cloth. Do not use abrasive cleaners or sharp objects that could damage the Teflon coating.
- General Cleaning: Wipe down the exterior of the machine with a dry or slightly damp cloth. Avoid getting water into electrical components.
- Storage: Store the machine in a clean, dry environment when not in use. Keep it covered to protect from dust.
- Inspection: Periodically check all cables and connections for wear or damage. Ensure all attachments are securely fastened.
7. Troubleshooting
This section addresses common issues you might encounter with your heat press machine.
| Problem | Possible Cause | Solution |
|---|---|---|
| Machine does not power on. | Power cord not plugged in; power switch off; blown fuse; power outage. | Check power cord connection; ensure power switch is ON; check the fuse on the control box and replace if necessary; verify power supply. |
| Uneven heating or poor transfer quality. | Incorrect temperature/time settings; uneven pressure; faulty heating element; item not flat. | Verify temperature and time settings according to transfer material instructions; adjust pressure knob for even contact; ensure item is flat on the platen; contact support if heating element is suspected faulty. |
| Transfer material not adhering properly. | Insufficient pressure; incorrect temperature; insufficient time; wrong type of transfer material for item. | Increase pressure; adjust temperature and time as per material specifications; ensure compatibility of transfer material and item. |
| Machine makes unusual noises. | Loose components; internal malfunction. | Inspect for any loose parts and tighten if safe to do so. If noise persists or is severe, power off and contact customer support. |
| Attachments are difficult to switch. | Misalignment; residue in connection points. | Ensure proper alignment before attempting to attach/detach. Clean connection points if necessary. Do not force attachments. |
8. Technical Specifications
- Model Number: SH015D
- Brand: SHUOHAO
- Voltage: 110 Volts
- Wattage: 1250 watts
- Upper Temperature Rating: 450 Degrees Fahrenheit (232°C)
- Temperature Range: 200-450°F (95-232°C)
- Timer Control: 0-999 Seconds
- Platen Press Size: 12 x 15 inches (29 x 38 cm)
- Product Dimensions: 16 x 15.7 x 13.8 inches (40.6 x 39.9 x 35.1 cm)
- Item Weight: 45.5 pounds (20.6 kg)
- Material: Alloy Steel, Aluminum, Stainless Steel
- Color: Black
- Recommended Uses: Hat, T-Shirt, Mug, Plate, Pen, Shoe, Football
- Manufacturer: Henan Difuou Machinery Equipment Co., Ltd
9. Warranty and Customer Support
For warranty information, technical support, or service inquiries, please contact the seller or manufacturer directly. Retain your proof of purchase for warranty claims.
Manufacturer: Henan Difuou Machinery Equipment Co., Ltd
Please refer to the contact information provided at the time of purchase or on the product packaging for the most current support details.
Ask a question about this manual
Ask about setup, troubleshooting, compatibility, parts, safety, or missing instructions. Manuals+ will review the question and use this page’s manual context to help answer it.