1. Introduction
This manual provides detailed instructions for the installation, operation, and maintenance of your HKUXZR N5105 Mini ITX NAS Motherboard. This motherboard is designed for various applications including Network Attached Storage (NAS), soft routers, VPN servers, and other micro appliance builds, leveraging the Intel Celeron N5105 processor and multiple high-speed connectivity options.
Please read this manual thoroughly before proceeding with installation or operation to ensure proper setup and to maximize the performance and longevity of your product.
2. Safety Information
- Always disconnect the power supply before installing or removing any components.
- Handle the motherboard by its edges to avoid touching sensitive components or integrated circuits.
- Use an anti-static wrist strap or discharge static electricity by touching a grounded metal object before handling the motherboard.
- Ensure proper ventilation for the system to prevent overheating.
- The motherboard requires both a 24-pin ATX power connector and a 4-pin ATX 12V power connector to power on. Failure to connect both will prevent the system from starting.
- Keep the motherboard away from moisture and extreme temperatures.
3. Product Overview
3.1 Key Features
- Low Power Processor: Integrated Intel Celeron Processor N5105 (4 Cores, 4 Threads, up to 2.90 GHz) with Intel UHD Graphics.
- High-Speed Network: Four Intel i226-V 2.5GbE LAN ports for secure, stable, and fast network connections.
- Industrial Design: Mini-ITX form factor (17.0 cm x 17.0 cm) with a high-density, moisture-proof fiber circuit board for durability.
- Versatile Connectivity: 2x USB 3.0, 2x USB 2.0 (rear), 2x internal USB headers, 1x HDMI 2.1, and 1x DisplayPort 1.4b supporting dual 4K@60Hz displays.
- Extensive Storage & Memory: Two DDR4 SO-DIMM slots (up to 16GB, non-ECC, 2133/2400/2666MHz), six SATA 3.0 ports (6Gbps), and two M.2 NVMe 2280 slots for stable and ultra-fast data transfer.
3.2 Component Identification
The following diagram illustrates the main components and connectors on the HKUXZR N5105 motherboard:

Image 1: Labeled diagram of the HKUXZR N5105 Mini ITX NAS Motherboard, highlighting key components such as the N5105 CPU with fan, DDR4 SO-DIMM slots, M.2 NVMe slots, SATA 3.0 ports, ATX 24-pin and 4-pin power connectors, USB ports, LAN ports, and display outputs.
- N5105 CPU with Fan: Central processing unit with active cooling.
- 2*DDR4: Two DDR4 SO-DIMM slots for system memory.
- M.2 (NVMe): Two M.2 2280 slots for NVMe SSDs.
- 6*SATA3.0: Six SATA 3.0 ports for connecting storage drives (SATA1 native, SATA2-SATA6 via JMB585 chip).
- ATX24PIN Power: Main 24-pin ATX power connector.
- 4PIN Power: Auxiliary 4-pin ATX 12V power connector.
- LAN_LED: Network activity indicator LEDs.
- TPM: Trusted Platform Module header.
- 2*USB2.0: Internal USB 2.0 headers.
- ESPI: Enhanced Serial Peripheral Interface header.
- COM1: Serial port header.
3.3 Rear I/O Ports
The rear panel of the motherboard provides the following input/output ports:
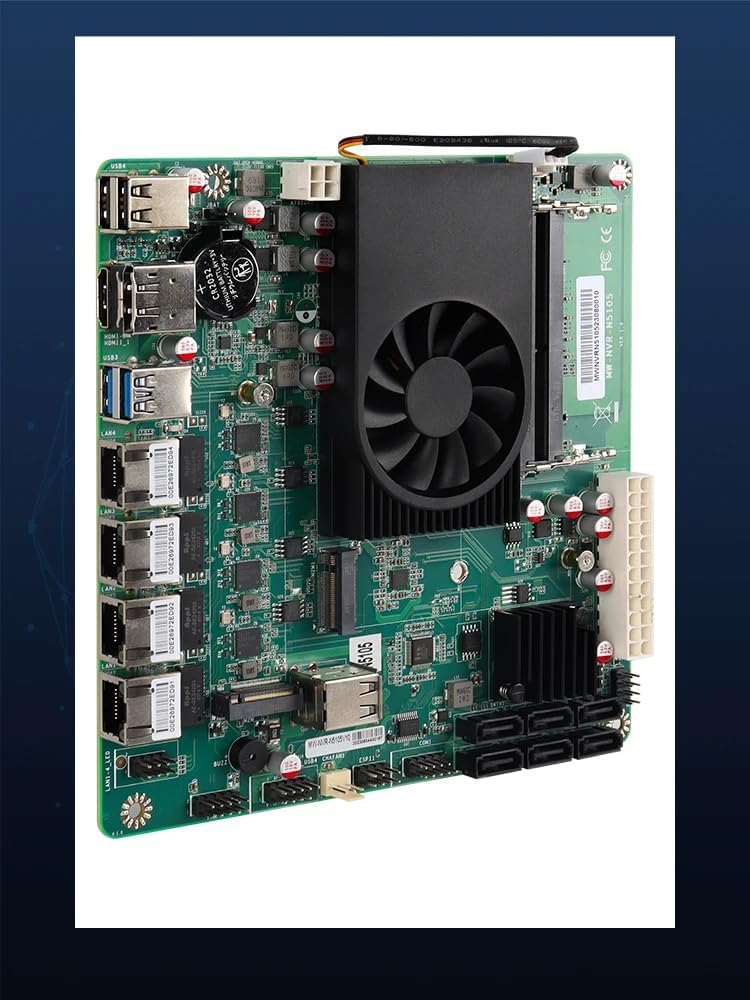
Image 2: Angled view of the HKUXZR N5105 Mini ITX NAS Motherboard, showcasing the rear I/O panel with multiple LAN ports, USB ports, HDMI, and DisplayPort connectors.
- USB Ports: 2x USB 3.0, 2x USB 2.0.
- Display Outputs: 1x HDMI 2.1, 1x DisplayPort 1.4b.
- LAN Ports: 4x 2.5 Gigabit Ethernet (Intel i226-V).
4. Setup Guide
4.1 Pre-installation Checks
- Ensure you have a compatible power supply (ATX with 24-pin and 4-pin 12V connectors).
- Acquire compatible DDR4 SO-DIMM memory modules (non-ECC, 2133/2400/2666MHz).
- Prepare your storage devices (M.2 NVMe SSDs, 2.5-inch/3.5-inch SATA HDDs/SSDs).
- Have a suitable Mini-ITX case ready.
4.2 Installation Steps
- Install Memory (DDR4 SO-DIMM): Open the clips on both ends of the DDR4 SO-DIMM slots. Align the notch on the memory module with the key in the slot. Insert the module firmly at an angle and push down until the clips snap into place.
- Install M.2 NVMe SSD: Locate the M.2 slots. Insert the M.2 SSD into the slot at an angle. Gently push down the other end and secure it with the provided screw.
- Connect SATA Drives: Connect one end of the SATA data cable to a SATA 3.0 port on the motherboard and the other end to your SATA HDD/SSD. Connect the SATA power cable from your power supply to the drive.
- Mount Motherboard: Carefully place the motherboard into your Mini-ITX case, aligning the screw holes. Secure the motherboard with screws.
- Connect Power Supply: Connect the 24-pin ATX power connector from your power supply to the corresponding port on the motherboard. Then, connect the 4-pin ATX 12V power connector to its designated port. Both must be connected for the motherboard to power on.
- Connect Peripherals: Connect your monitor to either the HDMI or DisplayPort. Connect a USB keyboard and mouse to the rear USB ports. Connect your network cables to the 2.5GbE LAN ports.
5. Operating Instructions
5.1 First Boot and BIOS Access
- Upon the first power-on, the motherboard may take a few minutes to read memory information. Please be patient during this initial boot sequence.
- To access the BIOS setup utility, press the "DEL" key repeatedly during the system startup process.
5.2 Operating System Installation
This motherboard supports a wide range of operating systems. For optimal performance with the Intel i226-V network card, it is recommended to install the newest versions of systems with supporting kernels. Compatible operating systems include:
- pfSense-CE 2.7
- OPNsense 23.x
- pfSense Plus
- OpenWrt
- ESXi
- Proxmox 8.x
- CentOS
- Windows (various versions)
- Linux (various distributions)
Prepare a bootable USB drive with your chosen operating system and follow the on-screen instructions for installation.
5.3 Network Configuration
The four 2.5GbE LAN ports provide high-speed network connectivity. After installing your operating system, ensure that the appropriate network drivers are installed. Most modern operating systems will automatically detect and install drivers for the Intel i226-V chipset. Refer to your operating system's documentation for specific network configuration steps.
6. Specifications
Below are the technical specifications for the HKUXZR N5105 Mini ITX NAS Motherboard:
| Feature | Specification |
|---|---|
| Model Name | N5105 NAS 2M |
| Processor | Intel Celeron N5105 (4 Cores, 4 Threads, up to 2.90 GHz) |
| CPU Socket | LGA 1338 (Integrated) |
| RAM Memory Technology | DDR4 SO-DIMM (2 slots, up to 16GB, 2133/2400/2666MHz non-ECC) |
| LAN Ports | 4x Intel i226-V 2.5GbE |
| Storage Interfaces | 6x SATA 3.0 (6Gbps), 2x M.2 NVMe 2280 |
| Display Outputs | 1x HDMI 2.1, 1x DisplayPort 1.4b (supports dual 4K@60Hz) |
| USB Ports | 2x USB 3.0 (rear), 2x USB 2.0 (rear), 2x internal USB headers |
| Form Factor | Mini-ITX (17.0 cm x 17.0 cm) |
| Compatible Operating Systems | Linux, Windows, pfSense, OPNsense, OpenWrt, ESXi, Proxmox, CentOS |
| Power Requirement | 24-pin ATX + 4-pin ATX 12V |
| Dimensions | 6.8 x 6.8 x 2 inches |
| Item Weight | 1.21 pounds |
| Batteries | 1 CR2032 battery (included) |
7. Maintenance
- Cleaning: Periodically clean dust from the motherboard and cooling fan using compressed air. Ensure the system is powered off and unplugged before cleaning.
- BIOS Updates: Check the manufacturer's website for BIOS updates. Follow the provided instructions carefully when updating the BIOS to avoid system instability.
- Driver Updates: Keep your operating system and device drivers updated to ensure optimal performance and compatibility, especially for network components.
8. Troubleshooting
- No Power: Ensure both the 24-pin ATX and 4-pin ATX 12V power connectors are securely attached to the motherboard from a functional power supply.
- No Display Output: Verify that the monitor cable is correctly connected to either the HDMI or DisplayPort on the motherboard and to the monitor. Ensure memory modules are properly seated.
- Operating System Installation Issues: If experiencing problems with OS installation, particularly with network detection, ensure you are using a recent version of the OS with kernel support for the Intel i226-V network card. Refer to the OS documentation for specific driver installation procedures.
- Fan Noise: The motherboard features a 3-pin fan connector. Fan speed control may be limited to BIOS settings and may not support automatic PWM adjustment based on system usage.
- System Instability: Check memory compatibility and seating. Ensure all power connections are secure. Verify that the CPU cooler is properly installed.
9. Warranty and Support
For warranty information and technical support, please refer to the documentation provided with your purchase or contact HKUXZR directly through their official support channels. Keep your proof of purchase for warranty claims.