
1. Product Overview
The JAYUBIEN 24-Pin Radio Wiring Harness Kit is designed to facilitate the installation of an aftermarket Android stereo in compatible Mazda vehicles. This kit includes a 16-pin ISO Android stereo connector, a 24-pin car adapter, an antenna adapter, a 4-pin USB cord, and butt connectors for a plug-and-play installation experience. It retains essential functions such as steering wheel controls and reverse camera trigger signals.
2. Compatibility
This wiring harness kit is compatible with the following Mazda models and years. Note: This harness is intended for vehicles without a CANBUS system or premium amplifier.
- Mazda 2: 2011-2014
- Mazda 3: 2004-2013
- Mazda 5: 2006-2015
- Mazda 6: 2009-2018
- Mazda 626: 2001-2002
- Mazda CX-5: 2013-2019
- Mazda CX-7: 2007-2012
- Mazda CX-9: 2007-2015
- Mazda Miata: 2002-2005
- Mazda Millenia: 2001-2002
- Mazda Tribute: 2002-2006
- Mazda MPV: 2002-2006
- Mazda MX-5 Miata: 2006-2019
- Mazda Protege: 2001-2003
- Mazda Protege5: 2002-2003
Always compare the radio wire connectors with your vehicle's factory radio sockets or aftermarket radio sockets to ensure compatibility. If unsure, consult a professional or provide pictures of your original radio installation frame's back connectors for verification.
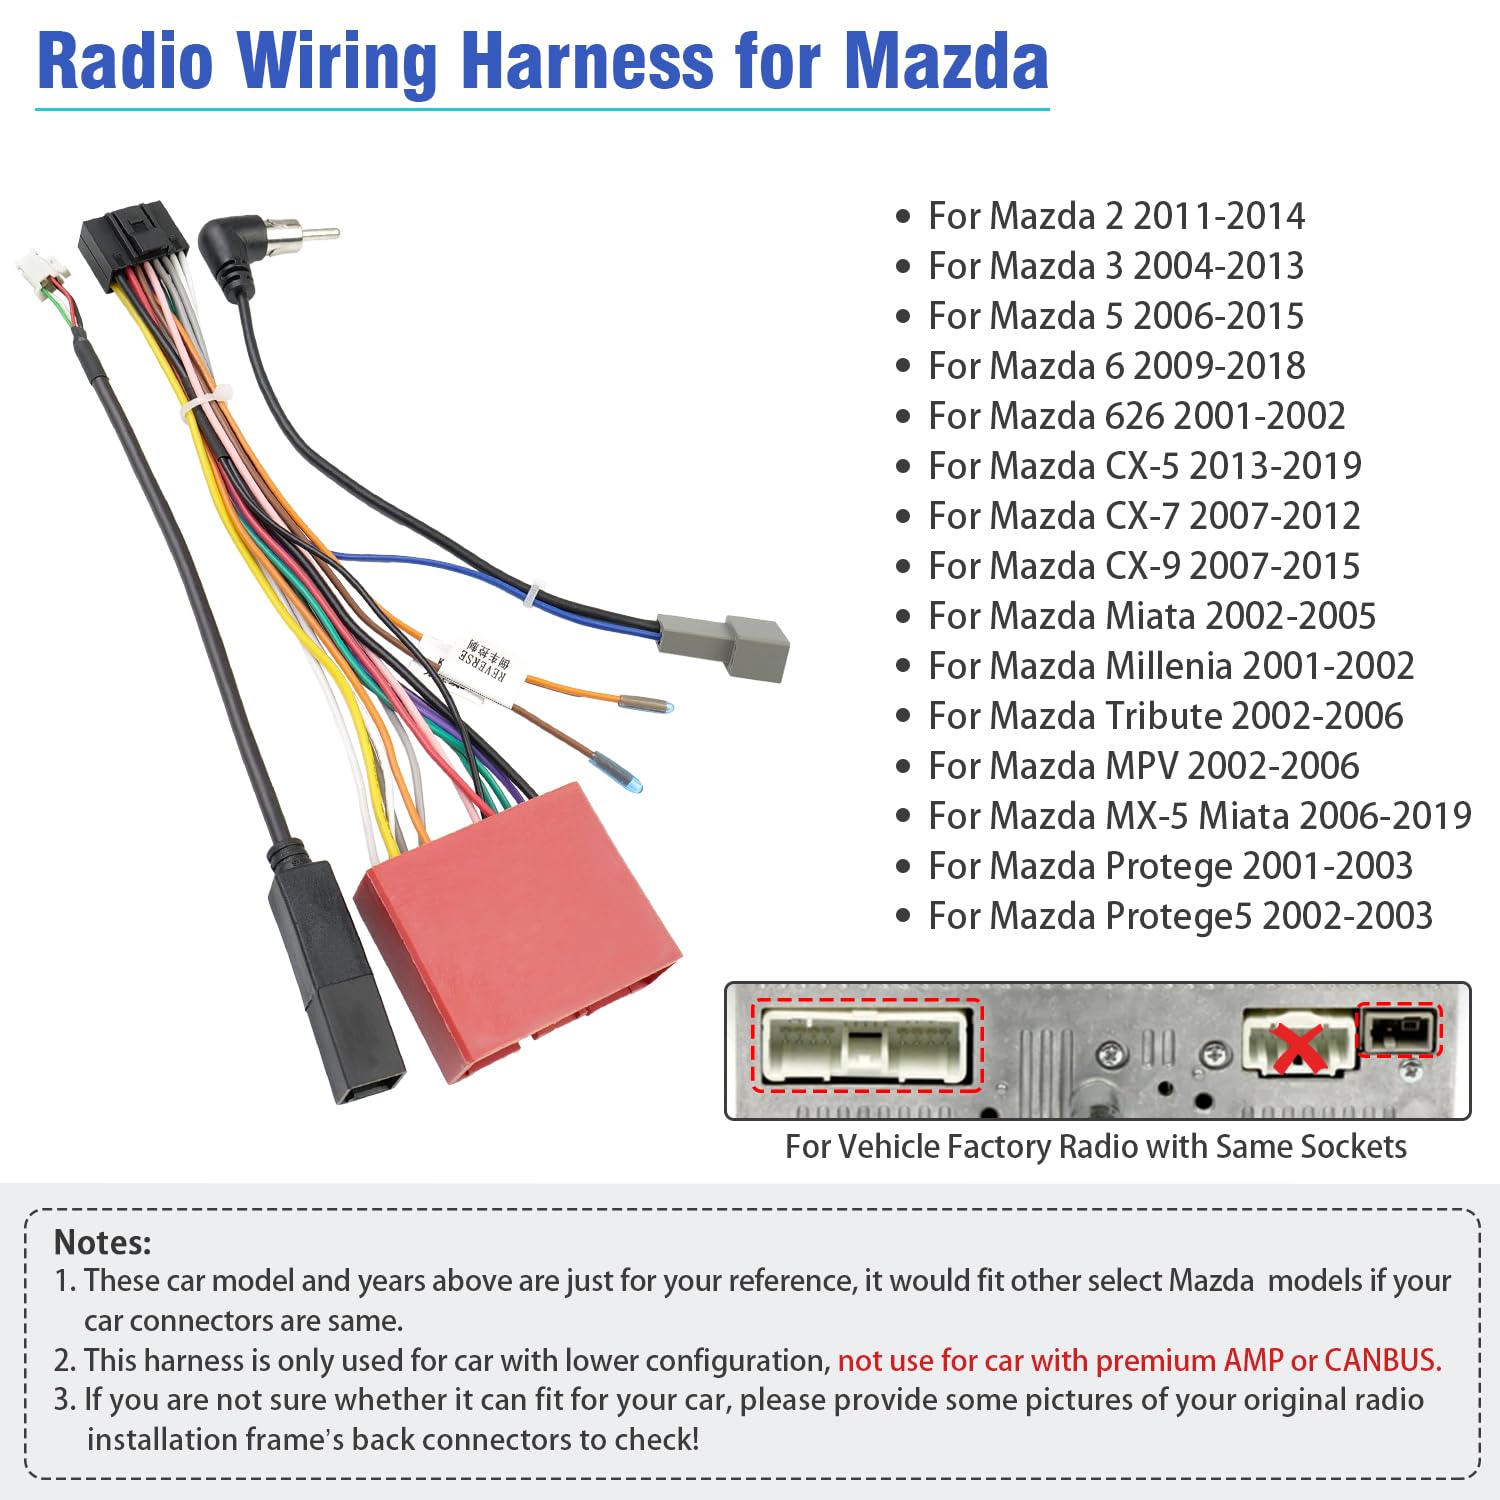
Image: The JAYUBIEN wiring harness shown alongside a list of compatible Mazda models and years. A diagram of vehicle factory radio sockets is included for comparison.
3. Package Contents
The package includes the following components:
- 1 x 16-pin ISO Wiring Harness (with 24-pin car adapter)
- 1 x Car Radio Antenna Adapter
- 1 x 4-pin USB Cord
- 3 x Butt Connectors

Image: A detailed view of all components included in the kit, labeled for easy identification: 16-pin ISO connector, 24-pin connector, car antenna connector, factory USB adapter, 4-pin connector, and radio antenna connector.
4. Installation Guide
Follow these steps for a successful installation of your JAYUBIEN wiring harness kit:
- Preparation: Disconnect the vehicle's battery before beginning any electrical work. Remove the factory radio from your dashboard.
- Connect to Aftermarket Stereo: Connect the 16-pin ISO connector of the harness to the corresponding 16-pin socket on your aftermarket Android head unit.
- Connect to Vehicle: Plug the 24-pin car adapter end of the harness directly into the female adapter from your vehicle's factory wiring.
- Antenna Connection: Connect the included car radio antenna adapter to your vehicle's antenna cable and then to the antenna input on your new stereo.
- USB Connection: Connect the 4-pin USB cord to the designated 4-pin power socket on your Android stereo. This provides power for the factory USB port if applicable.
- Special Connections (SWC & Reverse): If your vehicle and stereo support them, connect the Steering Wheel Control (SWC) wire and the Reverse trigger cable as described in Section 5.
- Secure Connections: Ensure all connections are secure and properly insulated. Use the provided butt connectors if any wire extensions or modifications are necessary (refer to Section 6).
- Test: Reconnect the vehicle's battery and test the functionality of the new stereo and all connected features before fully reassembling the dashboard.

Image: An overhead view of the complete JAYUBIEN wiring harness kit, including the 24-pin and 16-pin connectors, antenna adapter, and butt connectors, illustrating the components involved in the installation.
5. Special Features Wiring
This harness includes dedicated wires for specific functions:
Steering Wheel Control (SWC) Cable
The harness retains the KEY wire for steering wheel control functionality. Connect this wire to the corresponding SWC input on your aftermarket Android stereo. This feature is not applicable for vehicles with a CANBUS system.
Reverse Control Cable
The reversing trigger cable allows connection to your car's back camera RCA detection cable. This enables the stereo to automatically switch to the rearview camera display when the vehicle is put into reverse gear.
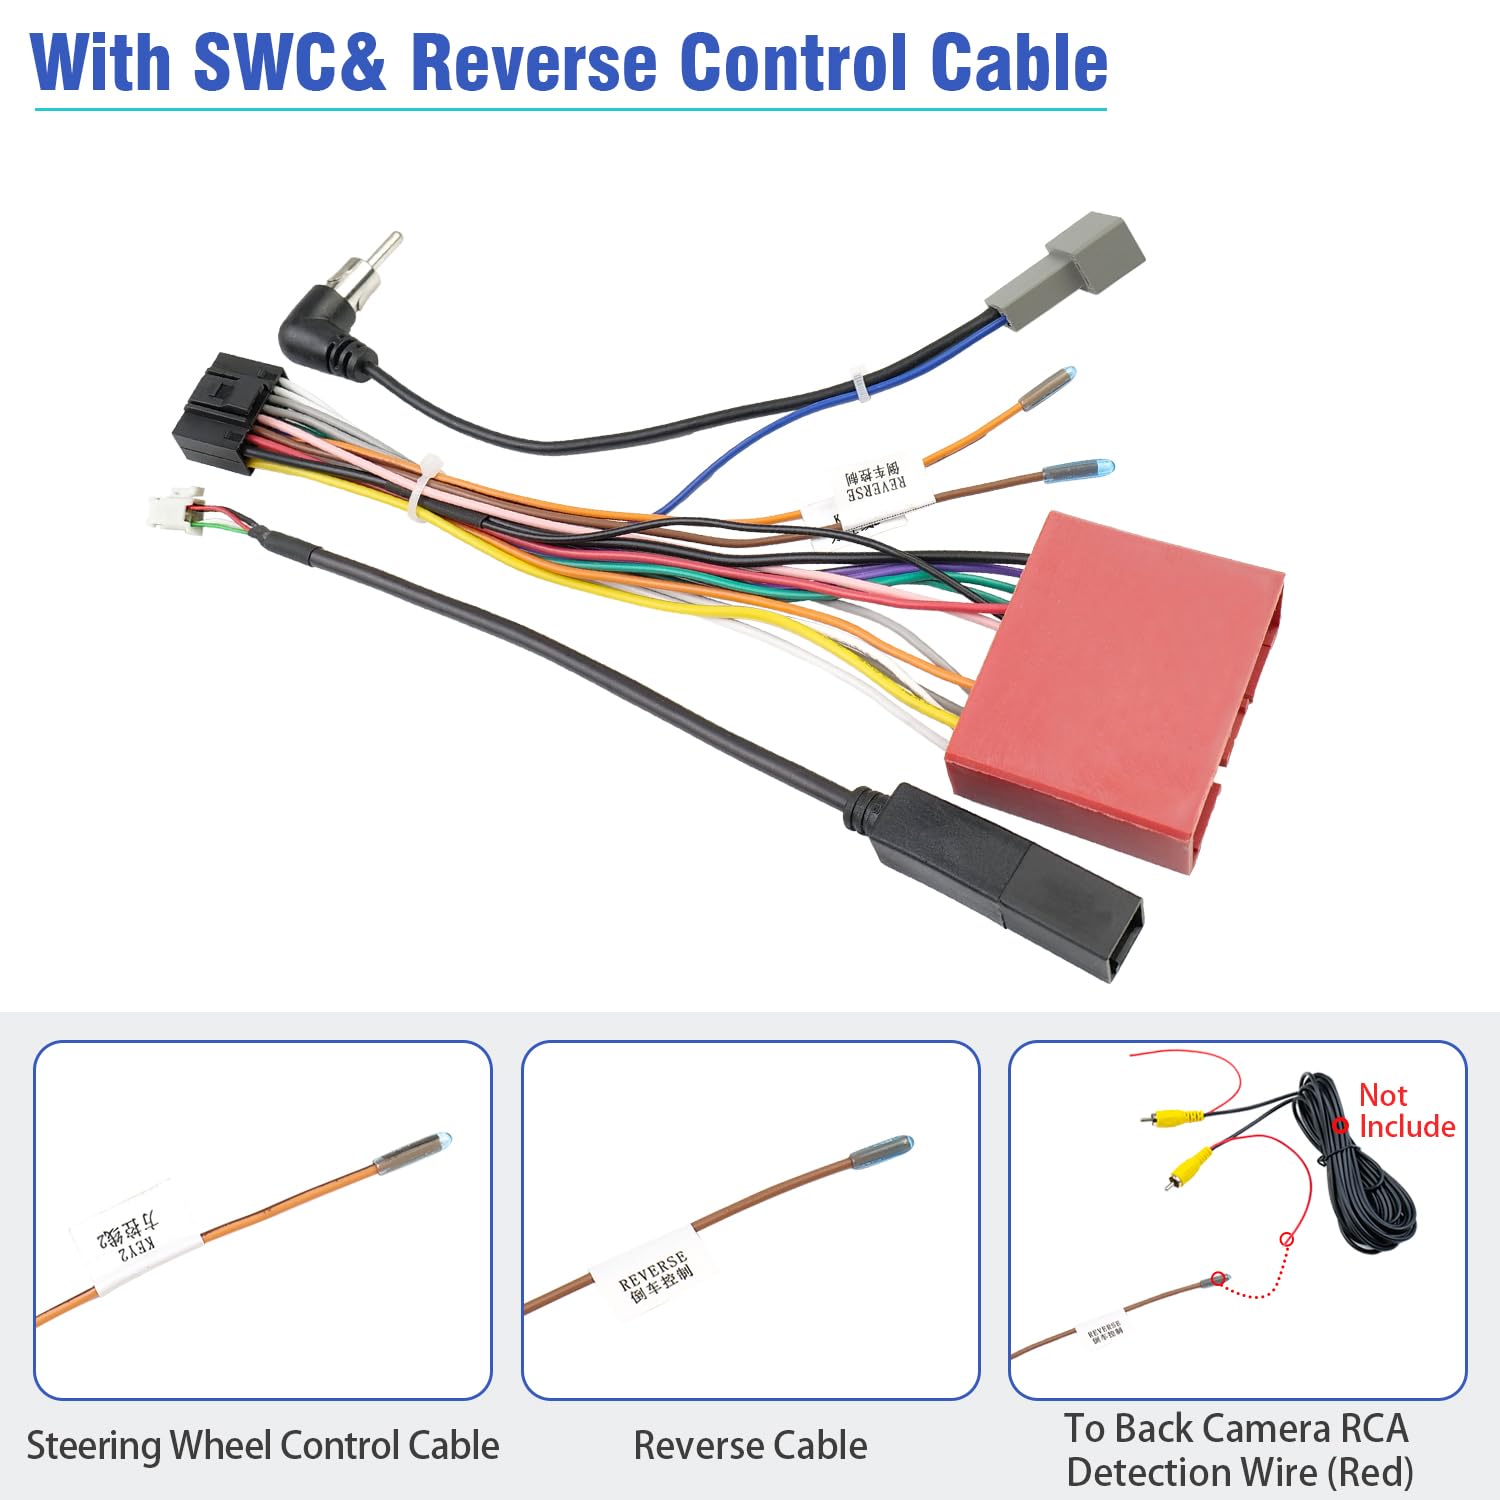
Image: Close-up view of the steering wheel control cable and reverse cable, indicating their purpose. Note that the back camera RCA detection wire is not included with this kit.
6. Using Butt Connectors
The kit includes butt connectors for secure wire connections without soldering. Follow these instructions:
- Prepare Wires: Carefully tear or strip the PVC jacket from the ends of the wires you wish to connect. If the metal wires are too long, trim them to an appropriate length.
- Insert Wire: Insert one end of a prepared wire into one side of the butt connector. The butt connectors are designed to fit 18AWG-22AWG cables.
- Crimp: Use a plier tool to crimp the butt connector firmly onto the wire. Ensure a secure connection that will not easily pull apart.
- Repeat: Insert the other wire into the opposite side of the butt connector and crimp it securely.
This method provides a reliable electrical connection without requiring heat shrinking.

Image: A visual guide demonstrating the three steps for using butt connectors: stripping the wire, inserting it into the connector, and crimping it with pliers.
7. Specifications
| Feature | Specification |
|---|---|
| Brand | JAYUBIEN |
| Model Number | USJY22 |
| Material | Copper, Polyvinyl Chloride (PVC) |
| Item Weight | 45 Grams |
| Connector Type | 16-pin ISO, 24-pin Car Adapter |
| Wire Diameter | 20 Hundredths-Inches |
| Included Components | 16-pin ISO Wiring Harness, 3 Butt Connectors |
| Cable Type | Radio Frequency (RF), USB |
8. Troubleshooting
- No Power to Stereo: Ensure all power connections (constant 12V, accessory 12V, ground) are correctly made and secure. Check vehicle fuses.
- No Sound: Verify speaker wire connections are correct and secure. Check stereo settings for audio output.
- Steering Wheel Controls Not Working: Confirm your vehicle does not have a CANBUS system. Ensure the SWC wire is correctly connected to your stereo's SWC input and that your stereo is configured for external SWC.
- Reverse Camera Not Activating: Check the connection of the reverse trigger cable to the vehicle's reverse light signal and the stereo's reverse input. Ensure the camera itself is powered and functioning.
- Poor Radio Reception: Ensure the antenna adapter is securely connected to both the vehicle's antenna and the stereo's antenna input.
- Harness Does Not Fit: Double-check the compatibility list and compare your vehicle's factory connectors with the harness. Contact customer support if you believe there is a mismatch.
9. Warranty and Support
JAYUBIEN products are designed for reliability and performance. For any questions, technical assistance, or warranty claims, please refer to the contact information provided with your purchase or visit the official JAYUBIEN website. Please retain your proof of purchase for warranty purposes.