AOKLEY AOKLEY123
AOKLEY 154 Carburetor Instruction Manual
Model: AOKLEY123 | Brand: AOKLEY
Introduction
This manual provides essential information for the installation, operation, maintenance, and troubleshooting of the AOKLEY 154 Carburetor. This carburetor is designed to fit SOLO 154SB and other brushcutters and strimmers. Please read this manual thoroughly before installation and use to ensure proper function and longevity of the product.
Product Overview and Package Contents
The AOKLEY 154 Carburetor is a replacement part designed for specific brushcutter and strimmer models. It is manufactured to be durable and provide a perfect match for compatible machines.
Key Features:
- 100% brand new construction.
- Durable, exquisite, and delicate design.
- Engineered for a perfect match with compatible machinery.
- Designed for ease of use and installation.
- Aims for a long service life.
Package Contents:
- 1 x AOKLEY 154 Carburetor

Figure 1: General view of the AOKLEY 154 Carburetor. This image shows the overall design and primary components of the carburetor.
Setup and Installation
Before beginning installation, ensure the engine is cool and disconnected from any power source. Always wear appropriate safety gear, including gloves and eye protection.
- Preparation: Gather necessary tools, such as screwdrivers, wrenches, and a clean cloth. Ensure the work area is well-lit and free of debris.
- Remove Old Carburetor: Carefully disconnect fuel lines, throttle linkage, and any mounting bolts securing the old carburetor. Note the orientation and connections for reassembly.
- Inspect Mounting Area: Clean the engine's intake manifold and ensure there are no old gasket residues. Inspect for any damage or blockages.
- Install New Carburetor: Position the new AOKLEY 154 Carburetor, ensuring gaskets are properly seated. Secure it with the mounting bolts, tightening them evenly to prevent air leaks.
- Connect Components: Reattach the fuel lines, ensuring they are securely clamped and free of kinks. Connect the throttle linkage, verifying smooth operation.
- Initial Checks: Before starting the engine, visually inspect all connections for tightness and proper routing. Check for any fuel leaks.
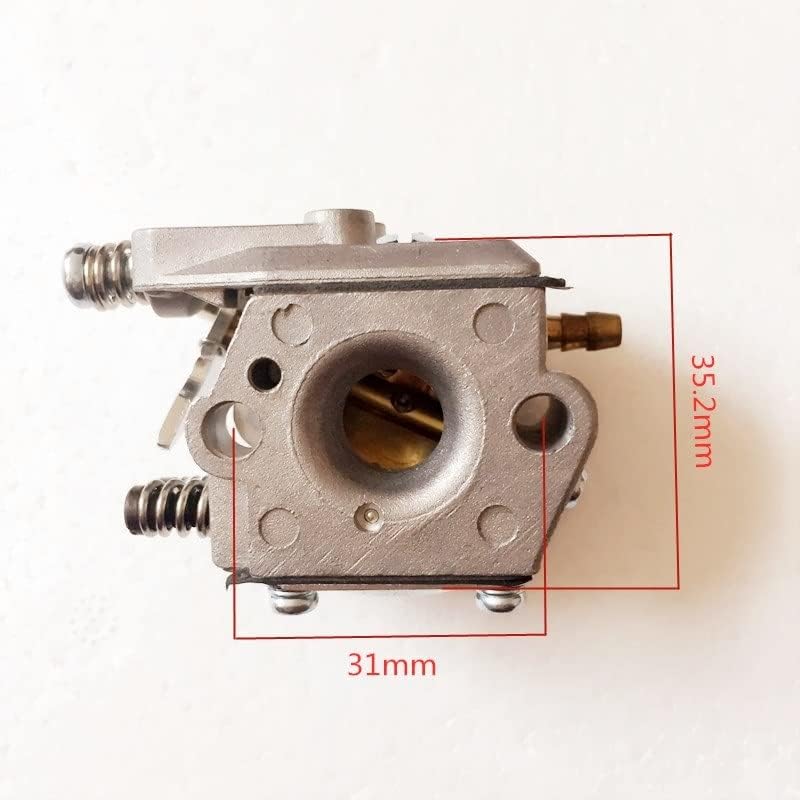
Figure 2: Side view of the carburetor illustrating key dimensions: approximately 35.2mm in height and 31mm in width. These measurements are crucial for verifying compatibility with your engine's mounting space.
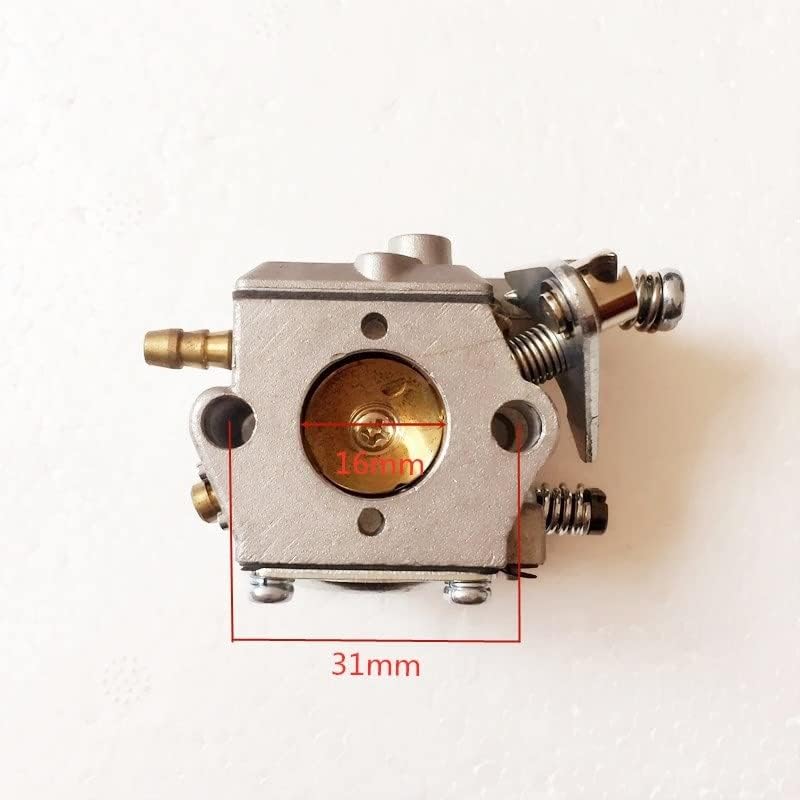
Figure 3: Front view of the carburetor showing additional dimensions: approximately 16mm for the intake bore and 31mm in width. These specifications are important for ensuring proper fit and air flow.
Operating Instructions
After installation, the carburetor may require minor adjustments for optimal performance. Refer to your engine's specific manual for detailed tuning procedures.
Initial Start-up:
- Ensure the fuel tank is filled with the correct fuel mixture as specified by your engine manufacturer.
- Engage the choke if required for cold starting.
- Start the engine according to your equipment's instructions.
- Once the engine warms up, disengage the choke.
Carburetor Adjustment (if necessary):
Most carburetors have idle speed and mixture screws. Adjustments should be made incrementally and with caution.
- Idle Speed Screw: Adjusts the engine's RPM at idle. Turn clockwise to increase idle, counter-clockwise to decrease.
- Mixture Screws (High/Low): These control the fuel-air mixture. Small adjustments (typically 1/8 to 1/4 turn) are usually sufficient. Refer to your engine's manual for specific settings. Incorrect adjustments can lead to engine damage.

Figure 4: Top view of the carburetor, demonstrating the location of various screws and linkages. This perspective is useful for identifying adjustment points.
Maintenance
Regular maintenance ensures the longevity and optimal performance of your carburetor.
- Fuel Quality: Always use fresh, clean fuel. Stale or contaminated fuel is a common cause of carburetor issues. Consider using a fuel stabilizer if storing equipment for extended periods.
- Fuel Filter: Regularly check and replace the fuel filter to prevent debris from entering the carburetor.
- Air Filter: A clean air filter is crucial for proper air-fuel mixture. Clean or replace the air filter as recommended by your engine's manual.
- Cleaning: If the carburetor becomes clogged, it may need to be disassembled and cleaned with a specialized carburetor cleaner. This should only be done by individuals familiar with carburetor mechanics.
- Storage: Before long-term storage, drain the fuel system or run the engine until it runs out of fuel to prevent gumming and varnish buildup in the carburetor.

Figure 5: Side view of the carburetor, highlighting the fuel inlet nozzle. Regular inspection of this area for blockages or damage is part of routine maintenance.

Figure 6: Bottom view of the carburetor, displaying the mounting screws and the main body. This view is relevant for understanding how the carburetor attaches to the engine and for accessing the float bowl if cleaning is required.
Troubleshooting
This section provides solutions to common issues you might encounter with your carburetor. For complex problems, consult a qualified technician.
| Problem | Possible Cause | Solution |
|---|---|---|
| Engine won't start | No fuel, clogged fuel filter, clogged carburetor jets, incorrect choke setting. | Check fuel level, replace fuel filter, clean carburetor, adjust choke. |
| Engine runs rough/stalls | Dirty air filter, incorrect fuel mixture, clogged jets, vacuum leak. | Clean/replace air filter, adjust mixture screws, clean carburetor, check for loose connections. |
| Engine lacks power | Clogged high-speed jet, restricted exhaust, incorrect valve clearance (if applicable). | Clean high-speed jet, check exhaust for blockages, consult engine manual for valve adjustment. |
| Fuel leaks from carburetor | Damaged gasket, stuck float, loose screws. | Inspect and replace gaskets, clean float needle and seat, tighten screws. |
Specifications
| Attribute | Value |
|---|---|
| Brand | AOKLEY |
| Model Number | AOKLEY123 |
| Item Weight | 1.76 ounces |
| Package Dimensions | 1.18 x 0.79 x 0.39 inches |
| Number of Pieces | 1 |
| Assembly Required | No (for the carburetor itself, installation into engine is required) |
| Vehicle Service Type | Street Bike (Note: Product description indicates brushcutters/strimmers, this specification might be a general category from Amazon) |
Warranty and Support
Specific warranty information for the AOKLEY 154 Carburetor is not provided in this manual. For details regarding warranty coverage, returns, or technical support, please refer to the product listing on the retailer's website or contact AOKLEY customer service directly.
It is recommended to retain your proof of purchase for any warranty claims.