1. Introduction
This manual provides detailed instructions for the assembly, operation, and maintenance of your Irfora Metal Detector. Please read this manual thoroughly before using the device to ensure proper function and safety. This metal detector is designed for detecting various metals including gold, silver, coins, and relics, suitable for both kids and adults.
2. Package Contents
Verify that all items listed below are included in your package:
- 1 x Metal Detector Unit
- 2 x 9V Alkaline Batteries
- 1 x Earphone
- 1 x Iron Shovel
- 1 x Nylon Bag
- 1 x User Manual (English)
3. Product Overview
3.1 Control Panel
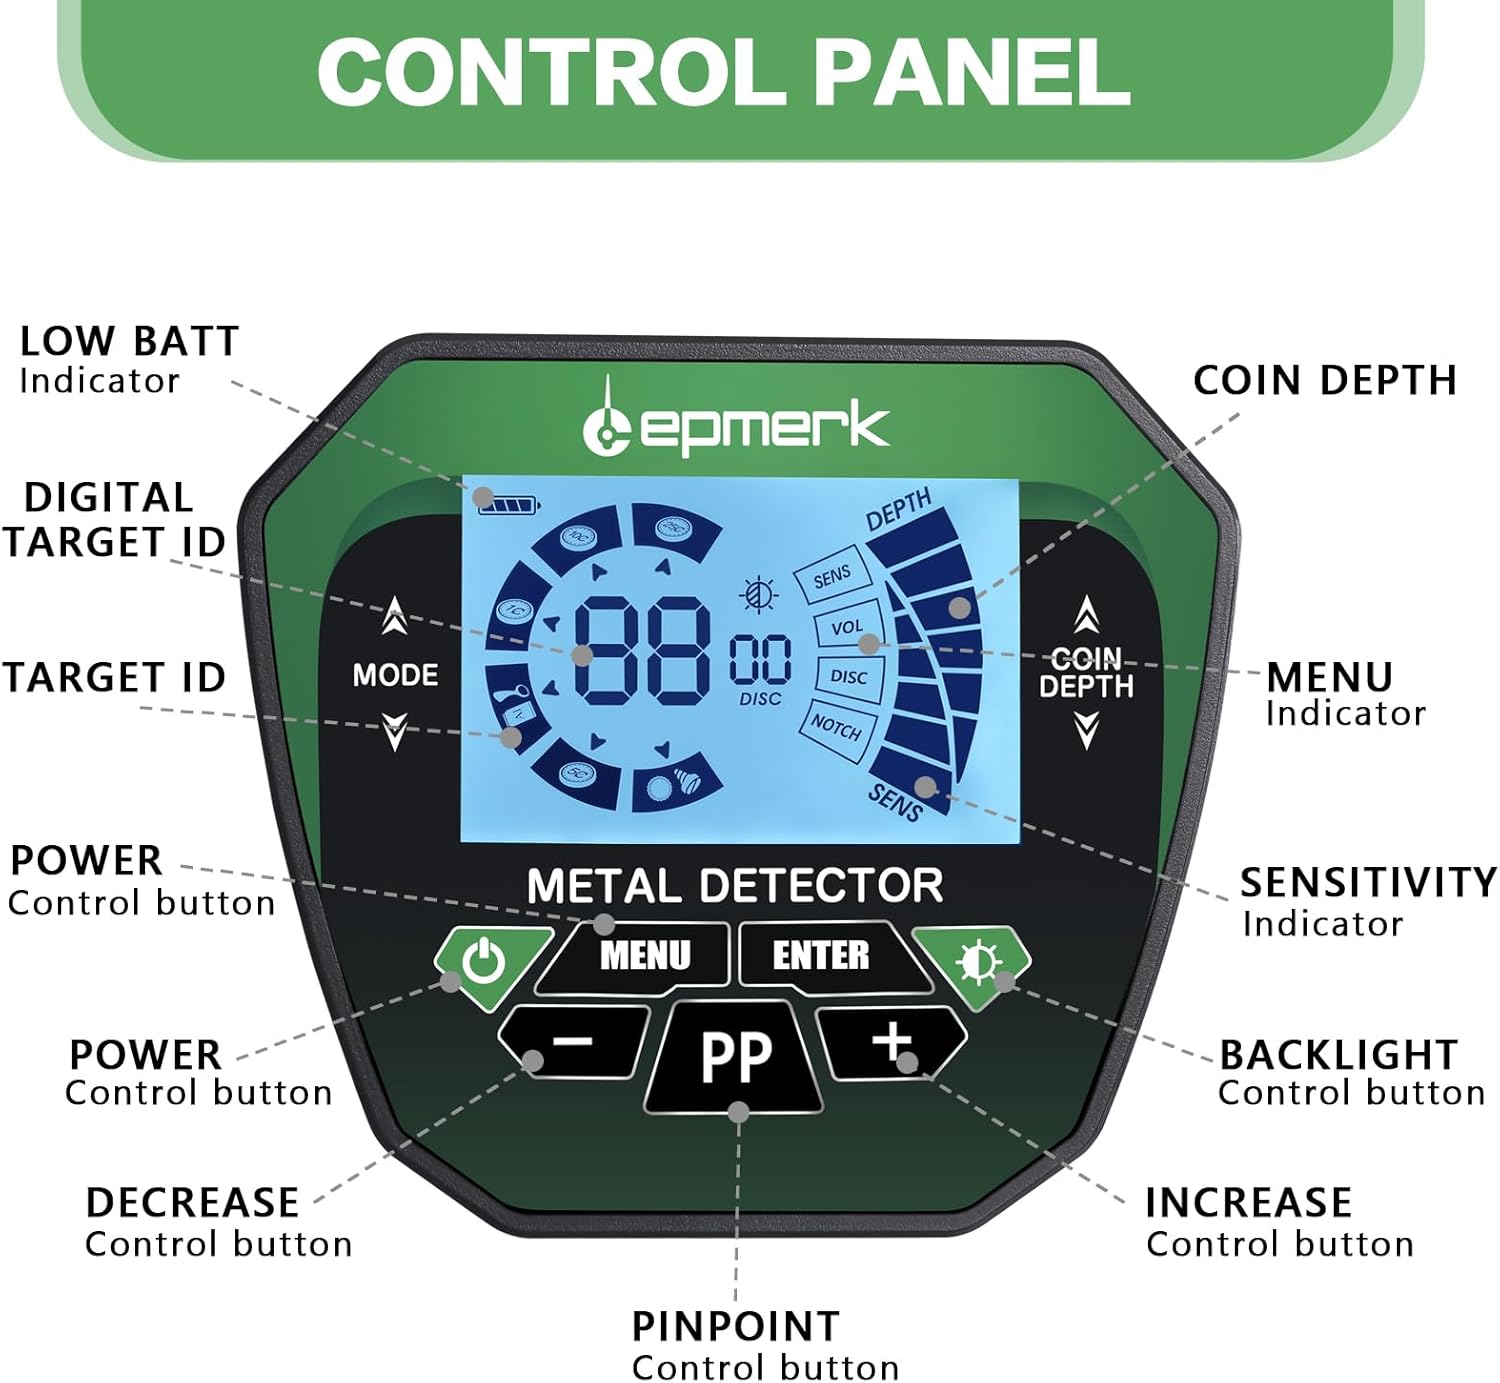
Figure 1: Detailed view of the metal detector's control panel, highlighting the LCD display, power button, mode selection, sensitivity, backlight control, and pinpoint function.
- LOW BATT Indicator: Shows when battery power is low.
- DIGITAL TARGET ID: Provides a numerical identification for detected targets.
- TARGET ID: Visual representation of the probable metal type.
- POWER Control button: Turns the device ON/OFF.
- DECREASE Control button (-): Reduces sensitivity, volume, or adjusts other settings.
- PINPOINT Control button (PP): Activates the pinpoint mode for precise target location.
- INCREASE Control button (+): Increases sensitivity, volume, or adjusts other settings.
- BACKLIGHT Control button: Turns the LCD backlight ON/OFF.
- SENSITIVITY Indicator: Displays the current sensitivity level.
- MENU Indicator: Navigates through menu options.
- COIN DEPTH: Indicates the approximate depth of coin-sized targets.
3.2 Main Components

Figure 2: Exploded view of the metal detector components, including the search coil, control box, stem sections, handle, and arm support.
- Search Coil: The primary detection component.
- Control Box: Houses the electronics, display, and controls.
- Middle Stem: Connects the control box to the lower stem.
- Fixing Knob: Secures the search coil to the lower stem.
- Handle: For gripping the detector.
- Cable: Connects the search coil to the control box.
- Cam Lock: Secures adjustable stem sections.
- Lower Stem: Connects the search coil to the middle stem.
- Top Stem: Connects the handle to the control box.
- Arm Support: Provides comfort and stability during use.
4. Setup and Assembly
Follow these steps to assemble your metal detector:
- Install Batteries: Open the battery compartment on the control box and insert 2 x 9V Alkaline batteries, ensuring correct polarity. Close the compartment securely.
- Assemble the Stem: Connect the middle stem to the top stem, securing it with the cam lock. Then, attach the lower stem to the middle stem, also securing it with its cam lock.
- Attach Arm Support: Slide the arm support onto the top stem and secure it in place.
- Attach Search Coil: Connect the search coil to the lower stem using the provided fixing knob and bolt. Ensure it is firmly attached but can still pivot.
- Connect Cable: Wrap the search coil cable around the stem, ensuring it is not too tight or loose, and plug the connector into the port on the control box. Tighten the connector ring to secure it.
Video 1: Step-by-step guide on how to assemble the metal detector and install batteries.
4.1 Digger Blade Assembly
The included iron shovel can be assembled for use:
- Unfold the shovel blade from its folded position.
- Extend the handle and secure it by twisting the locking mechanism.
- Ensure all parts are tightly secured before use.
5. Operating Instructions
5.1 Power On/Off
Press the POWER button on the control panel to turn the detector ON or OFF.
5.2 Modes of Operation

Figure 3: Visual representation of the four distinct operating modes for metal detection.
Your metal detector features 4 distinct modes for various treasure hunting scenarios:
- All Metal Mode: Designed to detect all types of metal without discrimination.
- DISC (Discrimination) Mode: Eliminates unwanted metal targets one by one. Use the '+' and '-' buttons to adjust the discrimination level.
- NOTCH Mode: Allows you to eliminate specific unwanted metal targets.
- PP (Pinpoint) Mode: After finding a metal object, use this mode to pinpoint the exact location of the target.
5.3 Sensitivity Adjustment
Adjust the SENSITIVITY level using the '+' and '-' buttons. Higher sensitivity increases detection depth but may also increase false signals in mineralized ground.
5.4 Audio Discrimination (Three Tone)
The detector provides three distinctive audio tones (high, medium, and low) to indicate different types of metal, aiding in target identification before digging.
5.5 Backlight Control
Press the BACKLIGHT button to turn the LCD screen backlight ON or OFF, useful for low-light conditions.
5.6 Ground Balance
Ground balance is crucial for eliminating false signals caused by ground mineralization. To perform ground balance:
- Turn on the detector and select the GROUND BALANCE mode (if available, otherwise use ALL-METAL mode).
- Hold the search coil about 5 cm above the ground.
- Press the SENSITIVITY button to turn down the sound to two to three bars; a buzzing sound is sufficient.
- Lift the coil up and press it down, listening to the sound volume. If the sound when lifting is greater than when pressing down, press the GROUND BALANCE button to increase the ground balance value, and vice versa.
- Adjust until the uplift and press-down sounds are consistent, indicating proper ground balance.
Video 2: Demonstration of the ground balance debugging process for optimal metal detection performance.
5.7 Target ID and Depth

Figure 4: Chart illustrating the 6 major metal categories, corresponding tone recognition, ID display, and digital value ranges.
The LCD display shows a digital Target ID and an approximate depth for detected objects. Refer to the chart above for common metal types and their corresponding ID ranges and tones.

Figure 5: Illustration demonstrating the 10-inch detection depth capability of the search coil.
6. Maintenance
- Cleaning: Wipe the detector with a damp cloth after each use. Do not use abrasive cleaners or solvents. The search coil is IP68 waterproof and can be rinsed, but the control box is not.
- Storage: Store the detector in a dry, cool place when not in use. Remove batteries if storing for extended periods to prevent leakage.
- Battery Care: Always use fresh, high-quality batteries. Replace batteries when the LOW BATT indicator appears.

Figure 6: Image highlighting the IP68 waterproof rating of the 10-inch search coil.
7. Troubleshooting
| Problem | Possible Cause | Solution |
|---|---|---|
| No Power | Dead or incorrectly installed batteries. | Replace batteries with new ones, ensuring correct polarity. |
| False Signals / Chatter | High sensitivity, ground mineralization, electromagnetic interference. | Reduce sensitivity, perform ground balance, move away from power lines or other electronic devices. |
| Poor Detection Depth | Low sensitivity, improper ground balance, small target size. | Increase sensitivity, re-perform ground balance, ensure the search coil is parallel to the ground. |
| Inaccurate Target ID | Target too deep, multiple targets, highly mineralized soil. | Use pinpoint mode for precise location, try different sweep angles, adjust ground balance. |
8. Specifications
| Feature | Specification |
|---|---|
| Brand | Irfora |
| Model Number | TYHUSE23619 |
| Material | Acrylonitrile Butadiene Styrene, Metal |
| Power Source | 2 x 9V Battery (Alkaline) |
| Adjustable Length | Yes |
| Display Type | LCD |
| Search Coil Size | 10 inches |
| Waterproof Rating (Search Coil) | IP68 |
| Operating Modes | 4 (All Metal, Discrimination, Notch, Pinpoint) |
| Audio Tones | 3 (High, Medium, Low) |
9. Safety Information
- Always obtain permission before searching on private property.
- Avoid searching in areas where buried utility lines or hazardous materials may be present.
- Exercise caution when digging to avoid injury or damage to property.
- Do not use the detector in thunderstorms or severe weather conditions.
- Keep the control box dry; only the search coil is waterproof.
10. Warranty and Support
Your Irfora Metal Detector is covered by the manufacturer's standard warranty. For warranty claims, technical support, or replacement parts, please contact Irfora customer service through your original purchase channel. Keep your proof of purchase for warranty validation.