
Introduction
The KRK Systems Classic 5 Active Studio Monitor Pack provides a pair of high-quality studio speakers designed for accurate audio reproduction in compact studio environments. Each monitor features a 5-inch glass aramid woofer for powerful bass and a 1-inch textile tweeter for crisp, clear highs. These monitors offer versatile connectivity and a compact, elegant design, making them suitable for various audio applications.
This manual provides essential information for setting up, operating, maintaining, and troubleshooting your Classic 5 studio monitors.
Package Contents
Before proceeding with the setup, please ensure all items are present in the package:
- Two (2) KRK Classic 5 Active Studio Monitors
- Power Cable (for each monitor)
- XLR Cable (for each monitor)
- Monitor Isolation Pads (typically included for optimal acoustic performance)

Image: Contents of the KRK Classic 5 Monitor Pack, including two monitors, isolation pads, and XLR cables.
Setup
1. Placement
Proper placement of your studio monitors is crucial for accurate sound reproduction. Position the monitors on a stable surface, ideally at ear level, forming an equilateral triangle with your listening position. Ensure there are no obstructions between the monitors and your ears.

Image: Front view of two KRK Classic 5 studio monitors, showing their compact design and placement on isolation pads.
2. Connections
The KRK Classic 5 monitors offer versatile connectivity options. Connect your audio source (e.g., audio interface, mixer, computer) to the monitors using the appropriate cables.
- XLR Connection: For balanced audio signals, connect an XLR cable from your audio source's output to the XLR input on the back of each monitor.
- TRS Connection: For balanced or unbalanced audio signals, connect a 1/4-inch TRS cable from your audio source's output to the TRS input on the back of each monitor.
- RCA Connection: For unbalanced audio signals, connect an RCA cable from your audio source's output to the RCA input on the back of each monitor. This offers versatile and easy setup for various audio equipment.
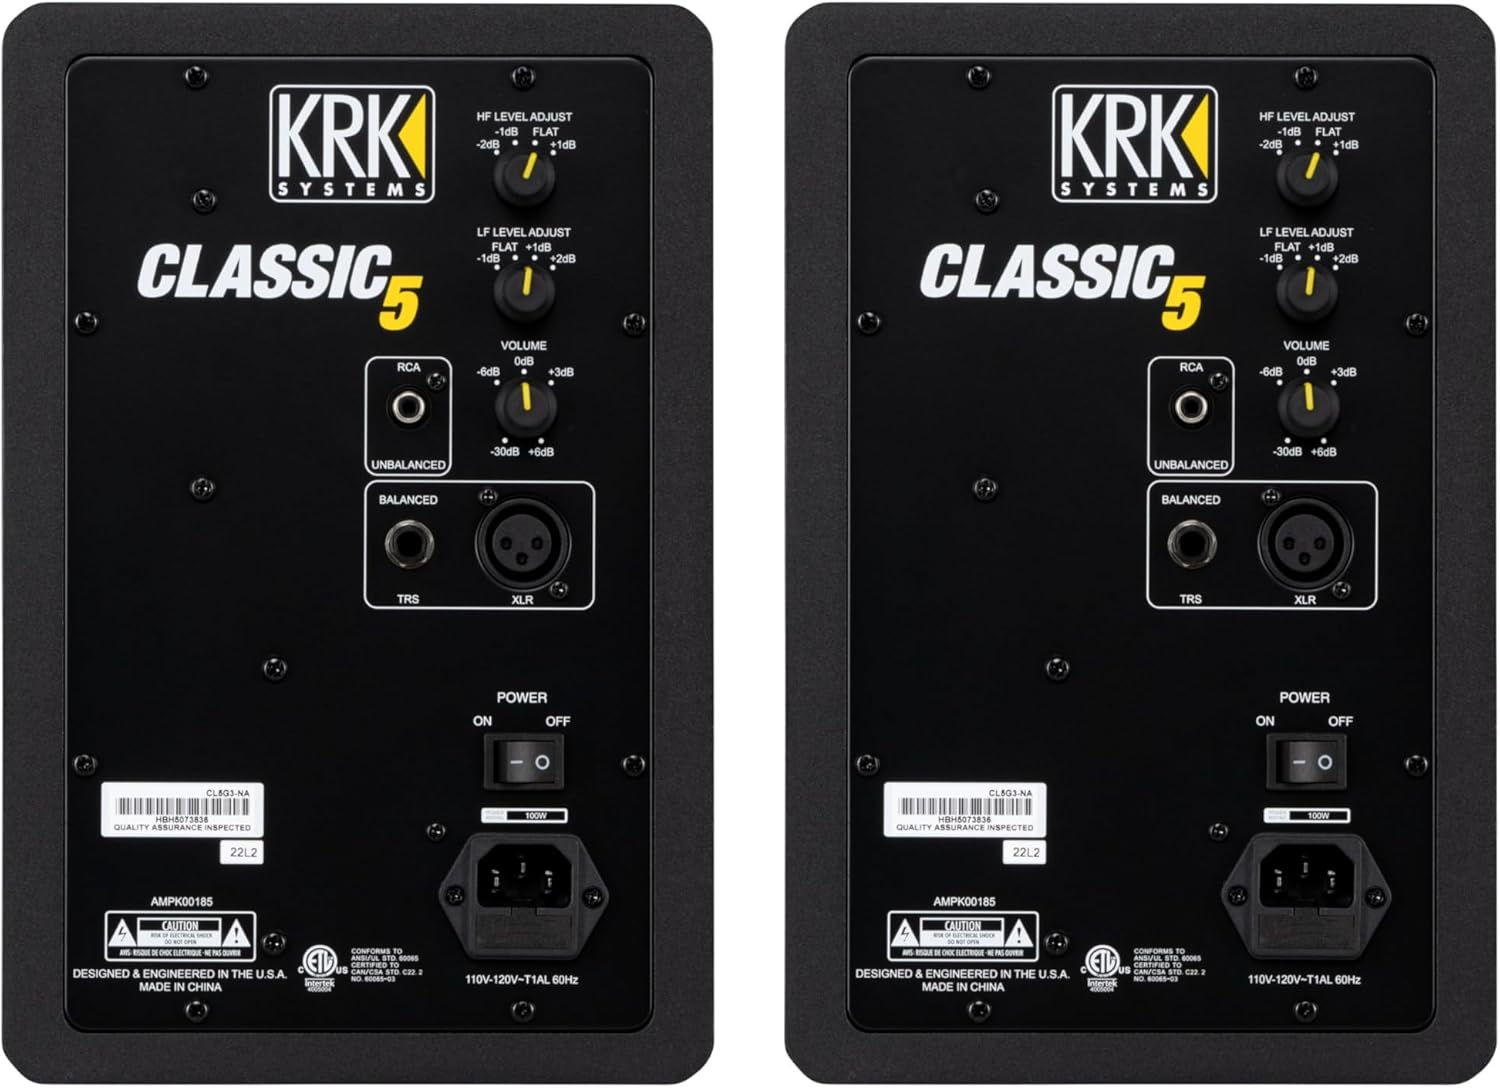
Image: Rear panel of the KRK Classic 5 monitor, highlighting the XLR, TRS, and RCA input connections, along with power input and acoustic adjustment controls.
3. Power
After connecting your audio source, plug the included power cables into the power inlets on the back of each monitor, then into a suitable AC power outlet. Ensure the power switch on each monitor is in the "OFF" position before plugging them in.
Operating Instructions
1. Power On/Off
To power on the monitors, flip the power switch on the back of each unit to the "ON" position. It is recommended to power on your monitors after your audio source and power them off before your audio source to prevent pops or clicks.
2. Volume Control
Adjust the overall output volume using the VOLUME knob located on the rear panel of each monitor. Start with a low volume setting and gradually increase it to a comfortable listening level. The monitors can also be controlled remotely for easy adjustment of volume and settings.
3. Acoustic Adjustment
The Classic 5 monitors feature controls to fine-tune their acoustic response to your room environment:
- HF LEVEL ADJUST: This control allows you to adjust the high-frequency output. Settings typically include FLAT, -1dB, -2dB. Adjust this based on your room's acoustics and personal preference to achieve balanced highs.
- LF LEVEL ADJUST: This control allows you to adjust the low-frequency output. Settings typically include FLAT, -1dB, -2dB. Adjust this to compensate for room modes or proximity to walls, ensuring accurate bass response.
Experiment with these settings to find the optimal sound for your specific studio setup.
Maintenance
To ensure the longevity and optimal performance of your KRK Classic 5 monitors, follow these maintenance guidelines:
- Cleaning: Use a soft, dry cloth to wipe down the exterior of the monitors. Avoid using abrasive cleaners, solvents, or waxes, as these can damage the finish.
- Dust Protection: Keep the monitors free from dust. You may use a soft brush or a vacuum cleaner with a brush attachment to gently clean the speaker cones and vents.
- Environmental Conditions: Operate the monitors in a stable environment, away from extreme temperatures, humidity, and direct sunlight.
- Ventilation: Ensure adequate airflow around the monitors. Do not block the rear ports or place them in enclosed spaces without proper ventilation.
- Power Off When Not in Use: If the monitors will not be used for an extended period, power them off and unplug them from the wall outlet.
Troubleshooting
If you encounter issues with your KRK Classic 5 monitors, refer to the following common problems and solutions:
| Problem | Possible Cause | Solution |
|---|---|---|
| No Sound |
|
|
| Distorted Sound |
|
|
| Hum or Buzz Noise |
|
|
| One Monitor Not Working |
|
|
If the problem persists after trying these solutions, please contact KRK Systems customer support.
Specifications
| Feature | Detail |
|---|---|
| Model Name | KRK Classic 5 |
| Model Number | REC0016524-000 |
| Speaker Type | Studio Monitor |
| Woofer Size | 5 inches (12.7 cm) Glass Aramid |
| Tweeter Size | 1 inch (2.54 cm) Textile |
| Maximum Speaker Output Power | 150 Watts |
| Frequency Response | 50 Hz |
| Connectivity Technology | RCA, XLR, TRS (wired) |
| Audio Output Mode | Stereo |
| Input Voltage | 120 Volts (AC) |
| Mounting Type | Table Mount |
| Material | Metallic |
| Color | Black |
| Control Method | Remote Control, Button |
| Product Dimensions (L x W x H) | 29 x 22.6 x 33.2 cm |
| Product Weight | 7.02 kg |
| Power Source | Corded Electric |
| Compatible Devices | Professional audio systems, TV, Projector, MP3 Player, Desktop Computer, Video Game Console, Laptop |
Warranty Information
The KRK Classic 5 Active Studio Monitor Pack comes with a Limited Warranty. Specific terms and conditions of the warranty may vary by region and retailer. Please retain your proof of purchase for warranty claims.
For detailed warranty information, including coverage period and claim procedures, please refer to the warranty card included with your product or visit the official KRK Systems website.
Support
For technical assistance, troubleshooting beyond this manual, or service inquiries, please contact KRK Systems customer support.
- Online Support: Visit the official KRK Systems website for FAQs, support articles, and contact forms.
- Contact Information: Refer to the product packaging or the KRK Systems website for regional customer service phone numbers and email addresses.
When contacting support, please have your product model number (REC0016524-000) and proof of purchase readily available.


