
1. Product Overview
The Wengart WG03-1 is a digital, programmable touchscreen thermostat designed for 24V water floor heating systems. It offers a comfortable and energy-efficient living environment through its advanced features and user-friendly interface. This thermostat supports both manual and programmable modes, features a large LCD with white backlight for easy viewing, and ensures precise temperature control.
Key features include:
- Weekly programming with 6 daily events for weekdays and 2 for weekends.
- Temperature calibration function for accurate readings.
- Child lock feature to prevent accidental adjustments.
- Anti-freeze function activates heating below 5°C to protect pipes.
- Power-off memory retains settings during power interruptions.
- Adjustable temperature differential (0.5~5°C) for precise control.

This image displays the Wengart WG03-1 thermostat with its main screen showing temperature and time, alongside a list of key features such as large screen display, multiple sensor modes, child lock, physical keying, PLC, anti-freezing, power-off memory, and easy installation. A specifications table is also visible, detailing power supply, load current, accuracy, set-point temperature range, limit temperature range, consumption, temperature sensor type, and size.
2. Installation Guide
2.1 Safety Precautions
- Always turn off the main power supply before installation to prevent electric shock.
- Installation should be performed by a qualified electrician.
- Ensure wiring complies with local electrical codes.
2.2 Installation Steps
- Turn off Main Power: Locate and switch off the circuit breaker for the heating system.
- Remove Front Display: Gently pry off the front display screen part using a screwdriver to access the installation panel.
- Wire Connections: Refer to the wiring diagram below. Connect the electrical lines to the appropriate terminals on the installation panel. Ensure wires are securely fastened. The installation wire should be 1.5-2.5mm².
- Mount Installation Panel: Fix the installation panel into a standard 86x86mm or European 60mm round wall box using the provided screws.
- Insert Display Screen: Carefully insert the front display screen part back into the fixed installation panel until it clicks into place.
- Restore Power: Turn on the main power supply.
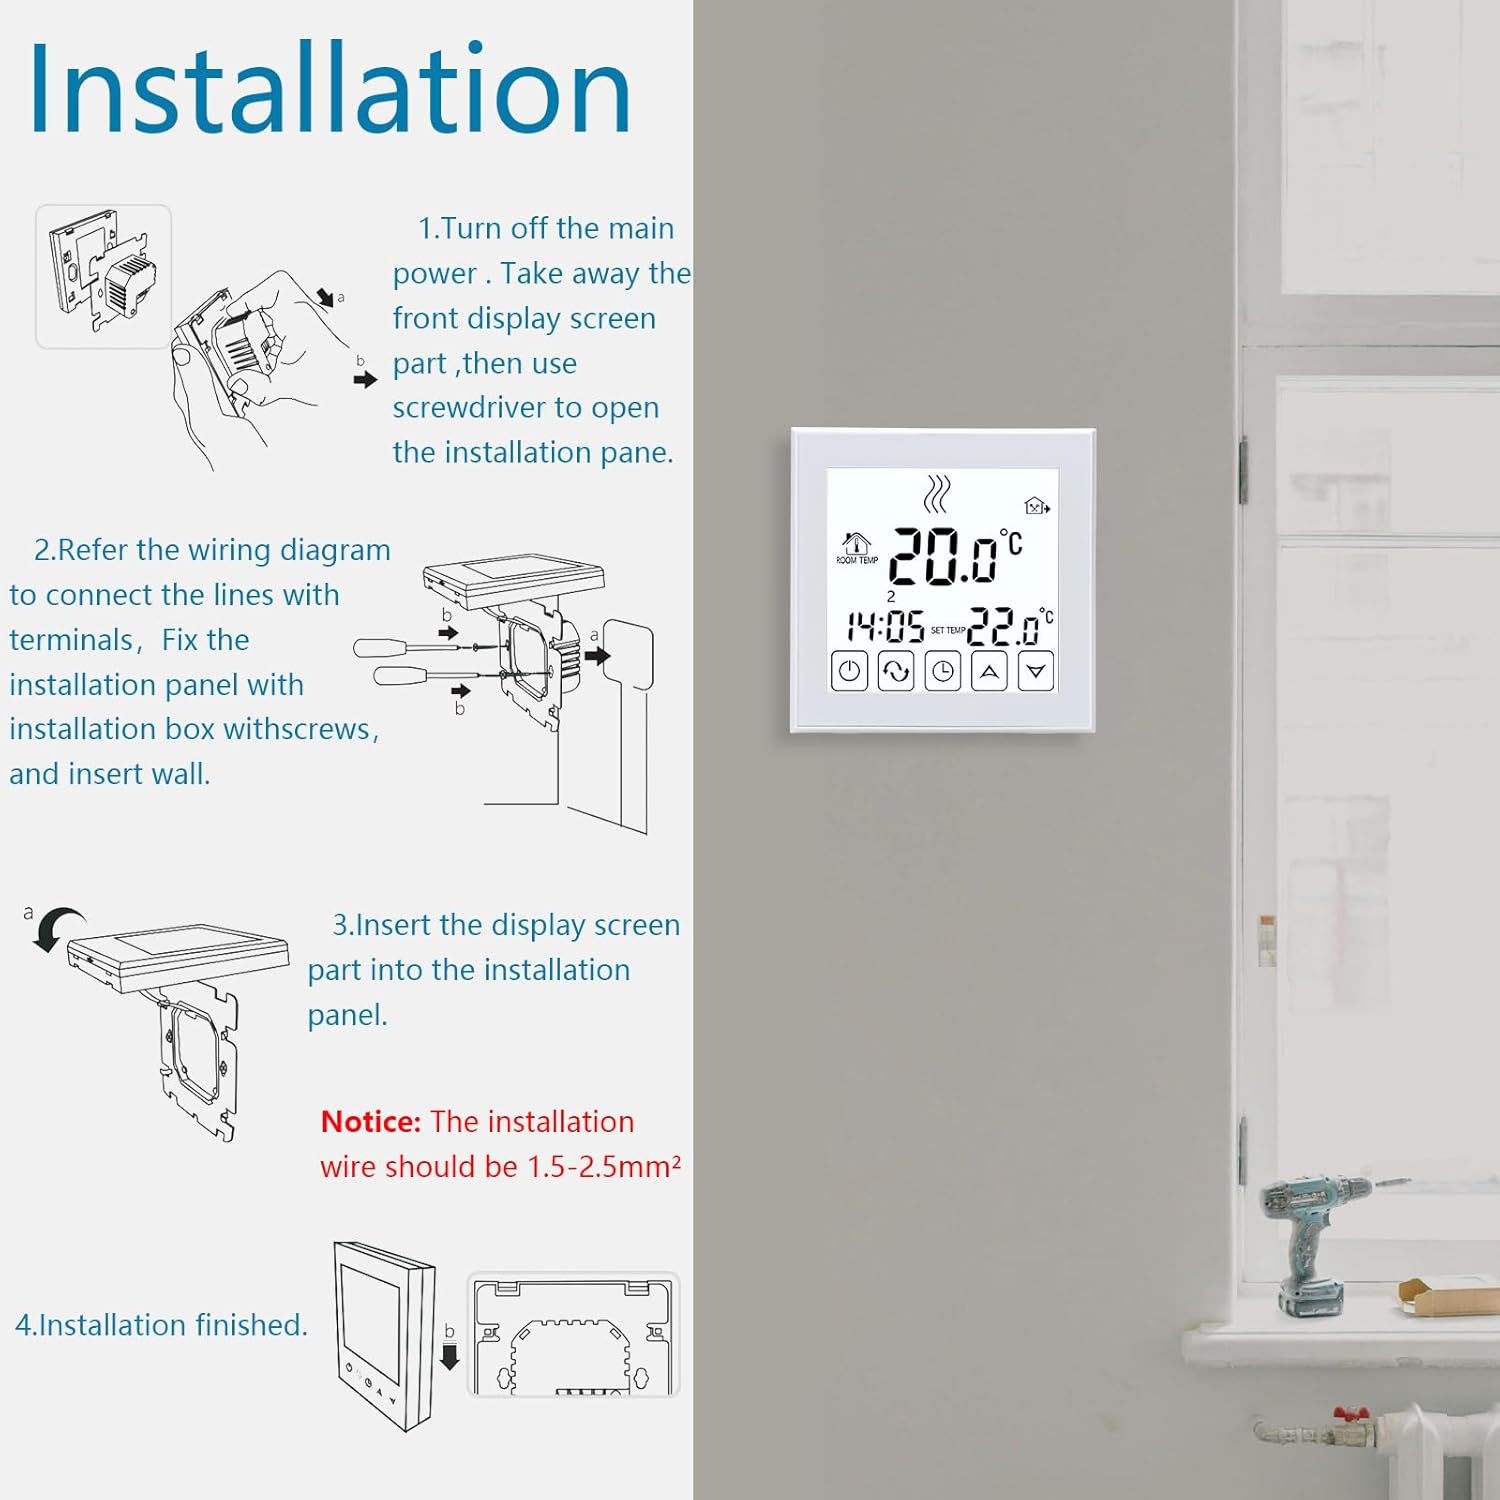
This image presents a four-step visual guide for installing the Wengart WG03-1 thermostat. It shows turning off main power, removing the front display, connecting wires to terminals, fixing the installation panel, and finally inserting the display screen. A note emphasizes that the installation wire should be 1.5-2.5mm².
2.3 Wiring Diagram
The thermostat is designed for AC 90-240V, 50/60Hz input and provides a switching relay output of AC230V, 3A. It supports normally open and normally closed electric heating actuators. An external NTC 10k sensor (at 25°C) can be used.

This image provides a clear wiring diagram for the Wengart WG03-1 thermostat. It shows connections for N (Neutral), L (Live), and NTC (sensor) terminals, along with connections for Normally Closed and Normally Open heating actuators. The diagram specifies AC230V Imax3A output.
3. Operating Instructions
3.1 Display Analysis
The large LCD screen provides clear information about the current status of the thermostat. Familiarize yourself with the display elements and button functions:
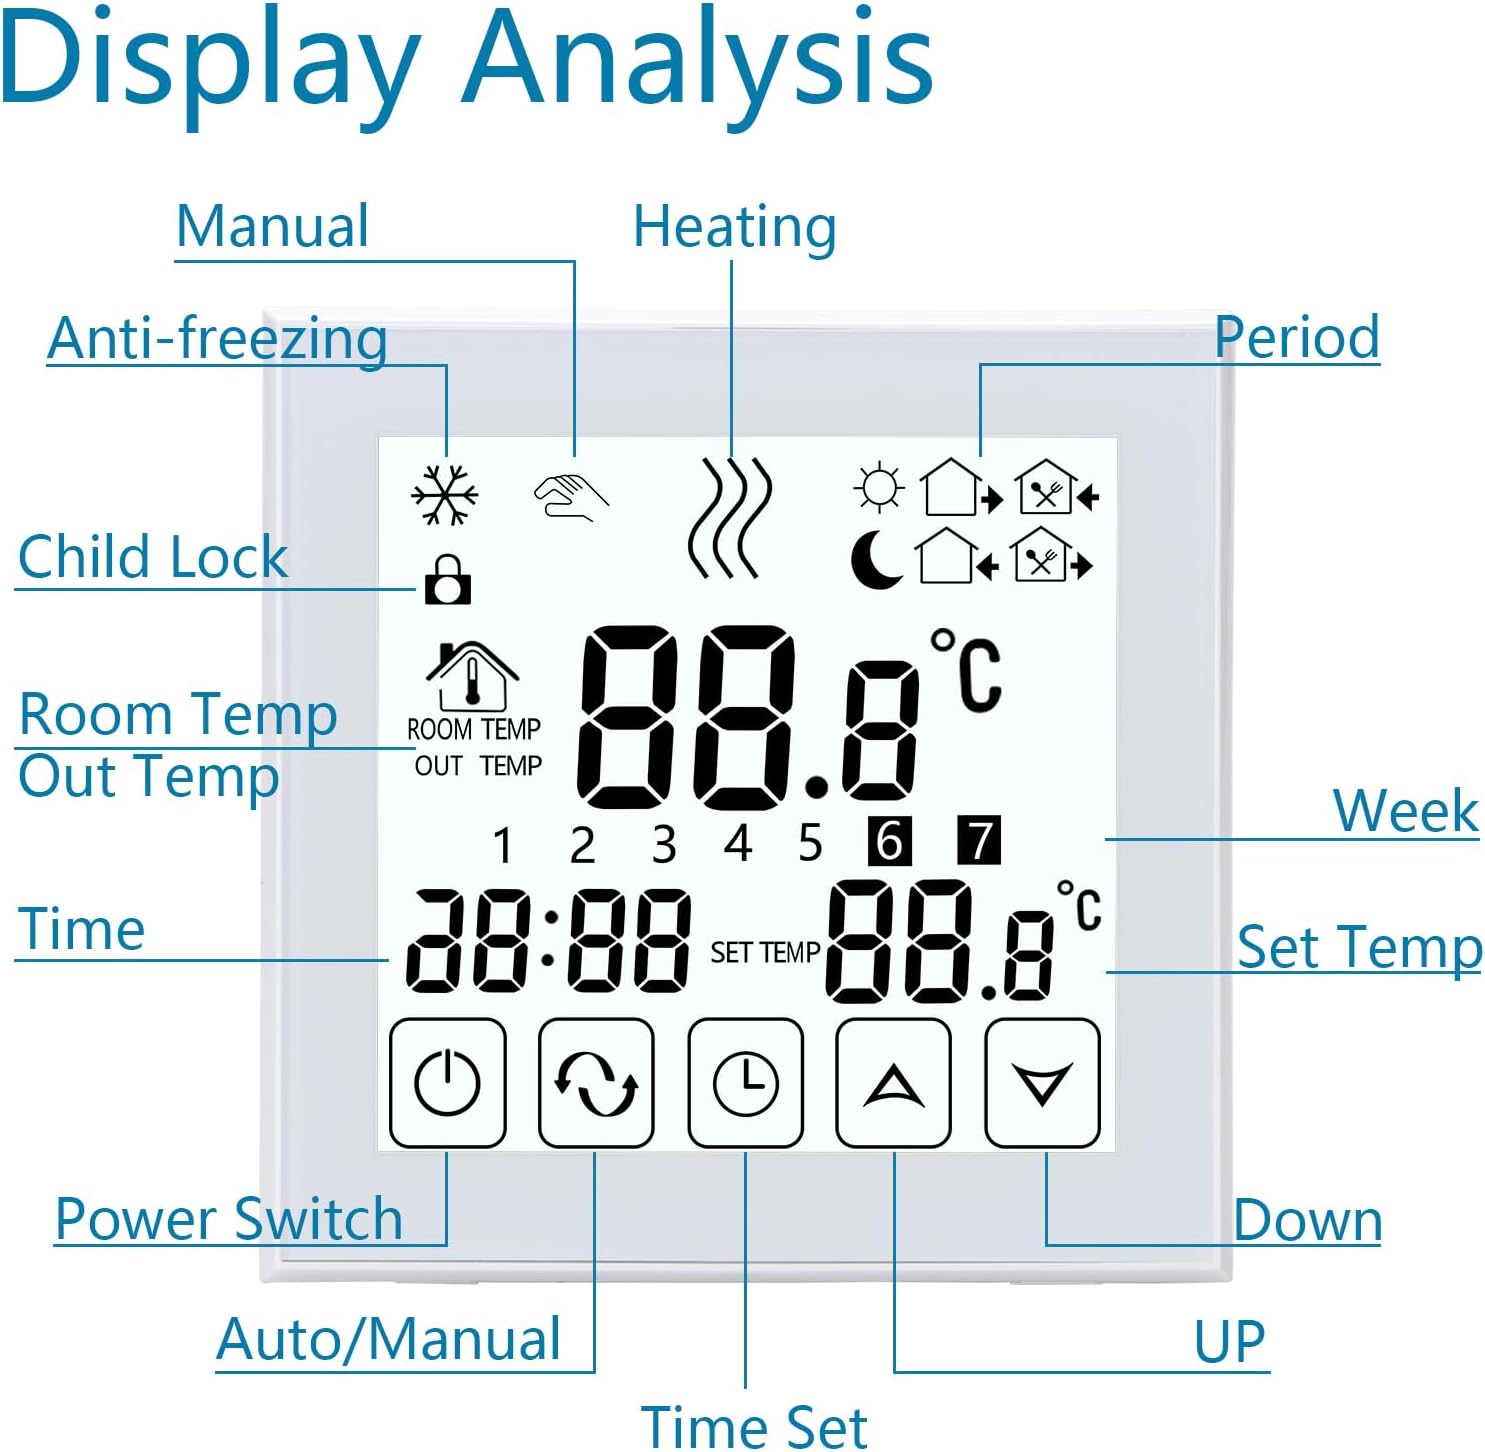
This image provides a detailed analysis of the Wengart WG03-1 thermostat's display, labeling each icon and numerical indicator. It points out elements like Manual mode, Heating indicator, Anti-freezing, Child Lock, Room Temp/Out Temp, Weekday indicators, Time, Set Temp, Power Switch, Auto/Manual button, Time Set button, Up button, and Down button.
- Room Temp / Out Temp: Displays the current ambient temperature or external sensor temperature.
- Set Temp: Shows the desired target temperature.
- Time: Displays the current time.
- Heating Icon: Indicates when the heating system is active.
- Anti-freezing Icon: Appears when the anti-freeze function is active.
- Child Lock Icon: Indicates that the buttons are locked.
- Period Icon: Shows the current programming period.
- Week: Displays the current day of the week (1-7).
3.2 Button Functions
- Power Switch (⏻): Turns the thermostat ON/OFF.
- Auto/Manual Mode (↻): Toggles between automatic (programmed) mode and manual mode.
- Time Set (⏱): Used to set the current time and enter programming mode.
- Up (▲): Increases temperature, time, or navigates menu options.
- Down (▼): Decreases temperature, time, or navigates menu options.
3.3 Manual Mode
In manual mode, the thermostat maintains a constant temperature set by the user. Press the Auto/Manual button (↻) to switch to manual mode. Use the Up (▲) and Down (▼) buttons to adjust the desired temperature. The thermostat will maintain this temperature until switched back to programmed mode or adjusted again.
4. Weekly Programming
The thermostat features a weekly programming function, allowing you to set different temperatures for various times of the day, optimizing comfort and energy savings. You can choose between 5+2 days (weekdays + weekend), 6+1 days (weekdays + Sunday), or 7 individual days programming.
4.1 Setting the Program Schedule
- Press and hold the Time Set (⏱) button for 3-5 seconds to enter programming mode.
- Use the Auto/Manual (↻) button to cycle through the programming options (5+2, 6+1, 7 days).
- Use the Time Set (⏱) button to select the day(s) or period you wish to program.
- Use the Up (▲) and Down (▼) buttons to adjust the start time and desired temperature for each of the 6 daily periods (weekdays) and 2 daily periods (weekends).
- Press the Power Switch (⏻) to exit programming mode and save settings.
The thermostat will automatically switch to the set temperatures at the programmed times, providing comfort when needed and saving energy when you are away.

This image illustrates the programming capabilities of the Wengart WG03-1 thermostat, showing the display set to a programmed temperature and time. A table outlines the weekly programming schedule with periods, default times, and default temperatures for weekdays and weekends. An accompanying text explains that the thermostat adjusts temperature according to the preset program when you go out.
5. Maintenance
5.1 Cleaning
To clean the thermostat, gently wipe the screen and casing with a soft, damp cloth. Do not use abrasive cleaners, solvents, or chemical sprays, as these can damage the device.
5.2 Child Lock Function
To activate the child lock, press and hold the Up (▲) and Down (▼) buttons simultaneously for 3-5 seconds until the child lock icon appears on the display. This will prevent unauthorized changes to the settings. To deactivate, repeat the process.
6. Troubleshooting
- Thermostat not turning on: Check the main power supply and ensure the circuit breaker is ON. Verify all wiring connections are secure.
- Heating not activating: Ensure the thermostat is in heating mode (not OFF or in a cooling mode if applicable). Check if the set temperature is higher than the current room temperature. Verify the wiring to the heating actuators.
- Inaccurate temperature reading: The thermostat has a temperature calibration function. If the measured temperature deviates from the actual room temperature, you can calibrate it by 0.5°C. Refer to the advanced settings in the full manual for calibration steps.
- Buttons unresponsive: Check if the child lock function is activated. Deactivate it if necessary.
- Programming issues: Ensure you are correctly following the programming steps. Verify the current time and day are set accurately.
7. Technical Specifications
| Feature | Specification |
|---|---|
| Operating Voltage | AC 90~240V, 50/60Hz |
| Power Consumption | 2 W (less than 0.3W in some descriptions) |
| Load Current | Max 3A (for water heating) |
| Set-point Temperature Range | 5~70°C (adjustable, factory setting 20-70°C) |
| Limit Temperature Range | 5-99°C |
| Switching Differential | 0.5~5°C adjustable (factory setting ±1°C) |
| Ambient Temperature | -5 ~ 50°C |
| Temperature Display Accuracy | ±0.5°C |
| Temperature Control Accuracy | ±0.5°C |
| Measurement Range | 1 ~ 70°C |
| Sensor Type | Internal NTC 10k @ 25°C (supports external sensor) |
| Protection Class | IP20 |
| Housing Material | Inflammable Polycarbonate |
| Dimensions (L x W x H) | 86 x 86 x 27 mm (visible part), 86 x 86 x 42.4 mm (total) |
| Installation Hole Distance | 60 mm |
| Weight | 210 Grams |
| Display Type | LCD with white backlight |
| Control Method | Touch control |
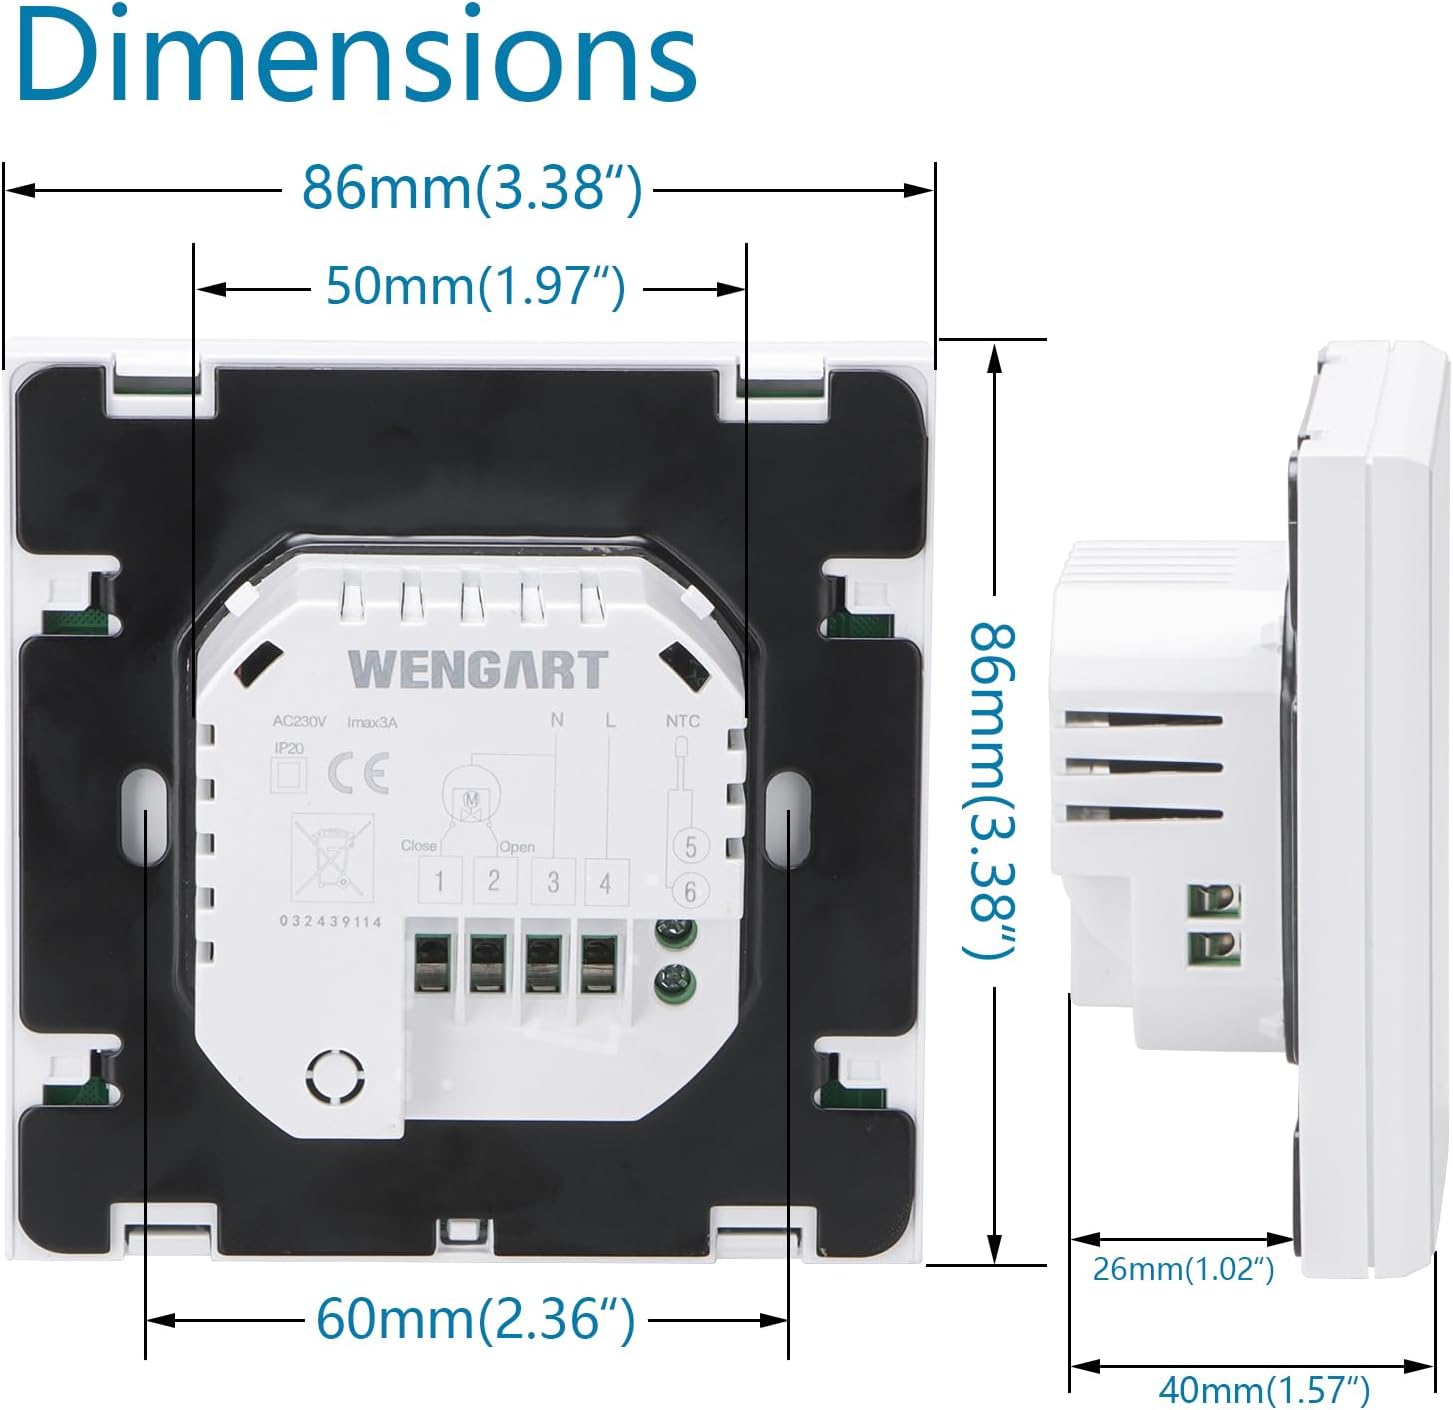
This image displays the precise dimensions of the Wengart WG03-1 thermostat in millimeters and inches. It shows the front face measuring 86mm x 86mm, with a depth of 26mm for the visible part and 40mm total depth including the embedded section. The installation hole distance is 60mm.
8. Warranty and Support
8.1 Warranty Information
Wengart products are manufactured to high-quality standards. For specific warranty details, please refer to the warranty card included with your product or contact Wengart customer support. Keep your purchase receipt as proof of purchase for any warranty claims.
8.2 Customer Support
If you encounter any issues or have questions regarding the installation, operation, or maintenance of your Wengart WG03-1 thermostat, please contact Wengart customer support. Contact information can typically be found on the product packaging or the official Wengart website.