X XFT XFT-120GA
XFT AED Trainer XFT-120GA Instruction Manual
Model: XFT-120GA | Brand: X XFT
1. Introduction
The XFT AED Trainer XFT-120GA is a professional training device designed to simulate the operation of an Automatic External Defibrillator (AED). This device is intended solely for educational purposes, providing realistic training scenarios for individuals learning CPR and first aid. It does not deliver high-voltage shocks and cannot be used for actual patient defibrillation, ensuring a safe learning environment. The trainer incorporates voice prompts, multiple training modes, and adjustable settings to enhance the training experience.
2. Product Overview and Components
The XFT AED Trainer XFT-120GA comes with all necessary components for comprehensive training. Familiarize yourself with each part before beginning your training.

Figure 2.1: XFT AED Trainer XFT-120GA and included accessories, including the main unit, remote control, electrode pads, and power adapter.
2.1 Main Components:
- AED Trainer Unit: The primary device simulating an AED, featuring a display, control buttons, and a port for electrode pads.
- Remote Control: Used to select training scenarios, adjust settings, and control the trainer remotely.
- Adult/Child Electrode Pads: Reusable training pads designed for placement on manikins, simulating adult and pediatric applications.
- Wire Connector: Connects the electrode pads to the AED trainer unit.
- Rechargeable Lithium Battery: Provides power to the trainer unit, offering extended operational time.
- Power Adapter: For charging the rechargeable lithium battery.
- Instruction Manual: This document, providing detailed guidance on setup and operation.
- Storage Bag: For convenient storage and transport of the trainer and its accessories.
2.2 Trainer Unit Functions:
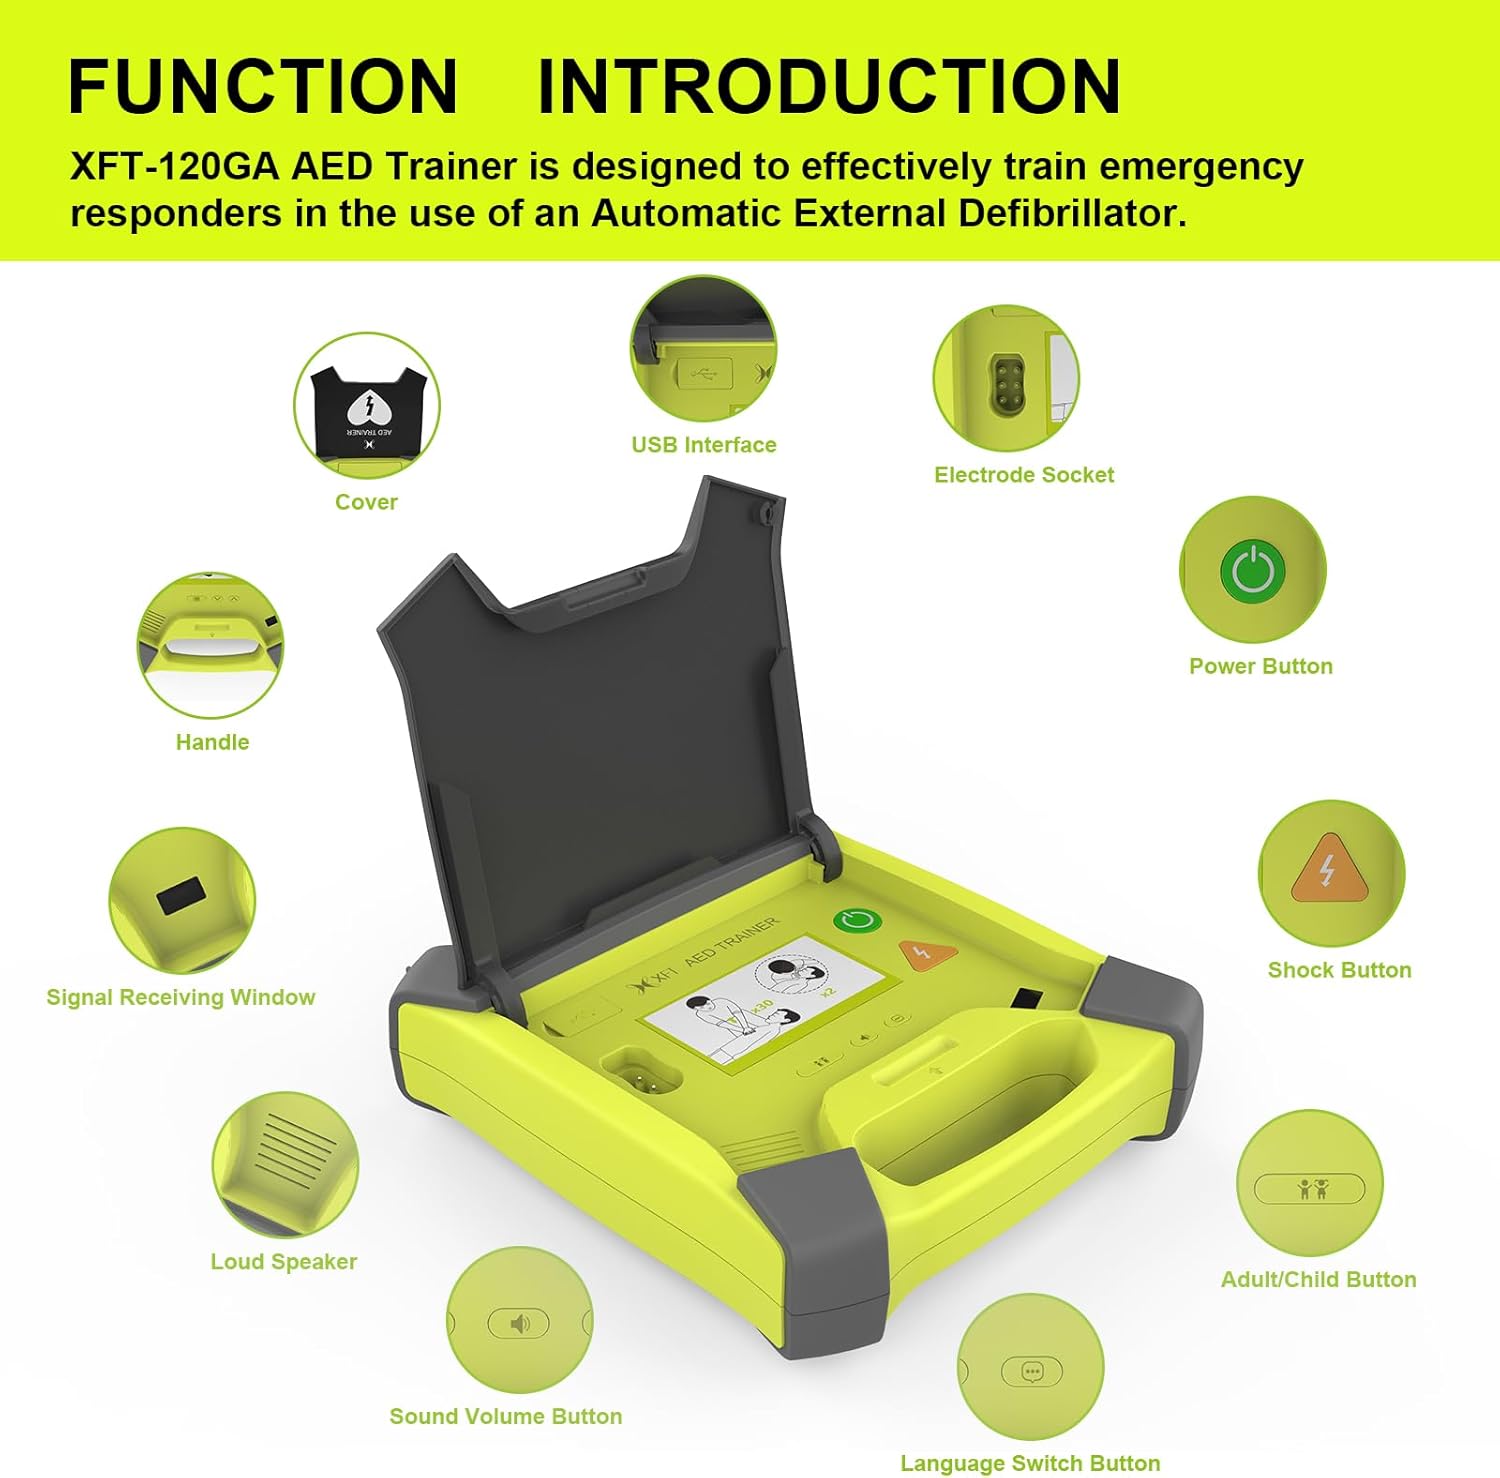
Figure 2.2: Detailed view of the AED Trainer unit highlighting its various functional parts.
- Cover: Protects the display and controls when closed. Opening the cover automatically powers on the device.
- Handle: For easy carrying of the unit.
- Signal Receiving Window: Receives signals from the remote control.
- Loud Speaker: Emits voice prompts and metronome sounds.
- Sound Volume Button: Adjusts the volume of voice prompts.
- Language Switch Button: Changes the language of the voice prompts.
- Adult/Child Button: Toggles between adult and pediatric training modes.
- Shock Button: Simulates the delivery of a shock.
- Power Button: Manually turns the device on or off.
- Electrode Socket: Port for connecting the electrode pads.
- USB Interface: For potential firmware updates or data transfer (if applicable).
3. Setup
- Charge the Battery: Before first use, ensure the rechargeable lithium battery is fully charged using the provided power adapter. Insert the battery into the designated compartment on the trainer unit. The battery provides up to 12 hours of continuous operation.
- Connect Electrode Pads:
- Attach the wire connector to the electrode pads.
- Plug the wire connector into the electrode socket on the AED trainer unit. Ensure a secure connection.
- Place the electrode pads on a CPR manikin according to the instructions for adult or pediatric placement.
- Power On: Open the lid of the AED trainer unit. The device will automatically power on and begin voice prompts. Alternatively, press the Power Button.
- Prepare Remote Control: Ensure the remote control has working batteries (not specified in JSON, assume standard AAA or button cell). The remote control is stored in the bottom of the machine.
4. Operating Instructions
The XFT AED Trainer XFT-120GA is designed for intuitive operation with voice guidance and remote control functionality.

Figure 4.1: Basic operational flow for AED training.
- Initial Power-On: Upon opening the lid or pressing the power button, the trainer will power on and begin voice prompts, guiding the user through the initial steps of an AED protocol.
- Following Voice Prompts: The trainer provides real-time voice guidance for each step of the AED protocol, including pad placement, analyzing rhythm, and advising shock.
- Shock Delivery: When prompted, press the Shock Button to simulate defibrillation.
- Language Selection: Use the Language Switch Button on the trainer or the remote control to select from available languages: English, Italian, French, and Chinese.
- Volume Adjustment: Adjust the volume of the voice prompts using the Sound Volume Button on the trainer or the remote control.
- Adult/Pediatric Mode:

Figure 4.2: Switching between adult and pediatric training modes.
The trainer can accurately switch between adult and pediatric modes. Use the Adult/Child Button on the trainer or the remote control to toggle between these settings. This changes the voice prompts and simulated energy levels appropriate for the selected patient type.
- CPR Feedback: The trainer provides real-time audible feedback on CPR quality, including compression rate and depth, to improve the effectiveness of training.
- CPR Frequency Modes: Select from 100, 110, or 120 beeps per minute for CPR metronome guidance. The metronome sound can also be turned off.
- Configuration Saving: The last selected training mode (Semi/Full Auto, Scenario, Metronome, CPR Mode, Language, Volume) will be remembered as the default for subsequent training sessions.
5. Training Scenarios
The XFT AED Trainer offers 8 basic training modes and 8 simulated realistic scenarios, designed to meet the latest AHA (American Heart Association) guidelines for CPR and AED training.

Figure 5.1: The trainer supports 8 simulated scenarios for comprehensive training.
5.1 Remote Control Scenario Selection:
The remote control allows for easy selection and control of various training scenarios. Each scenario simulates a real AED first aid situation.

Figure 5.2: Remote control functions for selecting and managing training scenarios.
| Scenario No. | Description |
|---|---|
| 1 | Ventricular Fibrillation with single shock conversion (Shockable rhythm 1 shock, Non-shockable rhythm) |
| 2 | Troubleshooting Skills (Defibrillation pads, Poor pad connection, Shockable rhythm 1 shock, Non-shockable rhythm) |
| 3 | Ventricular Fibrillation with two shocks required for conversion (Non-shockable rhythm, Shockable rhythm 2 shocks, Non-shockable rhythm) |
| 4 | Non-shockable rhythm (Non-shockable rhythm throughout) |
| 5 | Ventricular Fibrillation with two shocks required for conversion (Shockable rhythm 2 shocks, Non-shockable rhythm) |
| 6 | Troubleshooting Skills (Defibrillation pads with two shocks required for conversion, Poor pad connection, Shockable rhythm 2 shocks, Non-shockable rhythm) |
| 7 | Ventricular Fibrillation (Ventricular fibrillation throughout) |
| 8 | Troubleshooting Skills (Motion artifacts, Low battery, with one shock required for conversion, Motion artifacts, Shockable rhythm 1 shock, Non-shockable rhythm) |
6. Maintenance
- Battery Care: Regularly charge the rechargeable lithium battery. If the device will not be used for an extended period, it is recommended to fully charge the battery and store the unit in a cool, dry place.
- Cleaning: Clean the trainer unit and electrode pads with a soft, damp cloth. Do not use abrasive cleaners or immerse the unit in water. Ensure the unit is dry before storage.
- Storage: Store the AED trainer and all accessories in the provided storage bag to protect them from dust and damage. The electrode wires and pads can be stowed in the lid of the trainer unit, and the remote control can be stored in the bottom compartment.
- Electrode Pad Longevity: While reusable, the adhesive on the electrode pads may wear over time with repeated use. Replace pads if they no longer adhere properly to the manikin.
7. Troubleshooting
- Issue: Difficulty removing electrode pad connector.
The connector for the electrode pads is designed to be secure. To properly remove it without causing damage, follow these steps:

Figure 7.1: Proper technique for disconnecting electrode pads.
- Step 1: Lift the wired end of the connector with your right index finger.
- Step 2: Push the wireless end of the connector with your right thumb.
- Step 3: Pinch the middle of the connector and lift it straight up.
- Issue: Trainer does not power on.
- Ensure the rechargeable lithium battery is properly inserted and charged.
- Verify the power adapter is functioning if attempting to power on while charging.
- Confirm the lid is fully opened, as this triggers automatic power-on. Alternatively, press the Power Button.
- Issue: No voice prompts or low volume.
- Check the volume setting using the Sound Volume Button on the trainer or remote control.
- Ensure the device is powered on and a scenario is active.
- Issue: Remote control not responding.
- Ensure the remote control has working batteries.
- Point the remote control directly at the trainer's Signal Receiving Window.
- Ensure there are no obstructions between the remote and the trainer.
8. Specifications
| Feature | Detail |
|---|---|
| Model | XFT-120GA |
| Power Source | Rechargeable Lithium Battery (included) |
| Battery Life | Up to 12 hours continuous operation |
| Training Modes | 8 basic training modes, 8 simulated realistic scenarios |
| Languages Supported | English, Italian, French, Chinese |
| CPR Frequency Modes | 100, 110, 120 beeps per minute (adjustable) |
| Dimensions (Package) | 12.95 x 12.56 x 4.8 inches |
| Weight (Package) | 4.1 Pounds |
| Special Features | Compact, Portable, Configuration Saving Function, Voice Prompting, Real-time CPR Feedback |
9. Support
For any questions or issues regarding your XFT AED Trainer XFT-120GA, please contact XFT customer support. We are committed to assisting you and ensuring a positive training experience.
Please note: This AED training device is for teaching purposes only and cannot be used for medical treatment.
Ask a question about this manual
Ask about setup, troubleshooting, compatibility, parts, safety, or missing instructions. Manuals+ will review the question and use this page’s manual context to help answer it.