AOGETYO 3x3 4K
AOGETYO 3x3 4K Video Wall Controller User Manual
Model: 3x3 4K
1. Introduction
This manual provides instructions for the AOGETYO 3x3 4K Video Wall Controller. This device is designed to split a single HDMI or DVI high-definition video signal into up to nine separate outputs, allowing for the creation of a large dynamic display across multiple screens such as LCD TVs or projectors. It supports various splicing modes and advanced features like 180-degree screen rotation and edge masking.
2. Product Features
- 9-Screen Splicing: Divides one HDMI or DVI input signal into up to 9 HDMI outputs for multi-screen display.
- 4K Resolution Support: HDMI & DVI input supports resolutions up to 4K@30Hz (3840x2160P @24/30Hz). Each HDMI output supports up to 1920x1080P.
- Multiple Splicing Modes: Supports 13 display modes including 3x3, 1x2, 1x3, 1x4, 2x2, 2x3, 2x4, 2x1, 3x1, 4x1, 3x2, 4x2, and 1x1 HDMI splitter mode.
- Control Methods: Operates via IR remote control, RS232 serial control, and onboard button press control.
- 180° Screen Rotation: Allows rotation of the image on the first row of TVs by 180 degrees to minimize thick bezels in certain configurations.
- Edge Masking: Corrects and aligns bezels and image edges for a more seamless multi-screen experience.
- SPDIF Audio Port: Dedicated SPDIF stereo audio output for connecting to external audio systems.
- Plug and Play with Memory Function: Retains the last settings upon power-off and restart, requiring no software installation.
3. Package Contents
Verify that all items are present in the package:
- AOGETYO 3x3 4K Video Wall Controller (x1)
- IR Remote Control (x1) (AAA batteries not included)
- USB Power Cable (x1)
- USB Power Adapter (x1)

Image: The AOGETYO 3x3 4K Video Wall Controller unit, its power supply, and the included remote control.
4. Setup Instructions
Follow these steps to set up your video wall controller:
- Connect Input Source: Connect your HDMI or DVI source device (e.g., computer, TV box, game console) to the "HDMI IN" or "DVI IN" port on the video wall controller.
- Connect Display Units: Connect up to nine display units (TVs, monitors, projectors) to the "OUT1" through "OUT9" HDMI ports on the controller using HDMI cables.
- Connect Audio (Optional): If using external audio, connect your amplifier, sound bar, or speaker system to the "SPDIF" audio port.
- Power On: Connect the USB power cable to the controller's DC 12V port and then to the USB power adapter. Plug the adapter into a power outlet. The device will power on automatically.
- Initial Display Configuration: Ensure all connected display units are set to their native resolution, preferably 1080p, for optimal performance. If using splicing screens, reset them to factory default settings first.

Image: Diagram illustrating various input sources (HDMI, DVI from devices like computers, game consoles) and output displays (HDTVs, monitors, projectors, splicing screens) connected to the video wall controller.
5. Operating Instructions
5.1. Splicing Modes
The controller supports 13 different display configurations. You can select these modes using the remote control or the onboard buttons.
- Common Modes: 3x3, 1x2, 1x3, 1x4, 2x2, 2x3, 2x4, 2x1, 3x1, 4x1, 3x2, 4x2.
- HDMI Splitter Mode: 1x1 mode.
- Vertical Splicing: For portrait modes like 1x2, 1x3, 1x4, select modes 2x1, 3x1, 4x1 respectively, and rotate the desktop portrait on your PC input.

Image: Visual representation of the 13 available splicing modes, including 3x3, 3x1, 3x2, 4x1, 4x2, 1x1, 1x2, 1x3, 1x4, 2x1, 2x2, 2x3, and 2x4 configurations.
5.2. Control Methods
The device offers three ways to control its functions:
- IR Remote Control: Use the included remote for direct access to splicing modes, input selection, rotation, brightness, and contrast adjustments.
- RS232 Control: For advanced integration, the device can be controlled via an RS232 serial connection.
- Button Press Control: Onboard buttons allow for basic mode selection and input switching.

Image: Depiction of the three control methods: remote control, RS232 serial port, and physical buttons on the device.

Image: Detailed layout of the remote control with numbered buttons and their corresponding functions, including mode selection, input switching, rotation, brightness, and contrast.
5.3. 180° Screen Rotation
This feature is useful for optimizing display aesthetics, especially when TVs have thicker bezels on one side. It allows you to flip the image on the top row of TVs by 180 degrees, enabling you to arrange them with the thinnest bezels adjacent to each other.
- Applicable Modes: This function is primarily designed for two-row modes such as 2x1, 2x2, 2x3, and 2x4.
- Activation: Select the target screen using the remote control until it shows a red border, then press the "OUT" button to rotate.
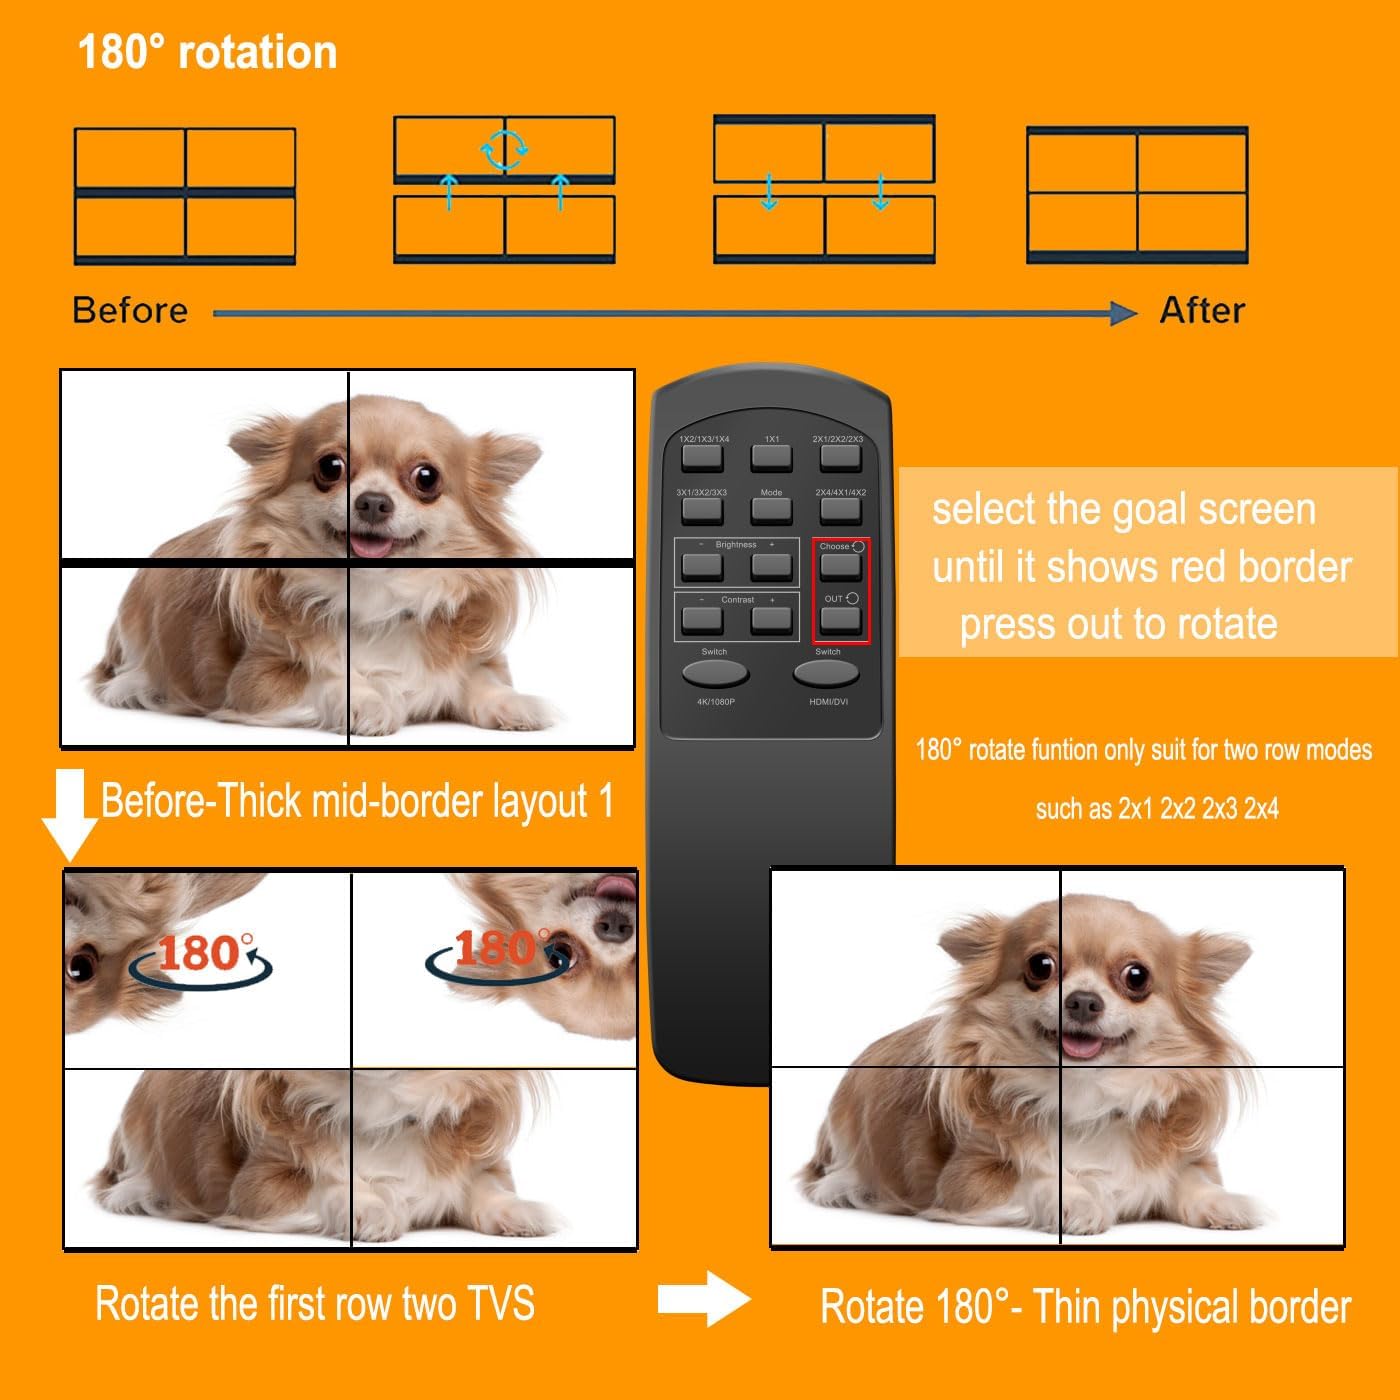
Image: Illustration demonstrating the 180-degree rotation feature, showing how rotating the top row of displays can create a thinner physical border between screens.
5.4. SPDIF Audio Output
The integrated SPDIF port allows for independent audio output. Connect this port to an external speaker, amplifier, or sound bar for enhanced audio. If no external audio device is connected, audio will still be output through the HDMI connections to your display units.

Image: Diagram showing the SPDIF audio port on the video wall controller and its connection to an external speaker system, with a large video wall display in the background.
6. Troubleshooting
- No Display/Signal:
- Ensure all HDMI/DVI cables are securely connected to both the source and display units.
- Verify the input source is correctly selected on the video wall controller (using the remote or buttons).
- Check if the input source device is powered on and outputting a signal.
- Confirm that display units are powered on and set to the correct HDMI input.
- Try setting the resolution of all screens to 1080p to ensure compatibility.
- Image Distortion/Incorrect Splicing:
- Ensure the selected splicing mode matches your physical display arrangement.
- If using splicing screens, reset them to factory default settings.
- Adjust the edge masking function to correct bezel alignment.
- For vertical portrait modes, ensure your PC input is rotated accordingly and the correct mode (e.g., 2x1 for 1x2 physical layout) is selected.
- Remote Control Not Responding:
- Check and replace AAA batteries in the remote control.
- Ensure there are no obstructions between the remote and the controller's IR receiver.
- No Audio Output:
- Verify that your external audio system is correctly connected to the SPDIF port and powered on.
- Check the audio settings on your input source device.
7. Specifications
| Feature | Detail |
|---|---|
| Product Dimensions | 3.38 x 8.89 x 0.86 inches |
| Item Weight | 1.9 pounds |
| Input Ports | 1x HDMI, 1x DVI |
| Output Ports | 9x HDMI |
| Input Resolution Support | Up to 3840x2160P @24/30Hz (HDMI & DVI). DVI does not support 4K. |
| Output Resolution Support | Each channel HDMI output supports 1920x1080P, 1280x800, 1280x700, 1024x768, 1366x768, 1280x1024. |
| HDCP Compliance | HDCP 1.4 |
| HDMI Version | HDMI 1.4 |
| Control Methods | IR Remote, RS232, Button Press |
| Special Features | 180° Screen Rotation, Edge Masking, Memory Function, SPDIF Audio Out |
| Manufacturer | AOGETYO |
| Model Number | 3x3 4K |

Image: A diagram showing the physical dimensions of the AOGETYO 3x3 4K Video Wall Controller, indicating its length, width, and height.
8. Warranty and Support
The AOGETYO 3x3 4K Video Wall Controller comes with a 12-month warranty from the date of purchase. AOGETYO provides lifetime technical support for this product. For any inquiries or assistance, please contact AOGETYO customer service.
Your satisfaction is our top concern.
Ask a question about this manual
Ask about setup, troubleshooting, compatibility, parts, safety, or missing instructions. Manuals+ will review the question and use this page’s manual context to help answer it.