iSunergy CM-60A
iSunergy MPPT Solar Charge Controller CM-60A User Manual
Model: CM-60A | Brand: iSunergy
1. Product Overview
The iSunergy CM-60A MPPT Solar Charge Controller is an advanced device designed to optimize the energy harvest from your solar panels and efficiently charge various battery types. Utilizing a Maximum Power Point Tracking (MPPT) algorithm, it significantly enhances the energy utilization efficiency of photovoltaic systems, offering a charging efficiency improvement of 15% to 20% compared to conventional PWM methods. Its robust design and intelligent features ensure reliable and safe operation for your solar power setup.

Figure 1: Front view of the iSunergy CM-60A MPPT Solar Charge Controller, showcasing its LCD display and control buttons.
Key Features:
- Advanced MPPT Technology: Achieves up to 99.9% tracking efficiency and 98% conversion efficiency, maximizing solar energy utilization.
- Smart LCD Display: Provides real-time operation information, parameters, and fault indicators. Allows user customization of parameters via four intuitive buttons.
- Automatic System Voltage Recognition: Automatically detects 12V, 24V, 36V, and 48V DC input system voltages.
- Broad Battery Compatibility: Supports charging of Gel, Sealed, Open, and customized lithium-ion batteries, including 0V lithium-ion batteries.
- Comprehensive Safety Protections: Features limited current charging mode, over-voltage, short-circuit, reverse connection, reverse charge, over-temperature, and TVS lightning protection.
- Integrated Design: Sliding cover design conceals terminals and wiring for a clean, integrated appearance, enhancing home aesthetics.
- Efficient Heat Dissipation: Durable metal shell ensures excellent heat management for prolonged lifespan.

Figure 2: Applicable scenarios for the iSunergy MPPT Solar Charge Controller, demonstrating its versatility in home, RV, yacht, and lighting systems.
2. Product Structure and Dimensions
The CM-60A controller is designed for durability and ease of integration. Its robust metal casing provides excellent heat dissipation, while the thoughtful internal layout ensures efficient operation and protection of components. The sliding cover design not only protects the terminals but also contributes to a neat installation.

Figure 3: Exploded view illustrating the internal structure and components of the controller.

Figure 4: Detailed views of the controller's side and bottom, highlighting the heat sinks and terminal access.

Figure 5: Physical dimensions of the CM-60A model.
The CM-60A has a length of 242mm, a width of 188mm, and a height of 67mm, making it a compact solution for various installations.
3. Installation and Wiring
Proper installation is crucial for the safe and efficient operation of your solar charge controller. Please follow these steps carefully. Ensure all power sources are disconnected before making any connections.
Wiring Sequence:
- Connect the Battery: First, connect the battery to the controller's battery terminals (marked with a battery symbol). Ensure correct polarity (+ to + and - to -). The controller will automatically detect the system voltage.
- Connect the Solar Panel: Next, connect the solar panel array to the controller's PV terminals (marked with a solar panel symbol). Again, observe correct polarity.
- Connect the DC Load: Finally, connect your DC load to the controller's load terminals (marked with a light bulb symbol). Ensure correct polarity.
Important Safety Note: Always connect the battery first and disconnect it last. Connecting the solar panel or load before the battery can damage the controller.
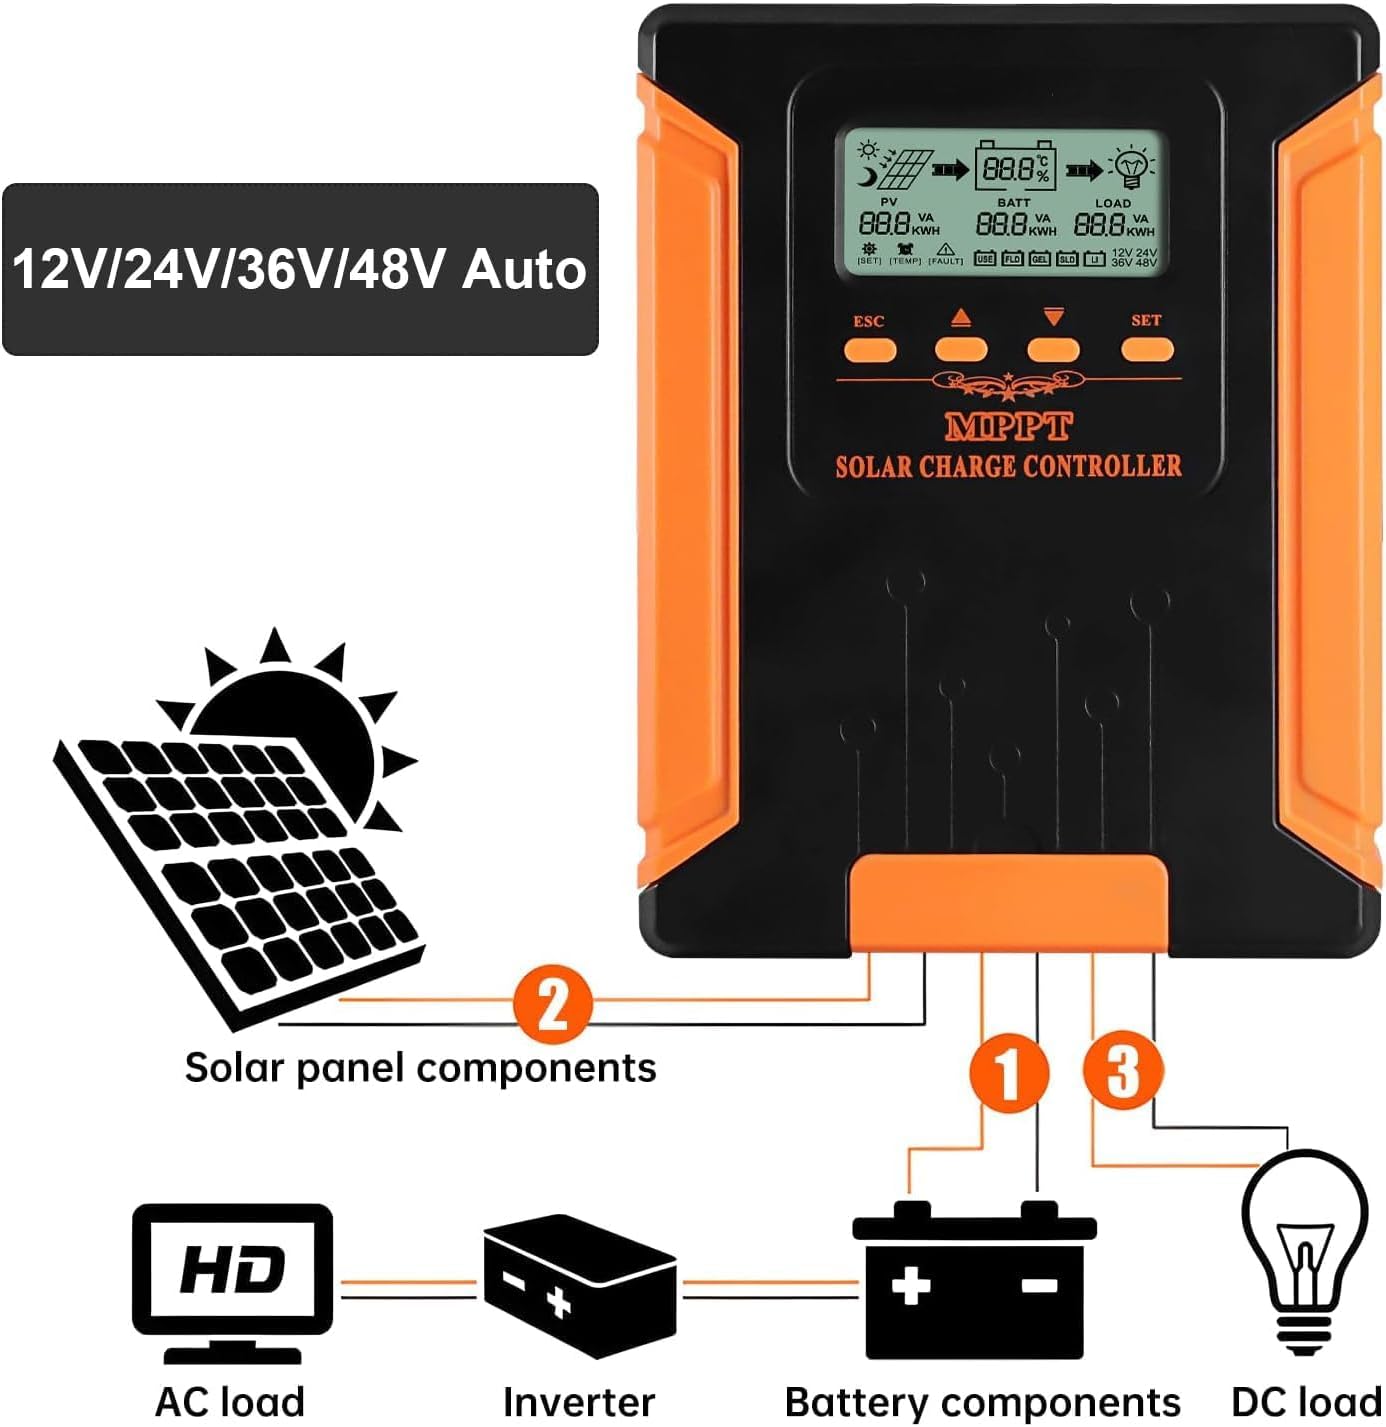
Figure 6: Connection diagram illustrating the proper wiring sequence for solar panels, battery, and DC load.
4. Operating the Controller
The iSunergy CM-60A features an intuitive LCD display and four control buttons for easy monitoring and parameter adjustment.
LCD Display Overview:

Figure 7: Explanation of the LCD display icons and parameters.
The LCD displays real-time data including PV input (VA, kWh), Battery status (percentage, VA, kWh), and Load output (VA, kWh). It also shows indicators for charging/discharging status, battery type, system voltage, temperature, and fault warnings.
Button Functions:

Figure 8: Functions of the control buttons.
- ESC: Exits the settings menu.
- Up Arrow: Navigates up through parameters or increases values.
- Down Arrow: Navigates down through parameters or decreases values.
- ENTE (Enter): Enters the settings menu, confirms selections, or saves changes. Press and hold for 10 seconds to exit setup.
Battery Type Settings:
The controller supports various battery types. You can select the appropriate type through the settings menu to ensure optimal charging. The available types typically include USER (customizable), FLD (Flooded), SEL (Sealed), GEL, and LI (Lithium-ion).

Figure 9: 5-Stage Charging process and supported battery types.
The controller employs a 5-stage charging process to prolong battery life and ensure efficient charging:
- Soft Start: Gradually increases charging current.
- Constant Current (Bulk): Charges the battery at maximum current until voltage reaches absorption level.
- Constant Voltage (Absorption): Maintains constant voltage while current gradually decreases.
- Floating Charge: Maintains battery at a full state of charge with a low, constant voltage.
- Equalization (for certain battery types): Periodically overcharges to balance cell voltages.
5. Specifications
Detailed technical specifications for the iSunergy CM-60A MPPT Solar Charge Controller:

Figure 10: Performance curves and detailed specifications table.
| Parameter | Value (CM-60A) |
|---|---|
| Model | CM-60A |
| System Voltage | 12V/24V/36V/48V Auto |
| No-load Loss | ≤0.4W |
| Max. Solar Input Voltage | 180V (25°C), 150V (25°C) |
| Battery Voltage Range | 9-64V |
| Max. Power Point Voltage Range | Battery Voltage + 2V ~ 150V |
| Rated Charging Current | 60A |
| Rated Load Current | 20A |
| Max. Photovoltaic System Input Power | 12V: 720W, 24V: 1440W, 36V: 2160W, 48V: 2880W |
| Conversion Efficiency | ≥98% |
| MPPT Tracking Efficiency | ≥99% |
| Temperature Compensation Factor | -2mV/°C/2V (default) |
| Operating Temperature | -10°C ~ +65°C |
| Waterproof Level | IP21 |
| Net Weight | 1.53 kg |
| Product Dimensions (L×W×H) | 242 × 188 × 67 mm |
| Altitude | ≤3000m |
| Display Type | LCD |
| Color | Orange |
| UPC | 772168461466 |
6. Maintenance
Regular maintenance ensures the longevity and optimal performance of your iSunergy MPPT Solar Charge Controller.
- Inspect Connections: Periodically check all wiring connections (solar panel, battery, load) to ensure they are tight and free from corrosion. Loose connections can cause overheating and damage.
- Clean the Controller: Keep the controller clean and free from dust and debris. Use a dry, soft cloth for cleaning. Do not use liquid cleaners or solvents. Ensure ventilation openings are not blocked.
- Check for Damage: Visually inspect the controller for any signs of physical damage, such as cracks, dents, or discolored components.
- Monitor Performance: Regularly check the LCD display for normal operation and any fault indicators. Compare actual performance with expected values.
- Environmental Conditions: Ensure the controller is installed in a well-ventilated area, away from direct sunlight, moisture, and corrosive substances, and within its specified operating temperature range.
7. Troubleshooting
This section provides solutions to common issues you might encounter with your iSunergy MPPT Solar Charge Controller. The controller is equipped with intelligent protection functions to prevent damage.

Figure 11: Overview of the controller's protection features.
| Problem | Possible Cause | Solution |
|---|---|---|
| No display/Controller not powering on | Battery not connected or low voltage; reverse polarity connection. | Ensure battery is connected correctly with sufficient voltage. Check battery terminals for secure connection. |
| No charging current from PV | Solar panel not connected; low solar input voltage; PV reverse polarity; PV short-circuit. | Check PV connections and polarity. Ensure adequate sunlight. Verify PV voltage is within controller's operating range. |
| Load not working | Load disconnected; load short-circuit; over-current protection activated; battery low voltage. | Check load connections. Reduce load if over-current. Allow battery to charge. |
| Battery not fully charged | Insufficient solar input; incorrect battery type setting; battery degradation. | Increase solar panel capacity or exposure. Verify battery type setting. Consider battery health. |
| Over-temperature warning | Poor ventilation; excessive ambient temperature; heavy load. | Ensure proper airflow around the controller. Relocate to a cooler environment if possible. Reduce load. |
If the problem persists after attempting these solutions, please contact iSunergy customer support.
8. Warranty and Support
iSunergy stands behind the quality of its products. The CM-60A MPPT Solar Charge Controller typically comes with a 2-year warranty from the date of purchase, covering defects in materials and workmanship under normal use.
Warranty Claims:
To initiate a warranty claim, please have your proof of purchase (e.g., order number, invoice) ready and contact iSunergy customer support. They will guide you through the process, which may include troubleshooting steps or arranging for a replacement.
Customer Support:
For technical assistance, troubleshooting, or any questions regarding your iSunergy product, please reach out to our dedicated customer support team. You can typically find contact information on the official iSunergy website or through the retailer where you purchased the product.
We are committed to providing excellent after-sales service and ensuring your satisfaction with our products.
Ask a question about this manual
Ask about setup, troubleshooting, compatibility, parts, safety, or missing instructions. Manuals+ will review the question and use this page’s manual context to help answer it.