iSunergy CM-120A
iSunergy 120A MPPT Solar Charge Controller User Manual
Model: CM-120A
1. Introduction
This manual provides detailed instructions for the installation, operation, maintenance, and troubleshooting of your iSunergy 120A 12V/24V/36V/48V DC Input MPPT Solar Charge Controller. This advanced controller is designed to optimize the energy harvest from your solar panels, ensuring efficient charging for various battery types including Lithium, Sealed, Gel, and Open Type batteries. Its built-in Maximum Power Point Tracking (MPPT) algorithm significantly improves energy utilization efficiency by 15% to 20% compared to conventional PWM methods, achieving a maximum tracking efficiency of up to 99.9% and a peak conversion efficiency of up to 98%.
2. Safety Information
Please read all safety instructions carefully before installation and operation. Failure to follow these instructions may result in electric shock, fire, or serious injury.
- Ensure all wiring is correctly polarized and securely connected to prevent short circuits.
- Always disconnect the solar panel and battery power before installing or adjusting the controller.
- Install the controller in a well-ventilated area, away from flammable materials and direct sunlight.
- Do not disassemble or attempt to repair the controller yourself. Contact qualified personnel for service.
- Wear appropriate personal protective equipment (PPE) during installation, including insulated gloves and eye protection.
- Ensure the system voltage matches the controller's specifications (12V/24V/36V/48V auto-recognition).
3. Product Overview

Figure 3.1: Front view of the iSunergy 120A MPPT Solar Charge Controller, showcasing its LCD display and control buttons.
Key Features:
- Advanced MPPT Tracking: Built-in algorithm for optimal power point tracking, increasing charging efficiency by 15-20% over PWM. Maximum tracking efficiency up to 99.9%, peak conversion efficiency up to 98%.
- Smart LCD Display: Shows operational information, parameters, and fault icons. Customizable parameters via 4 control buttons.
- Automatic System Voltage Recognition: Automatically detects 12V/24V/36V/48V DC input system voltage.
- Wide Battery Compatibility: Supports charging Gel, Sealed, Open, and customized Lithium-ion batteries, including 0V lithium-ion batteries.
- Comprehensive Safety Features: Includes limited current charging mode, over-voltage, short-circuit, reverse connection, reverse charge, over-temperature, and TVS lightning protection.
- Integrated Design: Sliding cover design conceals terminals and screwdriver for a clean installation. Metal shell ensures excellent heat dissipation.
Product Structure and Dimensions:

Figure 3.2: Exploded view illustrating the internal structure of the solar charge controller, including the metal casing and circuit board.

Figure 3.3: Dimensions of the iSunergy Solar Charge Controller. Length: 313mm, Width: 225mm, Height: 105mm.
Heat Dissipation:

Figure 3.4: The metal shell design incorporates honeycomb heat vents and dual fans for efficient cooling, ensuring stable operation.
4. Setup and Installation
Proper installation is crucial for the safe and efficient operation of your solar charge controller. Follow these steps carefully:
- Preparation: Ensure you have all necessary tools and components, including solar panels, batteries, appropriate wiring, and an inverter if using AC loads.
- Mounting: Mount the controller vertically on a solid surface in a cool, dry, and well-ventilated indoor location. Allow sufficient clearance around the unit for airflow.
- Wiring Order: Connect the components in the following sequence to prevent damage:
- Step 1: Connect the Battery. Connect the battery to the controller's battery terminals. Ensure correct polarity (+ to + and - to -). The controller will automatically detect the battery voltage.
- Step 2: Connect the Solar Panel. Connect the solar panel to the controller's PV input terminals. Ensure correct polarity.
- Step 3: Connect the Load (Optional). Connect your DC load to the controller's load terminals. Ensure correct polarity. If using AC loads, connect an inverter to the battery terminals, then connect AC loads to the inverter.
- Verify Connections: Double-check all connections for tightness and correct polarity before powering on the system.
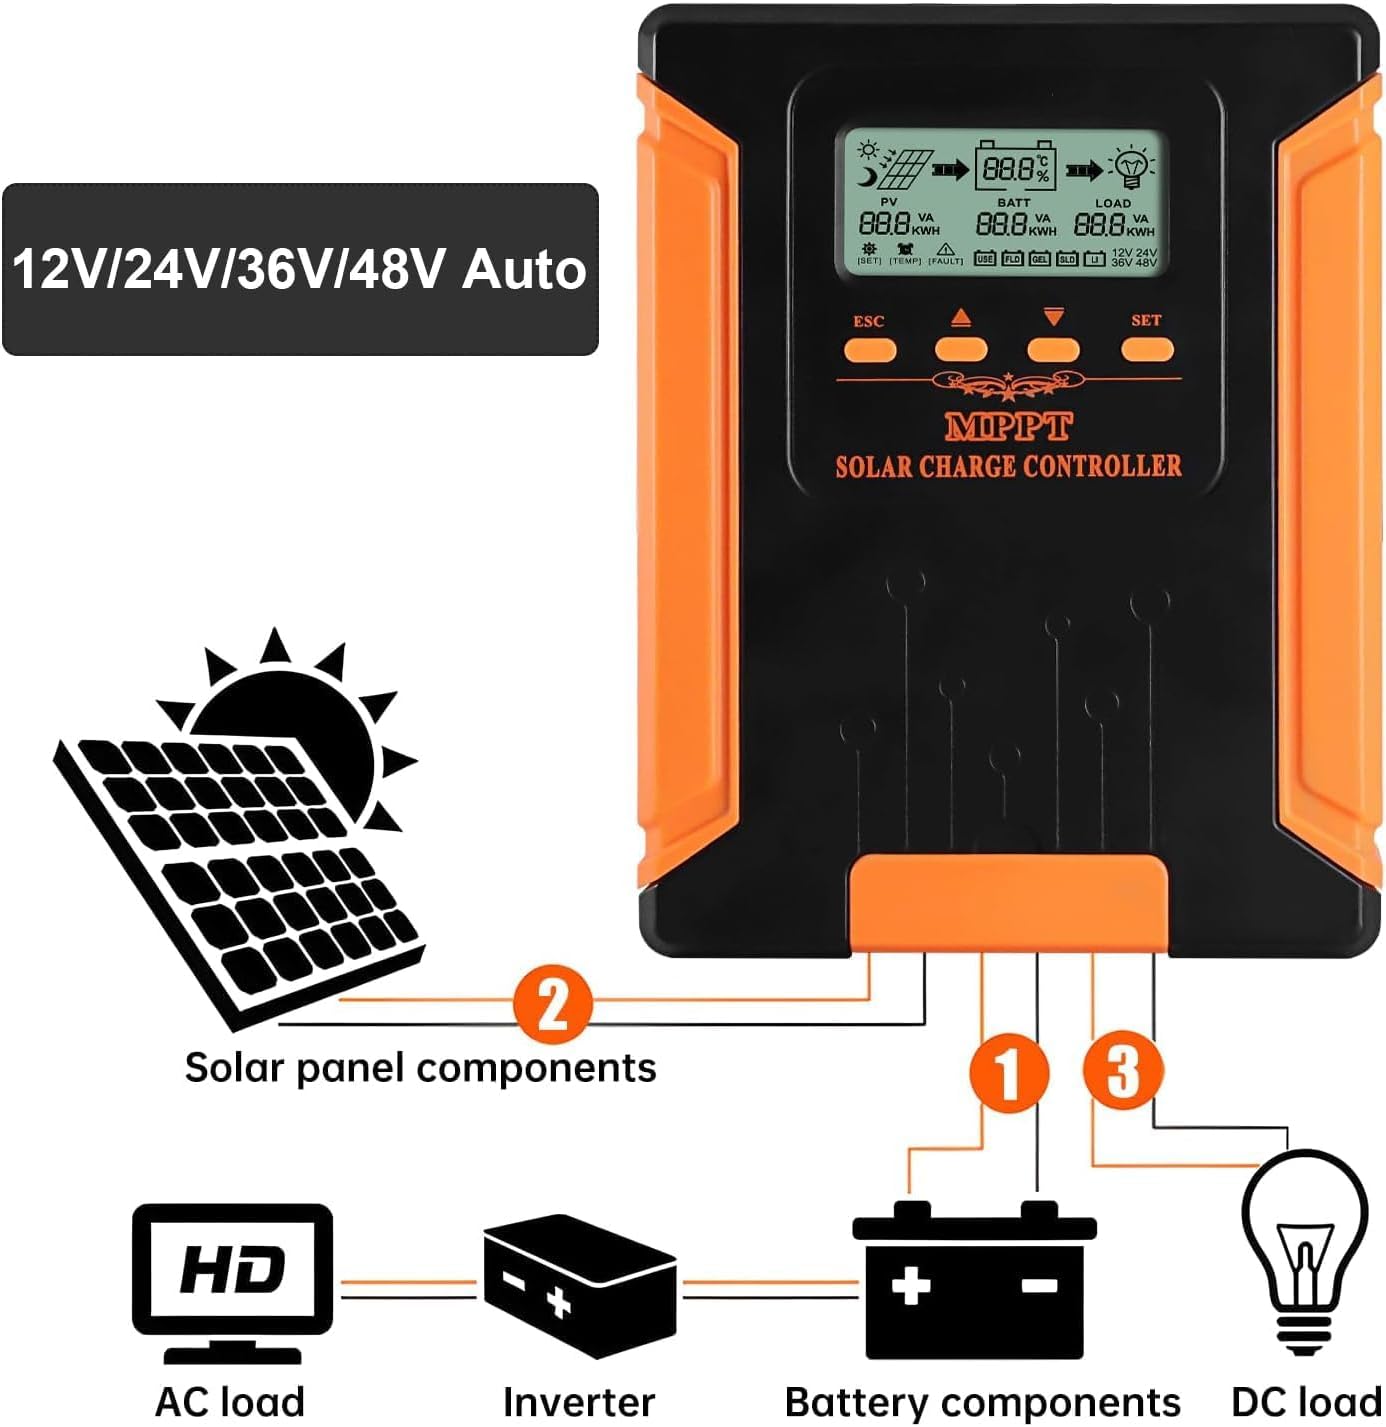
Figure 4.1: Connection diagram for the solar charge controller, showing connections for solar panels, battery, and DC/AC loads.
5. Operating Instructions
The iSunergy MPPT Solar Charge Controller features an intuitive LCD display and four buttons for easy operation and parameter customization.
LCD Display Overview:

Figure 5.1: Detailed view of the LCD display, showing icons for solar panel (PV), battery (BATT), and load (LOAD), along with various parameters and indicators.
The LCD displays real-time data such as PV voltage/current, battery voltage/current, load status, and system voltage. It also shows battery percentage, temperature, and fault indicators.
Button Functions:

Figure 5.2: Illustration of button functions for navigation and setting parameters on the controller.
- ESC: Exit settings or return to the previous menu.
- Up Arrow: Navigate up through menu options or increase parameter values.
- Down Arrow: Navigate down through menu options or decrease parameter values.
- ENTE'/SET: Enter a menu, confirm a selection, or save settings. Press and hold for 10 seconds to exit setup.
Setting Parameters:
To customize settings such as battery type or load control, use the navigation buttons to select the desired parameter and the ENTE'/SET button to confirm changes. The controller supports various battery types: USER (customizable), FLD (Flooded), GEL, SLD (Sealed), and LI (Lithium-ion).

Figure 5.3: The controller supports 5-stage charging for USER, FLD, SEL, GEL, and LI battery types.
6. Maintenance
Regular maintenance ensures the longevity and optimal performance of your iSunergy MPPT Solar Charge Controller.
- Cleanliness: Keep the controller clean and free from dust and debris. Use a dry cloth for cleaning.
- Connections: Periodically check all wiring connections to ensure they are tight and free from corrosion.
- Ventilation: Ensure the ventilation openings are not blocked to allow for proper heat dissipation.
- Environmental Conditions: Monitor the installation environment to ensure it remains within the specified operating temperature range (-10°C to +65°C).
7. Troubleshooting
If you encounter issues with your solar charge controller, refer to the following common troubleshooting steps:
| Problem | Possible Cause | Solution |
|---|---|---|
| No display/No power | Loose battery connection; Battery voltage too low; Blown fuse. | Check battery wiring; Charge battery externally; Check and replace fuse if necessary. |
| No charging from PV | PV connection issues; Insufficient sunlight; PV voltage too low/high. | Check PV wiring and polarity; Ensure adequate sunlight; Verify PV voltage is within range. |
| Load not working | Load connection issues; Overload protection activated; Low battery voltage. | Check load wiring; Reduce load; Charge battery. |
| Controller overheating | Poor ventilation; Excessive load. | Ensure proper airflow around the unit; Reduce load. |
If the problem persists after attempting these solutions, please contact customer support.
8. Specifications

Figure 8.1: Comprehensive table of technical parameters for the iSunergy Solar Charge Controller series.
| Parameter | Value |
|---|---|
| Model | CM-120A |
| System Voltage | 12V/24V/36V/48V Auto |
| Max. Solar Input Voltage | 180V (25°C), 160V (25°C) |
| Battery Voltage Range | 9-64V |
| Rated Charging Current | 120A |
| Rated Load Current | 40A |
| Max. Photovoltaic System Input Power | 1440W (12V), 2880W (24V), 4320W (36V), 5760W (48V) |
| Conversion Efficiency | ≥98% |
| MPPT Tracking Efficiency | ≥99% |
| Operating Temperature | -10°C ~ +65°C |
| Waterproof Level | IP21 |
| Net Weight | 7.11 pounds (3.23 kg) |
| Product Dimensions | 13.86 x 10.31 x 5.79 inches (35.2 x 26.2 x 14.7 cm) |
| Manufacturer | iSunergy |
| UPC | 772168461510 |
9. Warranty and Support
iSunergy stands behind the quality of its products.
- Warranty: This product comes with a 24-month warranty from the date of purchase.
- Customer Service: For any questions, technical assistance, or warranty claims, please contact iSunergy customer service. We offer 24-hour customer support to assist you.
For further assistance, please visit the official iSunergy Store: iSunergy Store on Amazon