Introduction
This manual provides comprehensive instructions for the installation, operation, and maintenance of the Generic G1.Sniper B6 Motherboard. Please read this manual thoroughly before beginning installation to ensure proper setup and optimal performance.
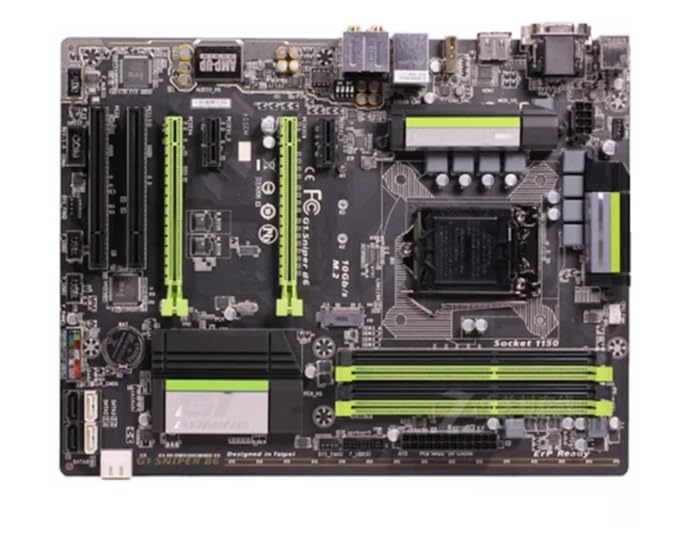
Figure 1: Top-down view of the Generic G1.Sniper B6 Motherboard, showcasing its various components including the CPU socket, RAM slots, PCIe slots, and I/O ports.
Safety Information
- Always disconnect power before installing or removing components.
- Handle the motherboard by its edges to avoid static discharge. Use an anti-static wrist strap if available.
- Ensure proper ventilation within the PC case to prevent overheating.
- Do not expose the motherboard to moisture or extreme temperatures.
Setup and Installation
1. Preparing Your System
Before installing the motherboard, ensure your PC case is compatible with ATX form factor motherboards. Gather necessary tools including screwdrivers, thermal paste, and anti-static equipment.
2. Installing the CPU
- Locate the LGA 1150 CPU socket on the motherboard.
- Gently lift the load lever and open the CPU socket cover.
- Align the CPU with the socket, matching the golden triangle on the CPU with the triangle on the socket.
- Carefully place the CPU into the socket without forcing it.
- Close the socket cover and press down the load lever until it clicks into place.
- Apply a small amount of thermal paste to the center of the CPU's integrated heat spreader (IHS).
3. Installing RAM Modules
The G1.Sniper B6 supports DDR3 RAM up to 32GB. Refer to the motherboard's manual for specific dual-channel configurations.
- Open the clips on both ends of the DDR3 memory slots.
- Align the notch on the RAM module with the key in the memory slot.
- Press down firmly on both ends of the RAM module until the clips snap into place.
4. Motherboard Installation into Case
- Install the I/O shield into the rear opening of your PC case.
- Carefully place the motherboard into the case, aligning it with the standoffs.
- Secure the motherboard with screws, ensuring it is firmly seated.
5. Connecting Power and Peripherals
- Connect the 24-pin ATX power connector from your power supply to the motherboard.
- Connect the 8-pin (or 4-pin) CPU power connector.
- Connect SATA cables for storage drives and optical drives.
- Connect front panel headers (power button, reset button, USB, audio) according to the motherboard's pinout diagram.
- Install any necessary expansion cards (e.g., graphics card) into the PCIe slots.
Operating Instructions
1. First Boot and BIOS Setup
After all components are installed and connected, power on your system. Press the designated key (usually DEL or F2) during startup to enter the BIOS/UEFI setup utility.
- Set the correct date and time.
- Configure boot order to prioritize your operating system installation media.
- Adjust any necessary system settings, such as XMP profiles for RAM or fan curves.
- Save changes and exit the BIOS.
2. Operating System Installation
Follow the instructions provided by your operating system (e.g., Windows, Linux) for installation. Ensure all necessary drivers for the motherboard chipset, audio, and network are installed after the OS is set up. These can typically be found on the manufacturer's website.
Maintenance
- Dust Removal: Regularly clean dust from the motherboard and components using compressed air. Ensure the system is powered off and unplugged before cleaning.
- BIOS Updates: Periodically check the manufacturer's website for BIOS/UEFI updates. Updates can improve stability, compatibility, and performance. Follow update instructions carefully to avoid system damage.
- Driver Updates: Keep all system drivers (chipset, audio, network, graphics) updated to ensure optimal performance and compatibility.
- Temperature Monitoring: Use monitoring software to keep track of CPU and chipset temperatures to prevent overheating.
Troubleshooting
Common Issues and Solutions:
- No Power:
- Check all power connections (24-pin ATX, 8-pin CPU, GPU).
- Ensure power supply is switched on.
- Test with a different power supply if possible.
- No Display:
- Verify monitor is connected and powered on.
- Reseat the graphics card and RAM modules.
- Try a different display cable or monitor.
- System Instability/Crashes:
- Check RAM for errors (e.g., using MemTest86).
- Monitor CPU and GPU temperatures for overheating.
- Ensure all drivers are up to date.
- Reset BIOS to default settings.
- Peripheral Not Detected:
- Check physical connection of the peripheral.
- Install or update relevant drivers.
- Test the peripheral on another port or system.
Specifications
| Feature | Specification |
|---|---|
| Model Name | G1.Sniper B6 |
| CPU Socket | LGA 1150 |
| RAM Memory Technology | DDR3 |
| Memory Storage Capacity | Up to 32 GB |
| Memory Clock Speed | 1 GHz |
| Platform | No Operating System (Motherboard) |
Note: Specifications are subject to change without prior notice. For the most up-to-date information, please refer to the product's official website.
Warranty and Support
This Generic G1.Sniper B6 Motherboard comes with a standard manufacturer's warranty. For specific warranty terms and conditions, please refer to the documentation included with your purchase or contact the seller directly.
For technical support, troubleshooting assistance beyond this manual, or driver downloads, please visit the official website of the product's manufacturer or contact their customer support.
- Manufacturer: Generic
- ASIN: B0CMQ8BGTH
- Date First Available: November 6, 2023