1. Introduction
This manual provides detailed instructions for the assembly, operation, and maintenance of your Armocity Floating Corner Desk. Designed to maximize space in compact areas, this wall-mounted desk features integrated power outlets and USB ports for convenience. Please read all instructions carefully before beginning assembly and retain this manual for future reference.
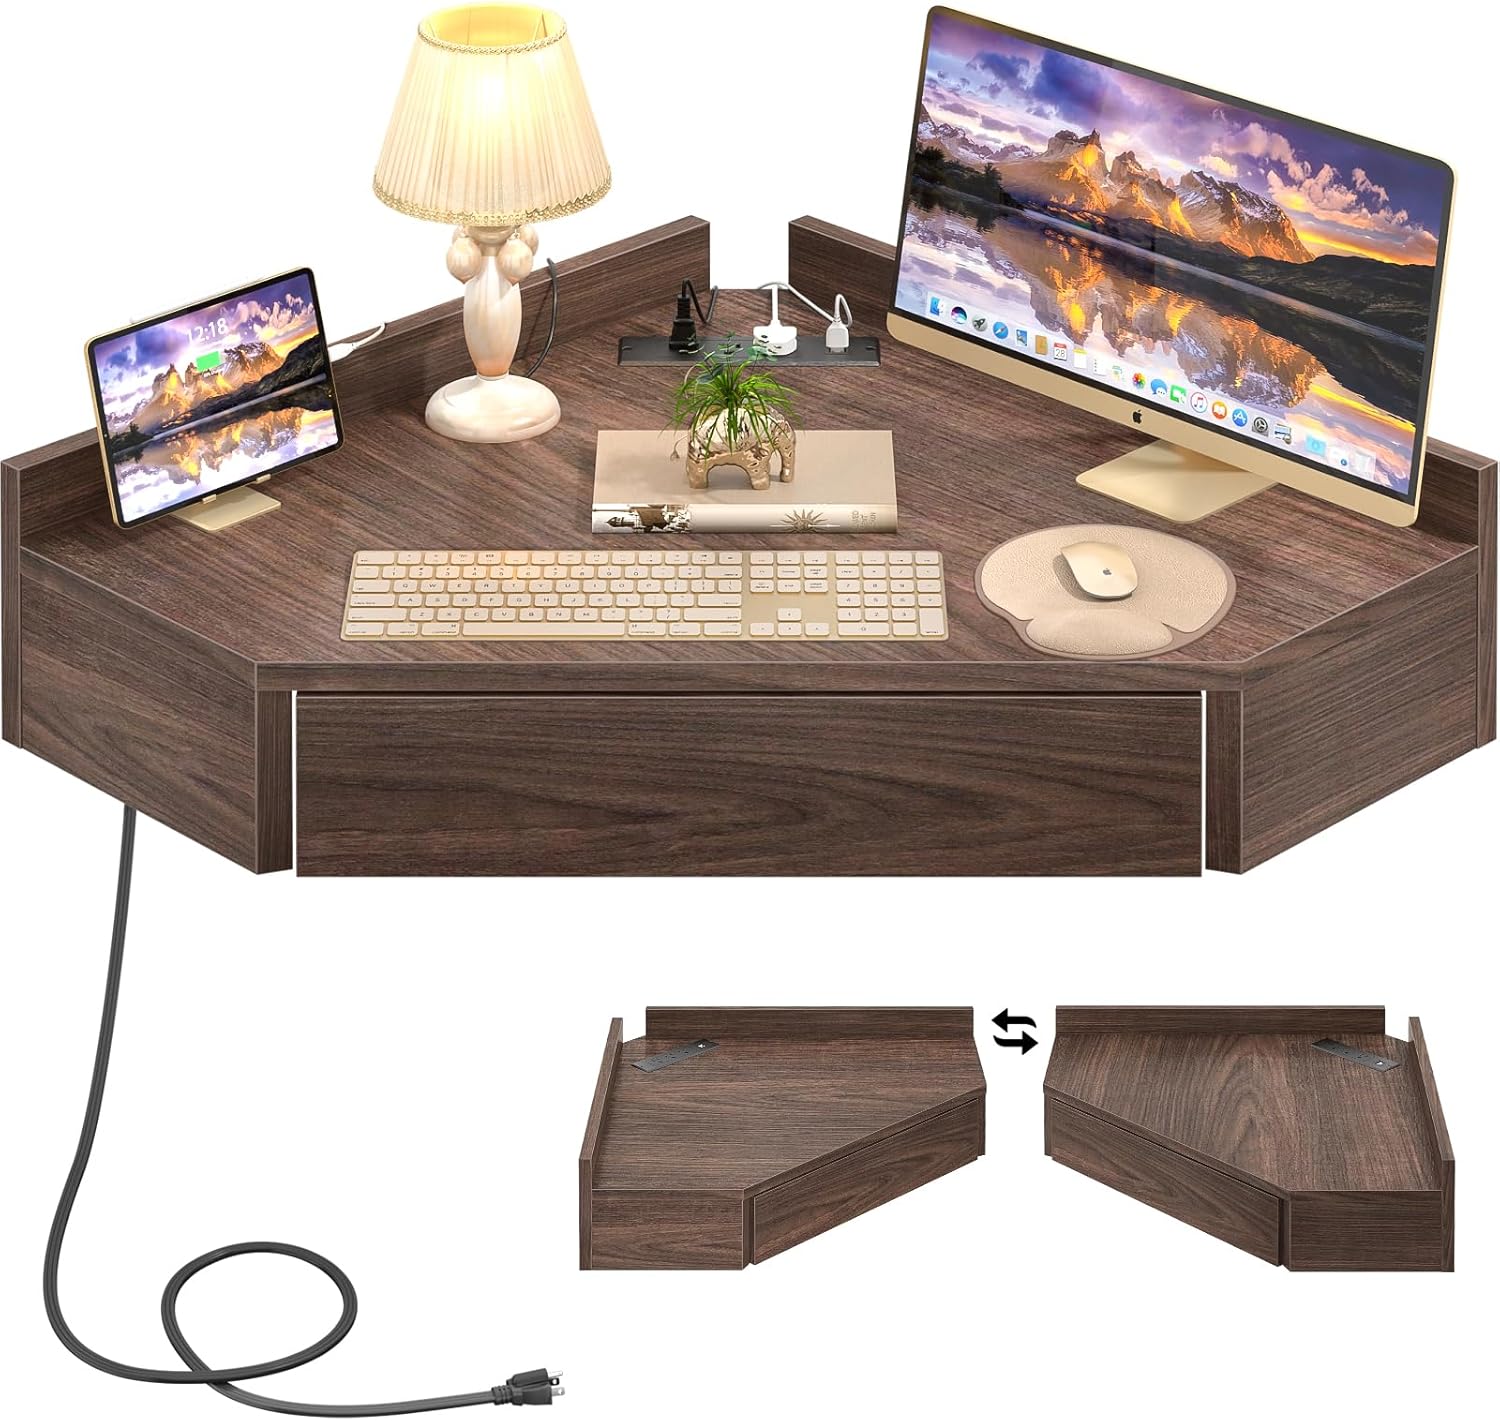
Image 1.1: The Armocity Floating Corner Desk, showcasing its integrated charging station and compact design suitable for various devices.
2. Safety Information
- Wall Mounting: This desk requires secure wall mounting. Ensure the wall material is suitable for drilling and can support the desk's weight (up to 50 lbs) plus any items placed on it. Consult a professional if unsure about wall suitability.
- Two-Person Assembly: For safety and ease of installation, two people are recommended for the wall mounting process.
- Electrical Safety: The built-in charging station is designed for standard household use. Do not overload the outlets. Keep liquids away from electrical components.
- Cable Management: Utilize the reserved wiring hole to keep cables tidy and prevent tripping hazards.
- Weight Limit: Do not exceed the maximum load bearing capacity of 50 pounds (approximately 22.7 kg). Overloading can cause damage or injury.
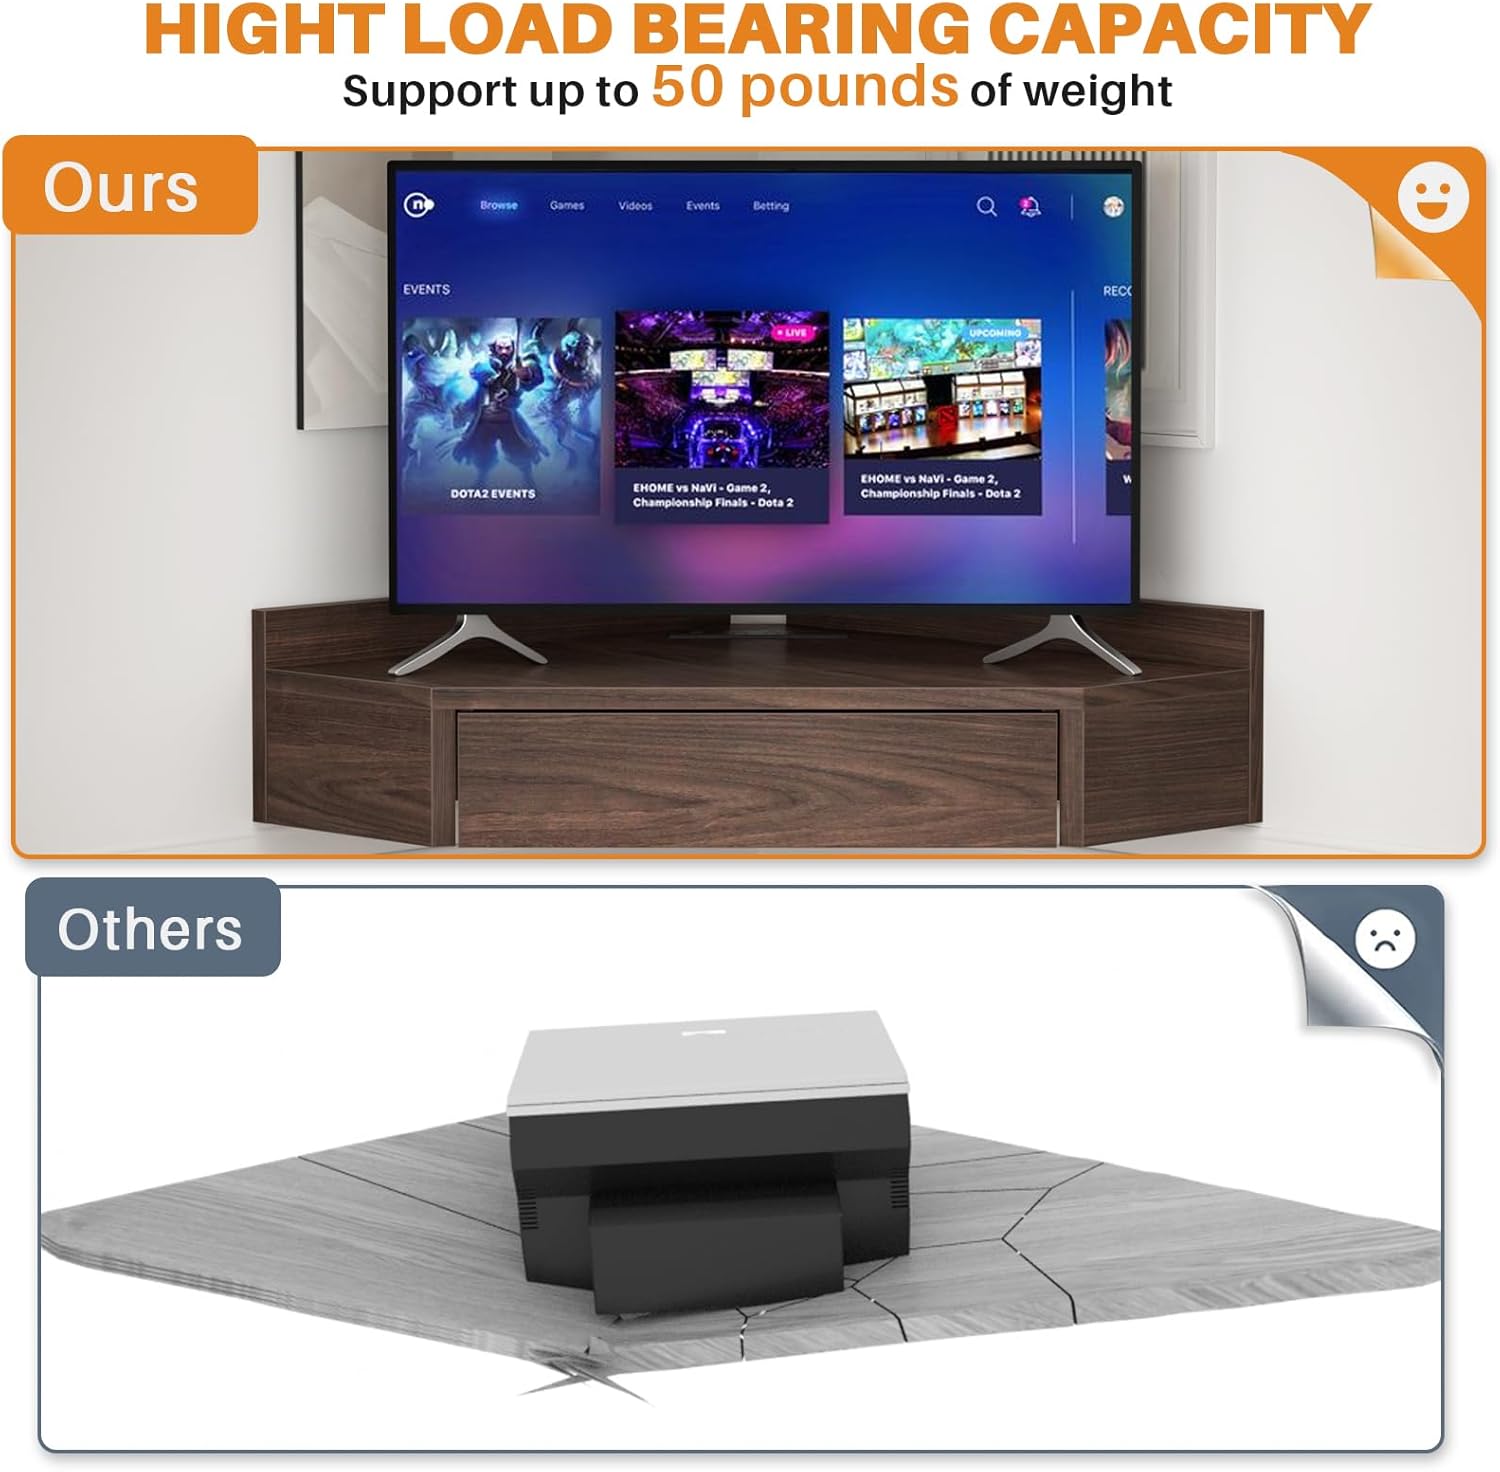
Image 2.1: Illustration of the desk's high load-bearing capacity, supporting up to 50 pounds.
3. Package Contents
Please verify that all components are present before beginning assembly. If any parts are missing or damaged, contact Armocity customer support.
- Floating Corner Desk Unit with Integrated Charging Station
- Mounting Hardware (screws, anchors, etc.)
- Instruction Manual
4. Setup and Assembly Instructions
Follow these steps carefully for proper installation. A drill, level, and stud finder (recommended) will be required.
- Choose Location: Select a corner in your desired room. Ensure there is a power outlet nearby for the desk's charging station.
- Determine Mounting Height: The desk's floating design allows for adjustable installation height. Choose a height that suits your ergonomic needs, whether for sitting or standing use.
- Mark Drilling Points: Hold the desk unit against the wall at the desired height. Use a level to ensure it is straight. Mark the positions for the mounting holes on both walls.
- Drill Holes: Using an appropriate drill bit for your wall type (e.g., drywall, concrete), drill pilot holes at the marked positions. Insert wall anchors if necessary.
- Mount the Desk: With the help of a second person, align the desk's mounting holes with the drilled holes. Secure the desk to the wall using the provided screws. Ensure all screws are tightened firmly.
- Connect Power: Plug the desk's power cord into a wall outlet.

Image 4.1: The desk installed at a comfortable height, providing ample legroom for a user.

Image 4.2: The desk's design allows for flexible mounting on either the left or right side of a corner.
5. Operating Instructions
5.1 Using the Charging Station
The integrated charging station includes 3 AC outlets (120V/12A) and 2 USB ports (5V/2A). Simply plug your devices into the available ports. The power cord is 4.9 feet long.
5.2 Drawer Usage
The desk features a large storage drawer with smooth glides. Pull the drawer gently to open and push to close. It is suitable for storing office supplies, small electronics, and other essentials.
5.3 Cable Management
Utilize the reserved wiring hole on the desktop to route device cables, keeping the surface clean and organized.
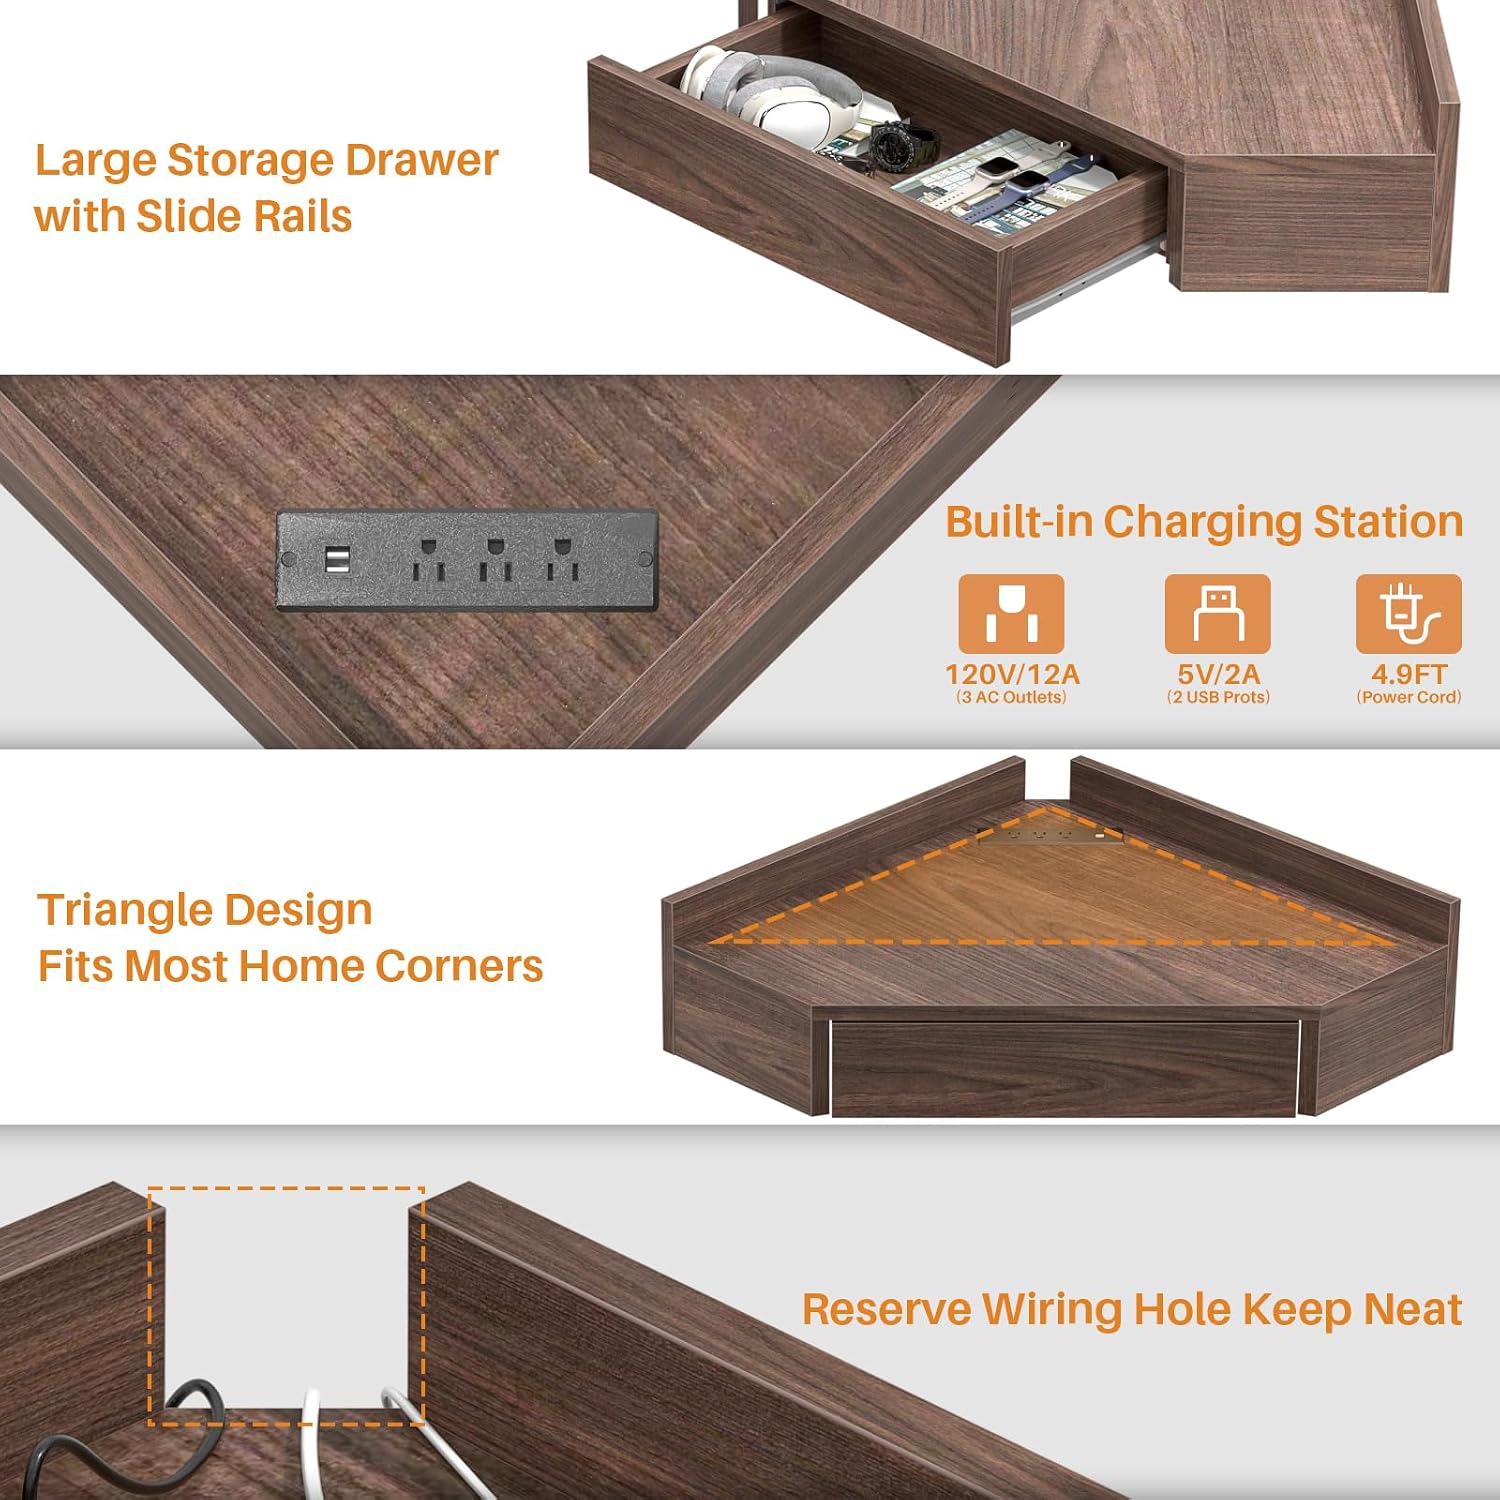
Image 5.1: Close-up view detailing the drawer, charging station, triangular design, and cable management hole.
6. Maintenance
6.1 Cleaning
Wipe the desk surface with a soft, damp cloth. Avoid abrasive cleaners or harsh chemicals that could damage the finish. Ensure the charging station is unplugged before cleaning around electrical components.
6.2 Stability Check
Periodically check all mounting screws to ensure they remain tight. Re-tighten if necessary to maintain stability.
6.3 Easy Floor Cleaning
The floating design facilitates easy cleaning of the floor area beneath the desk, allowing for barrier-free access for vacuum cleaners or mops.

Image 6.1: The floating design allows for comprehensive cleaning of the floor space below the desk.
7. Troubleshooting
- Desk feels unstable: Ensure all mounting screws are securely tightened. Verify that the wall anchors are properly installed and suitable for your wall type. If instability persists, consult a professional.
- Charging station not working: Check if the desk's power cord is firmly plugged into a functional wall outlet. Test the outlet with another device. Ensure devices are properly connected to the charging station's ports.
- Drawer not opening/closing smoothly: Check for any obstructions inside the drawer or along the slide rails. Ensure the desk is level, as an uneven installation can affect drawer operation.
8. Specifications
| Feature | Detail |
|---|---|
| Model | B0CMQ751WS |
| Dimensions (L x W x H) | 26.5'' x 26.5'' x 8.5'' (67.31 cm x 67.31 cm x 21.59 cm) |
| Item Weight | 14.04 kg (30.95 lbs) |
| Material | Solid Wood Boards |
| Color | Red Oak |
| Load Bearing Capacity | Up to 50 lbs (22.7 kg) |
| Charging Station | 3 AC Outlets (120V/12A), 2 USB Ports (5V/2A) |
| Power Cord Length | 4.9 ft (1.5 m) |
| Special Features | Wall-mounted, Floating Design, Integrated Charging Station, Storage Drawer, Cable Management Hole |

Image 8.1: Dimensional diagram of the Armocity Floating Corner Desk.
9. Warranty and Support
Armocity is committed to providing quality products and customer satisfaction. If you encounter any issues during assembly, operation, or if parts are missing or damaged, please contact Armocity Customer Support. Our team is available to assist you with any questions or concerns within 24 hours.
For support, please refer to the contact information provided with your purchase or visit the official Armocity website.