Depvko 60A MPPT-Green
Depvko 60A MPPT Solar Charge Controller User Manual
Model: 60A MPPT-Green
1. Product Overview
The Depvko 60A MPPT Solar Charge Controller is designed to efficiently manage the power flow from your solar panels to your batteries, ensuring optimal charging and prolonging battery lifespan. This controller is compatible with 12V and 24V systems and features advanced MPPT technology for high tracking efficiency.

Figure 1.1: Front view of the 60A MPPT Solar Charge Controller, showing the LCD display, control buttons, and dual USB ports.
Key Features:
- Advanced MPPT Technology: High tracking efficiency up to 99%, increasing power generation by 10%-30% compared to traditional PWM controllers.
- Automatic System Voltage Recognition: Automatically adapts to 12V/24V battery systems.
- Multiple Intelligent Protections: Built-in overcurrent, short circuit, reverse connection, and open circuit protection for enhanced safety.
- Functional LCD Screen: Displays status, data, and allows for parameter configuration.
- Dual USB Ports: Convenient 5V/2A output for charging external devices.
- 4-Stage Charge Management: Optimizes battery charging for improved efficiency and extended lifespan.
- Memory Function: Retains various parameters even after power loss.

Figure 1.2: Efficiency comparison illustrating the higher conversion efficiency of MPPT technology over PWM.
2. Safety Information
Please read all instructions carefully before installation and operation. Failure to follow these instructions may result in damage to the controller, battery, or other components, and may cause personal injury.
- Ensure the battery has sufficient voltage for the controller to recognize the battery type before first installation.
- Connect the battery first, then the solar panels, and finally the load. Disconnect in the reverse order.
- Install the controller indoors, away from direct sunlight, high temperatures, and humid environments.
- Ensure good ventilation around the controller.
- The controller is suitable for lead-acid batteries (GEL, Sealed, Flooded) and Lithium batteries. Do not use for other battery types.
- All connections should be tight to avoid excessive heat due to loose connections.
- This device is for off-grid solar systems only.

Figure 2.1: Overview of the 7-point safety system, including open circuit, short circuit, overcurrent, overcharge, reverse connect, put, and self-recovery protections.
3. Setup and Installation
3.1. Component Identification

Figure 3.1: Detailed view of the controller's buttons and ports, including Home Page (Menu), Turn on (UP), Down/ON/OFF buttons, Dual USB Ports, Solar Panel Interface, Battery Port, and DC Load Port.
3.2. Wiring Sequence
It is crucial to follow the correct wiring sequence to prevent damage to the controller. Disassembly should be done in the reverse order of wiring.
- Connect the Battery: Connect the battery to the charge controller first. Ensure the battery has enough energy for the controller to recognize its type.
- Connect the Solar Panels: Connect the solar panels to the charge controller.
- Connect the DC Load (Optional): Connect your DC loads to the controller.
- Connect Inverter/AC Loads (Optional): If using an inverter for AC loads, connect it to the battery.

Figure 3.2: Step 1 - Connecting the battery to the controller.

Figure 3.3: Step 2 - Connecting solar panels to the controller.

Figure 3.4: Step 3 - Connecting a DC load to the controller.
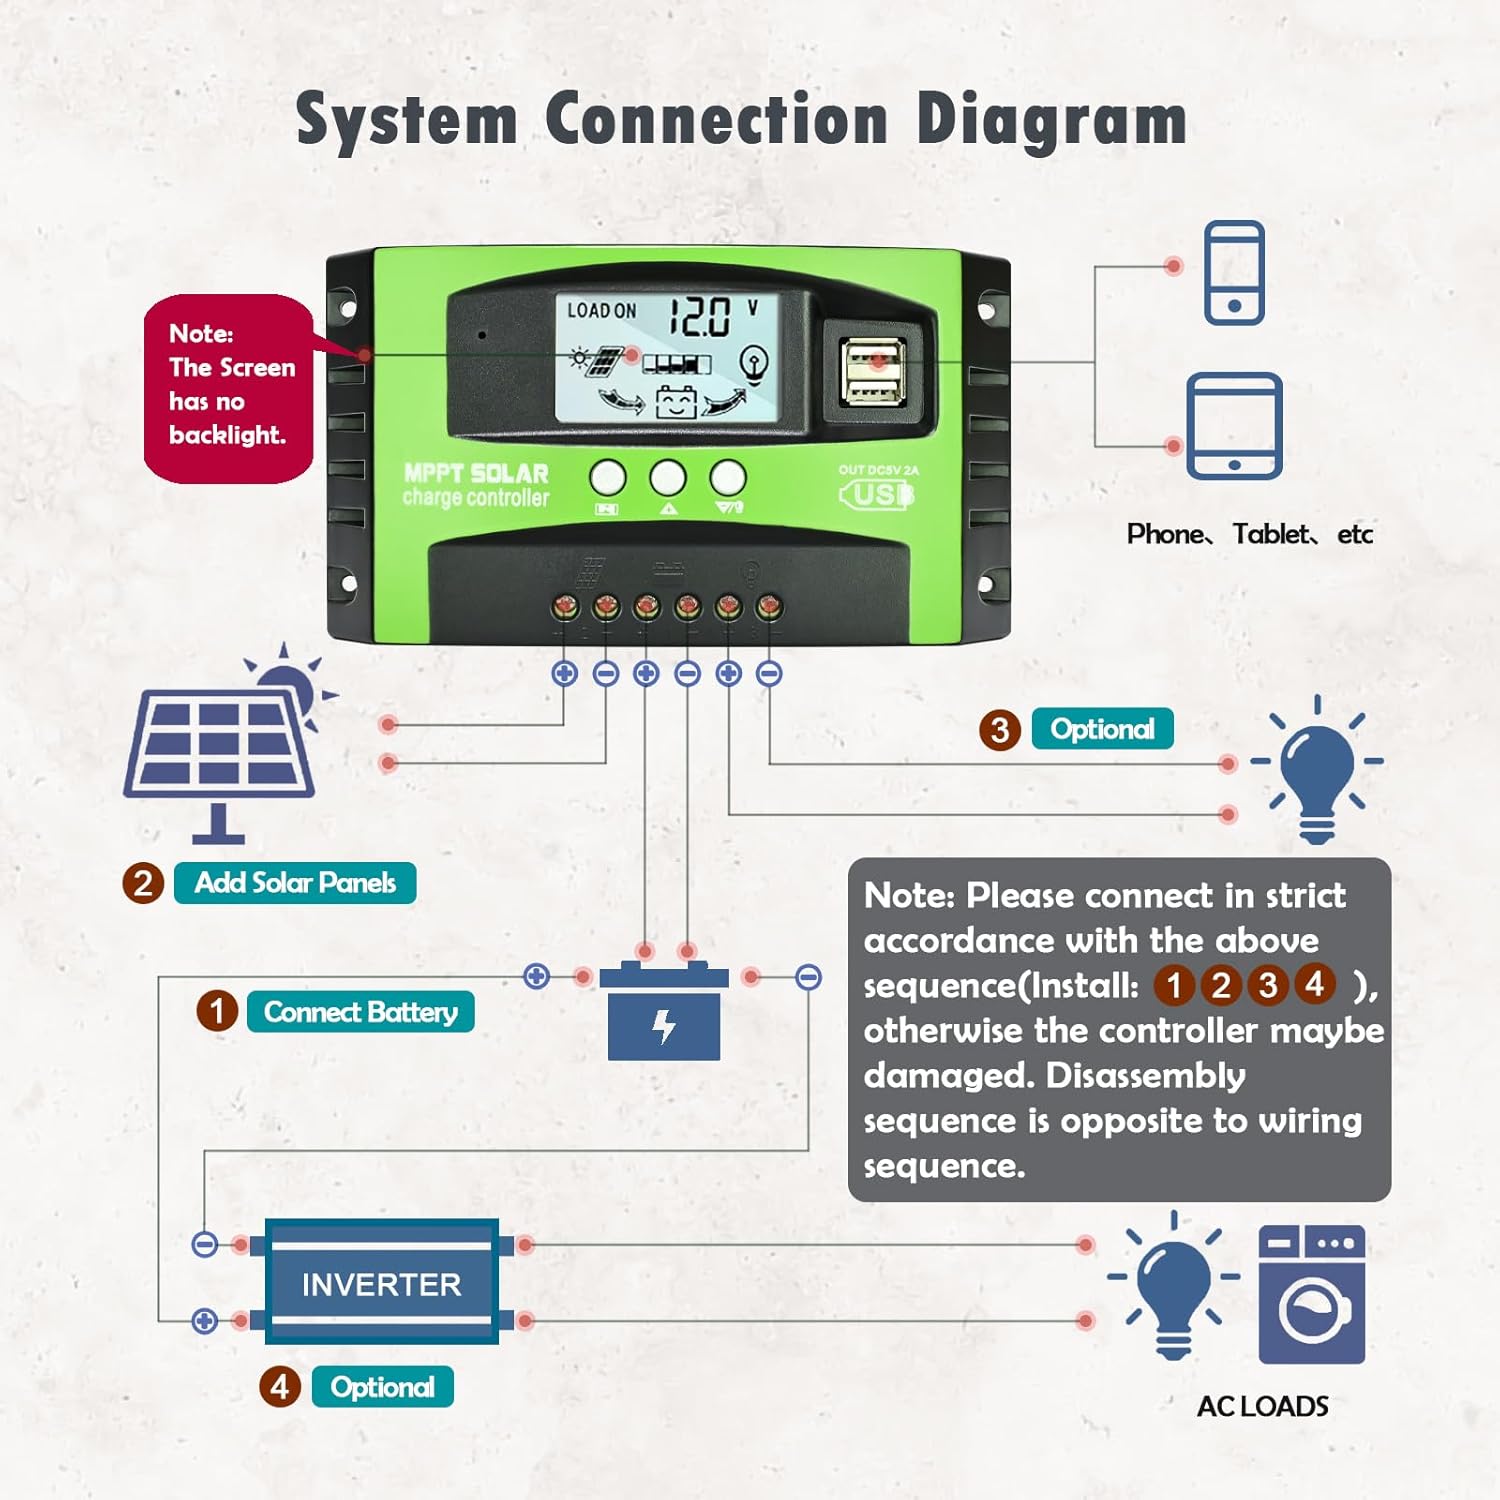
Figure 3.5: Comprehensive system connection diagram showing battery, solar panels, DC loads, and optional inverter/AC loads. Note: The screen has no backlight.
4. Operating Instructions
4.1. LCD Display and Navigation
The intuitive LCD screen displays various system parameters and allows for easy configuration.

Figure 4.1: Flowchart of LCD display screens, including Battery Voltage, Solar Panel Charge Current, Load Discharge Current, High Voltage Disconnection (HVD), Accumulated Discharging Power (Ah), Accumulated Charging Power (Ah), Low Voltage Reconnection (LVR), Low Voltage Disconnection (LVD), and Load Working Mode.
4.2. Parameter Settings
To set parameters:
- Navigate to interfaces 2-5 on the LCD.
- Press and hold the UP button for five seconds to restore default settings.
- Press and hold the MENU button for five seconds to enter manual settings. The number will flash.
- Use the UP and DOWN buttons to adjust parameter values.
- Press the MENU button again for three seconds to exit the setting mode.
4.3. Load Control Modes
The controller supports multiple load control modes, including timer settings, which can be configured via the LCD display.
4.4. USB Charging
The dual USB ports provide 5V/2A output for charging compatible devices.

Figure 4.2: Close-up view of the dual USB ports for device charging.
4.5. Battery Compatibility and Charging Stages
The controller is compatible with Sealed, Gel, Flooded, and Lithium (Li) batteries.

Figure 4.3: Icons representing compatible battery types: Sealed (SLD), Gel (GEL), Flooded (FLD), and Lithium (LI).
It employs a 4-stage charge management system:
- Bulk Charge: Rapid charging phase.
- Boost Charge: Brings the battery to full charge.
- Float Charge: Maintains the battery at full charge.
- Equalization Charge: (For certain battery types) Balances cell voltages.

Figure 4.4: Visual representation of the Smart 4-Stage Charging process.
5. Maintenance
To ensure optimal performance and longevity of your solar charge controller, regular maintenance is recommended:
- Periodically check all wiring connections for tightness and corrosion.
- Keep the controller clean and free from dust and debris. Use a dry cloth for cleaning.
- Ensure adequate ventilation around the unit to prevent overheating.
- Monitor the LCD display for any error codes or unusual readings.
- Inspect the battery terminals for corrosion and clean if necessary.
6. Troubleshooting
This section provides solutions to common issues you might encounter with your solar charge controller.
| Problem | Possible Cause | Solution |
|---|---|---|
| Controller not charging battery. |
|
|
| Load not working. |
|
|
| LCD display is blank. |
|
|
7. Specifications
| Parameter | Value |
|---|---|
| Model | 60A MPPT-Green |
| System Voltage | 12V/24V Auto |
| Max Charge Current | 60A |
| Charging Port Type | USB Type-A (Dual Ports) |
| USB Output | 5V/2A |
| Display Type | LCD |
| Battery Compatibility | Gel, Sealed, Flooded, Li Battery |
| Operating Temperature | 60°C |
| Package Dimensions | 6.89 x 4.02 x 1.81 inches |
| Item Weight | 9.9 ounces |
| Country of Origin | China |
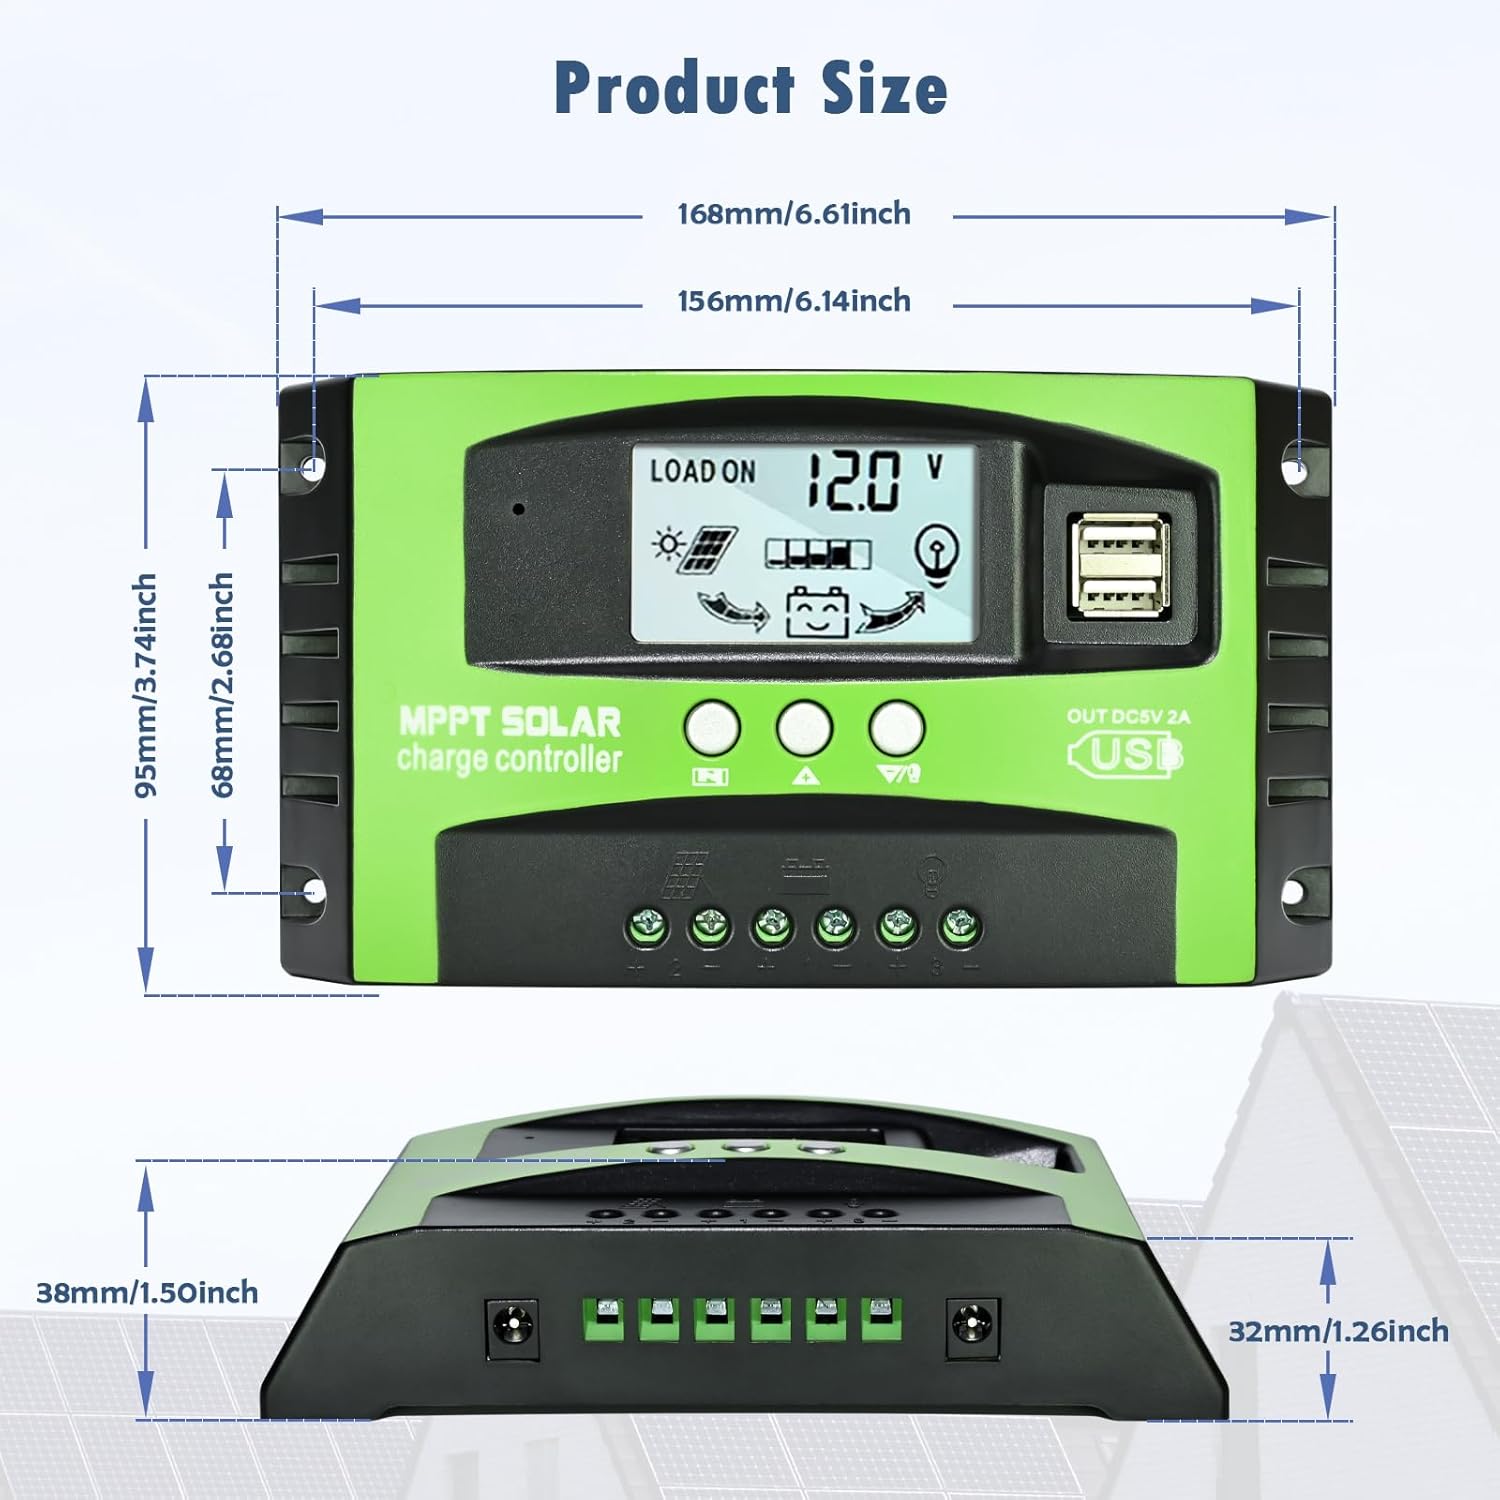
Figure 7.1: Product dimensions in millimeters and inches.
8. Warranty and Support
Depvko offers a 12-month guarantee for quality-related issues and technical support for this product.
If you encounter any product quality problems or require technical assistance, please do not hesitate to contact Depvko customer service. Refer to the contact information provided with your purchase or visit the official Depvko website for support details.
For additional resources, you may refer to the official User Manual (PDF) available at: User Manual (PDF)

Figure 8.1: Product certifications, including Supplier's Declaration of Conformity (FCC), Certificate of Compliance (CE), and RoHS compliance.
Ask a question about this manual
Ask about setup, troubleshooting, compatibility, parts, safety, or missing instructions. Manuals+ will review the question and use this page’s manual context to help answer it.